Branded swag boxes are judged before anyone touches the contents. That first five seconds tells the recipient whether the kit feels planned, premium, and worth keeping, or like a random stack of merch shoved into a box and shipped with a prayer.
Two kits can contain the same notebook, hoodie, mug, and card. One arrives in a snug mailer with a fitted insert and a clear reveal sequence. The other rattles around in loose tissue. The second one looks cheaper, even if the item cost was identical. That is the part most buyers miss.
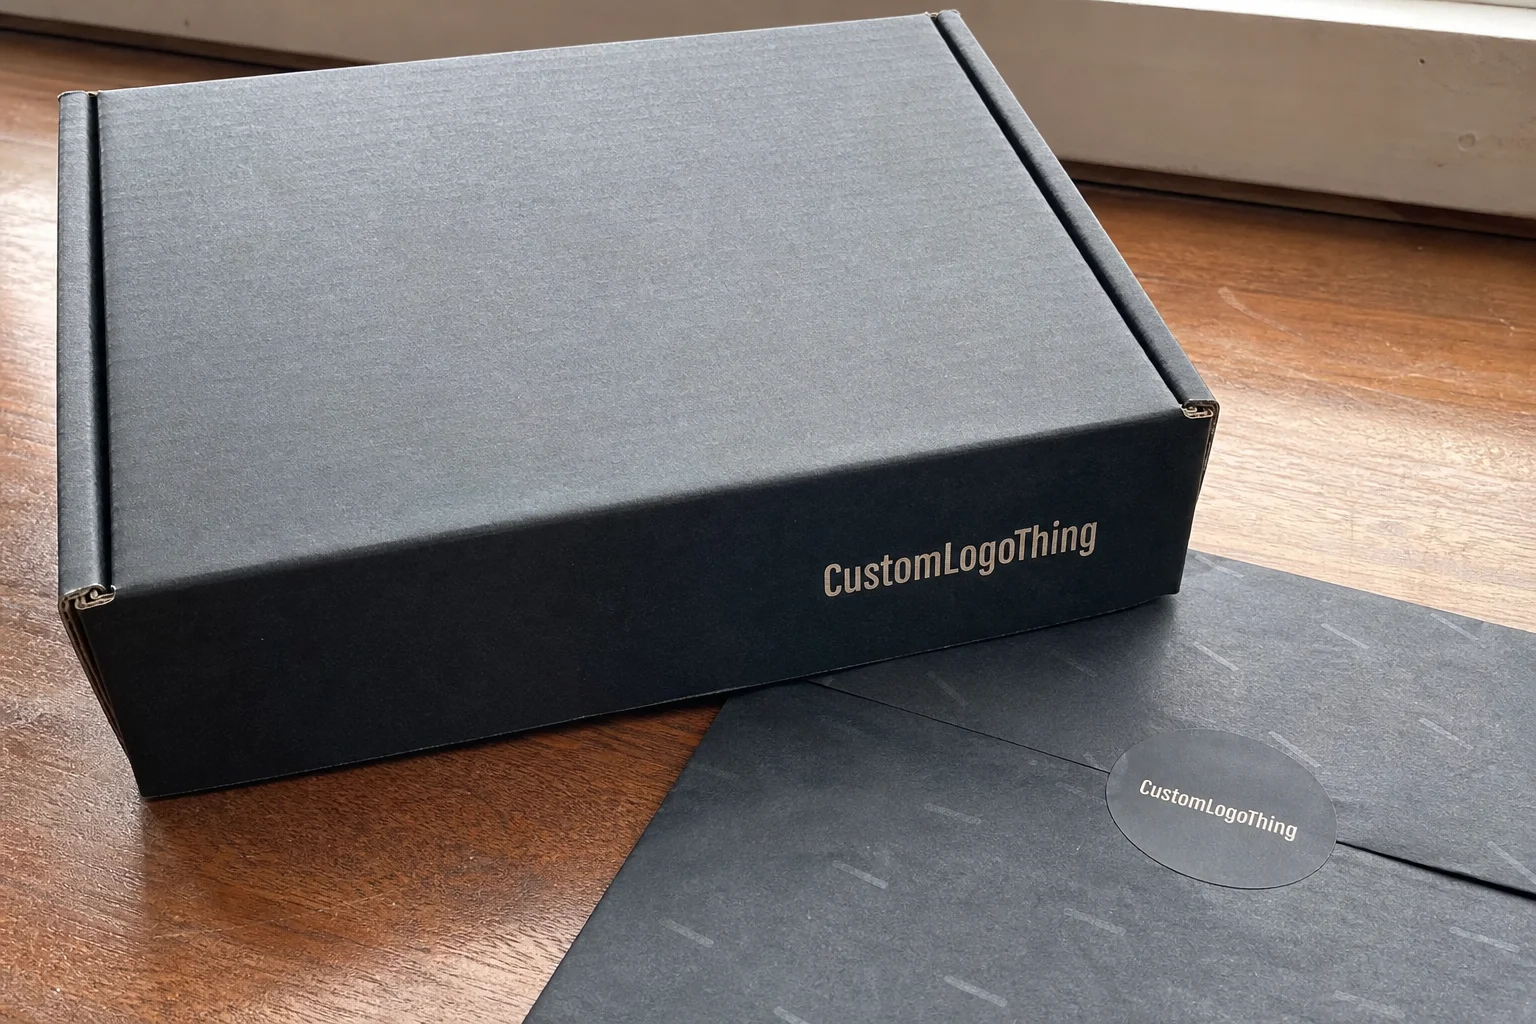
If you are ordering onboarding kits, event follow-ups, sales leave-behinds, client thank-you drops, or internal milestone gifts, the packaging is not decoration. It is the product wrapper, the reveal script, and the value signal in one package. That is why branded swag boxes are really a packaging system, not just Logo Placement On a box.
Why branded swag boxes feel premium fast
The box does more work than most people expect. Before anyone reads the card or pulls out the main item, they are making a judgment from size, print quality, closure style, and whether the contents look intentionally arranged. A clean outer carton with a fitted insert can make a modest kit feel sharper than a larger box full of filler.
Here is the annoying truth: adding more items often helps less than tightening the structure. A smaller kit with a better insert, a cleaner print setup, and a clear reveal order usually feels more expensive than a bulkier box packed with random extras. Buyers want the sense that someone thought through the experience. They can spot “we had a budget” from across the room.
In practice, the best use cases are the ones where the recipient is already forming an opinion about your brand: onboarding kits for new hires, post-event thank-yous, sales leave-behinds, client gifts, and internal recognition boxes. Those are all moments where branded swag boxes carry a signal before the merch does.
The category is practical. A box with a logo is not enough. A real branded kit includes the outer structure, print plan, insert, item layout, and shipping method as one coordinated package. If any one of those is sloppy, the whole thing feels improvised.
“The packaging should tell me what matters first. If I have to dig for the good stuff, the kit already lost some value.”
For buyers comparing options, that means presentation is not separate from function. A nice finish is useful, but not if the box arrives crushed or opens badly. The best branded swag boxes make the opening feel controlled, even when the budget is ordinary.
How custom swag kits are built and assembled
The outer structure sets the tone. Mailer boxes are the workhorse choice for shipping because they hold up better in transit and close securely. Folding cartons are lighter and cheaper, but they are better for lower-stress presentations. Rigid boxes are the premium lane: heavier board, better crush resistance, and a more formal feel. Sleeves are useful when you want a quick branded layer over a stock carton without rebuilding the entire package.
Print choices matter more than most teams think. A full-coverage exterior can look strong, but it can also get busy fast if the design has too many moving parts. A restrained one-color print, a branded inside lid, or a single strong message usually ages better in the hand than five different graphic moments fighting for attention. Clean wins more often than loud.
Then there is the insert. Die-cut paperboard inserts are common because they are economical and easy to scale. Molded pulp is a solid choice if you want an earth-friendlier look and decent product hold. Foam is more protective, but it can feel less polished unless the application really needs it. Simple cradles work when the items are uniform and the layout is straightforward.
The assembly flow is usually the same, even if the materials change:
- Box fabrication and print.
- Scoring, folding, and insert prep.
- Item placement and orientation checks.
- Protection for fragile pieces.
- Seal, label, and carton-out for freight or direct mail.
The point of the structure is not just to hold things in place. It should guide the recipient through the story. Good branded swag boxes let the first item land cleanly, then the second, then the supporting pieces. Bad ones make people dig through crumpled filler to find the actual gift.
If sustainability is part of the brief, ask about paper-based inserts, recycled board, and FSC-certified options. The Forest Stewardship Council has a clear standard for responsibly sourced paper products: fsc.org. That does not solve every materials question, but it gives you a real benchmark instead of marketing fluff. For transport-heavy programs, you can also sanity-check the shipping side through ISTA testing standards and packaging guidance from packaging.org.
Assembly is where packaging ideas get humbled. A box that looks great on a render can become a mess once sleeves, tissue, cards, cables, apparel, and drinkware all have to fit on a real line. If a kit takes more than a few minutes per unit to pack, labor starts to matter a lot. That is why structure and item selection should be decided together, not in separate meetings that never talk to each other.
Cost, pricing, and MOQ for custom swag kits
Pricing depends on the structure before anything else. Box style, board thickness, print coverage, insert complexity, item count, hand assembly time, and freight weight all move the number. A simple mailer with one-color print and a basic insert can be economical. A rigid box with foil, custom compartments, and several sourced items can climb fast.
For small runs, setup costs matter more than the board itself. On a run of 250 units, the tooling, proofing, and assembly labor can outweigh the raw carton cost. At 1,000 units, the unit price usually drops enough to make the structure look much more reasonable. That is normal. The setup is getting spread across more boxes.
MOQ rules vary by vendor. Some can do low quantities on stock sizes with standard print. Truly custom dimensions, special finishes, or a new insert tool usually push the minimum higher. If a quote looks unusually cheap, ask what is missing. A low number with no assembly, no insert, and no freight is not a real comparison.
Rough budgeting helps keep the conversation honest. In the current market, a simple direct-ship mailer kit with a modest insert and one or two light items may land somewhere around $12 to $25 per unit at mid-size quantities. A more polished kit with better print coverage, multiple items, and hand assembly often sits in the $25 to $45 range. Rigid presentation boxes, premium finishes, and heavier merch can go well beyond that. Once the box gets fancy, freight and labor stop being side notes.
Use this kind of apples-to-apples breakdown when you ask for pricing:
| Option | Typical Use | Relative Cost | Notes |
|---|---|---|---|
| Stock mailer + one-color print | Direct ship kits, internal drops | Low | Fastest path if the size works. |
| Custom mailer + die-cut insert | Most branded swag boxes | Medium | Best balance of presentation and shipping strength. |
| Rigid box + specialty finish | VIP client gifts, executive kits | High | Premium feel, but shipping and assembly cost rise. |
| Sleeve over stock carton | Fast visual upgrade | Medium | Useful when time is tight and the structure is already approved. |
Ask vendors to separate the quote into box, print, insert, sourcing, assembly, and freight. Otherwise the “cheap” option can quietly hide expensive kitting labor or a shipping bill that ruins the comparison. I would also compare the same quantity breaks, usually 250, 500, and 1,000 units, because the economics change a lot between those tiers.
MOQ also affects how much room you have to iterate. At lower quantities, one wrong assumption in item size or insert layout can wipe out the budget. At higher quantities, the unit economics improve, but the penalty for getting it wrong gets louder. Either way, you want the spec locked before anyone starts printing boxes in bulk.
Process and timeline: from dieline to delivery
The first step is intake, and it matters more than people admit. Confirm the box size, product dimensions, shipping method, budget target, and where the kit will be opened. A box that looks fine on a desk may be a disaster for direct mail if the contents move too much in transit.
After intake comes artwork and dielines. Get the structural file, place the logo and messaging with proper bleed and safe zones, and review a proof before anything is printed. If you are doing branded swag boxes for a launch or campaign, do not treat the proof like a formality. It is where most preventable mistakes show up. Wrong fold lines, bad copy placement, and tiny content shifts all become obvious once the box is built.
Sampling is worth the time if the kit matters. A prototype or even a digital mockup can catch fit problems, lid issues, or awkward item sequencing before production starts. Fixing those after the boxes are printed is expensive and annoying, which is a combination nobody enjoys.
The typical timeline is:
- Prepress and proofing.
- Print and finishing.
- Die cutting and insert prep.
- Assembly and quality checks.
- Packing and freight booking.
What slows things down? Usually not the box itself. The longest delay is often the merch sourcing, especially when the kit includes apparel, drinkware, or a custom insert that needs tooling. Artwork revisions also eat time. If the deadline is real, say so early. A vendor can only compress so much before quality starts slipping.
From a production standpoint, the cleanest projects are the ones where the structure is approved first, then the insert, then the contents. Reverse that order and you end up redesigning the box around items that should have been fit to a spec in the first place.
For planning, a simple rule helps: stock-size mailers with existing artwork can move in 2 to 4 weeks once proofs are approved. Custom dimensions, specialty finishes, or sourced merch usually push that to 4 to 8 weeks, sometimes longer if the product mix is messy. Holiday timing makes everything worse. That part is predictable, which is why people still get surprised by it.
Quality checks that prevent expensive mistakes
Good kits are won or lost in QC, not in the mockup deck. The checklist should be plain and boring, which is exactly why it works. Measure the actual contents, verify insert cutouts, confirm print alignment, and check that the closure survives handling. If a unit looks right but opens badly, it is not ready.
I would check for four things before approval: fit, orientation, protection, and presentation. Fit means the items do not rattle. Orientation means the opening sequence makes sense. Protection means fragile pieces have enough buffer or support. Presentation means the box still looks intentional after the items are installed, not just before.
Direct mail adds another layer. Corner crush, shifting items, and lid blowout are common failure modes. A good assembly line will do spot checks, but buyers should still ask for a packed sample. If possible, have one shipped through the same method as the final order. A hand-delivered prototype is useful, but it does not prove the package will survive a carrier network.
Quality control also catches boring errors that burn credibility. Missing cards. Upside-down logos. Inserts rotated a few degrees off center. A drinkware lid that contacts the box wall and marks the print. None of this looks dramatic in isolation. Put it together and the kit feels sloppy.
If the box includes apparel, verify fold size and accessory placement. If it includes tech, check cable length and power adapter height. If it includes food or anything with date sensitivity, make sure shelf life and storage conditions are realistic. The packaging cannot fix bad content decisions. It can only hide them for about ten seconds.
Spec choices that change the unboxing experience
Size is the first spec I would lock. A snug fit feels intentional. An oversized box makes it look like the team padded the order with whatever was available. That is not premium. That is logistics hiding behind filler.
The material choice sends a direct signal. Corrugated board is the safe shipping option and usually the default for mailers. Paperboard works well for lighter kits and lower-crush environments. Rigid board gives you the most premium feel, but it also raises the cost and the ship weight. Pick the structure that matches the audience and the transit risk, not the one that looks fancy on a sample table.
Finish is where teams often overspend without improving the outcome. Matte gives a calm, modern look. Gloss makes color pop but can feel louder. Soft-touch adds a nice tactile layer. Spot UV, foil, and embossing can all lift the perceived value, but only if the layout is controlled. If the design is already crowded, extra finishing just makes it busier.
Content hierarchy should be planned deliberately. The main item should land first in the reveal. Supporting pieces should frame it, not compete with it. A note card or insert sheet can explain the story, but it should not become the main event unless that is the point of the kit.
Personalization can be a smart upgrade. Names, custom notes, QR codes, or campaign-specific inserts create a more direct connection without bloating the order. That is usually a better investment than adding another throwaway item nobody asked for. For branded swag boxes, one personal detail often beats three generic extras.
If the box needs to travel by mail, ask whether the design has been considered against handling abuse. Shipping performance is not a vibe. It is a testable requirement. Keep an eye on closure strength, corner crush, and whether the insert protects the contents under realistic movement. Packaging teams use standards and testing for a reason. The box has to survive the trip, not just the mockup.
Small changes can swing the whole feel of the kit. A tighter insert. A stronger lid closure. A cleaner first reveal. A one-line note instead of a long brand manifesto. None of those sounds glamorous. All of them are noticeable.
Common mistakes that make kits look cheap
The easiest way to ruin a good kit is to oversize the box. Too much void fill makes the order feel under-planned, even if the items are useful. People notice empty space immediately. They may not know why it bothers them, but they feel it.
Overbranding is another common miss. Covering every surface with logos and copy usually makes the box harder to read. You do not need to shout on every panel. One strong brand moment, one clean inside message, and one well-executed insert usually do more for perceived value than a wall of ink.
Mismatched merch quality is a bigger problem than the packaging itself. A premium carton cannot rescue a flimsy shirt, a weak notebook, or filler nobody wants. If the contents are thin, the kit will still feel thin. The box is an amplifier, not a miracle worker.
Shipping abuse deserves more attention than it gets. If the kit is going out by direct mail or through a courier network, it needs enough crush resistance and closure strength to survive real handling. A beautiful prototype that falls apart in transit is just an expensive lesson.
The last mistake is skipping the recipient test. Open the box yourself. Watch whether the first item is obvious. Check whether the card blocks the view of the main piece. See whether anything spills when the lid lifts. If the experience feels awkward to you, it will feel awkward to the recipient too. That is especially true for branded swag boxes, because the opening sequence is part of the message.
There is also a category of failure that comes from trying to do too much at once. Four finishes, six items, three insert layers, and custom packaging for every single component sounds impressive in a deck. In production, it usually becomes slow, expensive, and fragile. Simpler systems tend to look more expensive because they are easier to execute cleanly.
Case Studies are useful here because they show how real kits were spec’d and assembled, not just how they looked in a render. If you are still deciding on structure, the right starting point is usually the box first and the merch second. Browse Custom Packaging Products to compare formats before you ask for pricing.
Next steps: lock the spec before you request quotes
Before you ask for pricing, define the audience, occasion, target unit cost, quantity, shipping method, and the feeling you want on opening. That sounds basic because it is. The hard part is forcing the team to choose a direction before the vendor starts guessing for you.
My rule is simple: choose the box structure first, then the insert, then the merch. Reversing that sequence usually causes rework and messy quotes. The box should fit the items, not the other way around. That is especially true for branded swag boxes that need to ship well and still look sharp on arrival.
Request at least two or three quotes using the exact same spec. If one vendor is cheaper, you will know whether that is because of material, assembly, or a missing line item. Ask for samples, prior work photos, and a clear timeline. A vendor that cannot show comparable work probably cannot rescue a tight launch schedule.
One more practical point: compare the quote against the actual opening experience. If the packaging creates a clean reveal, protects the items, and fits the budget, you have a usable spec. If it only looks good in a render, keep working. The real job of branded swag boxes is to make the packaging, contents, and delivery plan feel like one system, not three separate purchases.
There is no prize for making the spec more complicated than it needs to be. The better path is usually the duller one: a right-sized box, a clear insert, quality merch, and a shipping plan that matches the route. That combination is what people remember, even if they never say it out loud.
How much do branded swag boxes usually cost per kit?
The cost depends on box style, print coverage, insert complexity, item count, and whether the kit is hand-assembled. A simple stock-size mailer can stay relatively low, while a rigid box with specialty finishing and multiple sourced items can climb fast. As a rough range, simple kits may land around $12 to $25 per unit, more polished kits often sit around $25 to $45, and premium executive boxes can exceed that quickly. Ask for pricing at several quantity breaks so the economics are clear.
What is a realistic turnaround for branded swag boxes?
Simple stock-size kits can move faster than fully custom sizes with specialty finishes or custom inserts. The real timeline is driven by proof approval, production, assembly, and freight booking. If the merch items are being sourced separately, that part often becomes the longest lead time. A straightforward kit can be ready in a few weeks after approval, while more complex builds usually need 4 to 8 weeks or more.
What box style works best for custom swag kits that ship well?
Corrugated mailers are the safest default for shipping because they handle transit abuse better than lighter cartons. Use rigid boxes only when presentation matters more than shipping efficiency and the budget supports it. The structure should match the contents so the box does not crush, rattle, or arrive looking half empty.
How can I make swag boxes look premium without blowing the budget?
Use a snug size, one strong brand moment, and a clean insert instead of overprinting every surface. Choose one premium touch, such as inside print, foil, or a personal note, rather than adding expensive finishes everywhere. Keep the contents tight and intentional so the recipient sees value instead of filler.
What should I send a vendor before I request branded swag boxes pricing?
Send box dimensions, item dimensions, quantity, destination, target budget, and whether the kit needs direct mail or bulk shipment. Include brand files and a rough layout so the vendor can quote the real structure instead of guessing. If you already know your deadline, say it up front; that decides whether the project is feasible.

