Custom Bicycle Name stickers do more than dress up a frame. They make a bike easier to identify in a crowded rack, help teams keep equipment sorted, and give a rider a clean personal mark without repainting a frame or adding bulky accessories. The best versions feel intentional rather than decorative, which is why they have become a practical staple for shops, event organizers, clubs, and individual riders.
From a production standpoint, custom bicycle name stickers are more demanding than they first appear. A bike frame curves, flexes under load, gets wiped with cleaners, sits in sunlight, and takes vibration from the road or trail. That means the vinyl, adhesive, finish, and cut style need to work together. A decal that looks sharp on a proof can still fail if it is too delicate for the frame, too glossy for the surface, or built with the wrong adhesive balance.
That is where the real value sits: a name sticker should stay readable, resist edge lift, and survive routine use without becoming a maintenance problem. Buyers usually care about the finish and the price first, but the long-term outcome is decided by the material stack and the quality of the file preparation.
Why custom bicycle name stickers stand out on a bike
A bike name sticker is often the quickest way to identify a frame in a race pit, school rack, apartment storage room, or group ride staging area. That practical role explains why custom bicycle name stickers show up so often on both personal bikes and organized fleets. They make ownership clear at a glance, and they do it without changing the bike’s structure or finish.
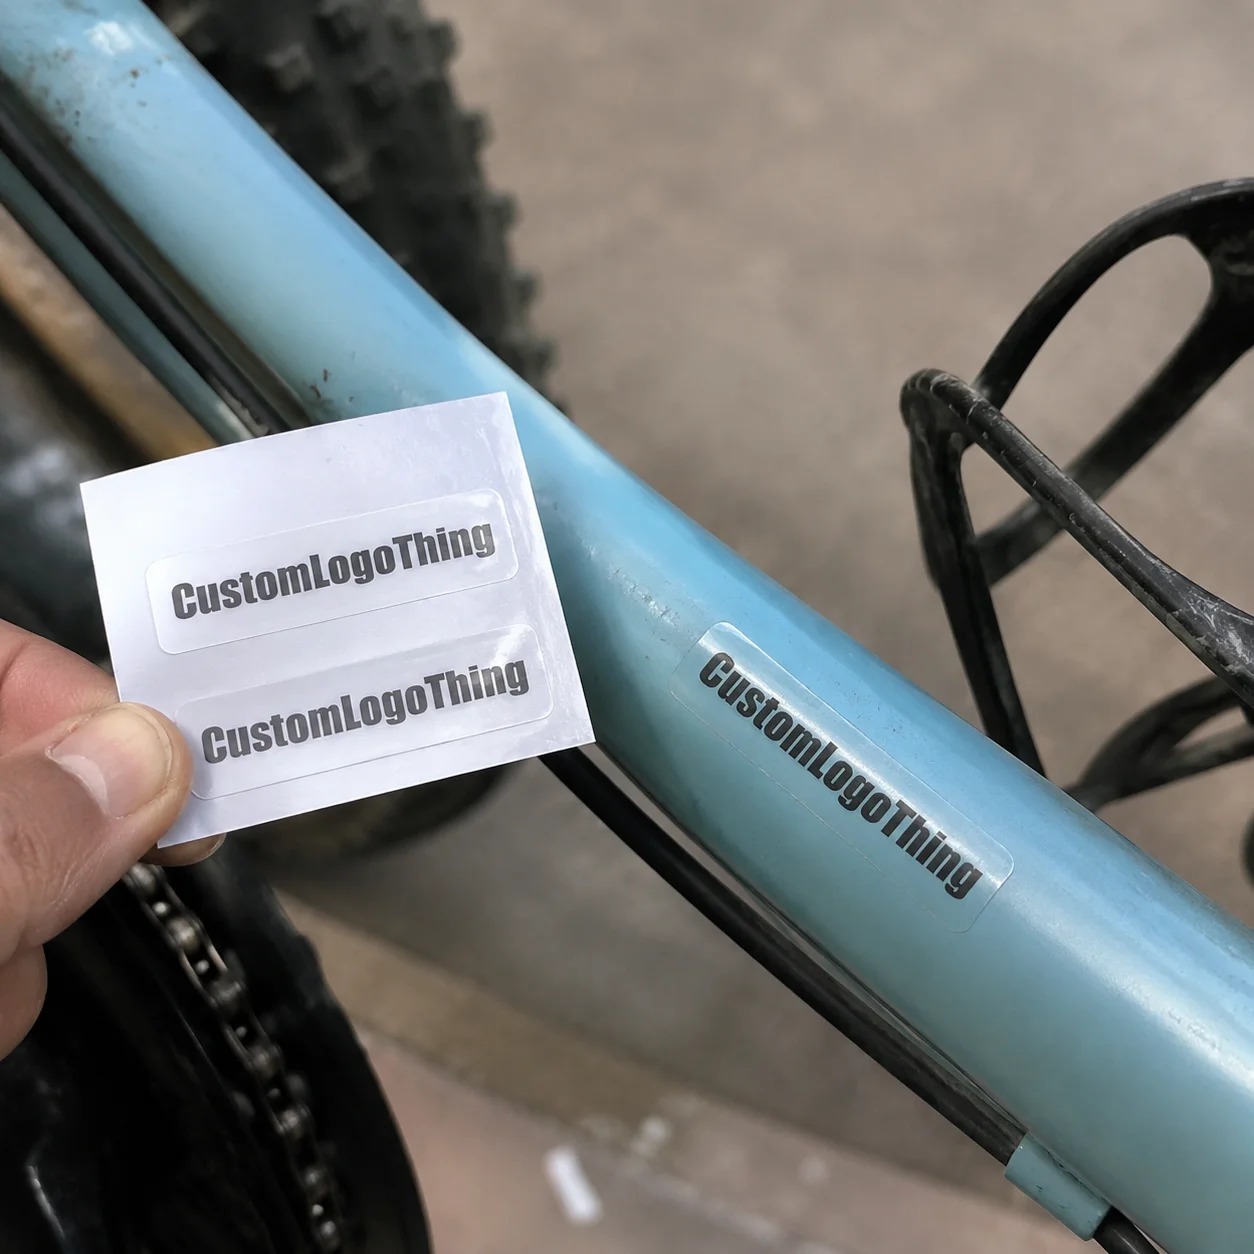
At a basic level, these are personalized adhesive graphics applied to a frame, fork, helmet, bottle cage, or travel case. Depending on the build, the artwork may be cut from solid vinyl, printed on a label stock, or made as a laminated decal with a protective top layer. Each option has a different visual effect. Cut vinyl gives a crisp, minimal look. Printed decals can handle color shifts, logos, or small graphic details. Laminated pieces offer a bit more protection when cleaning and handling are frequent.
There is also a strong identification benefit. A clear name decal helps reduce mix-ups when several bikes look nearly identical, and it can make event check-in or storage handling easier. In practical terms, it works the way a well-made label works on any finished product: the surface communicates identity immediately, without extra explanation.
Bikes are a harsh place for a thin adhesive graphic. Frames get exposed to heat, moisture, chain degreaser, sunscreen, sweat, and UV light. A sticker that feels fine on a desk may fail once it is applied to a tube with a tight curve or a textured finish. That is why the material choice needs to be made with the frame in mind, not just the artwork.
Simple designs usually perform best. Strong contrast, moderate stroke weight, and enough spacing between letters will age better than thin scripts or highly detailed layouts. If the goal is for the name to stay readable from a few feet away, clarity should come before ornament.
Practical rule: if the name has to survive real riding, keep the layout clean, choose a vinyl system designed for outdoor use, and match the adhesive to the frame finish.
How the sticker production process works
Most orders start with artwork intake. The buyer sends the name, size, color preference, and placement notes. The first review is not only about spelling. It also checks spacing, font weight, and whether the design can actually be cut, weeded, printed, and applied cleanly on a bike tube. A delicate font may look elegant in a mockup and still be a poor choice if the letters are too thin to hold up around corners or tight curves.
The proof stage matters just as much as the design itself. A proper proof should show the exact spelling, scale, color, and any cut outline before anything goes to production. Small changes are easy to make here. Once material is cut or printed, revisions cost time and money. This is one of those quiet differences between a casual label job and a production-ready piece.
There are three common build types. Die-cut vinyl lettering uses individually cut characters from colored film, usually with transfer tape for application. Printed decals place the design on printable film, which is useful for logos, gradients, or graphics that need more than one color. Laminated sticker builds add a clear protective layer over the print, which improves abrasion resistance and helps the surface hold up better during cleaning.
The adhesive system deserves attention too. Backing paper keeps the shape stable before installation. Pressure-sensitive adhesive does the actual bonding. Transfer tape helps keep separate letters aligned while they are applied. On curved bicycle tubing, that stack needs enough flexibility to settle without trapping bubbles, but enough initial tack to stay put while the installer positions it. A setup that is too weak lifts early; one that is too aggressive becomes hard to place accurately.
Surface compatibility can make or break the result. Painted aluminum, carbon fiber, powder-coated steel, and clear-coated frames all behave a little differently. Gloss finishes are usually easier to work with because they show contamination less aggressively. Matte finishes can look better on certain frames, but they often need more careful prep because fingerprints, wax, and cleaning residue show up faster. A clean clear coat is still the best starting point, yet even then the surface needs to be fully free of oils and polishing products.
Good suppliers also think about performance beyond the first day. A decal on a bike may be exposed to vibration, sunlight, moisture, and frequent wiping, sometimes all within the same week. That is why buyers should ask whether the film and adhesive have been selected for outdoor use rather than indoor shelf labeling. It is the same general discipline used in product packaging work: appearance matters, but the real test is how the material behaves after handling and exposure.
Cost, pricing, and order minimums
Pricing for custom bicycle name stickers usually depends on size, quantity, number of colors, print method, finish, and whether specialty material is involved. A small one-color name cut from standard outdoor vinyl will usually cost less than a full-color printed decal with lamination and contour cutting. The design may be simple, but setup, handling, and finishing still affect the quote.
Short runs almost always cost more per piece because the setup time is spread across fewer units. Even a basic name order still requires file review, material loading, cutting or printing, weeding or finishing, inspection, and packing. That is why a 10-piece order can look expensive next to a 100-piece run. In most production environments, quantity is the quickest route to a lower unit price.
Here is a practical way to compare common options:
| Option | Typical effect on price | Why it changes cost |
|---|---|---|
| Standard outdoor vinyl | Lowest base cost | Simple material, straightforward cutting, fewer finishing steps |
| Laminated printed decal | Moderate increase | Print time plus laminate and contour cutting |
| Reflective film | Higher than standard vinyl | Specialty stock and improved visibility |
| Matched color or specialty finish | Often the highest | Material sourcing and extra handling |
Minimum order quantity is another factor. Some suppliers will produce a single name or a very small batch, but the per-piece cost tends to rise. Others work in larger batches because their workflow is built around sheet production or efficient cutting runs. If the design is the same across a group, the unit price usually drops as the quantity climbs.
Optional add-ons can move the price more than many buyers expect. Contour cutting, reflective film, multiple colors, metallic finishes, and tighter color matching all add material or labor cost. If you are comparing quotes, compare the vinyl grade, outdoor rating, adhesive type, proofing process, turnaround time, and whether transfer tape is included. That is the same kind of practical comparison buyers use for Custom Labels & Tags and other Custom Packaging Products: the lowest number on the page is not always the best value.
Material, finish, and durability factors
Material choice shapes nearly everything else. Gloss vinyl gives strong color and is easy to wipe clean. Matte can look more premium on certain frame finishes, especially when the bike itself is matte. Reflective film improves visibility and makes sense on commuter bikes or any build used in low light. Textured finishes are less common for name decals, but they can work if the design is simple and the buyer wants something that feels more distinctive.
Outdoor-rated vinyl is the baseline for a reason. Cheap films can fade, shrink, or lift much faster than expected once they are exposed to sunlight and daily handling. A sticker on a top tube that sits in direct light should not be built like a short-term office label. UV resistance and adhesive stability are both part of the performance story, even if they are invisible in the final look.
The adhesive needs to match the application. Too weak, and edges start lifting on curves. Too aggressive, and placement becomes difficult. On fully cured powder coat, adhesion is usually reliable if the surface is prepared properly. On removable applications, a lower-tack adhesive may be acceptable, but the tradeoff is often shorter service life. There is no single best choice across all bikes; the right balance depends on the surface, the expected wear, and whether the decal is meant to be permanent.
Wear resistance matters more than most first-time buyers realize. Water alone is usually manageable with a decent vinyl system, but repeated wiping with harsh cleaners or degreasers can shorten the life of a low-grade label. A protective laminate is especially useful on printed decals because it adds scratch resistance and makes the surface easier to clean. If the bike is washed often, that added layer is usually worth the extra cost.
Letter size and stroke width also affect durability and readability. A fine script may look polished on a screen and still become difficult to apply neatly on curved tubing. Thicker strokes, better spacing, and clear contrast against the frame color produce a cleaner result. That advice holds whether the sticker is for a race bike, a commuter, or a kid’s first proper bike.
For buyers who want a more formal way to think about materials, it helps to look at performance and traceability together. Outdoor film suppliers may reference weathering or adhesive test data, while broader sourcing questions can involve chain-of-custody programs for paper components. For general material and disposal guidance, the EPA has useful resources at epa.gov, and global packaging standards information is available through ista.org. Those resources do not replace a supplier spec sheet, but they help buyers ask the right questions.
Process, timeline, and production steps
After proof approval, production usually follows a simple sequence: file review, cutting or printing, finishing, inspection, packing, and shipment. The schedule depends on workload and material availability, but many straightforward custom sticker jobs move in roughly 12 to 15 business days after proof approval if the artwork is ready and the materials are in stock. Specialty film or repeated revisions can push that out.
Rush orders are possible in some cases, but they narrow the material choices and reduce flexibility around finishing. A simple vector name is easier to rush than a multicolor laminated decal. If the sticker needs to arrive for a race, event, or gift date, the safest move is to finalize the layout early and avoid last-minute changes.
Here is the typical workflow:
- Customer sends names, sizes, colors, and placement details.
- Artwork is checked for spelling, scale, and production suitability.
- A digital proof is issued for approval.
- Production starts after final sign-off.
- Decals are finished, inspected, and packed for dispatch.
Good order prep saves time and reduces mistakes. The buyer should gather the exact spelling, preferred font style, frame color, quantity, and whether the sticker will go on a top tube, down tube, fork, helmet, or case. A quick photo of the placement area helps because it shows curvature, hardware, and available space. For teams or families placing multiple names, a single reference sheet prevents avoidable proof errors.
The cleanest orders are the ones where the design is already settled before the proof is issued. Every revision adds coordination. That is not a weakness in the process; it is simply how custom manufacturing works. The more decisions made up front, the smoother the run.
Step-by-step guide to ordering the right decal
Start with measurement. Before choosing width or height, measure the area where the sticker will sit. A tube can look larger than it really is once bottle bosses, cable guides, taper, and curvature are factored in. A decal that is a little smaller but placed well usually looks better than one that stretches too close to the edges.
Then match the material to the use case. Temporary labeling, race-day identification, commuter durability, and long-term branding all call for different priorities. A short-term label may use a simpler film. A decal intended to stay on the bike for years should generally use outdoor-rated vinyl and a finish that suits frequent handling. If the same name needs to work across a fleet or team program, consistency matters just as much as appearance.
Approve the artwork carefully. Check spelling, spacing, letter height, and contrast against the bike color. On a dark frame, a light decal usually reads better. On a busy or patterned surface, a simple name can outperform a decorative script. The best bike decals are easy to read at a glance and still feel intentional when viewed up close.
Confirm the application method before the job runs. Some decals ship as a single cut piece, while others use transfer tape for alignment. If the placement area is curved, transfer tape usually makes installation easier because it keeps the lettering in place until the adhesive grabs. After application, let the decal settle before heavy washing or wet riding, especially if the adhesive is still curing.
Surface prep is easy to overlook and hard to replace later. Wipe away silicone polish, chain residue, dust, and wax before applying. The surface should be clean and dry. A simple prep step often decides whether the sticker lasts or starts lifting at the edge within days.
Common mistakes and expert tips
The most common mistake is making the lettering too small. Fine details can look elegant on a proof and still become hard to apply on a curved frame. Long names need extra breathing room because the letters spread farther across the tube than many buyers expect. If the goal is clean readability, simpler usually works better.
Low contrast is another frequent problem. Dark vinyl on a dark matte frame can disappear in poor light, and pale colors on silver frames can lose edge definition quickly. If readability matters, choose contrast first and style second. That does not mean the sticker has to look plain; it just means the design should hold up under real conditions.
Poor surface prep causes more failures than most people realize. Oils, waxes, and dust prevent full contact and can lead to bubbling or edge lift. A careful clean with a safe prep method is usually enough, but the surface has to be fully dry before installation. One extra minute here can save the whole decal.
A few shop-floor habits make a noticeable difference:
- Round sharp corners where possible to reduce edge lift.
- Leave more space around thin strokes and script details.
- Order an extra set if the bike will be used heavily.
- Store unused decals flat, away from heat and dust.
- Check installation temperature because cold surfaces can hurt adhesion.
The best advice is still the simplest: keep the design readable, keep the expectations realistic, and match the material to the bike instead of the mockup. A well-made name sticker should be easy to apply, easy to read, and durable enough for actual riding. That is a far better result than a complicated graphic that looks impressive online but struggles on the frame.
Next steps before you place an order
Before placing an order, put together a short checklist: the exact name, placement area, preferred size, color, finish, and quantity. Add a photo or measurement reference so the sizing decision is easier. If you are ordering for a team, family group, or shop program, collect all names in one file to reduce proof errors.
Then compare options by material, durability, and turnaround rather than unit price alone. If two quotes are close, the better choice is often the one that explains the vinyl grade, finish, adhesive, and proofing process more clearly. Proof approval timing also matters; the faster the layout is confirmed, the sooner production can begin.
For anyone who manages branded packaging or retail packaging programs, the logic will feel familiar. Detail work at the beginning saves money later. The same is true for custom bicycle name stickers. Keep the layout clean, check the proof carefully, and choose the material based on how the bike will actually be used. That is the shortest path to a result that looks good on day one and still looks good after real riding.
What are custom bicycle name stickers made from?
Most are made from outdoor-rated vinyl with a pressure-sensitive adhesive. Higher-durability versions may include a laminate for added scratch and UV protection, and transfer tape can be used for clean installation of separate letters.
How long do custom bike name stickers usually last?
Lifespan depends on the material, sun exposure, washing frequency, and surface prep. Outdoor vinyl usually lasts longer than paper-based labels, and a laminate can improve wear resistance when the decal will be handled or cleaned often.
Can custom bicycle name stickers go on curved frames?
Yes, but sizing and material flexibility matter on tight curves. Smooth, clean, painted surfaces usually give the best bond, and very small lettering can be harder to apply neatly on tubing bends.
Do I need to order a large quantity to get custom bicycle name stickers?
Not always, but smaller runs usually have a higher unit cost. Bulk quantities often lower the price per sticker, though minimum order quantity depends on the print method, material, and finishing steps involved.
How do I make sure my bike name decal looks readable?
Use strong contrast between the sticker and the frame color, choose a font and size That Stay Legible at a short distance, and ask for a proof so spelling, spacing, and placement can be checked before production.

