Custom Soft Plastic Bait Bags: What Buyers Should Get Right Before They Order
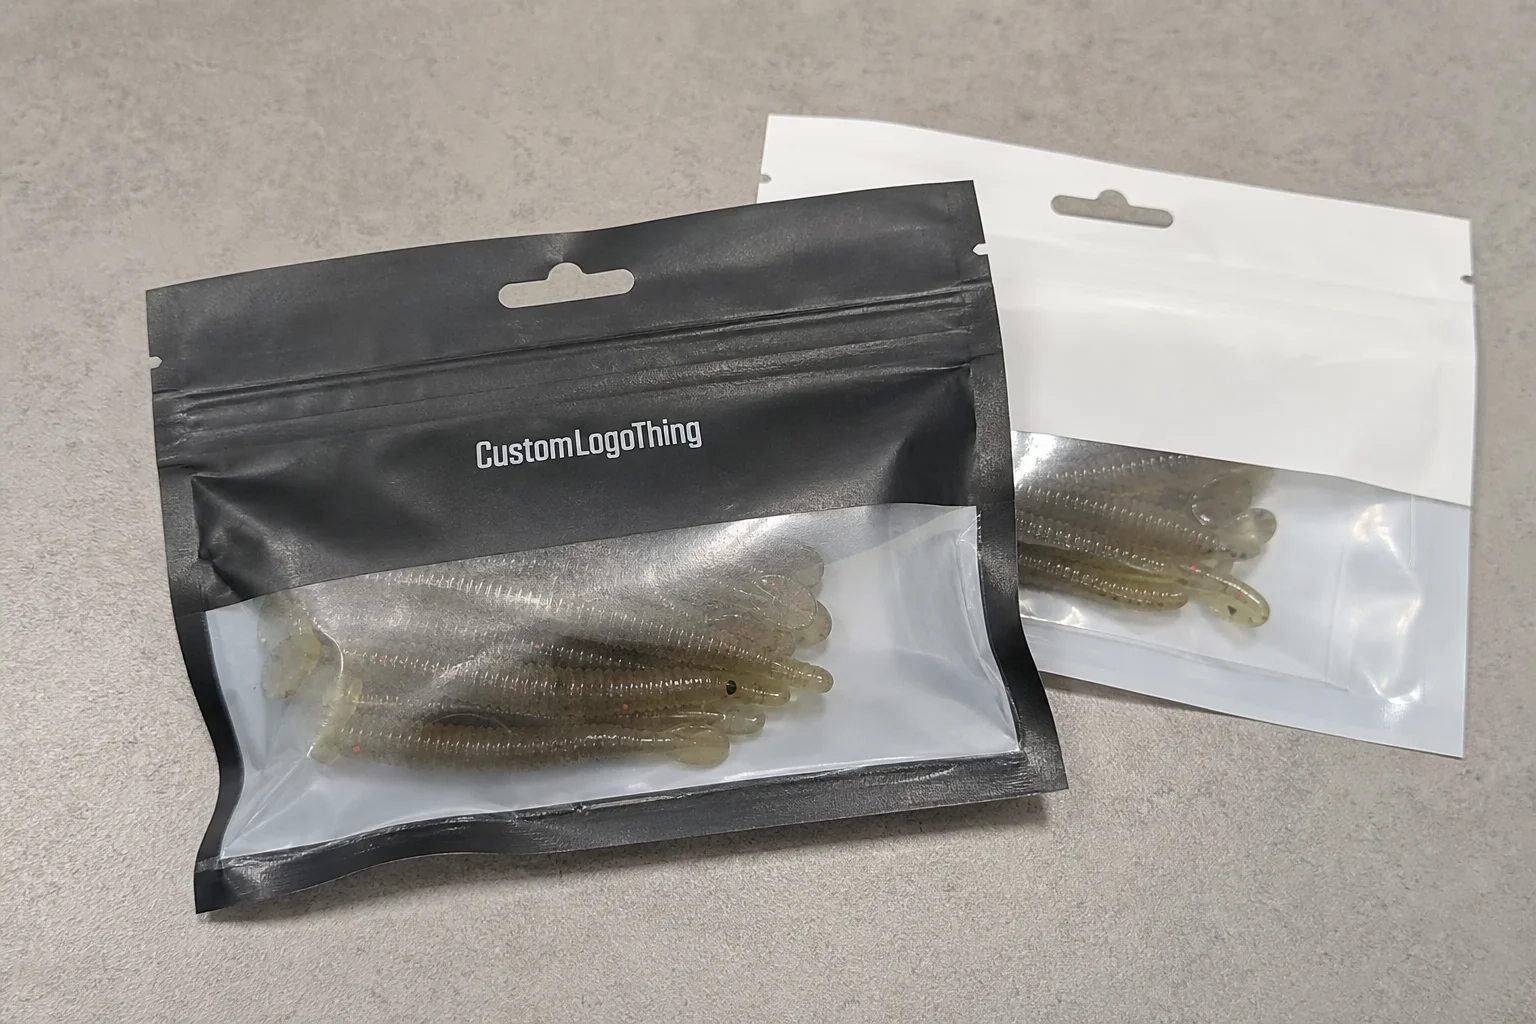
Custom soft plastic bait bags solve a specific packaging problem: the product is oily, flexible, and easily deformed, so the wrong package can leak, crease, or look tired before it reaches a shelf. The right bag does more than hold inventory. It protects the bait, manages scent and oil migration, improves shelf presentation, and reduces the chance of a customer opening a pack that already looks compromised.
For buyers, this format usually makes more sense than rigid clamshells or bulky boxes when freight, storage, and merchandising are part of the decision. Flexible bags take up less space, ship more efficiently, and are easier to adapt for hanging displays or flat shelf placement. The tradeoff is that the spec needs to be defined early. Size, film structure, closure style, print coverage, and finish all affect the quote and the final result. Leave those vague, and the packaging will be vague too.
Custom soft plastic bait bags: what they are and why they work
Soft plastics are not clean, dry goods. They bleed oil, they hold scent compounds, and they deform under pressure. That means the package is part of the product system, not a separate wrapper. A bad bag can cause returns, messy retail displays, and a product that looks older than it is because the lures got flattened during transit.
The format works because it keeps the bait sealed in a compact footprint. Compared with custom printed boxes or rigid clamshells, a flexible pouch uses less corrugate, less pallet space, and usually less freight. That matters whether the order is going to distributors, direct to retailers, or between warehouses. Less dead space in the package usually means less wasted space in shipping, and in this category that can add up quickly.
There is also a merchandising benefit. A well-designed pouch gives you a visible front panel, room for brand marks, space for scent or size callouts, and a hang option if the product needs to go on peg hooks. That is a lot to ask from a small package. Done well, it supports package branding without pushing the product into a format that costs more to move and more to fill.
Most buying decisions come down to four variables:
- Size based on bait count, bait length, and fill weight.
- Film type based on oil resistance, puncture risk, and clarity.
- Closure based on whether the bag needs to be resealed after opening.
- Print area based on how much branding and compliance copy is required.
Those choices sound basic because they are. They also explain most of the cost spread between one quote and another.
How the bag construction protects bait and improves shelf appeal
Think about the bag from the inside out. The inner layer needs to handle oily formulas and keep the lure from sticking to the film. The seal area has to stay closed under pressure, temperature swings, and normal handling. The outer layer needs to carry print without making the pack look washed out or cheap. If one part fails, the whole package feels off.
Most custom soft plastic bait bags use polyethylene film, either as a single layer or as part of a laminate with PET or another barrier layer. Clear film is the simplest choice when the bait itself is part of the sell. Tinted or opaque panels are better when the brand needs more control over color, better contrast for graphics, or a cleaner backdrop for multiple SKUs. Matte and gloss finishes change how the package reads on shelf more than many teams expect. Gloss intensifies color and sharpens contrast. Matte reduces glare and can make a premium line feel calmer and more deliberate.
Barrier performance matters because soft baits are not dry inventory. If the film is too weak, oils can migrate, the pack can feel greasy, and the contents can lose presentation quality over time. That does not automatically mean a heavy laminate is the answer. Overbuilding the bag is a common mistake. A thick, expensive structure that does not improve shelf value or transit performance is just extra cost disguised as quality.
Optional features should solve a retail or handling problem:
- Hang holes for peg displays.
- Tear notches for cleaner opening.
- Resealable zippers for products used in stages.
- Writable panels for batch notes, store notes, or bait selection details.
If the bags are going through distribution, ask about transit testing that reflects actual handling. Industry references such as ISTA are useful when you want the conversation to stay grounded in drop and vibration performance. If you are pairing the bags with cartons or inserts, FSC certification can matter for the broader packaging story even when the bait bag itself is plastic.
On shelf, visibility is usually a balancing act. Clear film lets buyers see the bait color and shape, which can help impulse conversion. Opaque or tinted sections give the brand more room to control the look of the pack and can hide compression better. The right answer depends on whether the product sells mainly on the lure itself or on the promise printed around it. That is a packaging decision, not just a material decision.
Pricing, MOQ, and unit cost for custom bait bags
Unit cost for custom soft plastic bait bags is driven by a set of variables that act like levers, not mysteries. Size, film gauge, print coverage, finish, closure style, and order volume all affect the number. Buyers often focus on the headline price and ignore the rest. That is how two quotes end up looking comparable when they are not.
As a practical range, a simple stock-style printed bait bag might land around $0.18-$0.28 per unit at 5,000 pieces. A more customized retail-ready version with better graphics, a zipper, or heavier film may sit closer to $0.24-$0.42 per unit. Premium structures with barrier layers, matte finish, and extra features can reach $0.32-$0.58 per unit or more. Those numbers are not promises. They are the range to expect before the final spec is locked.
MOQ is tied to how the bag is made. If the job uses custom print plates, a fixed film width, or specialty finishing, the minimum usually rises. Higher volume lowers unit cost, but it also raises upfront cash needs. Buyers often want a low MOQ and a low unit price. The math usually forces a choice between flexibility and efficiency, and pretending otherwise only delays the decision.
| Option | Typical unit cost at 5,000 | Common MOQ | Best use | Main tradeoff |
|---|---|---|---|---|
| Stock PE pouch, simple print | $0.18-$0.28 | 1,000-2,500 | Launch testing, value-focused product packaging | Less control over branding and finish |
| Custom printed PE bag with zipper and hang hole | $0.24-$0.42 | 3,000-5,000 | Mainline retail packaging | Higher setup cost than stock formats |
| Barrier laminate with matte finish | $0.32-$0.58 | 5,000-10,000+ | Premium bait, stronger scent control, shelf-heavy brands | More expensive and usually slower |
There are also hidden or overlooked costs that affect landed price:
- Setup charges for plates, cylinders, or print preparation.
- Sampling and proofing for artwork and fit checks.
- Freight, especially if the order is bulky or split across locations.
- Secondary packing if bags need to be packed in cartons, sleeves, or master cases.
If the goal is a cleaner comparison, ask for landed cost rather than just ex-factory price. A slightly higher unit price with cleaner packing and lower freight can beat a cheaper quote once the full logistics picture is included. That is where broader Custom Packaging Products planning becomes useful, because bait bags rarely stand alone. They sit inside a larger branded packaging system that may also include labels, inserts, and display cartons.
Production process and lead time: from artwork to delivery
The production sequence is straightforward when the input is clean. First comes the brief: size, material, closure, print count, and finish. Then the bag spec or dieline is confirmed. After that, artwork is prepared, proofed, and checked against the final dimensions. Once the proof is approved, production begins, then quality control, then shipment.
Delays usually happen in the same places. Artwork arrives half-finished. Barcode placement changes late. Someone moves the copy block after the proof is already signed off. Or the buyer changes the film spec after comparing another quote. Every one of those changes resets part of the schedule.
For a standard run with locked artwork and common materials, lead time is often 12-20 business days after proof approval, plus transit. If the bag uses a custom laminate, a specialty zipper, or a complex print setup, the schedule can run longer. If the supplier is using stock film and a simple build, the timeline can move faster. The quickest orders are not rushed ones. They are the ones that are decided early and changed as little as possible.
There is also a real difference between stock-material runs and fully custom builds. Stock runs let you move faster and test the market with lower commitment. Fully custom runs give stronger control over appearance, handling, and retail performance. For a new SKU, a staged approach usually makes more sense: validate the bait, validate the bag size, then move into the full custom version once the sell-through pattern justifies it. That is a more disciplined use of capital than trying to make every first order perfect.
“The quote looked fine until freight, proofing, and the zipper cost were added. The cheapest option was only cheap on paper.”
That is why launch dates should be built around proof approval, not around a vague estimate from sales. If a bag has to hit a seasonal retail window, create buffer. A clean program plan with one approved spec sheet is worth more than three scattered email threads and a calendar full of assumptions.
Spec choices that affect performance, cost, and shelf impact
Start with size, not graphics. If the bag is too large, the product floats around and looks underfilled. Too small, and the bait gets compressed, bent, or hard to seal consistently. For soft plastics, the right bag size depends on bait count, fill weight, and whether the product is packed loose or nested. A 3-count bag and a 10-count bag are not the same job even if the artwork template looks similar.
Film thickness is where buyers get tempted to shave pennies. A thinner film can reduce cost, but if the bait is sharp, heavy, or oily, that savings can disappear fast. For many soft bait applications, a practical starting point is 4-6 mil for standard bags, with heavier builds used for rough handling or premium retail packaging. That is not a universal rule. It is a sensible baseline. Increase it only when the sample actually shows a need for more protection.
Finish changes how the package reads on shelf. Gloss makes color pop and can sharpen contrast. Matte lowers glare and can feel more restrained, which works well for premium fishing brands. Clear film is still the easiest way to show the bait itself. Opaque panels are better when stronger branding, better copy legibility, or a cleaner backdrop for multiple SKUs matters more than product visibility. Most brands end up mixing these choices across the line rather than forcing one look on every product.
Useful add-ons should earn their keep:
- Euro slots if the product hangs on peg hooks.
- Tear notches if quick opening matters in the field.
- Resealable zippers if the bait will be opened and reused.
- Writable panels if batch notes or field notes add real value.
For brands building a larger product packaging system, the bait bag should match the rest of the line. Color discipline, font consistency, and a clear SKU hierarchy matter more than flashy effects. If the pouch looks like it belongs with the labels, inserts, and shipping materials, the whole brand feels more intentional. That is the difference between retail packaging that looks assembled and retail packaging that looks planned.
If the line also uses cartons or shipper boxes, keep the bag spec aligned with the outer pack. That helps pack-out speed and reduces mismatches between the contents and the shelf-facing story. It also simplifies quoting when you are comparing broader custom packaging product options for the same launch cycle.
Common mistakes that cause weak quotes and bad packaging
The first mistake is ordering by bag size alone. Two bags with the same dimensions can cost very different amounts depending on seal style, closure, film structure, and print area. If those details are missing, the quote will be vague and the production result will be vague too. That is not a supplier issue. It is a spec issue.
The second mistake is choosing the thinnest film possible because the unit price looks better. That move often backfires with oily or heavy bait formulas. The bag may look fine in a sample and then fail once it is shipped, stacked, or handled by retail staff. The wrong film is always more expensive than the right one after damage claims start showing up.
The third mistake is approving artwork before checking barcode contrast, copy legibility, and white ink requirements. A design can look sharp on screen and still fail on a printed pouch if the background is too dark or the type is too small. Packaging design is not only about appearance. It is readability at distance, under poor lighting, beside competing products, with a buyer glancing for two seconds.
The fourth mistake is trusting the lowest quote without checking what is included. Some quotes exclude proofing. Some exclude freight. Some leave out QC detail, which sounds harmless until a bad run arrives. The lowest number on paper can become the highest landed cost quickly.
Here is a simple filter for comparing custom soft plastic bait bags:
- Confirm the exact size, fill weight, and closure.
- Check whether the print is one side, two sides, or full wrap.
- Ask what material is being quoted, not just the thickness.
- Verify proofing, freight, and master pack assumptions.
- Compare the sample against actual bait, not an empty bag.
If you want a sanity check on broader material choices and packaging structures, references from packaging.org are useful because they keep the conversation tied to performance rather than presentation alone.
Expert tips and next steps for a cleaner quote
Start with the bait formula, fill weight, and display method. Those three inputs say more than a vague request for “a nice bag.” Soft bait packaging is one of those categories where the product behavior drives the spec. If the bait is oily and soft, the film and seal should be chosen for that reality, not for a generic pouch template.
Build a one-page spec sheet before requesting pricing. Keep it simple and specific:
- Bag dimensions and target fill weight.
- Film thickness and material preference.
- Print sides, ink count, and finish.
- Closure style, hang hole, and any tear features.
- Retail format: hang, shelf, or display tray.
Then ask for two or three options. Not ten. Too many versions create noise rather than clarity. A useful comparison usually includes a base version, a mid-tier version, and a premium version so cost, appearance, and durability can be judged side by side. That is the quickest way to see where the money is going.
For brands managing a full launch, the best results usually come from aligning artwork, sample approval, and launch timing as one project. If the graphics team is still changing colors while the production order is being placed, the schedule will slip. If the retail buyer wants hang holes while the operations team wants flat pack-out, settle that before the PO, not after.
The most practical approach is not to chase perfection on the first quote. Chase clarity. A clean spec, a realistic MOQ, and a sample that matches the bait in real conditions will beat a polished sales deck every time. That is how custom soft plastic bait bags become a sales tool instead of a packaging problem.
FAQ
What should I decide before ordering soft plastic bait bags?
Lock in bait size, fill weight, and whether the bag needs to hang, stand, or display flat. Choose the closure, film thickness, and print coverage before asking for a quote. Those choices drive the price more than the artwork does.
How thick should custom bait packaging usually be?
Use thickness based on bait weight, puncture risk, and how often the bag will be handled. A typical starting point is 4-6 mil for many soft bait applications, but heavier or sharper products may need more. Thin films can save money, but not if they tear or leak.
What affects MOQ for bait bag printing?
MOQ usually depends on film setup, print method, size, and whether the order is stock-based or fully custom. More colors, special finishes, and custom tooling often push the minimum higher. Simple builds tend to start lower.
How long does production normally take for soft bait bags?
Lead time depends on artwork approval, material availability, and whether the spec uses standard components or custom features. Fast approvals and locked specs shorten the schedule more than anything else. A standard run often lands in the 12-20 business day range after proof approval, plus transit.
Can I add a zipper, hang hole, or writable panel to bait bags?
Yes, but each add-on should solve a real use case, not just improve the quote sheet. Features that improve retail display or reuse can be worth the added cost if they support sell-through and fit the way the bait is actually sold.

