Why a personalized cosmetic pouch gets noticed fast
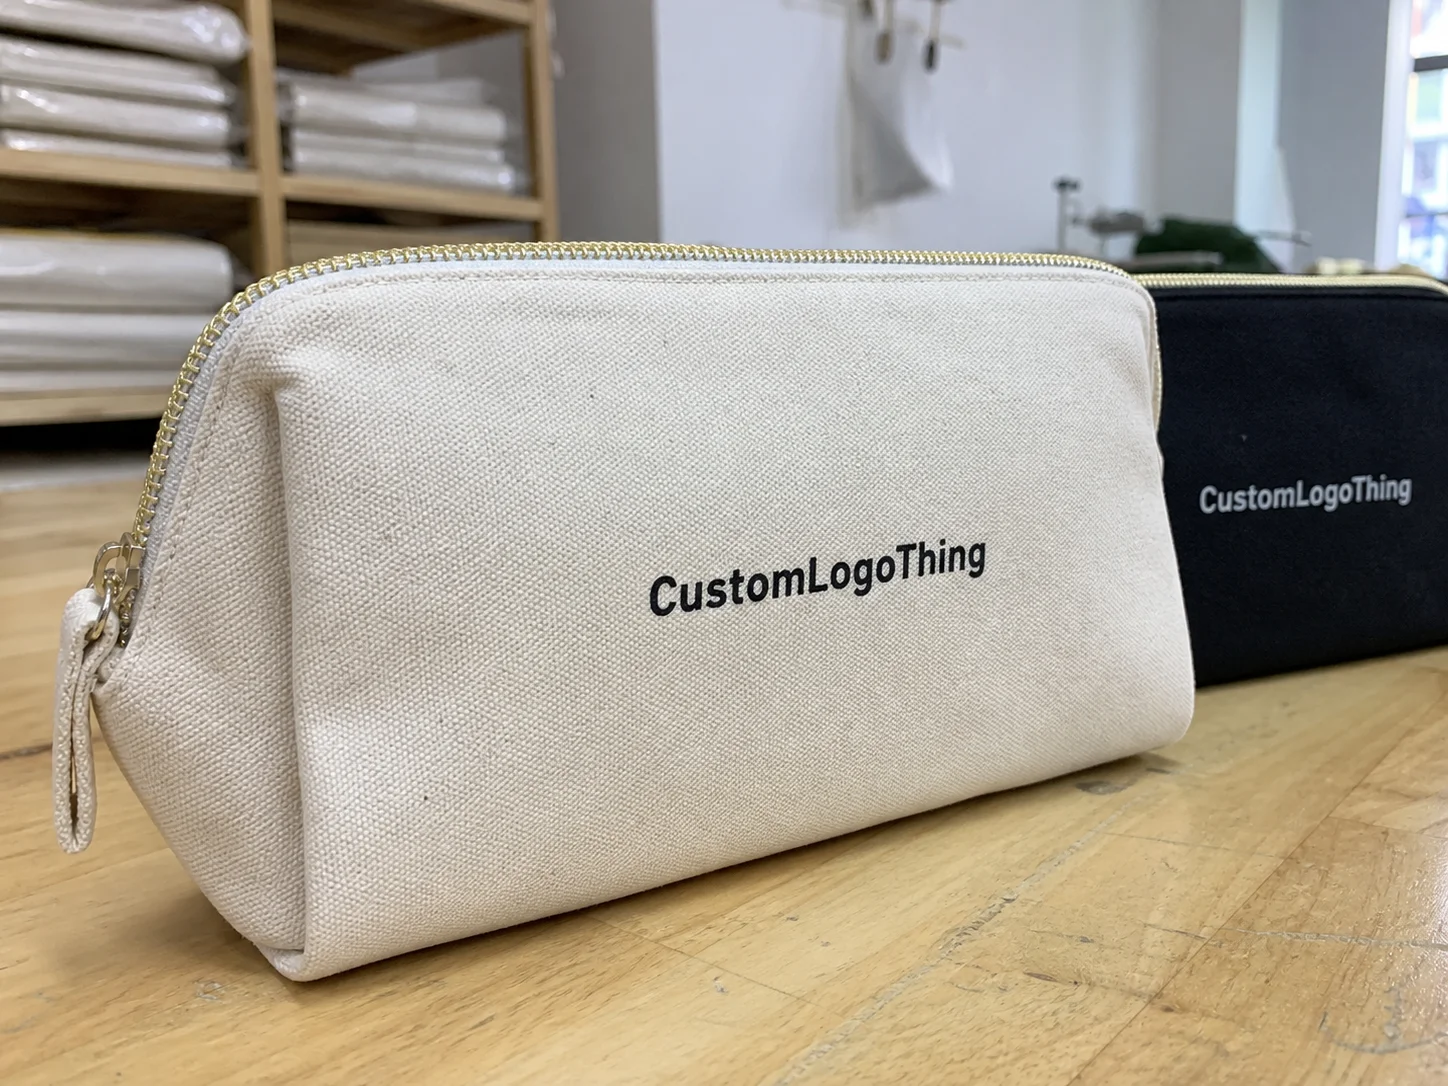
A personalized cosmetic pouch has a longer life than most of the products it carries. It moves from vanity to handbag to carry-on, so the brand travels with it. A customer may discard the box, but the pouch usually stays in rotation.
That changes the job. A box opens once. A pouch gets handled repeatedly, stuffed, zipped, wiped, and shown in public. If the build is weak, people notice quickly.
In beauty retail, travel kits, hotel amenities, subscription boxes, and gift-with-purchase programs, the pouch changes perceived value before anyone opens the product inside. A flimsy zip bag feels disposable. A well-made pouch feels deliberate.
Customization goes beyond the logo. Size, shape, material, lining, closure, and decoration method all affect performance. Some brands need clear PVC or EVA so contents stay visible. Others want PU, canvas, or polyester for a softer, more premium feel. The right choice depends on use, not on a render.
If the pouch survives daily use, the brand message survives too.
That is why the first brief should focus on function. A spa retail pouch, a PR kit pouch, and a hotel amenity pouch may share a category name, but they do not need the same material, thickness, or closure spec.
Materials, linings, and closures that change everyday use
Material choice affects cost, feel, durability, and lead time. It also affects resistance to moisture, staining, and repeated opening. The usual families are PVC, EVA, PU, polyester, canvas, and mesh.
PVC and EVA work well for clear or semi-clear pouches. They are easy to wipe down and suit travel kits or liquid-friendly sets. EVA tends to feel lighter and softer. PVC is usually firmer and often more economical. If you choose either one, check sustainability claims carefully, because mixed-material clear pouches are not automatically recyclable.
PU gives a more polished look and is common in premium beauty sets. It can mimic leather-like texture without leather cost, and it handles embossing or debossing well. Polyester and canvas fit lifestyle branding better when softness matters more than visibility. Mesh works when breathability and quick drying matter, especially for damp accessories or gym use.
Thickness matters more than most buyers expect. A thin clear pouch may look acceptable in a render and feel cheap in hand. A thicker film adds structure, but too much thickness can make the pouch stiff and harder to pack. For coated fabrics, the coating weight and backing matter as much as the face fabric.
Linings are easy to overlook and hard to change later. A soft lining raises perceived quality. A coated or laminated interior helps when the pouch may hold leaks, damp brushes, or bottles that do not stay upright. For travel and hospitality, a wipe-clean interior is usually worth the extra attention.
Closures deserve the same scrutiny. Zippers are the default because they are secure and familiar. Snap closures feel quicker but offer less protection. Drawstrings read more casual and are usually better for lightweight gifts or accessory kits. Magnetic closures look elevated, but they belong on more structured builds and typically raise cost.
Shape and volume matter just as much. A slim pouch that cannot fit a mascara tube, travel bottle, or brush handle will frustrate customers even if the branding is clean. Gusset depth, opening width, seam allowance, and corner radius all affect usable capacity. A slightly larger pouch with better proportions usually beats a pretty but cramped one.
Artwork, logo placement, and print methods that survive use
Logo placement changes how the pouch reads in photos and in hand. A centered mark gives strong front-facing visibility. A corner logo feels quieter and often more premium because the material and shape do more of the work. Side placement can work on gusseted pouches where the front panel already has texture or product visibility.
The decoration method should follow the substrate. Screen print is the common choice for simple logos and solid colors. It is cost-effective at larger runs and performs well on flat fabric or coated surfaces. Heat transfer can handle more detail and gradients, though the finish may feel less refined if the transfer film is thick or poorly applied. Embroidery adds texture and a premium look on fabric pouches, but it is not a good fit for very fine type or tiny logos.
Embossing and debossing work well on PU and similar materials because they create brand presence without relying on ink. That matters when the goal is a quiet, upscale finish. Digital print can be the right answer for multi-color artwork or illustration-heavy designs, but the substrate has to cooperate. Textured or glossy surfaces can soften detail, and fine lines can disappear faster than clients expect.
Artwork setup is where many orders slip. Thin lines can vanish. Small text can blur. Light colors can sink into a tinted substrate. White ink on clear or dark material needs a real plan, not a hope and a screenshot. Ask for Pantone references, not just RGB values, and confirm whether the factory is matching the digital file, a printed proof, or a physical swatch.
There are also limits on what can be reproduced cleanly. A tiny logo with five colors and hairline typography is not friendly to a small pouch. If the artwork has gradients, shadows, or a lot of fine detail, check it against the print method early. That avoids expensive revisions later.
Use case should guide visual density. A spa retail pouch can carry elegant typography or a single embossed mark. An influencer kit may need stronger front-panel branding because it has to read clearly in photos. A hotel amenity pouch usually benefits from simpler branding because different guests will handle it in different ways.
For repeat orders, lock three things early: logo size, logo placement, and the exact print method. Changing those later changes the feel of the product too. That is where consistency is lost.
Cost, pricing, and MOQ: what moves the quote
Price is driven by a cluster of decisions, not one line item. Material choice, size, closure complexity, print method, number of colors, lining, packaging format, and tooling all influence the final number. A low-cost pouch can turn expensive fast if the design asks the factory to do too many things at once.
MOQ changes for the same reason. A simple stock-style pouch with one-color print may be available at a smaller minimum. A custom shape, special hardware, or multi-step decoration usually pushes the minimum upward. MOQ usually reflects setup time, yield, and decoration complexity.
Sample pricing also deserves attention. A physical sample can feel like an extra fee, but it often prevents a bad print run, the wrong zipper choice, or a size that looked right on paper and fails in use. For a personalized cosmetic pouch, that early test usually pays for itself.
Here is a practical pricing frame. These figures are directional only. Freight, inserts, and outer packaging often sit outside the unit quote.
| Option | Typical use | Approx. unit cost at 1,000 pcs | Common MOQ | Notes |
|---|---|---|---|---|
| Polyester zip pouch, one-color screen print | Promotions, subscription boxes | $0.55-$1.10 | 500-1,000 | Fast to quote, good for simple branding |
| PU pouch with debossed logo | Premium beauty sets | $1.10-$2.20 | 300-500 | Cleaner look, stronger perceived value |
| PVC or EVA clear pouch with print | Travel kits, visibility-driven sets | $0.85-$1.80 | 1,000+ | Wipe-clean, practical for liquids |
| Canvas pouch with embroidery | Lifestyle retail, gift sets | $1.30-$2.60 | 500+ | Better tactile feel, more labor in decoration |
If the order needs rigid inserts, special boxes, or custom outer cartons, ask for tiered pricing at 500, 1,000, and 3,000 units. That comparison shows where setup costs stop hurting so much and helps the buyer decide whether to protect margin or reduce inventory risk.
Unit price is not the only number that matters. A slightly higher-cost pouch can still be the better buy if it reduces damage, lowers returns, or holds up long enough to keep the branding visible.
Production steps and lead time: from artwork to shipment
Most delays happen before mass production starts. The cleanest process begins with a brief, then quote review, artwork proofing, sampling, production, inspection, packing, and shipment. If any one of those steps is vague, the schedule stretches.
- Briefing: confirm dimensions, use case, material, closure, decoration, and target quantity.
- Quoting: compare options by unit price, tooling, sample cost, and packaging needs.
- Proofing: verify logo placement, Pantone references, artwork scale, and file quality.
- Sampling: review a physical sample or photo proof before mass production.
- Production: cut, print, stitch, weld, assemble, and finish the order.
- Inspection and shipping: check quality, pack to spec, then ship.
Lead time depends more on decisions than on the calendar. A simple repeat order can often move in roughly 12-15 business days after proof approval. Custom shapes, specialty closures, or complex decoration can push the schedule toward 20-30 business days, especially if materials need to be sourced.
Quality control is where a lot of the real work happens. Good factories check seam strength, zipper glide, print registration, stitching consistency, and discoloration after friction or wipe tests. For clear materials, they also check haze, scratches, and edge finish. For fabric builds, they look at thread tension, loose ends, and puckering around corners.
Ask for the sample to be tested with real contents, not just air. Put bottles inside. Add brushes. Close the zipper when the pouch is full. Check whether the logo shifts onto a seam or bends too much when packed. A pouch can look correct empty and behave badly when loaded.
If the pouch is part of a retail set, transit testing matters too. Standards from ISTA help confirm whether the pack can survive distribution stress rather than just sitting well on a shelf. If cartons or inserts use fiber content and the broader packaging story includes sourcing claims, FSC certification may matter even if it does not change the pouch itself.
Rush orders do happen, but they narrow the material pool and leave less room for correction. A better move is to approve one clean sample, freeze the key specs, and keep one person accountable for sign-off.
Common mistakes that hurt fit, durability, and branding
The most common mistake is buying on appearance alone. A pouch can look polished in a mockup and still fail in use if the zipper snags, the seams split, or the lining stains easily. If the product is meant to travel, it needs to tolerate compression, moisture, and repeated opening.
Size errors come next. Buyers often estimate based on the average item rather than the tallest or widest one. That is how a pouch ends up too short for a pump bottle, too shallow for brushes, or too narrow once the zipper tape and gusset are added. Measure the largest item in the kit, then add practical clearance.
Artwork mistakes can be expensive and avoidable. Weak files, fuzzy edges, low-resolution logos, and unclear color instructions often trigger a second round of sampling. If the logo has to be exact, use vector artwork and confirm the substrate before approving color. A white logo on a textured material behaves differently from the same file on a flat coated surface.
Durability mistakes usually show up late. Thin seams, low-grade zippers, poor stitching density, and materials that stain easily all shorten the life of the pouch and, by extension, the life of the branding. A pouch is a small product, but it represents the brand every time it sits on a bathroom counter or gets pulled out of a tote.
There is also a sustainability mistake that comes from overclaiming. If a pouch uses mixed materials, coatings, or PVC, do not call it recyclable without checking the actual waste stream and local rules. Accurate language is better than polished language that fails a basic check.
One more issue: overdesign. Too many decorative elements can make a pouch harder to produce, harder to price, and less durable. If the structure already has texture, color, and shape, the branding may only need a small mark.
Next steps for a cleaner brief, sample, and reorder plan
The best orders start with a short, specific brief. A one-page document that covers use case, target audience, dimensions, closure type, decoration method, target price, and expected MOQ will usually produce better quotes than a long email thread with missing details.
From there, request a sample that matches the real Material and Print method. Do not test an empty pouch and call it approved. Put actual products inside. Check zipper action. Check how the pouch closes when filled. Check whether the logo still sits where you wanted it to sit under stress, not just on a desk.
For reorder planning, separate what must stay fixed from what can change. The logo, dimensions, and core material should usually stay consistent if brand recognition and cost predictability matter. Seasonal colors, secondary packaging, and small inserts can change more easily.
It also helps to document what failed in the sample stage. If the zipper gauge felt too light, note it. If the lining was harder to wipe than expected, note that too. Reorders are where small records pay off.
Compare two spec options, verify sample performance, and choose the pouch that balances presentation, durability, and budget.
That is the practical rule. A personalized cosmetic pouch should do three jobs at once: look credible, hold up in use, and fit the budget without forcing compromise on the details customers notice first.
What size should a personalized cosmetic pouch be for travel kits?
Base the size on the tallest item in the kit, not the average item, so the pouch can close without bulging. For travel sets, a shallow pouch works for minis and tools, while a deeper gusset is better for bottles, palettes, and brushes.
Which material works best for a custom cosmetic pouch that gets daily use?
Choose wipe-clean materials like PVC, EVA, or coated fabrics if the pouch may hold liquids or be used in bathrooms and travel bags. Use polyester or canvas if you want a softer, more lifestyle-oriented look and lighter contents.
How do I keep logo colors accurate on a personalized cosmetic pouch?
Ask for Pantone references and confirm whether the factory is matching a digital file, printed output, or a physical swatch. Review a sample on the actual substrate, because ink and texture can shift the final color.
What MOQ should I expect for a branded cosmetic pouch order?
MOQ usually depends on material availability, decoration method, and whether the pouch uses stock dimensions or a custom shape. Simpler builds usually allow lower minimums, while special hardware and complex printing raise them.
How long does production usually take after artwork approval?
Lead time depends on sampling, material sourcing, print setup, and factory workload, so approval speed matters. If you want a faster schedule, lock the size, artwork, and packaging requirements before sampling begins.


