A personalized makeup pouch sounds straightforward until the sample arrives and the zipper snags, the logo sits too close to the seam, or the pouch looks good empty and awkward full. The difference between a pouch that stays in circulation and one that gets forgotten usually comes down to size, material behavior, closure quality, and print placement. Buyers who treat it like a tiny billboard often miss the real job. The better ones behave like practical gear first, branding surface second.
That matters because a pouch lives inside a bag, gets handled constantly, and has to survive scuffs, spills, compression, and overstuffing. If the shape is awkward or the print wears off, the brand impression disappears quickly. If the spec is right, the pouch keeps showing up in daily use, which is the point of ordering a personalized makeup pouch in the first place.
For beauty brands, salons, subscription boxes, and event programs, the goal is repeat visibility, not decoration for its own sake. A pouch that fits the right products, closes cleanly, and feels solid in the hand gets reused. That is where value compounds, because the item keeps working long after the initial handoff.
Why a personalized makeup pouch gets used, not tossed
Beauty buyers are practical. They do not keep a pouch because it is “cute.” They keep it because it solves a small daily problem: holding lipstick, brushes, balm, hair ties, or the loose items that always end up floating around in a tote bag. A personalized makeup pouch works best when the utility is obvious the moment someone picks it up.
The strongest use cases are usually the least theatrical:
- Retail gifts-with-purchase that add value without inflating the promotion budget.
- Salon or spa giveaways that feel useful instead of disposable.
- Travel kits for mini toiletries, brushes, and touch-up items.
- Subscription inserts that make the unboxing feel more deliberate.
- Event giveaways that survive long after the conference bag is gone.
The difference between a novelty bag and a real pouch is structure. A novelty piece may look good on a product page, but if it is too thin, too small, or too awkward to open, people stop using it. A properly planned personalized makeup pouch has enough body to hold shape, enough clearance for the zipper to close, and enough surface area for the logo to remain visible when the pouch is full.
A pouch should feel useful before it feels promotional. If the user reads it as storage, the brand gets repeated impressions. If they read it as clutter, it disappears.
Size decisions matter more than most buyers expect. A pouch that is too small forces the zipper to strain. One that is too large wastes material and feels loose. The sweet spot is a pouch that fits the actual contents with a little clearance, not an abstract “medium” that sounds safe but rarely is.
From a packaging buyer’s point of view, this is the first filter: if the pouch does not match the daily use case, it will not be reused. And if it is not reused, the branding has one job left and usually fails at that too.
How the pouch structure and print method work together
The best results happen when the pouch body, closure, and artwork are planned together. People often choose a logo first and treat the pouch as a blank surface. That is backwards. The structure determines what the decoration can realistically look like.
A basic build usually includes the body material, zipper style, pull tab, seam placement, and sometimes lining or reinforcement. On soft goods like a personalized makeup pouch, those details shape both the appearance and the life of the item. A strong print on a weak bag still gives you a weak product.
Common material choices usually fall into a few categories:
- Clear PVC for visibility and a straightforward retail look.
- Frosted vinyl for a cleaner appearance with less glare and better fingerprint hiding.
- Soft plastic or TPU-style materials for lighter weight and more flexibility.
- Fabric-based pouches for a softer hand feel, though print and cost behave differently from plastic builds.
Clear PVC makes it easy to show contents, which works well for travel sets or compliance-style kits. Frosted material tends to look more finished on shelf and hides handling marks better. Softer materials can feel nicer in hand, but they do not always hold crisp edges the same way a firmer pouch does. If the logo matters, the surface matters even more.
Print method is just as important. Screen print is usually the simplest route for bold logos and limited colors. UV print or digital print can handle finer detail and gradients, but the result depends on surface smoothness and ink adhesion. On a smooth plastic pouch, a clean one-color logo often looks sharper than a busy full-color design that fights the substrate.
| Option | Best For | Typical Impression | Cost Impact |
|---|---|---|---|
| Screen print | Simple logos, solid colors, larger runs | Crisp if the art is simple | Lower setup burden, usually better at scale |
| UV print | Detail, small type, richer graphics | Sharper artwork on smooth surfaces | Often higher than screen print |
| Digital print | Short runs, color-heavy designs | Flexible, but surface prep matters | Can be efficient for smaller orders |
| Deboss or emboss | Premium branding on compatible materials | Subtle and tactile | Usually adds tooling or process cost |
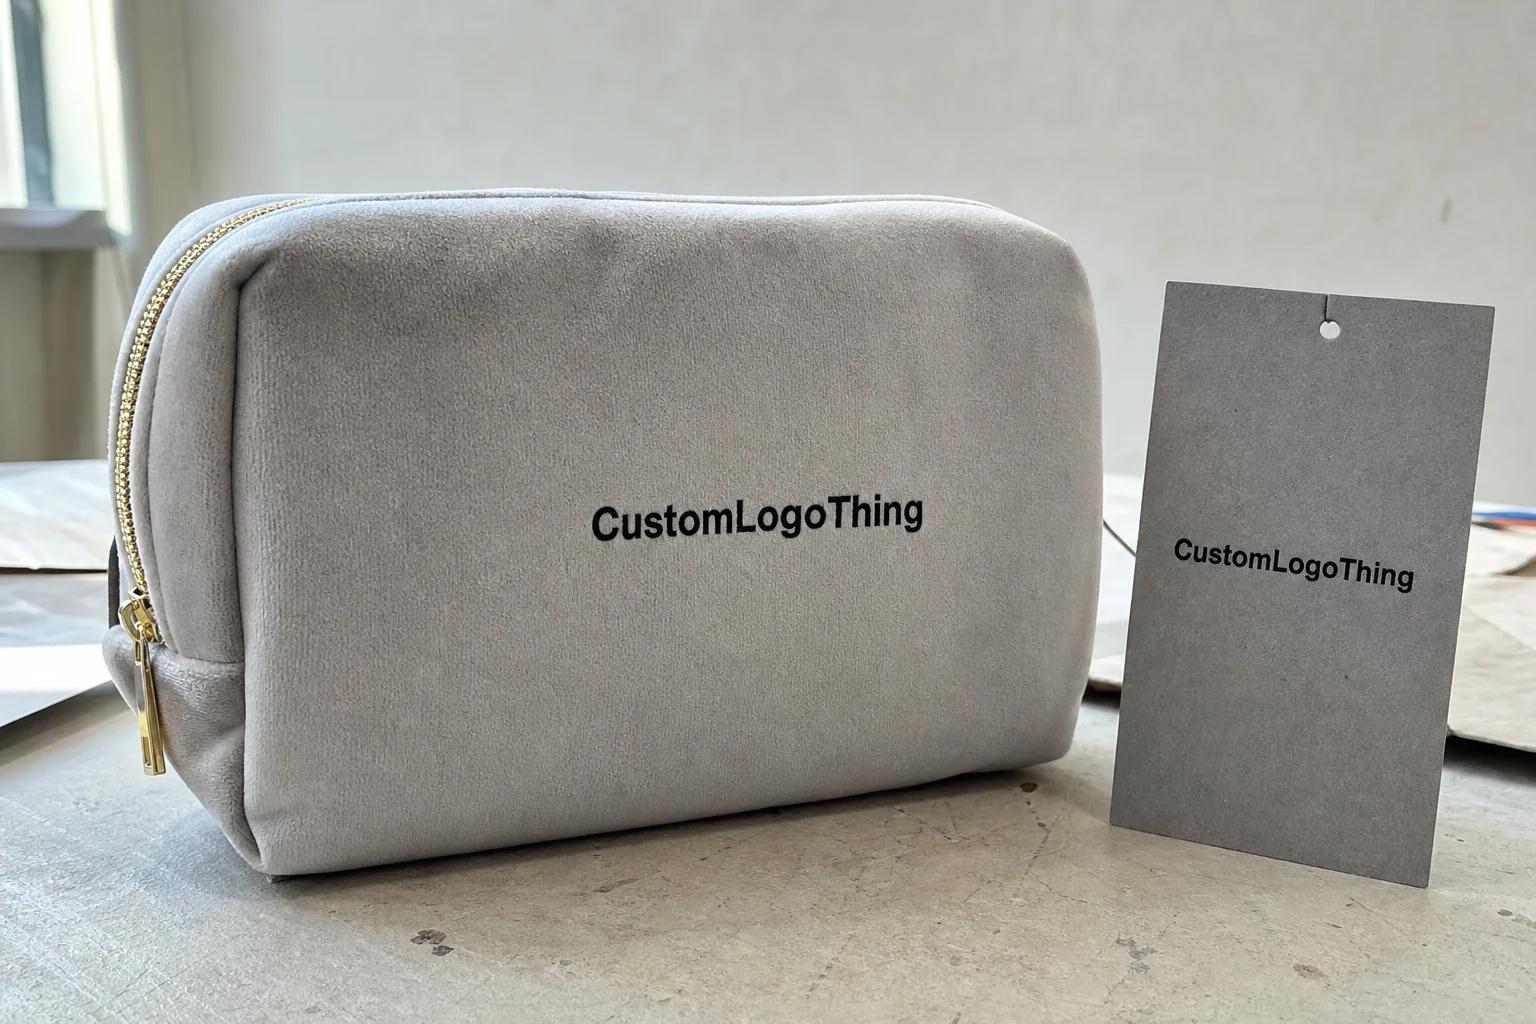
Where the logo sits is part of the design, not an afterthought. A print that crosses a seam, lands too close to a zipper line, or wraps over a corner can look distorted even if the artwork file is perfect. That is where first-time buyers get caught. A good logo can still fail if the print-safe zone is ignored.
Transparent materials can help or hurt the artwork. High-contrast logos pop. Low-contrast logos fade into the background. If the pouch is clear, the contents behind the mark may compete with the branding, so placement and opacity matter. For a personalized makeup pouch, the best print is the one that stays readable when the pouch is full, half-full, or overstuffed with a brush and three lip products nobody planned to carry.
If the order includes outer cartons, paper inserts, or instruction cards, that is where materials standards like FSC become relevant. For shipping durability and transit testing, it is worth checking how the packed goods will move through the chain. The ISTA test methods are useful if the pouch is part of a retail set or e-commerce kit that needs to arrive looking intact. For paper components, FSC certification gives buyers a cleaner sourcing story.
Cost, pricing, and MOQ: what changes the unit cost
Pricing on a personalized makeup pouch is driven by hard variables, not vague supplier mood. Material thickness, pouch size, print coverage, number of colors, zipper upgrades, and packaging requirements all affect the quote. Quantity matters too, usually more than buyers want to admit. Unit cost tends to follow volume closely because setup and handling costs get spread across more pieces.
For reference, simple pouches in larger quantities can land in the rough range of $0.35 to $1.20 per unit, depending on material and decoration. More premium builds, special finishes, or smaller runs can move well above that. Setup charges, sampling, and freight are separate line items in many quotes, and that is where buyers get surprised.
MOQ changes more than the unit price. Lower quantities usually mean fewer decoration options, less room to customize the full build, and a higher share of fixed setup cost per piece. If you want a complex print, a custom zipper pull, and special packaging in a small order, the math will not be friendly.
There are still practical ways to keep cost under control without degrading the result:
- Use simpler artwork with fewer colors.
- Keep dimensions standard instead of insisting on an odd custom size.
- Limit print locations to the side that matters most.
- Skip specialty finishes unless the retail margin can justify them.
- Choose a standard zipper unless the pull tab is part of the brand story.
Hidden costs are where first-time orders get annoying. Art cleanup takes time. Sample approval can add days. Split shipments and rush freight can eat the savings from a lower unit price. If a vendor is not spelling those costs out clearly, the quote is incomplete. That is not a bargain. That is a future argument.
Ask for pricing in a way that lets you compare cleanly. The quote should separate unit cost, setup cost, sampling, and shipping. Without that split, two bids may look different when they are really hiding the same expense in different places. That is especially true with a personalized makeup pouch, where print complexity can change the quote quickly.
Buying rule: if the vendor cannot explain why the price changed between 1,000 and 5,000 pieces, keep asking. The answer is usually material, setup, print coverage, or a combination of all three.
Process, timeline, and lead time from proof to shipment
The production flow is usually predictable: inquiry, spec confirmation, artwork review, digital proof, sample approval if needed, mass production, quality control, packing, and shipment. A good vendor should be able to walk through those steps without improvising. A personalized makeup pouch is not a complicated object, but it still needs a disciplined process.
Where time gets lost is also predictable. Unclear artwork slows proofs. Late changes to material or color restart approvals. Waiting too long to sign off on samples pushes the entire schedule back. Most delays are not factory mysteries. They are communication problems with a purchase order attached.
A realistic framework looks like this:
- Proofing: 1 to 3 business days if the artwork is clean.
- Sampling: often 5 to 10 business days, depending on build complexity.
- Production: commonly 10 to 20 business days after approval for standard builds.
- Transit: separate from production and often longer than people budget for.
Simple orders can move faster. Custom shapes, heavy print coverage, unusual materials, or special packaging can push the schedule out. If a launch date is fixed, production should be built backward from the delivery deadline, not forward from the deposit date. That sounds obvious. It still gets ignored.
The biggest mistake is treating production time and transit time as the same thing. They are not. A pouch can finish on schedule and still miss the launch if shipping was not planned correctly. That is why timeline conversations need to include destination, freight method, and buffer days. A personalized makeup pouch ordered for a show, promo drop, or retail reset needs calendar discipline, not hope.
Clear specs shorten timelines more than a rushed order ever does. If the supplier has to chase basic details, the clock starts later. The fastest orders are usually the ones with the least ambiguity.
Step-by-step: how to plan the right pouch spec
Start with the end use. What will the pouch hold? How often will it be carried? Where will it be handed out? A pouch meant for a lipstick and compact is not the same as one built for travel minis and brushes. If you get the use case wrong, the dimensions will be wrong too.
Then choose the size around the actual contents. Measure the widest item first, then allow enough room for the zipper to close without forcing the pouch into a bulge. That is the difference between a product that feels intentional and one that looks like it was sized by guesswork. For a personalized makeup pouch, the fit should be obvious the moment someone uses it.
A practical spec sheet should include:
- Dimensions in width, height, and gusset depth.
- Material and thickness, if the supplier can specify it.
- Color for the pouch body, zipper, and pull tab.
- Print area with placement notes.
- Artwork files in vector format when possible.
- Quantity plus a small overage if reorders matter.
- Target delivery date with destination city or warehouse.
- Packaging needs such as polybags, inserts, or retail cartons.
Artwork should be prepared early and in the right format. AI, EPS, or print-ready PDF files are usually the safest starting point. If brand colors matter, include Pantone references or clear color notes. On plastic surfaces, fine lines and tiny type can blur faster than people expect, so the logo should be strong enough to survive production, not just a screen preview.
Size and structure should also match the value of the product you are packaging. A basic zipper pouch works for giveaways and subscription inserts. A sturdier, retail-ready build makes more sense if the pouch is sold on its own or bundled with premium products. That is a buyer decision, not a decoration decision.
Before requesting a quote, build a one-page spec sheet. That small step usually saves more time than a week of email follow-ups. It also gives the vendor fewer excuses to interpret what you meant. Packaging people like guessing only when they are not the ones paying for the mistake.
Common mistakes that raise unit cost or ruin the print
Most bad pouch orders fail for boring reasons. The artwork is too complicated. The size is wrong. The print crosses a seam. The buyer chose the cheapest quote without checking what was included. None of that is glamorous. All of it is fixable if someone asks the right questions early.
The first mistake is overcomplicated art. What looks clean on a computer can turn muddy on plastic. Thin lines, tiny text, and gradient-heavy logos often lose clarity in print, especially on textured or flexible materials. If the artwork is a logo, the pouch is not the place to squeeze in every detail from the brand system.
The second mistake is choosing the wrong size. If the pouch is too small, customers fight the zipper. If it is too large, the pouch feels wasteful and floppy. Either way, the daily user experience gets worse. That is bad for retention and bad for perceived value.
The third mistake is ignoring print-safe areas. Seams, corners, gussets, zipper tracks, and reinforcement points all affect the usable surface. If a logo is placed without checking those zones, it can come out clipped or crooked. A personalized makeup pouch should never look like the art was dropped on after the build was already finished.
The fourth mistake is chasing the lowest unit price without reading the material spec. A low quote can hide thin film, weak zippers, poor print adhesion, or sloppy finishing. If the closure fails or the print rubs off quickly, the real cost per impression rises fast. Cheap becomes expensive when the product gets tossed after two uses.
One more thing: do not forget extras. Sampling, production losses, and future reorder continuity all matter. Ordering a few spares is practical, not paranoid. If the first run sells or gets used up quickly, a matching reorder is easier when you have the approved spec and some margin built in.
Quality control should not be vague either. Ask how the finished pieces are checked for print alignment, zipper function, seam strength, and surface defects. A factory can promise “inspection” while still missing the kind of issue that shows up only when a pouch is packed flat, then filled, then zipped three times. The useful question is not whether inspection exists. It is what gets measured and what gets rejected.
Next steps for a production-ready order
Before placing an order, gather the details that actually drive production: dimensions, logo files, quantity, target colors, packaging requirements, and delivery deadline. If any of those are fuzzy, the quote will be fuzzy too. That is how budgets drift.
For retail bundles, customer-facing promotions, or any order that has to look polished on arrival, ask for a mockup or sample. A digital proof is useful, but it does not tell you everything about zipper feel, material stiffness, or how the print behaves on the actual surface. A personalized makeup pouch is one of those products where a sample can save a lot of regret.
Confirm print placement before the deposit is paid. Confirm proof approval rules too. Some vendors will not start production until every detail is signed off, which is fine as long as you know it upfront. Surprises are acceptable in desserts. Not in lead times.
The cleanest buying process is simple: compare two or three quotes, check what each one includes, choose the spec that balances cost and durability, then lock the production schedule. If the pouch is supposed to sell, it needs to look good, hold up in use, and arrive on time. Those three things are not optional. They are the whole job.
When the design, price, and timeline line up before production starts, a personalized makeup pouch becomes a useful branded item instead of a disposable promo piece. That is the version people keep in their bag, which is exactly where the brand impression should live.
What size should a personalized makeup pouch be for everyday use?
Pick the size based on the actual contents, not the vibe. For daily cosmetics, the pouch should fit a compact, lipstick, brush, and small tools without bulging at the zipper. If it is for travel kits or retail sets, build around the largest item first and leave a little clearance for easy closing.
What affects the price of a personalized makeup pouch the most?
Material thickness, pouch size, print complexity, and order quantity are the biggest drivers. Custom zipper upgrades, special packaging, and artwork cleanup can also move the number. The cheapest quote is often cheap for a reason, so compare what is actually included.
How long does production usually take for a personalized makeup pouch?
The full timeline depends on proof approval, sample needs, and how complex the build is. Simple orders move faster than custom shapes, heavy print coverage, or special packaging requests. Transit time is separate from production time, and that distinction matters more than people admit.
What file format works best for pouch printing?
Vector files are the safest choice because they hold edges and text cleanly. AI, EPS, or print-ready PDF files usually work best, especially for logos with sharp detail. If the art includes colors that need matching, include Pantone references or clear brand color notes.
Can a personalized makeup pouch be water-resistant?
Yes, depending on the material and seam construction. Plastic-based pouches can handle spills and light moisture well, but that is not the same as fully waterproof. If the pouch will be used around liquids, ask about closure quality and seam behavior before approving the spec.


