Printed clear bags sit in a practical middle ground that buyers ask for all the time: the product stays visible, the brand still gets space, and the package does enough protective work to survive shipping and shelf handling. That sounds simple, but it usually is not. Printed clear bags only look effortless when the film, print method, closure, and artwork are matched properly.
They appear across retail, food, apparel, cosmetics, and promotional packaging because transparency helps sell the item itself. Shoppers can judge color, shape, texture, and size faster when they are not looking through an opaque wall of plastic. Add a logo, sizing details, warnings, or decorative graphics, and the package stops feeling generic.
The catch is that clear packaging is less forgiving than it looks. Tiny type can disappear. Colors can flatten. A weak seal can turn a decent design into a pile of returns. A solid spec sheet keeps those problems in check.
What printed clear bags are and why they stand out on shelf
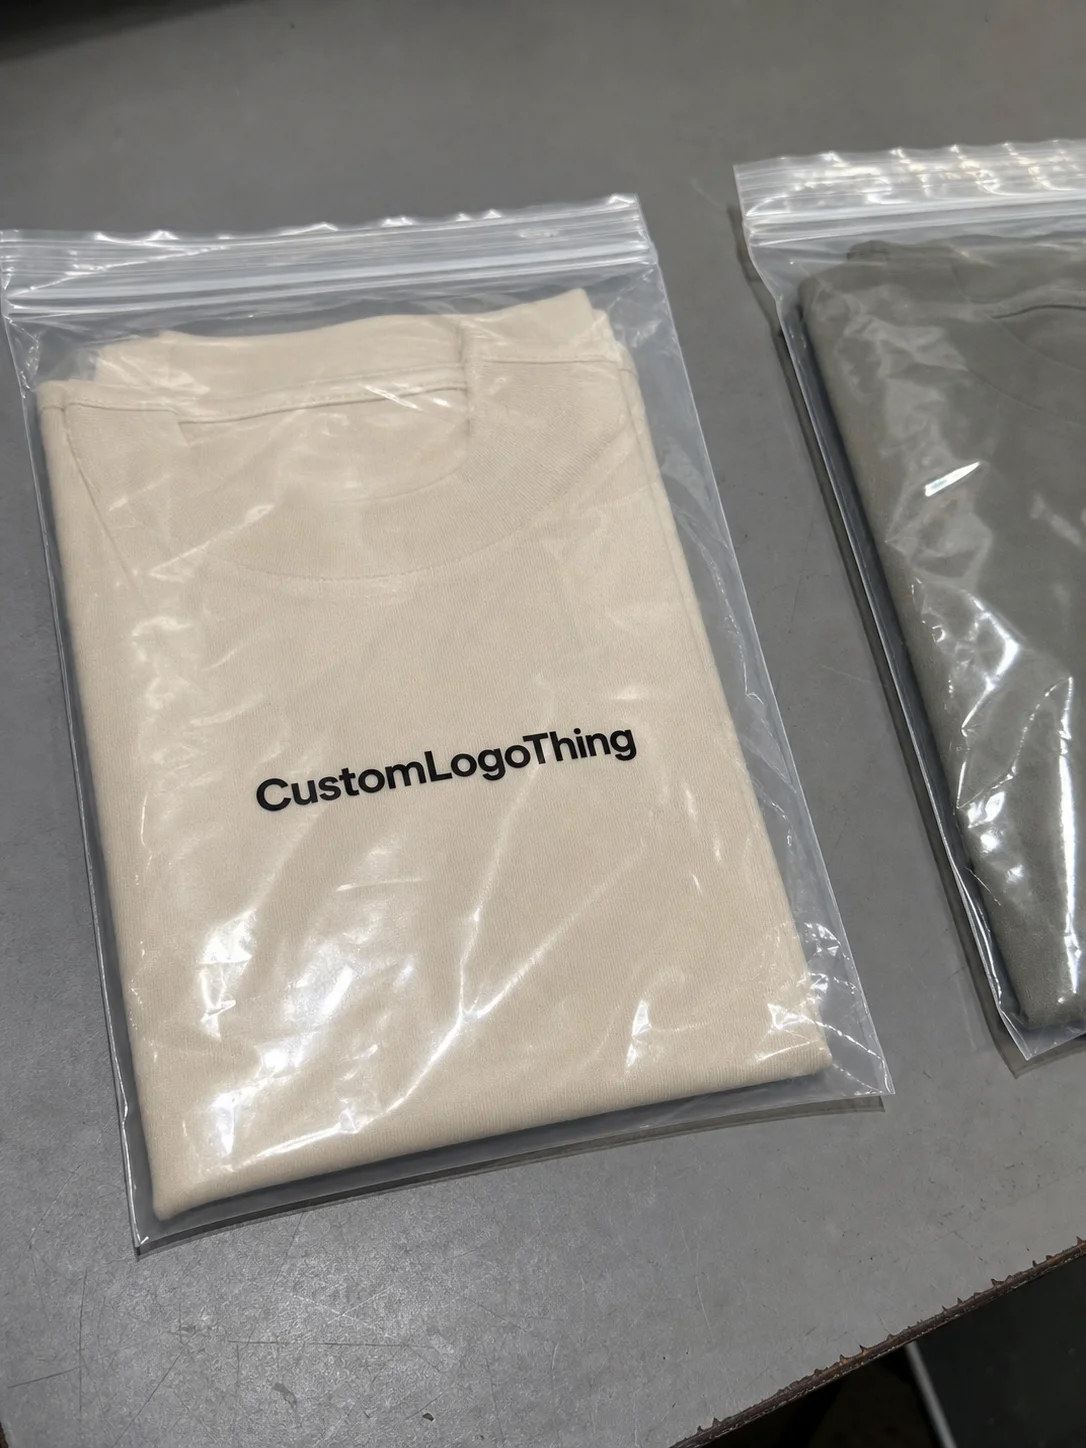
A clear printed bag is usually a transparent pouch, sleeve, or overwrap made from a plastic film such as LDPE, PP, or another clear flexible substrate, then printed on one or more surfaces. The graphics may stay minimal, like a small logo and barcode, or go further with product copy, care instructions, warning text, and decorative art. The film handles the visibility. The print handles the branding.
That combination matters because shoppers decide faster when they can see the product. Apparel depends on fabric color and fold. Cosmetics rely on shape and finish. Food leans on freshness cues and portion size. A fully opaque package hides those things, which is useful if the item itself is unattractive. It helps less when the product is the main selling point.
Different clear films behave in different ways. LDPE tends to be soft and flexible, with good sealability and a lower-cost profile for many applications. PP is usually crisper, with a cleaner sheen and a slightly more premium look. Specialty clear structures can add stiffness, better barrier performance, or a different hand feel. None is automatically best. The right choice depends on product weight, the closure style, whether the bag will hang on a peg, and the claims you plan to make.
Buyers often focus on appearance first and performance later. That order is backwards. A clear bag still has to seal properly, hold up in transit, and reproduce the artwork cleanly under production conditions.
How printing on clear film actually works
Printing on transparent film behaves differently from printing on paper. Clear material gives the ink very little visual help, so contrast, opacity, and adhesion have to be managed carefully. White ink shows up so often in clear packaging for a reason. Without it, bright colors can look dull, fine copy can fade into the background, and a logo can turn into a pale suggestion of itself once the package sits under store lighting.
Several print methods are common. Flexographic printing is widely used for medium and high volumes because it becomes efficient once plates are made. Gravure fits very long runs and can deliver strong consistency, though the tooling setup is more involved. Digital printing works well for shorter runs, artwork changes, and launch testing. Screen printing is often used for bold graphics, special effects, or heavier ink deposits on select projects.
Many clear bag designs are printed on the reverse side of the film so the image reads correctly from the outside. That helps protect the print from scuffing because the film sits between the artwork and the outside world. For bags that rub against other packages, travel through rough handling, or sit in displays for a long time, that detail matters more than most buyers expect. Some jobs also use an overprint layer or protective finish, but that adds cost and another production variable.
Three technical points matter more than the marketing copy on a quote sheet: registration, ink adhesion, and curing. Registration is the alignment of colors and graphic elements. Ink adhesion is whether the print stays bonded to the film instead of scratching off or flaking. Curing is the drying or setting process that locks the ink in place. If any one of those is off, the bag can look blurry, streaky, or fragile.
Film finish changes the visual result too. Glossy clear film usually makes colors look stronger and more saturated, but it can throw glare across small text. Matte or frosted film softens reflections and can look more refined, though it also reduces contrast a bit. The right answer depends on shelf lighting, the product photography style, and whether your design relies on fine details.
There is no single "best" print setup for all clear bags. That is the frustrating part. The right process is the one that matches quantity, artwork complexity, finish, and the way the package will actually be used.
For standards and packaging terminology, the Packaging School and packaging industry resources are a useful reference if your team is sorting out print methods, film types, and structural terms for the first time.
Key specs that affect appearance, durability, and usability
Once the print method is set, the bag specifications start controlling both appearance and performance. Film thickness is one of the first decisions to lock in. Thin film can work for light apparel or inserts, but heavier products can stretch it, wrinkle the print, or stress the seal. Heavier gauge film usually improves durability and hand feel, though it adds material cost and can reduce softness.
Closure style matters just as much. Heat-seal bags are common where tamper resistance or a permanent closure is needed. Zipper tops are popular for resealable retail packaging and sample packs. Adhesive closures work for lower-cost applications. Hang holes and euro slots help a package display on pegs. Venting has to be designed in from the start if the product needs airflow; it is not something you can patch in later.
Print coverage affects both look and price. A simple one-color logo on clear film is faster and usually less expensive than full-art coverage with multiple colors, white underlay, and large solid blocks. Heavy coverage can also affect drying and reduce transparency. That works fine if the goal is a more branded, less see-through look. It is a poor trade if visibility is the main reason the customer wanted a clear bag in the first place.
Surface finish changes the outcome too. Crystal-clear film gives maximum visibility. Frosted finishes reduce glare and hide fingerprints. Anti-glare surfaces work better under bright retail lights. Glossy surfaces can make colors appear richer. None of those is universally better. The best finish is the one that matches the product and the display environment, not the one that looks fancy in a spec sheet.
Compliance is another area where buyers should be precise. Food packaging may need food-contact suitability and migration documentation. Retail packaging may require suffocation warnings or other labeling, depending on the market. Apparel, medical, and industrial applications can each trigger different requirements. The exact rules depend on the category and destination market, so the supplier should confirm what applies before artwork is approved.
| Option | Typical Use | Strength / Feel | Cost Impact |
|---|---|---|---|
| LDPE clear bag | Apparel, soft goods, lightweight retail items | Soft, flexible, good sealability | Usually lower to moderate |
| PP clear bag | Premium retail, stationery, gift items | Crisper, more rigid, cleaner sheen | Moderate |
| Thicker gauge / heavier film | Heavier items, shipping, higher durability needs | More robust, stronger hand feel | Higher |
Cost and pricing factors to plan before you request a quote
Pricing for printed clear bags rarely comes down to a single number. Quantity is the biggest lever. Larger runs usually lower the per-unit cost because setup gets spread across more pieces. Short runs often cost more per bag because plates, setup, and proofing still need to happen.
Artwork complexity pushes the price around too. More colors mean more press work. White ink can add opacity and impact, but it also adds steps. Full-bleed graphics and heavy coverage use more ink and can create more waste during startup. Simple marks usually cost less to produce than layered artwork with tight registration.
Film choice matters as well. Standard LDPE and PP structures are often more economical than specialty films with barrier layers, enhanced clarity, or unusual finishes. Extra features like resealable zippers, hang holes, tamper-evident seals, or custom die-cuts can raise cost, but they may also improve the package enough to justify the spend.
Lead time affects pricing in indirect ways. Rush orders can require priority scheduling, extra freight, or shorter proof cycles. Shipping method adds its own cost, especially for bulky packaging that takes up real space in transit. A quote looks cleaner when it includes all of those pieces up front.
The safest move is to request pricing with a full spec set instead of asking for a vague "clear printed bag" quote. Size, gauge, print colors, closure type, finish, quantity, and intended use all matter. Without those details, the number on the page is usually just a guess with nicer formatting.
Production steps and timeline from artwork to shipment
Production usually starts with artwork review. The supplier checks file resolution, color setup, safe areas, bleed, and whether the design works on a transparent background. If the artwork depends on white ink or reverse printing, that has to be mapped correctly before anything goes to press.
After review comes proofing. A digital proof shows layout and text placement. A press proof or sample may be needed for color, opacity, and finish checks. This stage matters because clear film can make design problems harder to spot until the package is already in production. A small spacing issue or weak contrast can become obvious only when the sample is held in hand.
Once the proof is approved, tooling and scheduling move ahead. Plates, screens, or digital files are prepared depending on the print method. Film is then printed, cured or dried, cut, sealed, and inspected. If the bag includes zippers, hang holes, or other structural features, those steps are built into the production line.
Inspection usually covers print accuracy, seal strength, registration, and general appearance. A decent supplier will also watch for scratching, ink transfer, or film defects before packing the order. Finished bags are then boxed, palletized if needed, and shipped according to the agreed timeline.
Timing depends on volume and complexity. A simple stock-style clear bag with limited print can move quickly. Custom structures, special finishes, or larger runs take longer. The safest schedule includes room for proof revisions, material sourcing, and freight delays. Tight launch dates leave very little margin for last-minute artwork fixes.
Common mistakes buyers make when ordering clear printed packaging
One common mistake is forgetting how transparent film changes the artwork. Designs built for white paper can look washed out on clear plastic unless they include white underlay or stronger contrast. Another is using fine text that reads well on a monitor but disappears in production.
Size errors cause plenty of problems too. Buyers sometimes approve a bag that is too tight for the product, which can distort the seal or wrinkle the print. Others specify extra room that makes the package look loose and unfinished. Getting the fit right usually matters more than making the bag larger.
Another frequent miss is ignoring the end use. A retail hanging bag needs different features from a food pouch or an apparel sleeve. Venting, hang holes, resealability, and barrier needs all change the structure. A bag that looks good in a mockup can fail in the actual setting if those basics were not considered.
Some teams also under-spec compliance. Food-contact rules, warning labels, and market-specific requirements are easy to overlook until late in the process. That can trigger artwork changes or reprints. Confirming the regulatory side before approval is far cheaper than fixing it after production starts.
The last mistake is treating price as the only variable. A low quote that skips white ink, uses thin film, or leaves out protective features can cost more later if the package performs badly. A slightly higher spec is often the cheaper path once returns, damage, and brand presentation are part of the equation.
Expert tips for choosing the right bag construction and finish
Start with the product, not the packaging trend. Heavy items need stronger film and seals. Premium goods usually benefit from cleaner finishes and tighter print registration. Lightweight inserts can get by with simpler construction. The bag should fit the job rather than forcing the product into a generic format.
Think about lighting early. Bright retail shelves can turn gloss into glare and make small type harder to read. Frosted or matte surfaces reduce that problem and can improve the overall look. If the item has strong visual appeal on its own, clearer film may do more for sales than a busy graphic treatment.
Use white ink where contrast matters. It can turn a faint design into a readable one, especially on clear film. That said, white coverage changes the look and can reduce the transparent effect. The right balance depends on whether the package should showcase the product or present a more branded face.
Ask for samples whenever the budget allows. A flat proof can hide a lot. A physical sample reveals how the film feels, how the print sits on the surface, and how the package looks under real lighting. That simple check can prevent expensive surprises later.
Next steps to specify your bag and move toward ordering
The easiest way to get to a usable quote is to gather the core specs before you contact a supplier. Size, quantity, product weight, closure type, print colors, finish, and intended use should all be clear. If the bag needs food-contact support, retail warnings, or any other compliance details, include those too.
From there, ask for the print method that best fits the run size and artwork. Digital can be a better fit for short runs and frequent changes. Flexographic or gravure may make more sense for larger orders. The right process depends on volume, not on whatever sounds most impressive in a sales conversation.
Once the options are in hand, compare samples or proof images against your product and your shelf environment. A package that looks strong in isolation may not work once it sits beside competitors or under harsh store lights. The final choice should hold up in the real setting, not just on screen.
Clear printed packaging works best when the structure, artwork, and finish all support the same goal. If you define that goal early, the rest of the process gets much easier.
FAQ
Can any design be printed on clear bags?
Not really. Designs that depend on paper-like contrast often need white ink or stronger color choices to stay readable on clear film.
Which film is better, LDPE or PP?
Neither is always better. LDPE is softer and flexible, while PP feels crisper and more premium. Product weight, closure style, and display goals usually decide it.
Do clear printed bags cost more than plain ones?
Usually yes. Print setup, artwork complexity, white ink, and special finishes all add cost.
How do I keep the print from scratching off?
Reverse printing, proper curing, and the right film/ink combination help a lot. Protective finishes can help too, depending on the application.
What details should I send for a quote?
Size, quantity, film type, thickness, print colors, finish, closure style, and any compliance needs are the main items.


