Why 3 Inch Custom Stickers Feel Bigger Than They Look
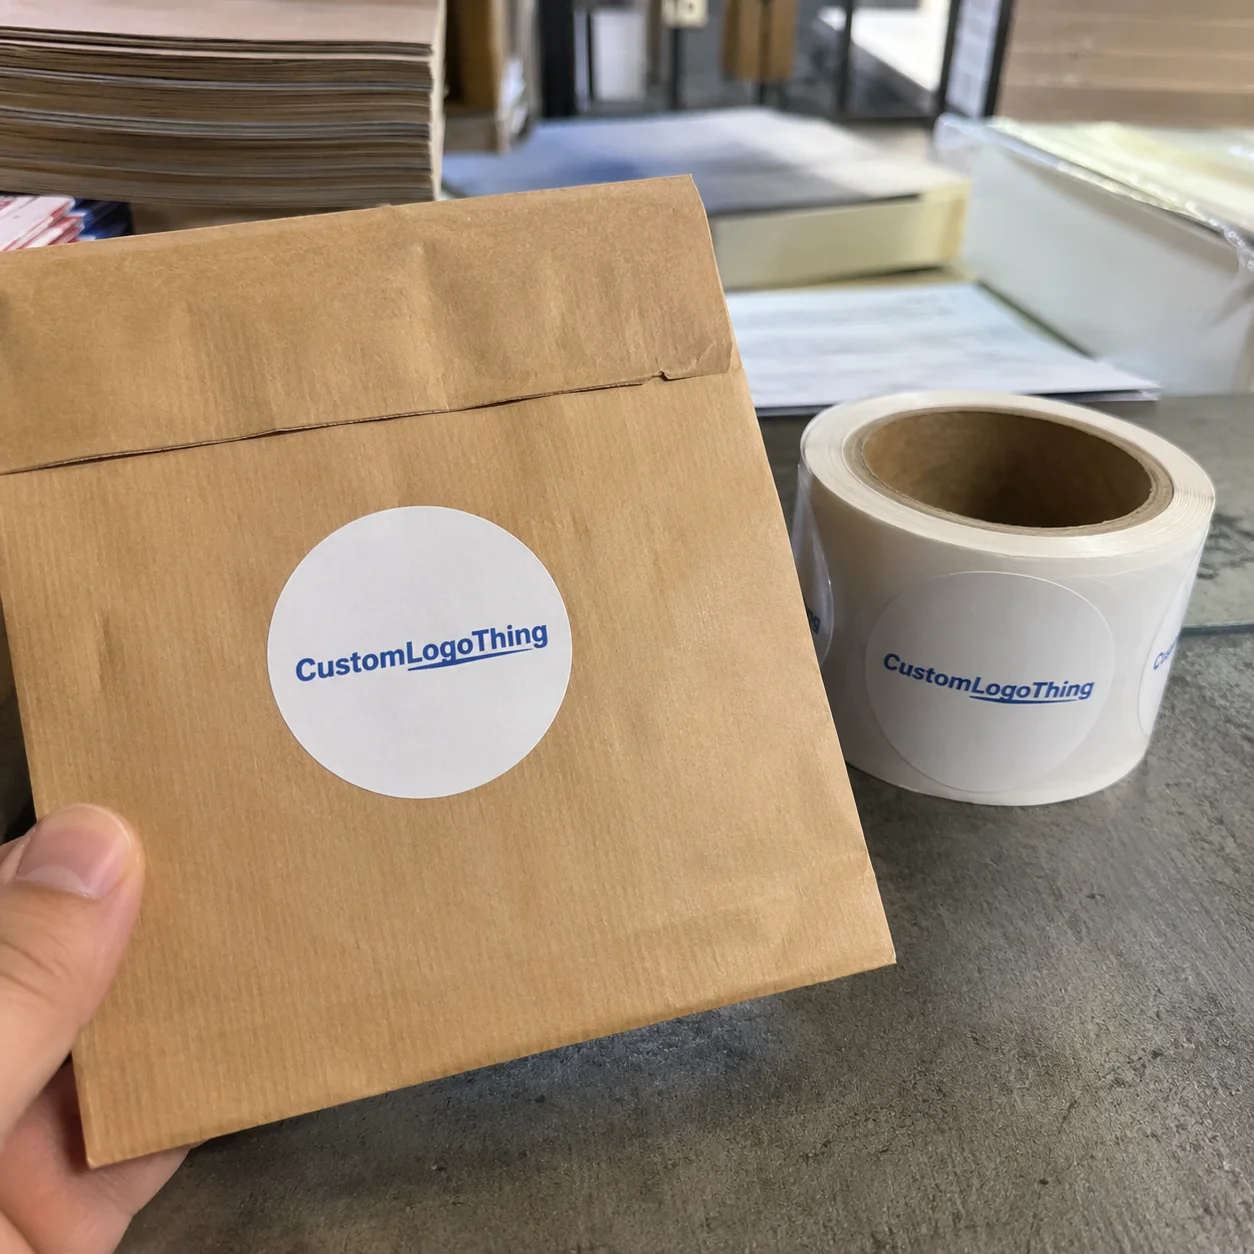
A 3-inch sticker often surprises people the first time they place it on real packaging. On screen, it looks modest. On a candle lid, bakery pouch, 4-ounce jar, tissue wrap, or the top flap of a mailer, it suddenly has presence.
That is the practical appeal of 3 inch custom stickers. They are small enough to stay affordable and easy to apply by hand, yet large enough for a logo, short product name, scent, flavor, QR code, batch note, or simple claim. The size sits in a useful middle ground: more substantial than a decorative mini sticker, less demanding than a full label system.
For many brands, that middle ground is where packaging decisions actually happen. Fully printed cartons may not make sense for a test launch. Seasonal packaging may need flexibility. A small product line may share one stock pouch or box, then use stickers to separate scents, flavors, sizes, or limited runs. A 3-inch round seal on a plain kraft mailer can make a shipment feel intentional. The same sticker on a jar can become the main front label.
In production language, “3 inch” should be defined carefully. For a circle, it usually means a 3-inch diameter. For a square, it means 3 inches by 3 inches. For an oval, rounded rectangle, or die-cut shape, the quote should state the maximum width and height, such as 3 inches wide by 2.25 inches tall. If a supplier only writes “3 inch sticker” without the finished dimensions, ask for clarification before approving the proof.
There is a scale issue here that catches buyers. A 3-inch circle covers about 7.1 square inches. A 2-inch circle covers about 3.1 square inches. That one extra inch in diameter more than doubles the printable area. It is the difference between “logo only” and “logo plus enough supporting information to be useful.”
Packaging floor reality: a sticker that looks restrained in a design file can look dominant on a small jar, tin, pouch, or mailer. Print a paper mockup at actual size and place it on the package before ordering thousands.
How the Sticker Size, Shape, and Artwork Actually Work
Most sticker problems start before printing. A buyer asks for a 3-inch label. The designer builds the art exactly 3 inches wide. Then the file arrives with no bleed, no safe margin, and no usable cut line. Nothing is technically “wrong” with the design, but it is not production-ready.
A clean file separates five things: finished size, artwork size, bleed, safe area, and cut line. The finished size is the sticker after trimming. Bleed is artwork that extends beyond the cut line, commonly 0.0625 to 0.125 inch depending on the printer’s equipment. The safe area is the protected zone inside the cut line where logos, type, QR codes, and required copy should sit. For small stickers, a practical safe margin is at least 0.0625 inch; small type and scan codes deserve more.
Shape changes how a 3-inch sticker reads. Circles are efficient for seals, lid labels, simple logos, and closure stickers. Squares feel steady and front-facing, especially on boxes and jars. Rounded rectangles provide more horizontal space for scent, flavor, size, website, or batch information. Ovals can suit handmade goods, soaps, candles, and apothecary-style packaging. Custom Die Cuts create stronger visual identity, but thin points, tight corners, and fragile protrusions can slow cutting and make peeling harder.
Artwork should be prepared for print, not only for a product mockup. Vector logos are best because they scale cleanly. Raster images should usually be 300 dpi at final size. CMYK setup helps reduce color surprises, though brand-critical colors may still need Pantone targets or an approved printed reference. Fonts should be outlined or packaged with the file. Small reverse type, hairline strokes, fine scripts, and pale gray text often look better on screen than they do on a 3-inch printed piece.
QR codes need their own discipline. A code may fit on the sticker, but that does not mean it will scan reliably after lamination, cutting, handling, and application to a curved surface. Keep the code high contrast. Leave quiet space around it. Test it at printed size from a normal phone distance, not only from a crisp PDF on a monitor.
Sticker format matters too. Rolls are useful for repeated application, label dispensers, packing lines, and higher-volume handwork. Sheets are easy for small teams and short runs because they store flat and are simple to count. Individually cut stickers work better for giveaways, event kits, order inserts, and retail packs. The same artwork can behave differently depending on whether it is peeled from a roll, a sheet, or a single backing.
Materials and Finishes That Change Performance
Material choice should start with the surface and environment. A sticker on a dry bakery bag has different needs than one on a refrigerated glass jar. A label sealing tissue paper inside a mailer does not need the same construction as a sticker on a water bottle. Same size, very different job.
Paper stickers are common for indoor, budget-conscious packaging. They print well, feel familiar, and can be a good fit for candles, dry goods, bakery bags, retail seals, and decorative closures. Paper is not the safe default for wet, oily, frozen, or heavily handled products unless the specific paper construction is designed for that exposure.
White BOPP is a frequent choice for food, beauty, household, and jar labels because it resists moisture better than paper and keeps print looking clean. BOPP is a polypropylene film, not a paper stock, so it handles splashes and condensation more confidently. It still needs the right adhesive for the surface. A smooth glass jar, a squeezable plastic bottle, and an uncoated kraft pouch can all require different adhesive behavior.
Clear BOPP or clear film can create a no-label look on glass and clear plastic. It is attractive, but it has traps. Transparent areas show whatever sits behind the label. Colors may look weaker without white ink underneath. Small type can disappear over dark liquids, patterned products, or curved containers. If readability matters, clear stock should be tested on the actual package, filled if possible.
Vinyl is often used when durability, flexibility, outdoor exposure, or rough handling matter. For simple retail packaging, vinyl may be more construction than the job needs. For water bottles, equipment stickers, outdoor promos, or stickers that customers are meant to keep, it can be appropriate. Lamination is usually part of that durability discussion, not an afterthought.
Finishes change both appearance and performance. Matte reduces glare and gives a softer retail feel. Gloss can make color look more saturated and helps designs feel sharper. Soft-touch has a premium hand feel, although some coatings show oils or fingerprints. Metallic and holographic films attract attention but can weaken readability when the artwork has thin type or low contrast. Spot gloss over matte can look polished, but it adds cost, proofing detail, and production time.
Adhesive deserves more attention than it usually gets. Permanent adhesive suits most packaging. Removable adhesive works for temporary promotions, price labels, and short-term notices. Freezer-grade adhesive helps with cold storage, but it still needs the right application conditions. Rough kraft paper, low-energy plastics, textured boxes, curved bottles, and flexible pouches can all challenge standard adhesives. If edge lift would ruin the package, ask for a material recommendation instead of choosing by price alone.
| Material or Finish | Best Use | Watchout | Typical Cost Effect |
|---|---|---|---|
| Paper | Dry indoor packaging, seals, simple retail labels | Weak around moisture, oils, and heavy handling | Lowest unit cost in many short runs |
| White BOPP | Jars, bottles, beauty products, food labels | Adhesive still needs to match the surface and temperature | Moderate increase over paper |
| Clear Film | No-label look on glass or clear plastic | White ink may be needed under colors or small type | Moderate to higher, depending on ink setup |
| Vinyl with Laminate | Outdoor, wet, or heavily handled stickers | Can be overbuilt for simple indoor packaging | Higher, especially with durable laminate |
| Metallic or Holographic | Promotions, cosmetics, limited releases | Fine text and pale colors can lose contrast | Higher due to specialty film or effects |
Cost, Pricing, and Unit Cost Factors to Know
Sticker pricing is shaped by quantity, material, print method, shape complexity, finish, delivery format, and setup. A plain 3-inch paper circle on sheets is not priced like a clear film die-cut sticker on rolls with white ink, laminate, and a tight unwind requirement. Size is only one line in the quote.
Three-inch stickers are usually cost-efficient because they fit well on many digital sheets and roll layouts. Unit cost still drops sharply as quantity increases. Proofing, press setup, cutting, waste stripping, packing, and administration are spread across more pieces. That is why 250 stickers can feel expensive per unit while 2,500 looks much more reasonable.
For rough planning, simple 3-inch digitally printed stickers may land around $0.25 to $0.75 each at low quantities, depending on material, shape, and finish. At several thousand pieces, common paper or BOPP stickers may move closer to $0.05 to $0.18 each. Specialty constructions, including metallic film, holographic stock, heavy laminate, clear material with white ink, removable adhesive, or intricate die cuts, can sit above those ranges. Freight, rush timing, artwork condition, supplier equipment, and material availability can move the number quickly.
Minimum order quantity matters. Digital printing often allows lower minimums because setup is lighter. Flexographic and other high-volume methods can become more economical for larger roll-label orders, but they may require more setup, longer planning, and sometimes tooling. A short digital run is useful for testing. A larger reorder is where the better economics usually appear.
Ask for quantity breaks instead of one price. Compare a starter run, a practical reorder quantity, and a larger tier. The quote may reveal that doubling the order adds less cost than expected. It may also show that a premium finish is manageable at 500 pieces but inefficient at 100. Buyers who already purchase Custom Labels & Tags can often keep packaging more consistent by comparing stickers within the same material family.
Do not ignore waste and application speed. A cheaper sticker that peels poorly, curls on the liner, or arrives in the wrong roll direction can cost time at the packing table. If a team applies thousands by hand, a few seconds per label becomes real labor. Price per sticker matters, but price per correctly labeled package matters more.
Process, Timeline, and Production Steps Before Delivery
The order flow is simple on paper: confirm specifications, submit artwork, receive a proof, approve the proof, schedule production, print, finish, cut, pack, and ship. The proofing stage is where schedules often lose time. Missing bleed, low-resolution images, unclear dielines, unreadable type, and vague color expectations can add one or two business days before production starts.
Production has its own sequence. Material is loaded into a digital press, roll press, or sheet-fed setup. The artwork is printed on the face stock. If needed, a coating or laminate is applied after printing. Stickers are then die-cut with tooling or digitally cut with a plotter-style system. For roll labels, the waste matrix is removed and the rolls are rewound. For sheets, the printed material is trimmed, counted, and packed. For singles, each piece needs individual cutting and handling.
Roll specifications can affect the job more than new buyers expect. Core size, roll outside diameter, unwind direction, gap between labels, and whether labels are wound in or wound out may matter if the stickers go into a dispenser or application machine. A roll that looks fine in a box can be wrong for the equipment using it.
Simple digital jobs can often move faster than foil, laminate, specialty film, or high-volume roll orders. A realistic timeline for a clean standard job may be 5 to 10 business days after proof approval. Specialty materials, custom tooling, larger quantities, complex finishing, or strict roll requirements may push the schedule to 10 to 20 business days or more. Shipping time sits on top of production time.
Launch dates, holiday kits, subscription boxes, retail resets, and trade shows do not leave much room for sticker delays. The risk is not only the printing schedule. Filled jars may sit unlabeled. Mailers may be ready but missing sealing stickers. A packing team may lose its assigned labor window. If the sticker is tied to a larger packaging operation, add cushion.
For packaged-product testing, standards groups such as ISTA can be useful references when stickers are part of a ship-ready kit. For paper labels and cartons, FSC certification may be relevant if documented responsible sourcing is part of the brand’s packaging requirements.
Step-by-Step Guide to Ordering the Right Sticker
Start with the surface. Glass, PET, HDPE, coated paperboard, uncoated kraft, aluminum, flexible pouch film, and corrugated packaging do not behave the same way. Smooth glass gives an adhesive a very different task than fibrous kraft. A flexible pouch may move and wrinkle during filling. A cold bottle may collect condensation. Adhesion is never only about the sticker; it is about the sticker, the package, and the conditions around application.
- Confirm the application surface. Name the exact material if possible, such as glass jar, PET bottle, coated paperboard, uncoated kraft, aluminum tin, flexible pouch, or corrugated mailer.
- Define the finished size. State whether the sticker is a 3-inch circle, 3-inch square, or custom shape with a maximum width and height.
- Choose the shape by use. Circles work well for seals, squares keep logos centered, rectangles carry readable information, and die cuts add stronger brand shape.
- Select material and adhesive. Match the construction to moisture, refrigeration, oils, abrasion, outdoor exposure, rough surfaces, or removability.
- Prepare print-ready artwork. Include bleed, safe margins, a visible cut line, readable type, color notes, and Pantone targets where brand color is strict.
- Pick the delivery format. Rolls suit repeated application, sheets suit small packing stations, and individually cut stickers suit giveaways or inserts.
- Confirm the production details. Quantity, finish, proofing method, roll direction, schedule, shipping method, and reorder information should be settled before approval.
If the sticker is part of a packaging refresh, compare it with the rest of the materials. A matte paper sticker on a glossy pouch might be a deliberate contrast, or it might feel accidental. A glossy film label on a soft-touch box can look too shiny unless the brand direction supports that tension. Packaging quality is often judged through these small mismatches.
Many buyers use 3 inch custom stickers as a bridge between plain stock packaging and fully printed packaging. It is a practical approach. You can test a scent, flavor, event message, influencer kit, or seasonal bundle without committing to new cartons. If the product proves itself, the same design language can later move into Custom Packaging Products such as printed mailers, sleeves, cartons, or product boxes.
Common Mistakes That Make Small Stickers Look Cheap
The first mistake is crowding. A 3-inch sticker can hold a logo and a few useful details. It cannot replace a full back-panel label. If the artwork includes a logo, tagline, website, QR code, social handle, flavor, ingredients, three claims, and a badge, something will fail. Usually readability fails first.
Low contrast causes the same problem in a quieter way. Small gray type on a kraft-look background may feel tasteful in a mockup and nearly vanish in print. Thin script fonts can fill in. Metallic and holographic films can fight with fine lettering. Clear labels can lose contrast against dark liquids or patterned products. If a customer needs to understand the sticker in two seconds, simplify the design.
Material mismatch creates expensive frustration. Paper can look beautiful, but it is not the right default for wet jars, oily cosmetics, refrigerated drinks, or heavily handled containers. A film material with protective laminate may cost more, but it can prevent scuffing, wrinkling, edge lift, and smudged print. This is one of the classic places buyers save pennies and pay later in rework, complaints, or unusable inventory.
Color expectations need discipline. Screen color, digital proof color, and printed ink color are not identical. Brand reds, greens, blues, and oranges can shift depending on Material and Print method. Clear, kraft, metallic, and textured stocks complicate the match further. If color is critical, provide Pantone targets or an approved printed sample. A printer cannot match “make it pop” with the same accuracy as a real reference.
Application conditions matter more than people expect. Stickers applied to dusty, cold, textured, curved, oily, or freshly filled surfaces may not bond well. Some adhesives need dwell time to build strength. Condensation can interfere with adhesion. A label that sticks perfectly in an office may lift on a chilled bottle coming out of production. Test on the real package under real handling conditions before scaling the order.
Skipping proof review is another avoidable risk. A digital proof checks layout, spelling, size, cut line, and general color direction. A material sample checks touch, opacity, and basic fit. A printed sample, when available, gives the clearest view of color, finish, readability, and how the sticker behaves during peeling and application. Not every job needs a full sample run, but sensitive jobs often do.
Next Steps Before You Approve Your Sticker Order
Before approving production, pause for a short checklist. Confirm the final dimensions, shape, surface, environment, quantity, material, finish, adhesive, roll or sheet format, and delivery deadline. These are basic details, but they are also the details that prevent avoidable reprints.
- Final size: verify whether the sticker is 3 inches across, 3 inches tall, or a custom width and height within that general size.
- Surface and environment: note glass, plastic, kraft, paperboard, refrigeration, moisture, oils, abrasion, or outdoor exposure.
- Artwork files: include logo files, linked images, outlined fonts, dieline, bleed, color notes, and special instructions in one organized upload.
- Proofing: request a digital proof, and ask for a material or printed sample when adhesion, color, opacity, or finish is sensitive.
- Delivery format: choose rolls, sheets, or individually cut pieces based on how the stickers will be stored, peeled, and applied.
Make a plain paper mockup at actual size and place it on the package. It takes five minutes and catches proportion problems that screens hide. A 3-inch design can feel generous on a small gift box, balanced on a candle lid, and too small on a large mailer. Curves, seams, handles, and existing graphics change the way the size reads.
If the order supports a launch, subscription box, holiday run, or trade show, protect the schedule. Approve the proof quickly once it is correct, but do not rush through missing specifications. Good suppliers can move efficiently; they cannot print cleanly from unclear files, vague material choices, or last-minute changes. With the artwork, adhesive, material, and timing settled upfront, 3 inch custom stickers become one of the simpler ways to make packaging look more finished without committing to a full custom packaging run.
FAQ
Are 3 inch stickers big enough for a logo and QR code?
Yes, if the layout stays simple. Use a clean logo, short supporting text, strong contrast, and enough quiet space around the QR code. Test the code at printed size from a normal phone distance before approving production.
What is the best material for 3 inch custom labels on jars?
White BOPP, clear BOPP, or vinyl are usually better than paper for jars exposed to moisture, refrigeration, or frequent handling. Paper can work for dry goods, candles, and decorative indoor packaging. The adhesive should match the jar material, filling process, and storage conditions.
How much do 3 inch custom stickers usually cost?
Cost depends on quantity, material, finish, shape, adhesive, and whether the stickers are supplied on rolls, sheets, or individually cut. Low-quantity digital runs often cost more per piece, while larger runs spread setup and production time across more stickers. Ask for multiple quantity breaks before choosing the order size.
How long does it take to produce custom 3 inch stickers?
Simple digital sticker jobs may take about 5 to 10 business days after proof approval. Specialty materials, laminate, foil, die cuts, larger quantities, or strict roll specifications may require 10 to 20 business days or more. Shipping time is separate.
Should I order 3 inch stickers on rolls or sheets?
Rolls are best for repeated application, packing lines, label dispensers, and higher-volume operations. Sheets are convenient for small teams, craft packaging, and short runs. Individually cut stickers are useful for giveaways, inserts, retail kits, and promotional packs.


