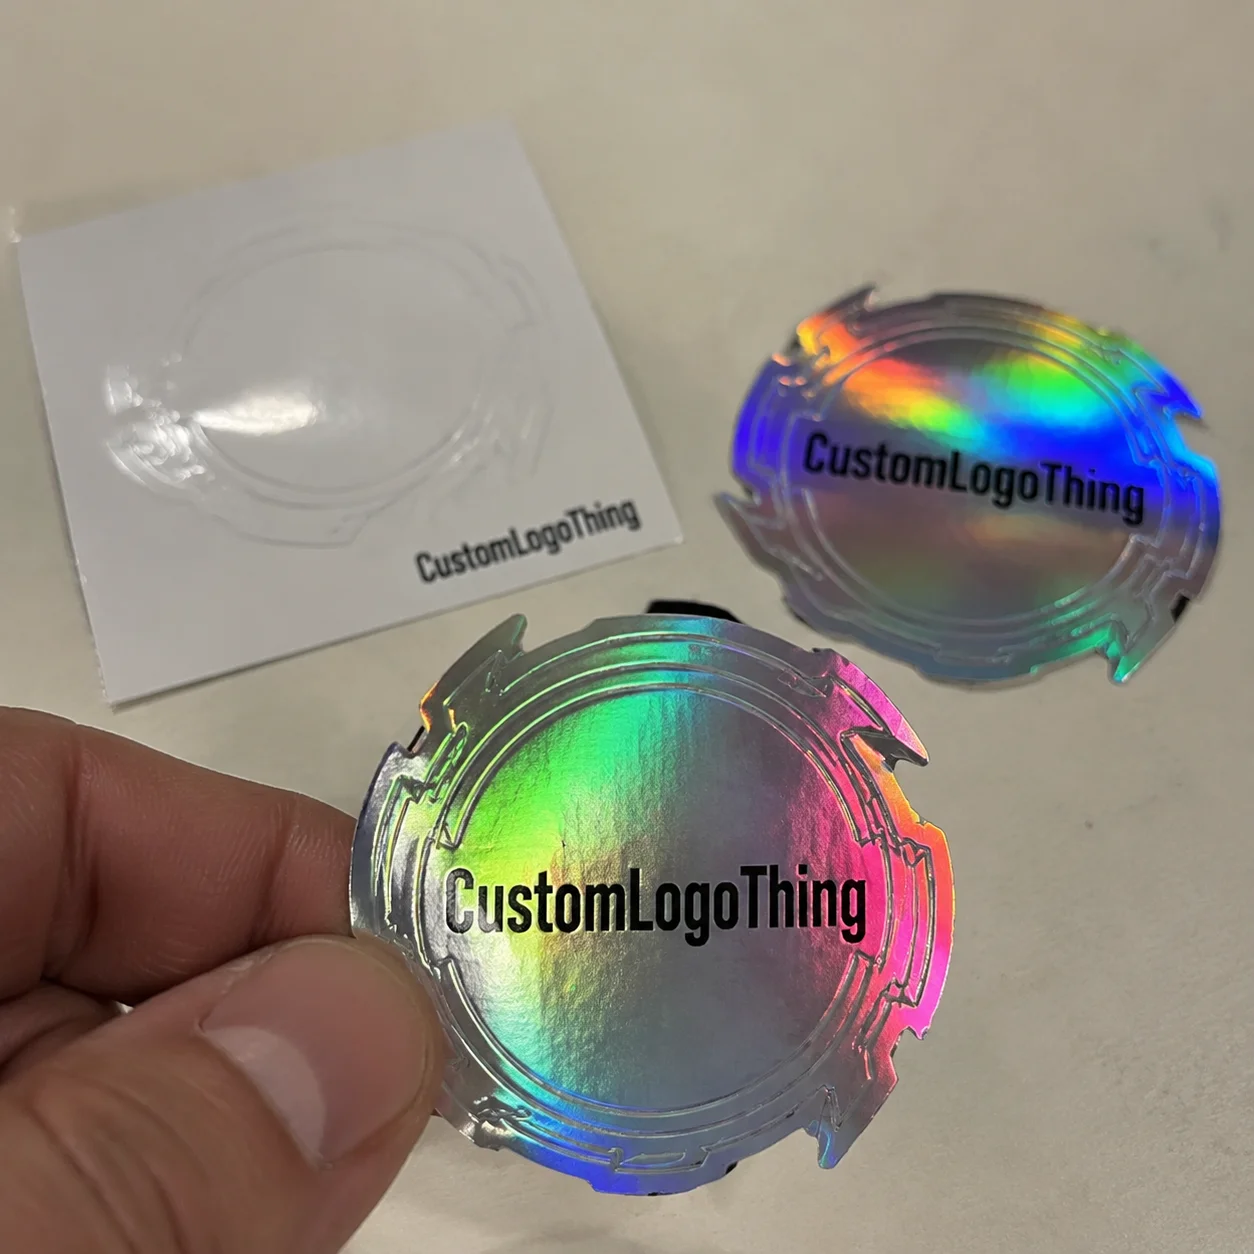
Beyblade X Custom Stickers can change the way a build reads in a very small amount of space. Under bright arena lighting, the difference between a clean, well-cut sticker set and a rushed one shows immediately: edges lift, colors flatten, tiny text disappears, or the whole piece looks slightly off-center. Because the format is so small, the production details matter more than they do on a standard label or package insert.
For buyers, this is usually not just about decoration. Sticker sets support team identification, fan merch, collector presentation, and product branding, and they need to survive handling, storage, and repeated contact with plastic parts. A good set should feel precise in the hand, hold its shape during application, and stay legible after it has been moved around a few times.
For miniature graphics, the artwork is only half the job. Material, finish, cut line, and adhesive choice decide whether the set feels intentional or improvised.
What Beyblade X Custom Stickers Actually Do
beyblade x custom stickers are usually pressure-sensitive labels or decal sets sized for small parts, display shells, or accessory packaging. In practical use, they let a builder add character without painting plastic, and they let a seller or club build a consistent look across a batch of pieces. That matters because these graphics are seen up close, often while the item is moving, and usually against glossy surfaces that expose every flaw in the cut or print.
The strongest use cases are simple. Team builds need fast identification. Tournament presentation benefits from consistent branding. Collectors like limited-run art. Gift sets feel more finished when the graphics match the theme. Fan communities often use sticker sets as the most accessible form of custom merch because the order sizes can stay modest while the visual impact stays high.
There is an important difference between decorative stickers and production-ready stickers. Decorative decals can be forgiving. Production-ready pieces need sharper registration, stronger adhesive performance, and a cut shape that matches the usable surface. On a small part, even a slight shift can cover a detail, catch a fingernail, or make the design look crooked.
If the set is part of a broader branded package, the sticker design should sit comfortably beside the rest of the line instead of feeling pasted on at the end. That is why buyers who order labels, inserts, and small merch pieces together usually get better consistency across the full presentation. Matching artwork, color tone, and finish across those items makes the set feel more deliberate.
How Custom Sticker Sets Fit, Print, and Hold Up
Behind a good sticker order is a fairly strict workflow: artwork prep, proofing, print, finishing, and die-cutting or kiss-cutting. The sequence sounds basic, but the details become more demanding once the pieces get tiny. A one-millimeter shift can be harmless on a box label and visibly wrong on a miniature part; on a tight contour, that same shift can make the sticker look sloppy even if the print itself is sharp.
Material choice usually comes down to vinyl, BOPP, or coated label stock. Vinyl offers flexibility and solid tear resistance, which helps when the stickers are handled often. BOPP is a strong option for moisture resistance, bright color, and a clean surface feel. Coated label stock can be useful for lower-cost runs, but it is less forgiving if the pieces are stored in warm conditions or handled repeatedly. When extra wear resistance is needed, laminate or a clear protective layer can help the printed surface survive scuffs.
Adhesive performance matters just as much as the print stock. Small plastic surfaces should be clean, dry, and free of oils or mold-release residue before application. Permanent adhesive is better for long-term display or resale-ready sets. Removable adhesive can make sense for test pieces, seasonal graphics, or anything that may need to come off later without leaving residue. There is no universal best choice; the right adhesive depends on how often the piece will be touched and whether the graphic needs to stay in place through repeated handling.
Finish changes the practical feel of the set. Gloss gives stronger color pop and can make the art look richer under hard light. Matte cuts glare and often makes small typography easier to read. Clear overlay and laminate improve abrasion resistance, which is useful when the sticker set will travel in a case with other hard parts or be handled during events. On tiny art, finish is not just aesthetic; it affects legibility.
| Material | Best For | Typical Strength | Tradeoff |
|---|---|---|---|
| Vinyl | Flexible parts and handled sets | Good durability and tear resistance | Can cost more than basic label stock |
| BOPP | Color-rich, moisture-resistant runs | Strong print clarity and clean finish | Less soft than some vinyl options |
| Coated label stock | Lower-cost or short display runs | Fast, economical production | Less abrasion resistance without lamination |
For the most reliable results, the proof should show the contour clearly. That is where weaker runs tend to fail. The artwork may be fine, but if the cut line drifts, the margins look uneven or the edge becomes ragged. On small-format printed pieces, clean registration is not optional; it is the difference between premium and homemade.
Key Specs That Affect Cost, Pricing, and MOQ
Sticker pricing is driven by a short list of practical variables: sheet size, number of designs, ink coverage, lamination, die-cut complexity, proofing, and revision count. A simple layout with repeated shapes stays lower in cost. If the order adds metallic effects, dense ink, or detailed contour cutting, the price moves up because both press time and finishing time increase.
Minimum order quantity, or MOQ, matters more than many buyers expect. Setup costs are real, even on a short run. A small order usually costs more per sheet or per set because the fixed work is divided across fewer pieces. A larger order spreads that setup cost more efficiently and usually improves the per-unit price. That is standard across label and packaging work, not just stickers.
Custom shapes change the economics again. A basic rectangle is faster to print and cut than a set of tight contours that must line up around tiny details. If the order requires individually cut pieces instead of sheets, labor and handling increase as well. Roll format can help for some label applications, but for miniature fan graphics, sheets or die-cut sets are often easier to store, count, and apply.
For beyblade x custom stickers, a useful way to think about cost is by build complexity rather than by the sticker name alone.
| Order Type | Typical Setup | Relative Unit Cost | Best Fit |
|---|---|---|---|
| Simple sheet labels | Basic artwork, standard cut | Lower | Testing, samples, club giveaways |
| Custom die-cut set | Contour shapes, tighter proofing | Medium | Collector sets, team branding |
| Laminated specialty run | Protective finish, more prep | Higher | Merch, resale, repeated handling |
A clean quote request saves time on both sides. Include exact dimensions, finish preference, quantity range, and whether the set will be used for display, resale, or repeated handling. If you compare suppliers, make sure they are quoting the same spec set. Otherwise, you end up comparing a laminated die-cut run against a basic uncoated sheet, which tells you very little.
For buyers who also manage labels, inserts, or other packaging pieces, the logic stays the same: specific specs produce more reliable pricing. Vague artwork and vague usage assumptions lead to vague quotes.
Production Steps and Timeline for a Sticker Order
A typical order starts with the brief, moves into proofing, then goes through print, finishing, cutting, inspection, and shipping. The order of operations is predictable; what changes is how clean the files are when they arrive. If the dimensions are clear and the artwork is organized, production usually moves at a steady pace. If the file is missing a dieline or the scale is uncertain, the job slows down quickly.
Artwork quality is the first major checkpoint. Low-resolution files, unclear color targets, and missing bleed are the common trouble spots. For miniature graphics, safe area and stroke thickness matter as much as image resolution. Thin outlines that look fine on a screen can blur or disappear once the design is reduced to its final size.
Turnaround depends on complexity. Simple digitally printed sticker sets generally move faster than projects that need specialty finishes or unusually tight contour cutting. A realistic schedule is usually measured in business days after proof approval. If the finish is more involved or the approval cycle drags, the timeline stretches. Buyers often underestimate how much time is lost waiting for artwork changes, not on press time itself.
There is also a prepress step that should never be skipped. Before the job goes live, the file should be checked for:
- Bleed and trim alignment
- Readable type at final size
- Correct color intent
- Clear cut-line registration
- Enough edge margin for handling and peelability
If the sticker set needs to match a specific color in a merch line or product launch, build in time for sample approval. That is especially useful when the stickers coordinate with package branding or a larger retail packaging program. Color on small graphics can shift a little depending on substrate, ink density, and finish, so a sample is where most expensive surprises get caught.
Step-by-Step: Ordering Beyblade X Custom Stickers
Start with the use case. Are these stickers for a single display piece, a club batch, or a resale-ready merch set? That one decision changes the rest of the order. A one-off showpiece can tolerate a little more manual attention, while a batch meant for distribution needs repeatable cut accuracy and a finish that holds up under frequent handling.
Next, measure the usable surface carefully. Do not estimate. Tiny pieces demand exact dimensions, and a rough guess usually leads to an oversized contour or wasted art space. Sketching the layout before requesting a quote is usually worth the extra few minutes because it gives the printer a better sense of how the sticker interacts with the part shape.
Then prepare the artwork. Vector files are ideal because they scale cleanly and keep edges sharp, but high-resolution raster art can work if the file is large enough and the linework is not too delicate. If the design uses small text, make sure it remains readable at final size. That is one of the most common failure points in miniature label work.
After that, request a digital proof and study it closely. Do not only look at the color. Check scale, placement, bleed, and cut-line accuracy. Ask whether the piece still feels balanced once it is reduced to the actual size. A proof should answer more than “does this look good?” It should show that the sticker can be produced correctly.
Finally, choose the material, adhesive, and finish based on handling. Gloss is strong for visual punch, matte helps with glare, and lamination adds protection when the surface will be rubbed or touched often. Once the proof is approved, production can move. When the set arrives, clean the part first, apply from one edge to the other with firm pressure, and give the adhesive time to settle before heavy handling.
- Define the use case and quantity.
- Measure the usable surface.
- Prepare or collect artwork files.
- Review the proof at final size.
- Approve material and finish.
- Apply on a clean, dry surface.
beyblade x custom stickers are easiest to get right when the order is treated like a small packaging project instead of a casual craft purchase. The tighter the spec, the better the result.
Common Mistakes That Make Custom Stickers Fail
The most common mistake is using artwork that looks polished on a screen but turns muddy when scaled down. Tiny graphics need stronger contrast, thicker strokes, and fewer micro-details than a poster or a box panel. Dense gradients can also break up in print, which makes the design feel less controlled than it looked in the file.
Poor surface prep creates its own problems. Oil from fingers, dust, and mold-release residue can interfere with bonding. If a sticker lifts at the corners after a day or two, the issue is often not the adhesive alone; the surface underneath was never ready. That is a simple mistake, but it wastes material and time.
Finish selection can also cause trouble. Gloss helps colors pop, but it can create glare that hides small details. An unlaminated print may look fine on day one and then scuff quickly if it is slid into a case or handled often. In short, the finish should follow the way the piece will be used, not just the way it looks in a mockup.
Contour mismatch is another easy way to spoil the result. If the sticker shape does not match the part, the edges lift, wrinkle, or show too much border. On a small object, that mismatch is obvious. In packaging terms, a poor fit makes the whole presentation feel off even when the print quality is strong.
- Scaling artwork too aggressively
- Using lines that are too thin
- Skipping proof review at final size
- Ignoring surface cleanliness
- Choosing a finish without considering handling
These problems are avoidable when the order gets a little more planning up front. That is true for miniature decals, and it is just as true for larger custom printed boxes and other branded packaging pieces.
Expert Tips for Better Fit, Durability, and Display
If the goal is a better result, design for contrast first and decoration second. Bold shapes, clear type, and clean spacing survive reduction much better than intricate linework. On tiny pieces, hierarchy matters. The eye should know what to read first, even if the person only glances at the part for a second.
Rounded corners or softer contour transitions usually hold up better than sharp points. That is partly mechanical and partly visual. Sharp corners tend to catch and lift more easily, while softened edges feel more deliberate. For a set that will be handled repeatedly, that small design choice can make a real difference in durability.
If the stickers are going into a club run or a product drop, test one sample set before approving the full quantity. A small trial often reveals whether the colors are too dark, the text is too small, or the cut line needs to move. Keeping a versioned art file and a measured template also helps future reorders stay consistent, even if the artwork gets updated later.
Standards groups can be useful reference points here. ISTA focuses on transport and handling performance, which is a good reminder that materials need to survive real use, not just a photo. If paper components or insert cards are part of the package, FSC certification may matter as well. Those details are not always required, but they can be relevant when the sticker set is part of a larger packaging program.
Finish choice should follow function. Use gloss when you want visual punch, matte when glare is a problem, and laminate when frequent friction is likely. That rule solves more issues than a dozen design tweaks.
Best Next Steps Before You Request a Quote
Before asking for pricing, gather the exact dimensions, quantity, design count, and format preference. Sheets, rolls, and individually cut pieces all affect labor and handling. If the stickers are tied to a larger merch or packaging program, mention that too so the supplier can align the print style with the rest of the line.
Next, decide how much durability you actually need. A display set is not the same as a set that will be handled at events, shipped in bundles, or resold. The quote should reflect the use case, not just the artwork. That is one of the fastest ways to avoid paying for a premium finish you do not need or underbuying protection for a set that will take a lot of contact.
Prepare a short brief with files, intended use, and reference images. If you already know the preferred finish or adhesive type, say so. If not, ask for options. Good suppliers can usually quote a basic version, a laminated version, and a more durable version so you can compare the tradeoffs clearly.
Then request a proof, confirm the turnaround window, and compare suppliers on the things that actually matter: print quality, cut accuracy, adhesive options, communication speed, and consistency on reorders. That is the real buying framework for beyblade x custom stickers, and it is the same framework that applies to labels, inserts, and other branded packaging pieces.
If the stickers need to feel like part of a complete line, keep the artwork aligned with the wider package branding and retail packaging strategy. The best small graphics do not only look good on their own; they fit the full presentation.
For practical buyers, the next move is simple: define the spec, confirm the proof, and choose the material that matches the way the piece will actually be handled. That is how beyblade x custom stickers end up sharp, durable, and ready for display or battle.
FAQ
What are Beyblade X custom stickers made from?
Most are made from vinyl, BOPP, or similar pressure-sensitive label stock depending on durability needs. A laminate or topcoat can be added when the stickers need extra scuff resistance or a glossier finish.
How do I know if my Beyblade X custom stickers will fit properly?
Use exact measurements of the part surface and ask for a proof with cut lines shown clearly. Test one sample or compare the proof against a template before approving full production.
Do custom stickers need a minimum order quantity?
Often yes, because setup and proofing costs need to be spread across the run. Higher quantities usually lower unit cost, while very small runs cost more per sheet or set.
What affects the turnaround time for custom sticker orders?
Artwork readiness, revision count, cutting complexity, and finish selection are the biggest variables. Fast approvals and clean files usually shorten the timeline significantly.
How should I apply custom stickers to small plastic parts?
Clean the surface first, then apply the sticker with steady pressure from one edge to the other. Let the adhesive set before heavy handling so the bond has time to stabilize.


