Custom dropper bottle boxes do a lot more than wrap a small carton around a glass container. They protect narrow necks and fragile closures, reduce scuffing during packing and transit, and give a product a more deliberate, credible presentation the moment someone picks it up.
That matters because dropper products rarely compete on packaging alone, yet packaging still shapes the first judgment. Oils, serums, tinctures, concentrates, and specialty extracts all live in categories where trust is built quickly, and a carton that feels engineered instead of improvised can improve how the product is perceived before the cap is even opened.
Most buyers are trying to balance three things at once: protection, branding, and cost. If the box is too light, damage rises. If it is too elaborate, unit price can move beyond the margin the product can support. Good custom dropper bottle boxes sit in the middle of that range and do the practical work without wasting material or labor.
Why dropper bottle packaging matters more than it looks
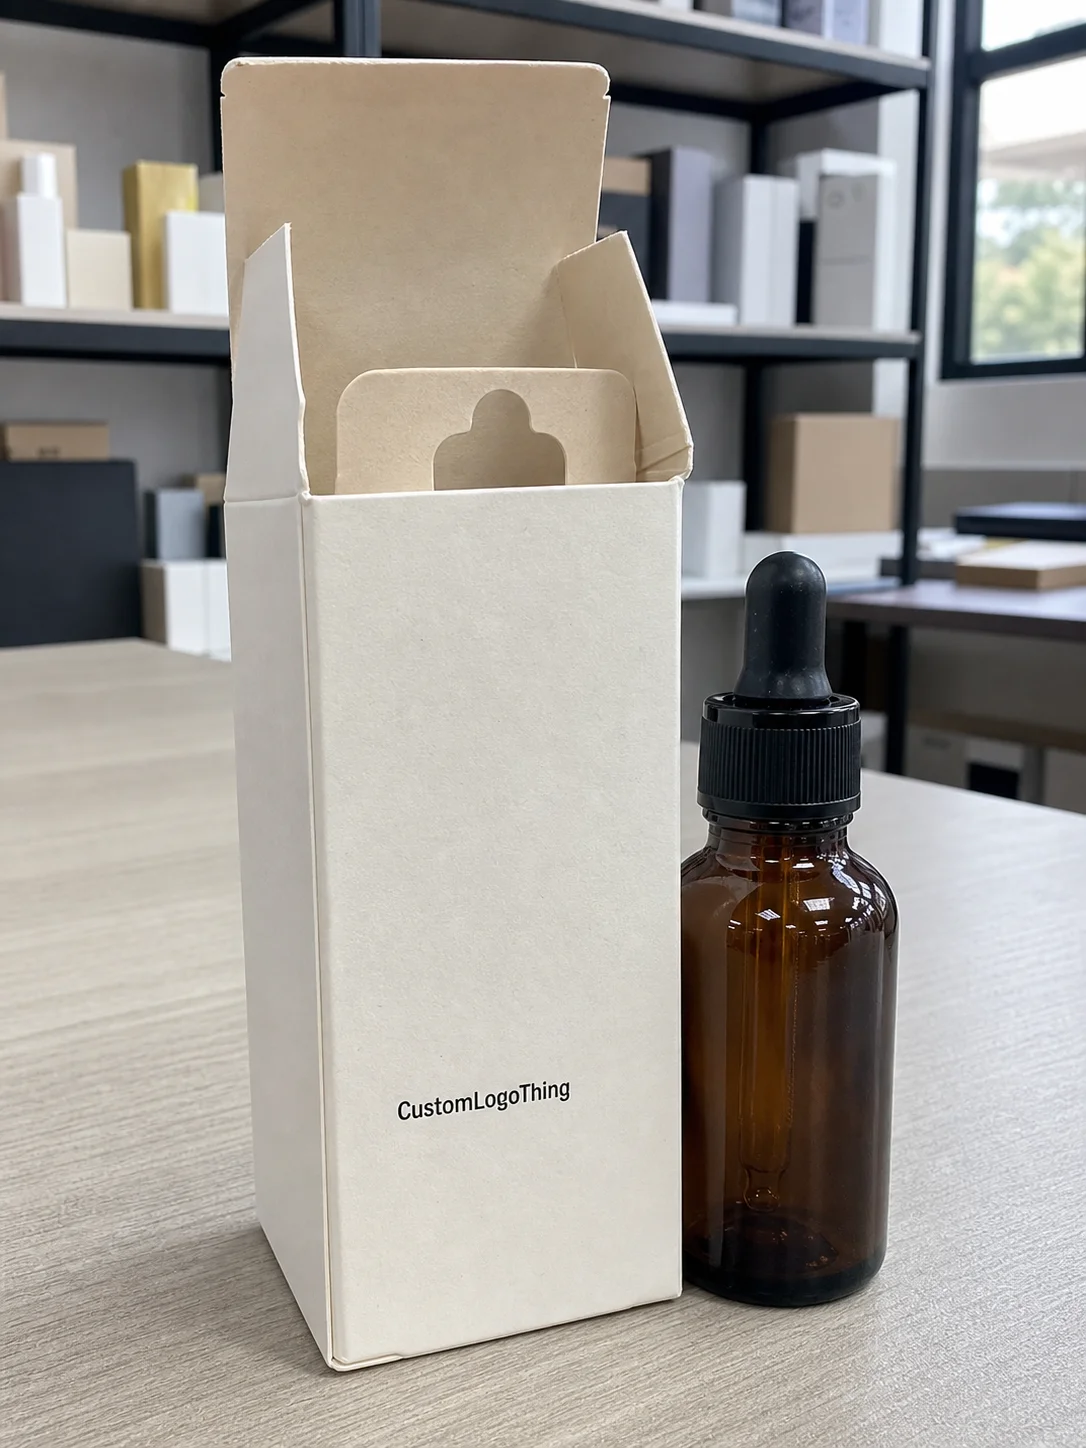
Dropper bottles are small, but they are not simple. The bottle is often glass, the shoulder may taper, the closure adds height, and the dropper bulb can create more top load than a buyer expects when looking at a spec sheet. If the carton does not account for those details, the bottle may rattle, lean, or press against the top panel.
A basic folding carton can be enough for light retail use, especially when the product is handed directly to a customer or displayed close to the point of sale. Once the bottle enters fulfillment, subscription kits, wholesale handling, or parcel delivery, the packaging has to do more work. That usually means tighter tolerances, a stronger bottom lock, or an insert that keeps the bottle centered instead of letting it shift inside the box.
There is also a presentation side that should not be dismissed as cosmetic. Customers often compare liquid products with very little time and a lot of visual noise around them. A clean carton with good structure signals order, care, and quality control, and those signals matter in categories where buyers read labels closely and assume a great deal from packaging alone.
A dropper carton should fit, hold still, and survive handling without turning into a source of damage or a distraction from the product.
From a packaging buyer’s point of view, the real goal is usually straightforward: protect the bottle, support the brand, and avoid unnecessary material. Overbuilding a carton can raise costs without improving performance, while underbuilding can lead to breakage, complaints, and returns. The better approach is usually the one that matches the product’s actual use, not the prettiest version on a mockup.
How custom packaging for droppers works
Most Custom Printed Boxes for droppers begin with a structure that matches the sales channel. Tuck-end cartons are common for retail display because they are efficient to make and easy to assemble. Auto-lock bottoms are a useful step up when the box needs more support or faster packing. Sleeves can work well for premium presentation, especially when they slide over a tray or insert. Rigid-style builds are usually reserved for higher-end sets, heavier glass, or gift-oriented packaging where the box itself is part of the experience.
Fit should always start with real measurements. Bottle height, bottle diameter or width, the assembled closure height, and the shape of the dropper bulb all matter, because the top assembly often takes up more room than expected. If the bottle has a wide shoulder, a thick glass base, or a taper that changes the internal geometry, those details need to be on the dieline from the start. For any order that will be shipped repeatedly, an insert or partition is worth discussing early rather than after the artwork is already approved.
Print and finish decisions change both appearance and handling. A plain uncoated carton can be practical and economical, but many brands want a cleaner retail look. Common upgrades include aqueous coating for better scuff resistance, matte or gloss lamination, soft-touch coating for a more tactile finish, foil accents for emphasis, and spot UV for contrast. Each one changes the feel of the box, and each one also changes how the carton behaves if it passes through automated packing or sits in humid storage conditions.
Custom die-cuts can add value when they are used for a clear reason. A viewing window can reveal the bottle color or label design. A tailored insert can keep the bottle upright and make the unboxing feel more deliberate. The problem starts when features are added just because they look good in a render. Every extra cut, fold, or component should improve fit, transit stability, or brand presentation; otherwise it is just cost.
If you are standardizing packaging across several product lines, a broader catalog of Custom Packaging Products can help you keep dimensions, print standards, and material choices aligned from one SKU to the next.
Key specs that affect fit, protection, and shelf appeal
Board stock is one of the earliest decisions that affects both cost and performance. For standard retail cartons, SBS and C1S paperboard are widely used because they print cleanly and hold sharp detail. Kraft board creates a more natural look and is often used by brands leaning into botanical, wellness, or earth-toned packaging. Heavier rigid materials are better for premium presentation, but they are not necessary for every single dropper bottle, especially when the product is light and the retail environment is controlled.
| Material / Build | Best Use | Typical Strength | Cost Impact |
|---|---|---|---|
| SBS paperboard | Retail cartons, crisp print detail | Good for light to medium bottles | Moderate |
| C1S board | Printed cartons with one clean front side | Good for standard shelf packaging | Moderate |
| Kraft board | Natural, eco-forward presentation | Good, depending on caliper | Moderate to slightly higher |
| Rigid board | Gift sets and premium kits | Very strong | Highest |
Insert choice matters just as much as board choice. Paperboard inserts are usually the most economical and are often easier to recycle in common streams. Molded pulp adds a protective, more sustainability-oriented feel for some brands, although the appearance is less crisp than folded board. EVA foam cushions well and can look premium, but it is usually the least eco-friendly option and can push costs up quickly. Some bottles do not need an insert at all if the carton is sized tightly and the shape naturally holds the bottle in place.
Print layout also deserves careful planning. CMYK is the standard route for full-color graphics, while spot colors help when a brand needs tighter color matching across multiple product lines. If the carton needs a barcode, ingredients, dosage information, warnings, or batch area, those elements should be placed early in the design rather than squeezed into the last available space. Small cartons expose weak layout decisions very quickly, and crowded compliance text usually looks as awkward in print as it does in proof.
Good packaging design depends on contrast and hierarchy more than on decoration. Dark type on a dark background may feel elegant on screen and disappear under store lighting. A clean type system, enough white space, and a clear brand mark usually do more for shelf impact than layering on more graphics. For dropper cartons, restraint often reads as quality because it gives the product room to speak.
Brands that sell through subscription kits or retail displays also need to think about how the box sits next to other items. A strong color block, a consistent top panel, or a recognizable side graphic can help a carton Stand Out Without turning it into visual noise. That is especially useful when the product is small and competing against many similar-looking packages.
For sustainability claims, it helps to verify material sourcing and recovery before the artwork is finalized. Industry references like EPA recycling guidance and FSC-certified paper standards are useful starting points, especially if the brand expects to reference recycled content or responsible forestry on the pack.
Custom dropper bottle boxes cost, MOQ, and quote basics
Pricing for custom dropper bottle boxes usually comes down to a few predictable variables: size, board thickness, print coverage, finishing, inserts, and quantity. A simple two-color kraft carton with a standard tuck style can sit in a very different price band from a full-color carton with soft-touch coating, foil, and a die-cut insert. As the number of components grows, so does the labor, setup time, and risk of waste.
For many projects, a realistic starting range for a standard folding carton is often around $0.18-$0.45 per unit at 5,000 pieces, depending on the size and finish level. Add an insert, specialty coating, foil, or a more complex structure, and that range can climb. Rigid packaging sits above that because the board and assembly requirements are heavier from the start. Lower quantities nearly always cost more per unit because tooling, press setup, and finishing prep have to be spread across fewer boxes.
MOQ exists because printing and die-cutting are setup-driven processes. A production line cannot be tooled, adjusted, and inspected for a tiny handful of boxes without carrying a lot of fixed cost in every unit. Standard styles may allow lower minimums, while unusual dimensions, custom inserts, or complex shapes usually push the minimum higher. That is not a sales tactic so much as a basic production reality.
Here is a practical way to think about what moves pricing:
- Size: larger cartons use more board and may require larger dies.
- Print coverage: flood colors and heavy ink coverage increase press time and waste risk.
- Finishes: foil, spot UV, lamination, and soft-touch each add steps.
- Inserts: extra components increase material use and assembly labor.
- Quantity: higher volume generally lowers unit cost.
For an accurate quote, gather the bottle dimensions, closure type, fill weight, artwork files, expected quantity, and shipping method. If the product will ship individually, say that. If it will sit inside a corrugated shipper, say that too. A carton designed for shelf display is not always the best choice for parcel transit, and the difference should be identified before production begins.
If you are deciding between two packaging directions, request pricing at two quantities such as 2,500 and 10,000 units. That comparison often reveals whether a slightly larger run makes better financial sense or whether a simpler build is the smarter decision for the current stage of the product line.
Production steps and timeline from dieline to delivery
The typical workflow starts with a brief that includes bottle measurements, closure details, artwork needs, and the intended use of the carton. From there, a dieline is created or adjusted so the artwork can be placed correctly around the folds, glue flap, and any insert slots. Once the layout is ready, prepress checks bleed, image resolution, color mode, and safe areas. That review step prevents a lot of avoidable problems later, especially for a small carton where a millimeter matters.
After proof approval, production usually moves into printing, coating or lamination, die-cutting, folding, and final packing. If the box includes foil, embossing, window patches, or special inserts, those steps are added into the sequence. Simple runs can move quickly; more complicated projects naturally take longer because every added process creates another point where tolerances and registration have to stay aligned.
In many cases, a standard production timeline after proof approval is often 12-15 business days, though the exact schedule depends on capacity, season, and complexity. Rush orders are possible in some situations, but they usually require simpler specs and faster decision-making. Delays tend to come from ordinary issues: incomplete bottle measurements, missing barcode files, low-resolution logos, or artwork that has to be rebuilt to fit the dieline.
Sampling is one of the smartest steps a buyer can take, especially with glass dropper bottles. A prototype or short run confirms that the bottle sits correctly, the insert does not pinch the neck, and the carton closes without bulging. It also shows whether the finish feels right in hand and whether any print detail disappears under the lighting where the product will actually be sold.
For categories that need parcel-level confidence, the ISTA shipping test standards are a useful benchmark to discuss with a packaging team, especially if the carton is part of a broader transit system rather than just a shelf pack.
Common mistakes buyers make when ordering packaging
The first mistake is measuring the bottle without accounting for the dropper assembly. A bottle might be 90 mm tall by itself and closer to 115 mm once the bulb and cap are included. If the box height is based on the bare glass only, the closure can get crushed or the carton can leave too much dead space. Neither outcome is good.
Another common problem is choosing board that is too light. Thin stock may be fine for a sample kit or a short retail run, but glass bottles moving through shipping lanes need more support. If the carton is for e-commerce, weak board can show corner crush, scuffing, or open seams before the customer ever sees the product. The extra cents for better material are usually easier to justify than the cost of damaged units and replacements.
Design problems are just as expensive. Tiny text, weak contrast, and crowded layouts may look polished on a monitor, but they print less gracefully on a small carton. If the product must carry warnings, ingredients, dosage text, or barcode requirements, the design needs room for those elements from the beginning. Custom printed boxes work best when the layout is built around production needs instead of being forced to fit them at the end.
Skipping a sample is another costly habit. A digital proof is useful, but it cannot fully show how a carton feels once the fold lines, glue flap, and insert are assembled. A physical sample is the safer choice when the bottle is new, the closure is unusual, or the quantity is large enough that a mistake would be painful. In packaging, one approved sample can prevent a pallet of rework.
Expert tips for ordering better packaging every time
Ask for a mockup whenever the bottle is new or the line is still being refined. Even a plain sample can answer the most basic question: does the product actually fit the structure you have in mind? That is especially true with droppers, where the neck, bulb, and cap geometry can complicate a carton that seems simple on paper.
Standardizing dimensions across product lines can save real money over time. If three serums can share one carton family with artwork changes instead of three completely different structures, tooling complexity drops and replenishment gets easier. That kind of planning is not flashy, but it improves inventory control and makes future reorders less disruptive.
Finish choice should reflect how the box will be handled. Matte or soft-touch can feel premium in a retail setting, but if the carton will be handled heavily during fulfillment, a more durable coating may be the better choice. Many brands want the richest tactile effect possible, yet the most successful finish is often the one that still looks good after storage, transit, and repeat handling.
Think of the box as part of the product system rather than a separate accessory. The bottle, label, carton, shipper, and storage environment all influence one another. If the carton is beautiful but fragile, it creates waste. If it is strong but visually flat, it misses an opportunity to build recognition. The best product packaging does both jobs together, and that is where careful planning pays off.
Keep notes on what worked once a box performs well in packing, transit, and shelf display. Save the dimensions, insert style, finish spec, and any comments from receiving or fulfillment in a shared file. That makes future production faster and helps the team avoid re-learning the same lessons every time the order repeats.
Best next steps before you place an order
Before requesting pricing, gather exact bottle measurements, closure details, and final fill weight. If the bottle is already in hand, measure the widest point, the shoulder, the neck, and the full assembled height. Those numbers are the foundation of good packaging, and they are more reliable than a guess from a product page.
Prepare the artwork files and a short list of must-haves: finish, insert type, shipping method, target quantity, and any compliance text that must remain visible. If you are deciding between a retail carton and something more shipping-friendly, say that early. Good packaging guidance depends on the actual use case, not just the bottle itself.
Request a Quote using one target quantity and one backup quantity so you can compare unit cost and planning flexibility. Often the pricing curve tells you more than the first number alone. A slightly larger order may reduce the per-unit cost enough to make inventory sense, but that depends on storage space and how quickly the product moves.
Most importantly, review a proof or sample before full production. Check fit, close the carton, inspect the print, and make sure the insert holds the bottle securely without deforming the box. That last check is where a good concept becomes a reliable production run.
Done well, custom dropper bottle boxes protect fragile glass, support shelf appeal, and make ordering far more manageable. The carton is part of the product system, not something to think about after everything else is finished.
FAQs
What size should custom dropper bottle boxes be for a glass bottle?
Measure bottle height, width, and closure assembly separately, because the dropper top often adds more height than buyers expect. Allow space for an insert or divider if the bottle will ship or travel frequently. A proper fit should hold the bottle securely without crushing the carton or making assembly difficult.
Do dropper bottle cartons need inserts?
Not always, but inserts are useful when the bottle is glass, heavy, tall, or likely to move in transit. Paperboard, molded pulp, and foam each offer different protection levels and presentation styles. If the bottle fits snugly and stays stable without an insert, a simpler structure may be more economical.
What affects the price of custom packaging the most?
Order quantity, board stock, print coverage, and special finishes usually have the biggest impact on unit cost. Complex structures and custom inserts add more labor and tooling requirements. Accurate dimensions and clean artwork can also reduce revision costs and avoid delays.
How long does production usually take for custom boxes?
Timeline depends on artwork readiness, proof approval speed, order size, and whether special finishes are included. Sample approval can add time upfront but often prevents bigger delays later. Rush orders may be possible, but they usually require simpler specs and fast decision-making.
Can custom dropper bottle boxes help with branding and compliance?
Yes, the box can carry brand color, product story, and shelf-ready design while also leaving room for required text and barcodes. Good layout planning helps keep important information readable without making the pack look crowded. It is smart to confirm any regulatory or labeling requirements before artwork is finalized.

