Custom embossed labels stand out because they work on two levels at once: the eye catches the raised detail, and the hand confirms it. That combination matters in apparel. A logo patch on denim, a badge on outerwear, or a small mark on a cap can change how the entire product is perceived before anyone reads the hang tag. For brands trying to make packaging, trim, and garment construction feel connected, embossing often does more than print ever can. It gives the product a physical signature.
The appeal is not only aesthetic. Raised and recessed details help a label survive busy retail environments, where flat graphics disappear quickly among competing colors and patterns. They also support a cleaner presentation when the rest of the product line uses restrained branding. If the label sits alongside other elements in your Custom Labels & Tags program, embossing can anchor the whole system without adding visual noise.
Why embossed labels stand out on clothing
A flat printed label can communicate information, but it rarely changes the way light moves across a garment. An embossed surface does. That shift is subtle at a distance and obvious up close, which is part of the reason custom embossed labels often read as premium even when the artwork is minimal.
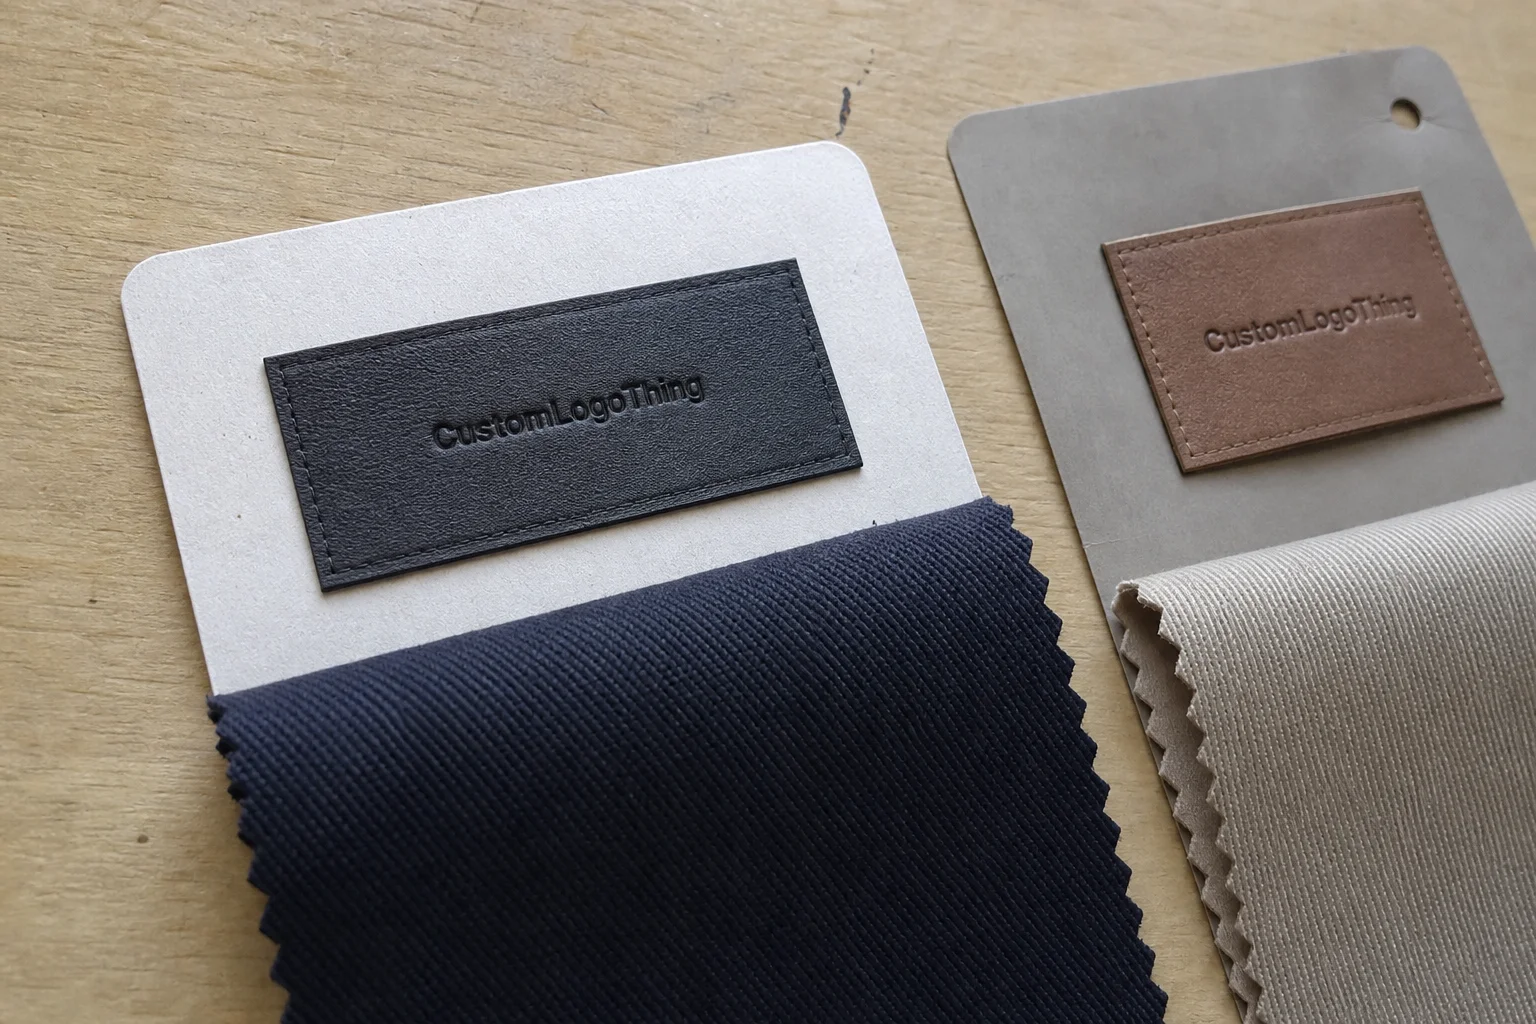
They are especially effective on materials that already signal durability or craftsmanship. Denim waistbands, leather jackets, workwear, heavyweight hoodies, caps, and technical shells all benefit from trim that feels intentional. A raised mark on those garments does not have to shout. It just needs to look like it belongs there.
Simple artwork usually produces the best result. Bold shapes, clear spacing, and solid line weights emboss more cleanly than highly detailed logos with thin strokes or tiny counters.
That matters because embossing exaggerates both strengths and flaws. A clean emblem will look sharper after pressing; an overcomplicated one can lose definition fast. Fine serifs, hairline lines, and compressed letter spacing are frequent trouble spots. If the design only works when viewed on a screen, it probably needs to be simplified for production.
There is also a brand consistency advantage. When the same visual language appears on labels, cartons, tissue, and inserts, the collection feels more coherent. A raised logo can bridge garment and packaging in a way that printed text rarely does. It can also complement broader Custom Packaging Products without competing with them.
The main limitation is resolution. Very small type and intricate line art can close up once pressure is applied, especially on softer substrates. Buyers who accept that early tend to get better results than buyers who try to preserve every detail from the original artwork. In production, simplification is often a sign of control, not compromise.
How the embossing process works on labels
Embossing begins with artwork preparation and a tooling step. The design is converted into a die or plate, then pressure, sometimes with heat, forms the image into the material. The quality of that tooling affects the depth, edge clarity, and consistency of every label that follows. Once the die is wrong, the whole run carries the error.
There are three common approaches. Blind embossing raises or recesses the design without added color, producing the most understated finish. Foil embossing combines the impression with metallic film, which increases contrast and works well for premium retail presentation. Debossing pushes the design inward instead of upward, giving a quieter look that can be useful on thicker or more flexible materials.
The substrate changes the outcome more than most first-time buyers expect. Leather and faux leather generally hold crisp detail and handle depth well. Soft PVC gives a durable, flexible result with cleaner edges on simplified artwork. Silicone can take wear and wash exposure well, but the visual finish is softer. Coated textile stock can work for lighter labels and tags, although it needs tighter art control and careful press settings.
Vector artwork is the safest starting point. The file should be checked for minimum line thickness, clear spacing, and readable type sizes before quoting. If the design includes a border, small subtext, or fine symbols, those elements need to be reviewed at actual size, not just on a monitor. A logo that looks balanced in a presentation file can collapse once it is compressed into a denser material.
Quality control is usually focused on four areas: die alignment, impression depth, edge finish, and repeatability across the run. A label that is deeper on one side than the other, or one with uneven trimming, may still be usable. It will not read as premium, though, and apparel buyers notice that quickly. On visible trim, small defects have an outsized effect.
Custom embossed labels cost, MOQ, and pricing factors
Pricing depends on the material, size, emboss depth, color or foil additions, backer style, attachment method, and order quantity. Setup cost is a major factor on smaller runs because the tooling and press preparation are spread over fewer units. A straightforward shape in a standard material will usually come in lower than a multi-step label with layered finishes or specialty backing.
For planning purposes, smaller orders often land in the $0.80-$1.80 per unit range, while larger volume orders can move closer to $0.18-$0.45 per unit. Those numbers are only a working benchmark. Tooling, sampling, finishing, and shipping can shift the final total quickly, so quotes should be reviewed line by line rather than by the unit price alone.
MOQ changes with construction. Basic leather or faux leather patches may have a lower entry point than foil-heavy or layered silicone builds. If the artwork is simple, some suppliers will be more flexible. That can be useful for newer brands testing a trim concept before committing to a full seasonal run.
| Material / Construction | Best Fit | Typical Cost Impact | Notes |
|---|---|---|---|
| Leather or faux leather | Denim, heritage pieces, outerwear | Mid to higher | Strong tactile look, good depth, best with bold artwork |
| Soft PVC | Caps, sportswear, flexible trims | Mid | Durable and bendable, with clean edges on simplified shapes |
| Silicone | Athleisure, technical apparel, wash-heavy use | Mid | Good abrasion resistance, softer visual finish |
| Coated textile stock | Lightweight apparel, hang tags, lighter trims | Lower to mid | Works best with careful artwork prep and moderate detail |
Quote comparison should include the full production path. Ask whether art setup, die creation, sampling, finishing, packaging, and shipping are included. A lower per-piece price can become the higher total once the extras appear. Buyers often discover that only after approval, when the schedule is already locked.
Environmental and transit requirements can matter if the trim is packed with retail components. FSC-certified paper pieces are relevant when the order includes hang tags or carrier cards, and ISTA testing is useful when folded garments or packaged labels need to survive shipping and distribution. The standards themselves are straightforward to verify at fsc.org and ista.org.
One practical point gets overlooked: the cheapest order is not always the best value if the label fails on the garment. A patch that curls, peels, or feels too stiff can create returns or force a rerun. That is more expensive than paying a little more for the right material from the start.
Process and turnaround from artwork to finished labels
The usual workflow is artwork review, proofing, sample approval, manufacturing, finishing, inspection, and packing. It sounds routine, but each step can slow down if the file is incomplete or if the buyer changes dimensions midstream. Tooling is where most schedules become fixed, so the earlier the artwork is resolved, the better the timeline stays intact.
Turnaround depends on die complexity, material availability, whether foil or layered color is involved, and how crowded the production queue is. A simple label can sometimes move through production in less than two weeks after proof approval. More detailed artwork or specialty construction usually needs longer. Shipping time should be counted separately so production and delivery do not get blended into one vague promise.
Most delays are preventable. Blurry artwork, missing dimensions, late logo swaps, and sample revisions that restart approval all cost time. Placement questions can also stall the order. A collar patch, waistband badge, or sleeve label needs garment context before production begins, not after the first sample comes back.
A useful schedule request asks for four dates: proof timing, sample delivery, bulk production window, and shipping handoff. That gives a realistic picture of whether the trim supports a launch or needs to be ordered earlier. Brands that map labels alongside sewing, ticketing, and pack-out avoid the kind of last-minute scramble that turns a simple trim order into a bottleneck.
If the label belongs to a larger trim and packaging system, approve the most sensitive item first. If the same collection uses Woven Neck Labels, printed care labels, and embossed logo patches, the artwork standard should be locked before the rest of the Custom Labels & Tags package is ordered. That reduces rework and keeps the collection visually aligned.
How to choose the right construction for your garment
The right construction depends on how the garment will actually be used. Soft PVC works well on caps and casual outerwear because it flexes without cracking. Leather and faux leather fit heritage branding, denim, and heavier layers. Silicone suits wash-heavy or abrasion-prone applications. Coated textile stock is often a better match for lighter garments or low-profile trims.
Attachment method matters just as much. Sew-on labels are the most familiar and usually the most secure for denim, jackets, and bags. Heat-seal versions can work for specific performance garments, but only when the textile and care requirements support that process. Adhesive backers are useful for temporary placement, presentation sets, or sample handling, not for every finished product. Loop-through and hang-tag styles have their own place in retail presentation.
Durability should be judged against wear, not just the spec sheet. A waistband patch on denim sees rubbing, folding, and repeated laundering. A cap badge takes less wash stress but more hand contact and sweat. An outerwear chest badge may need to survive straps, zippers, and abrasion from movement. That is why a sample that looks perfect in isolation may still fail the real use case.
Finish affects perceived value in a direct way. Matte surfaces tend to feel calmer and more heritage-driven. Gloss and metallic accents push the label toward a sharper retail look. Stitch color, edge color, and border treatment can either disappear into the garment or become part of the design language. The best choice is the one that matches the fabric, the care profile, and the brand tone.
Packaging design should inform that decision. A collection with restrained cartons and minimal paper goods can feel awkward with an overly loud label. A bolder label can work well when the rest of the packaging already uses strong graphics and contrast. The trim should reinforce the same hierarchy, not fight it.
Common mistakes when ordering embossed labels
The most common mistake is approving artwork that is too detailed for the substrate. Small serif type, thin lines, and dense symbols may look acceptable in a PDF but press poorly in real material. Once the impression is made, those details can soften or disappear. The result is a label that feels generic, even if the original artwork was strong.
A second mistake is under-specifying the build. If the order does not clearly define size, attachment method, border style, and placement, the supplier may deliver a label that technically matches the file but does not fit the garment correctly. That problem shows up most often in multi-SKU programs where the same trim has to work across tees, hoodies, and jackets.
Relying on screen images for finish approval is another common error. A monitor can hide gloss, texture, and the actual depth of the emboss. Photos are helpful, but they are not a substitute for a physical sample when the label will be touched directly or sits close to the skin.
Skipping sample approval is expensive in a different way. Buyers sometimes assume the first production article will match the design intent, then discover the depth is too shallow, the stock feels too stiff, or the surface sheen is off. That extra revision cycle usually costs more than the sample itself.
Ordering too few units can be a mistake too. Unit cost rises, shipping eats into savings, and the brand ends up with a premium trim that is too costly to use consistently. If the label is meant to work across a full line, inconsistency usually becomes more expensive than the original upgrade.
Expert tips before you place an order
Ask for a vector-art check before approving the quote. That tells you whether the logo needs simplification, line-weight changes, or spacing adjustments before the die is cut. It is a small step that prevents expensive corrections later.
Request a physical sample or pre-production proof when the label will be handled closely. Neck areas, cuffs, collars, and waistbands reveal stiffness and edge quality fast. If the trim feels wrong in the hand, the customer will notice it too.
Match the finish to the garment category. Understated embossing tends to fit workwear, heritage pieces, and premium basics. Brighter accents can suit fashion capsules or more expressive packaging systems. The goal is not to add effects for their own sake. It is to make the label feel like part of the product rather than something attached after the fact.
For new trim styles across multiple SKUs, build a small test run into the launch plan. That gives you time to check sewing behavior, wash performance, and how the label sits beside other components such as Woven Neck Labels or hang tags. It also reduces the risk of locking a large order into the wrong version.
Keep the final artwork, measurement sheet, and placement notes together in one file set. Repeat orders move faster when the supplier has a complete record, and variation drops sharply when the spec is clear. That discipline matters more than most brands expect once the line starts scaling.
Next steps for ordering custom embossed labels
Start by looking at the garment range and deciding where a raised mark will add more value than a woven, printed, or stitched label. Not every product needs embossing, but the right one can sharpen the product story and make the trim feel integrated rather than decorative.
Build a concise spec sheet before requesting quotes. Include size, material, attachment method, finish, quantity, and target delivery date. If the collection also needs broader packaging support, coordinate the trim order with your Custom Packaging Products so the visual language stays aligned across the full presentation.
Send vector artwork early and ask for proof feedback before production begins. That is the fastest way to catch readability issues, especially when the logo is detailed or the label is small. It also reduces back-and-forth during sampling, which is where many schedules lose time.
Compare suppliers on more than price. Sample quality, response time, lead time, and whether the quote includes setup can matter more than a small unit-cost gap. In apparel, the trim is part of the product, not an accessory to it. The supplier needs to support the launch schedule and the visual standard at the same time.
If the label is tied to a new collection, lock the timeline first and place the order before sewing and packing begin. That sequence keeps the trim from becoming a bottleneck and gives custom embossed labels the best chance to arrive as part of a clean, coordinated launch.
Frequently asked questions
What are custom embossed labels used for on clothing?
They add a raised, tactile brand mark to apparel, accessories, and trims. They are common on denim, outerwear, caps, and premium basics because texture helps the product feel more finished. Depending on the design, they can replace or complement woven, printed, or stitched labels.
Are custom embossed labels durable enough for wash and wear?
Durability depends on the substrate, attachment method, and garment use. Leather, faux leather, PVC, and silicone are common choices for better wear resistance, but the final approval should always match the label to the garment's wash and abrasion expectations.
What affects the price of embossed clothing labels the most?
The main drivers are material, size, emboss depth, finishing steps, and quantity. Tooling or die setup can have a bigger effect on small runs, and foil accents, specialty backers, and complex shapes usually increase cost.
How long does production usually take for embossed labels?
Timing depends on artwork approval, die creation, sample review, and the production queue. Simple jobs can move faster, while detailed artwork or specialty materials add time, so shipping should be included in the schedule from the start.
What file should I send for a custom embossed label order?
A vector file is the safest choice because it keeps lines sharp and scalable. Include exact dimensions, desired material, attachment method, and finish notes. That is the most reliable way to keep custom embossed labels moving through proofing without delays.


