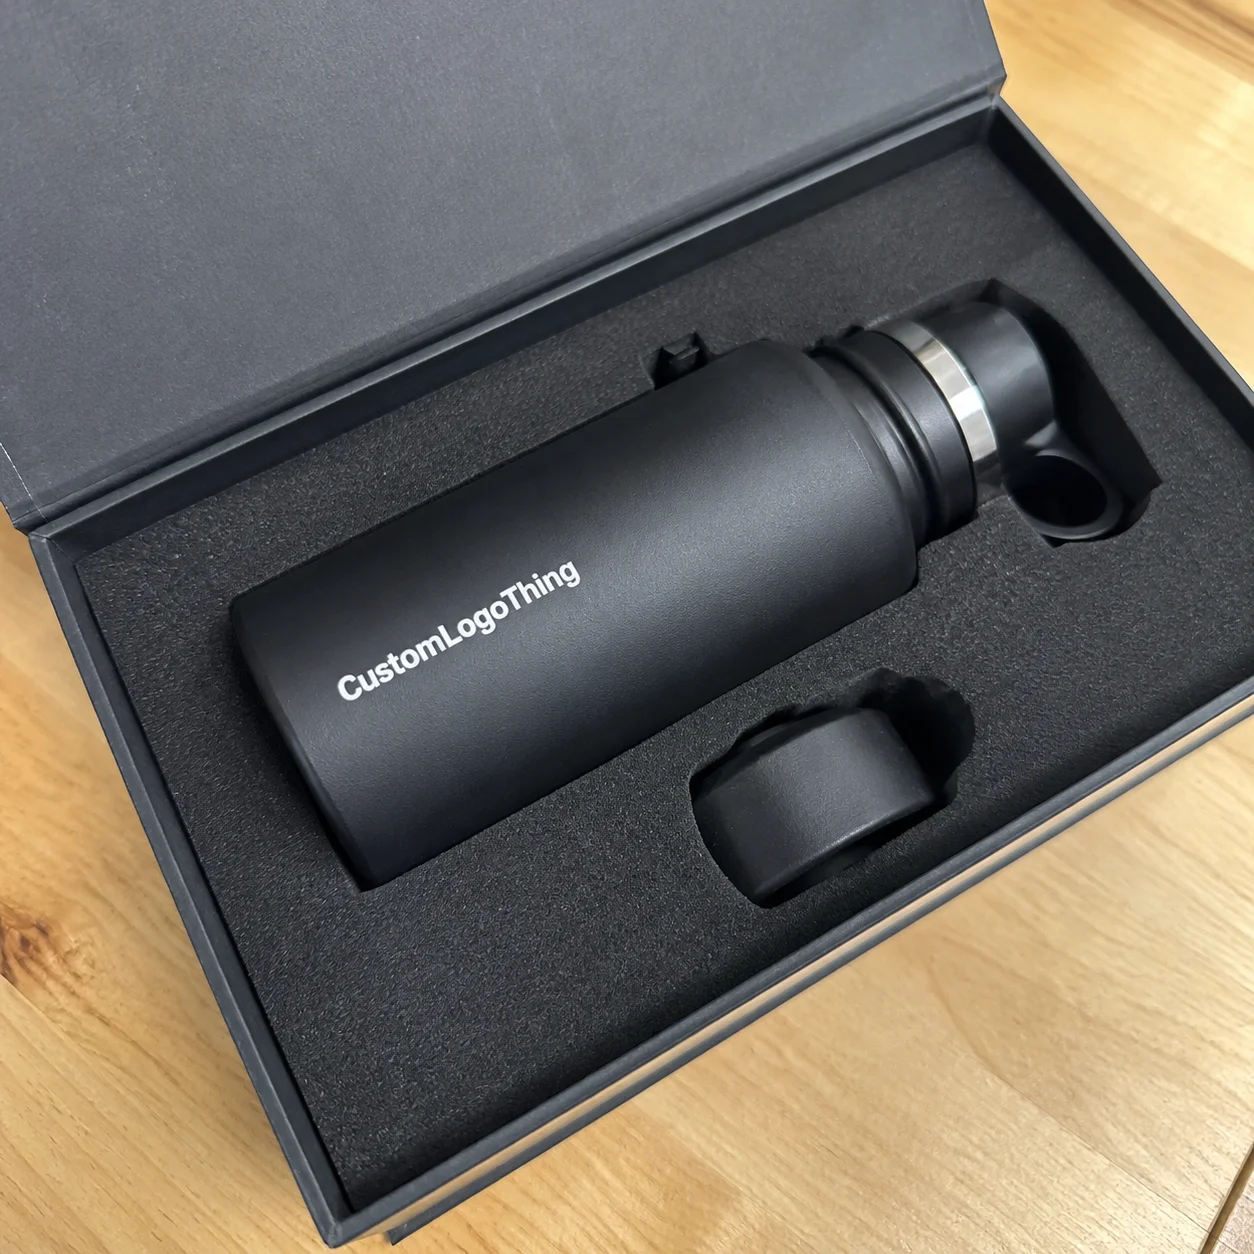
Products usually get damaged because they move inside the box, not because the outer carton failed. That is why custom foam box inserts matter: they hold the product in place, reduce vibration, and keep edges, finishes, and accessories from rubbing together.
Buyers care about two outcomes at once. The first is protection: fewer breakages, fewer replacement shipments, fewer complaints. The second is presentation: the package should feel intentional and consistent with the brand. When the insert is wrong, the problem is not only physical damage. It can also create a poor first impression and trigger costly rework or returns.
For fragile or high-value items, foam gives predictable support. For presentation-driven packaging, it can do that job while still looking refined. That is why many teams choose foam instead of loose fill or folded paper alone.
Why custom foam inserts solve the damage problem
The common failure is simple: the box arrives intact, but the product inside has a scuffed corner, a cracked fitting, a bent accessory, or a rattling component. The carton did its job. The interior did not. Loose wrap and void fill can cushion, but they do not control movement the way a fitted insert does.
Custom foam box inserts solve that by creating a shaped cavity around the product. The part stays where it belongs during vibration, stacking, and repeated handling. That matters most when the product has polished surfaces, sharp edges, glass components, painted housings, or small add-ons that can shift inside the package.
Good inserts also make packing repeatable. Staff do not need to improvise with extra wrap or guess how much void fill to add. The insert defines the layout, which helps quality control and makes shipments more consistent from one run to the next.
Common use cases include:
- Electronics and accessories
- Cosmetics and fragrance sets
- Glassware and bottles
- Tools and calibration equipment
- Medical kits and diagnostic items
- Premium gift sets and branded packaging
Shipping performance should be checked against realistic handling, not just a sample that looks neat on a desk. Packaging teams often reference ISTA drop and vibration practices because they reflect what happens in transit: repeated impacts, compression, and container movement.
How the foam insert structure works
Think of the insert as a simple engineered system. The outer box carries the load, while the foam manages the product’s position and movement. The key variables are the cavity shape, foam density, foam thickness, cut depth, and clearance around the product.
Foam is not one material with one behavior. Softer foams cushion well and conform around surfaces, but they can compress too much under heavier items. Firmer foams hold shape better and resist crush, but they may transmit impact if the contact surface is too hard or too shallow. The right choice depends on product weight, finish quality, and shipping risk.
There are three common build approaches:
- Die-cut foam works well for repeated shapes and stable production runs.
- CNC-cut foam is useful for prototypes, detailed cavities, and products with irregular profiles.
- Layered foam helps when a kit has different depths for the main product and accessories.
Die-cutting is usually the better choice when the shape is fixed and volume is steady. CNC cutting gives more flexibility when the design is still changing or the product has small features that need precise clearance. Layered builds are practical for sets that include chargers, cables, manuals, sample jars, or spare parts.
The small features matter more than buyers expect. A finger notch can make a product easier to remove without tearing the foam. A bridge or lift point can keep a fragile item from pressing against the lid. A snug shoulder around a bottle neck can stop tilt.
| Insert Method | Best For | Typical Strength | Typical Tradeoff |
|---|---|---|---|
| Die-cut foam | Stable shapes, repeat orders | Consistent output and efficient production | Less flexible for design changes |
| CNC-cut foam | Prototypes and detailed cavities | High precision and easy revisions | Usually higher unit cost at low volume |
| Layered foam | Kits with accessories or mixed depths | Strong organization and presentation | More assembly steps |
If the package also uses a rigid carton, magnetic box, or printed paperboard, the insert should be designed as part of the full structure rather than added at the end. A good foam layout supports the box and keeps the product centered. A poor one creates pressure points, lid bulge, or wasted space.
Key specs that affect fit, protection, and pricing
Most fit problems begin with incomplete measurements. Buyers often measure the main body of the product and stop there. That is not enough. Buttons, handles, caps, hinges, charging ports, labels, corner radii, and attached accessories all change the space needed inside the insert.
It also helps to plan for tolerance instead of chasing an exact theoretical match. Foam has recovery, cartons have compression, and products vary from unit to unit. A cavity cut to the exact nominal size can end up too tight once those realities are included. For many projects, a few millimeters of clearance is normal.
Key Specs Buyers Should define early:
- Product dimensions with real-world tolerance
- Product weight to match density and firmness
- Fragile points such as corners, lenses, screens, or glass surfaces
- Accessory count for cords, manuals, chargers, or spare parts
- Shipping method including parcel, freight, or retail distribution
- Presentation goals for retail packaging or gift packaging
Foam density and firmness affect both protection and cost. Heavier items generally need firmer foam so the cavity does not collapse under load. Softer contact layers can help protect painted, polished, or coated surfaces that scuff easily. Black foam is common in premium packaging because it hides wear well. White can look cleaner in some categories. Gray is often chosen as a practical middle ground.
Pricing moves quickly when the design gets more complex. Multi-depth layouts, tight tolerances, deep cutouts, and finger lifts all add labor or machining time. Specialty foams also raise cost. More sample rounds do the same. A prototype often costs more per unit than a production run because the setup is not spread across many pieces.
For companies building custom printed boxes or complete branded packaging systems, the insert should be treated as one part of a larger structure. A premium outer box cannot rescue a loose interior, and a perfect insert does not solve a carton that is too thin or too large.
Custom foam box inserts: process and timeline
The process usually begins with product measurements and photos from multiple angles. A packaging engineer or supplier then maps the cavity layout, confirms the outer carton dimensions, and creates a sample or prototype. Once the sample is checked, the design is approved, programmed, and moved into production.
Simple jobs can move from approval to production in roughly 12 to 15 business days when the dimensions are clear and no revisions are needed. More complex work takes longer, especially when the insert has multiple layers, a custom box to confirm, or several accessories that need separate cavities.
“The slowest part is usually not the cutting. It is the back-and-forth before approval.”
Delays often come from missing measurements, revised box sizes, accessory changes, or last-minute artwork updates that force the entire pack to be reconsidered. If the outer carton changes after the insert has been approved, the fit can fail even when the foam itself is cut correctly.
Common delay points:
- Dimensions are estimated instead of measured.
- The sample is close but not quite right.
- Material availability changes the build plan.
- The outer box is revised after insert approval.
Repeat orders move faster because the approved design already exists. That is why documenting the final cavity drawing, foam specification, and carton specification together matters. The file history prevents teams from remaking decisions they already paid for once.
How to choose the right insert for your product
Start with the product, not the foam. The right insert depends on what the item needs to survive and what the package needs to communicate. A delicate item with a flawless finish has different requirements from a rugged tool or a branded gift set.
A practical decision path looks like this:
- Identify the product’s weak points.
- Measure the product and any accessories that ship with it.
- Define whether the package is for transit, retail display, or both.
- Choose foam firmness and cut style based on movement risk.
- Confirm the outer box or rigid carton before final approval.
If the item is fragile and expensive, protection comes first. If the item is part of a luxury presentation, appearance may justify a more detailed layout. Some projects need both. That is usually where the budget becomes more specific, because a basic insert and a presentation-oriented insert are not the same product, even if they share the same box size.
Multi-item kits deserve extra attention. Chargers, cords, manuals, sample jars, refill pieces, and spare parts all change the layout. A good insert keeps the primary item centered and gives each accessory its own place. That reduces rattling and makes the package easier to repack later.
Material choices should also account for environmental expectations without pretending there is a shortcut. Less foam is not automatically better if the result is damage and replacement shipments. The more responsible option is usually the one that reduces waste from both packaging material and failed deliveries. For surrounding paper components or fiber-based packaging elements, EPA recycling guidance is a useful reference point, but transport performance still has to come first.
If the broader package needs branding work too, it helps to align the insert with the box, print, and internal layout through Custom Packaging Products.
Common mistakes that make foam inserts fail
The first mistake is measuring only the main product body and forgetting the features that create real-world interference. Caps, triggers, corner radii, charging ports, and labels all matter. The second mistake is choosing foam that is too soft for the item’s weight. It may look fine in a sample, then compress under vibration or stacking.
Another common error is designing the insert before the final carton size has been confirmed. That can force awkward compromises, especially if the box has already been printed or sourced. Insert and carton need to work as one system. If they do not, the result is often excess void, lid pressure, or a rework that costs more than the original sample.
Other problems show up just as often:
- Too little clearance for lid pressure
- Too much clearance, allowing movement inside the cavity
- Overly complex shapes that slow production
- Accessory placement left until the final revision
There is also the presentation trap. Some buyers keep adding cutouts, layers, and decorative pockets because the insert needs to look premium. That works only up to the point where the added complexity starts raising cost without improving protection or usability.
Formal testing standards can help here. ASTM standards are useful if a product is being validated before launch, but even without formal certification, the same basic forces apply: vibration, drop, compression, and handling.
Cost, pricing, and quote planning
Pricing for custom foam box inserts is usually driven by four variables: quantity, foam type, cut complexity, and revision count. Small runs cost more per unit because setup is spread across fewer pieces. Dense or specialty foam adds material cost. Detailed cavities increase machining or labor. Extra sample rounds add time and expense.
For planning, ranges are more realistic than a single number. A simple insert at a higher quantity may land in a much lower unit-cost band than a prototype run with several layers and tight tolerances. More complexity and less volume push the price up, while repeatable geometry and larger runs bring it down.
When comparing quotes, keep the line items identical:
- Setup charges
- Sample or prototype costs
- Unit price at the target quantity
- Assembly or packing fees
- Any tooling or cut-program fees
Good quote planning often saves more than negotiation does. Standardizing cavity sizes, simplifying accessory pockets, reducing the number of layers, or increasing the order quantity can all improve the unit price. A tidy layout is usually cheaper to cut, easier to pack, and easier to repeat.
Before asking for a quote, send the information that actually affects the design:
- Final product dimensions with photos
- Product weight and fragile points
- Outer box dimensions or carton type
- Accessory list and required cavity count
- Target order quantity and expected repeat volume
- Shipping method: parcel, freight, or retail distribution
If the packaging program needs FSC-certified paper or board components, check requirements with FSC. Foam itself is only one part of the system, but surrounding materials can still matter for procurement, reporting, and brand standards.
The cheapest quote is not always the least expensive package. A slightly higher unit cost that reduces damage, shortens packing time, and improves presentation can be the better business decision, especially for branded products with real return and replacement costs.
FAQ
What products work best with custom foam box inserts?
Fragile, high-value, or presentation-focused items benefit most. Electronics, glass bottles, cosmetics, medical tools, and premium gift sets are common examples. If the product can move inside the box, it usually needs an insert.
How do I choose the right foam density for box inserts?
Match density to the product’s weight, shape, and fragility. Heavier items usually need firmer foam, while delicate finishes may need a softer contact layer. Ask for a material recommendation based on the shipping method and expected handling.
What affects the cost of custom foam box inserts the most?
Quantity, foam type, cut complexity, and sample revisions are the main cost drivers. Tighter tolerances, deeper cavities, and multi-item kits usually cost more. A simple layout in a larger run is generally the lowest-cost path.
How long does the process usually take?
Simple projects can move from approval to production in about 12 to 15 business days. More complex layouts take longer, especially when revisions are needed. Final timing depends on measurements, sample approval, and material availability.
Can custom foam box inserts be reused for product kits?
Yes, if the cavity design is durable and the box is meant to be opened and closed repeatedly. Reusable kits work best when the insert holds accessories securely without tearing at the edges or losing shape over time.
Done well, custom foam box inserts protect the product, keep the package organized, and make the shipment feel more intentional. The best results usually come from simple decisions made early: measure carefully, confirm the carton, choose foam for the actual product weight, and keep the layout honest about how the item will travel.

