Custom Foam Inserts for Packaging
Custom foam Inserts for Packaging are used to stop movement, protect finishes, and make the unboxing experience feel deliberate. Cardboard can hold a product in place at the outer level, but the insert is what controls the item inside the box. That matters when the product is fragile, premium, or packed with accessories that need to stay organized.
For buyers, the insert is part of the packaging system, not an add-on. It affects damage rates, assembly labor, repackability, and how the customer judges the product before it is even touched. If your broader program includes Custom Packaging Products, the insert needs to work with the carton and presentation, not against them.
The best projects start with clear inputs: product dimensions, weight, finish sensitivity, and the actual shipping environment. If those are not defined, the first sample often reveals the gap. The goal is not just a tight fit. It is a fit that survives production, transit, and handling without creating rework.
Why custom foam inserts fail faster than most teams expect
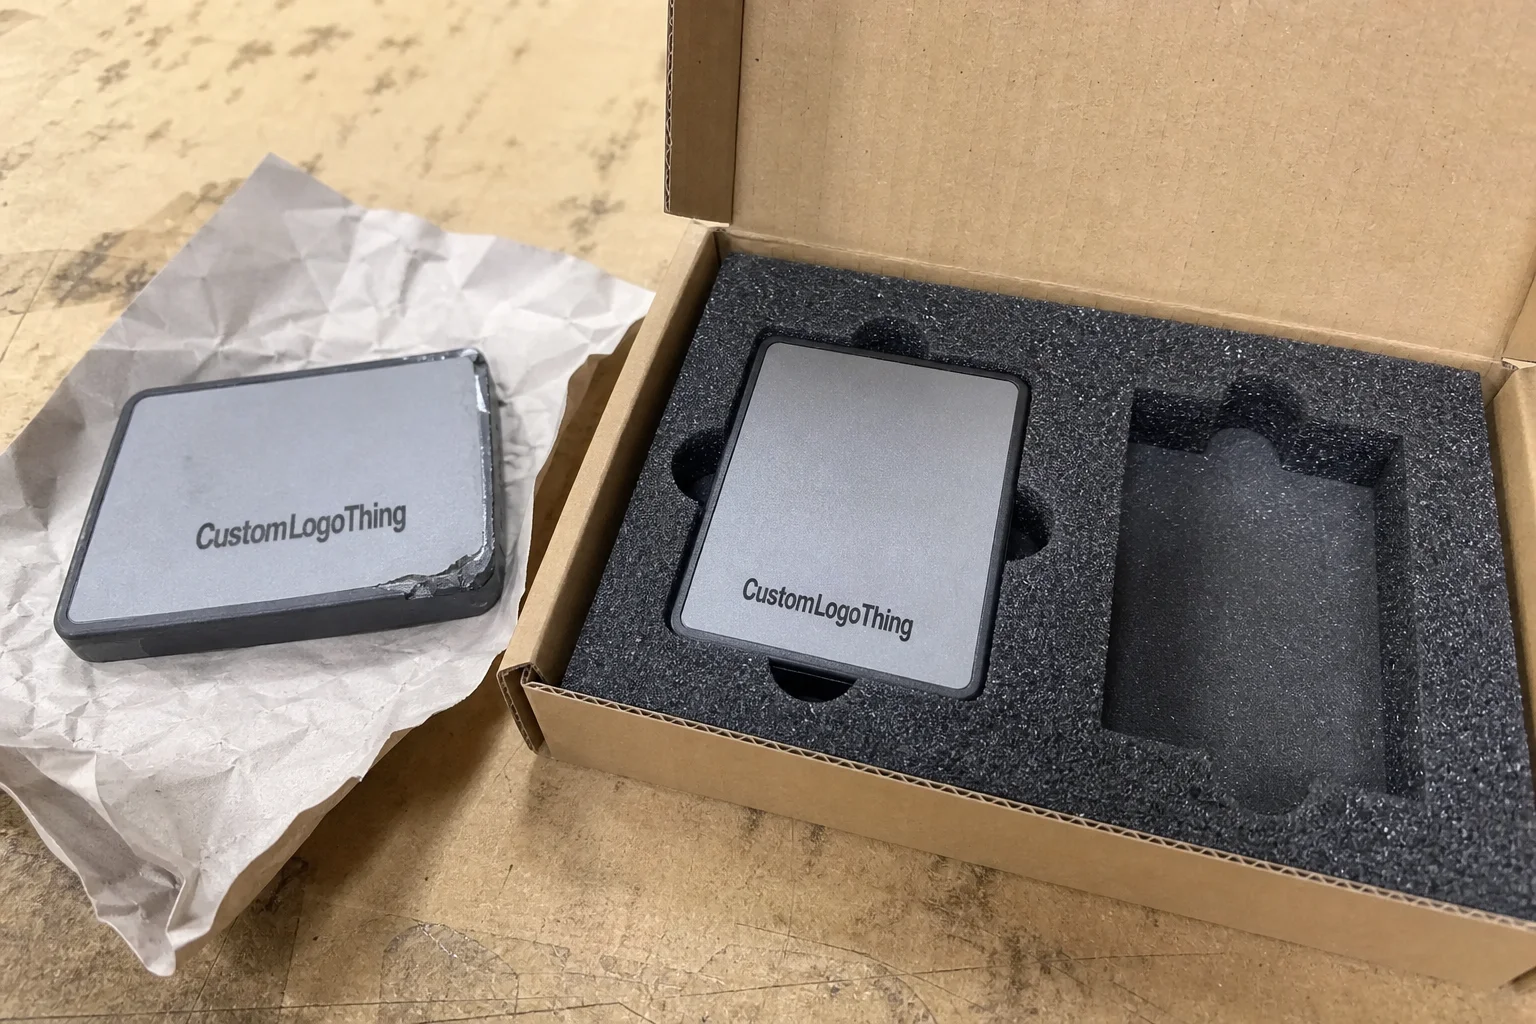
Loose packing usually fails quietly. The product may still arrive, but it can rub, shift, or pick up scuffs that ruin the first impression. That is why foam inserts matter more than loose fill or simple dividers in many programs. They immobilize the item, absorb impact, and keep the box looking finished when opened.
The main foam approaches each solve a different problem. Die-cut foam is efficient for repeat shapes and simpler production. CNC-cut foam handles more complex contours and tighter tolerances. Layered foam works when the product has variable heights or several parts. Multi-cavity layouts are useful when one insert needs to support more than one SKU family.
The right material is not chosen by appearance alone. Weight, finish, geometry, and the shipping lane all change the answer. A light cosmetic item in retail packaging is a different job from a glass component moving through parcel carriers and warehouse stacking. Same category, different engineering.
A box that rattles feels cheaper than one that stays still, even when the product is identical. Buyers notice that immediately, and so do returns teams.
That is also why the insert should match the brand promise. If the outer carton is clean and premium, the internal structure should reinforce that same feel with centered placement, consistent clearance, and no awkward motion. A sloppy insert makes an otherwise polished package feel unfinished.
Retail programs need extra attention to removal and repacking. If the item scrapes on the way out, if accessories are jammed into the main cavity, or if the customer cannot reinsert the product cleanly, the design is not finished. It is only cut.
How the insert design works inside the box
Good insert design starts with the full stack: the carton, the internal clearance, the foam cavity, and the removal path. If one layer is wrong, the others have to compensate. A printed box can still feel poor if the insert lets the product drift or makes extraction awkward.
Cavity sizing is the first key decision. You want enough compression to hold the item securely, but not so much that delicate corners, lenses, or coated faces carry constant pressure. Wall thickness matters for the same reason. Thin walls save material, but they can deform under heavier items or repeated handling. Cut depth changes whether the product sits high for presentation or lower for protection.
For premium presentation packaging, the objective is usually a snug fit and a controlled reveal. For shipping-heavy programs, the priorities shift toward shock absorption, crush resistance, and keeping the product away from the carton during drops and vibration. Those are related jobs, not identical ones.
If the customer must remove, inspect, and repack the product, test that sequence before approval. A cavity can look precise on a drawing and still be annoying in use if the item catches on the foam or requires force to lift out. Accessories also need dedicated spaces. Cables, manuals, chargers, and spare parts should not be wedged in as an afterthought.
For teams also planning custom printed boxes, the carton and insert should be reviewed together. A black EVA insert can look premium in one line and heavy in another. A white tray can feel clean in one product family and flat in another. Material, color, and depth all affect the final read.
One simple way to think about the system: the outer carton makes the first impression, and the foam proves the packout was planned instead of improvised. In electronics, cosmetics, premium gifts, and consumer kits, that second layer matters.
Cost, pricing, MOQ, and unit economics
Foam pricing depends on more than material type. Density, thickness, cut complexity, finish quality, cavity count, and whether tooling is required all affect the number. MOQ matters because setup time is fixed. A small run has to absorb that work across fewer units, which pushes the unit price up.
As a rough frame, simpler inserts can land around $0.18-$0.45 per unit at a few thousand pieces, while more complex presentation builds can move into the $0.60-$1.50 per unit range or higher. That is not a quote. It is a practical range to prevent false expectations. A layered EVA build with polished edges and tight tolerances will not price like a simple die-cut PE block.
| Foam Type | Best Fit | Typical Use | Rough Unit Cost Range | Tradeoff |
|---|---|---|---|---|
| EPE / PE foam | Light to medium products | Transit protection, simple cavities | $0.18-$0.45 | Affordable, but less premium in appearance |
| PU foam | Light presentation items | Gift sets, cosmetic kits, display packaging | $0.22-$0.60 | Good feel, but not ideal for heavier loads |
| EVA foam | Premium products | Electronics, tools, branded presentation boxes | $0.45-$1.20 | Cleaner finish, usually higher cost |
| EPP foam | Heavier or reusable packs | Higher protection, repeated handling | $0.35-$0.90 | Strong performance, but not always the first visual choice |
The real comparison is between insert cost and avoided claims, replacements, and customer complaints. A 2% damage rate on a $40 product can erase the savings from a cheaper foam choice quickly. Add labor for rework and reshipping, and the lowest-priced option stops looking low-cost.
It also helps to evaluate the insert with the carton, not in isolation. An insert that fits a poorly sized box is still a problem. If you are comparing structures across a product family, it is usually cleaner to review the insert with the broader custom packaging options program in one quote rather than chase separate line items.
In practice, the cheapest insert is often the one that survives production, protects the product, and avoids a second sampling round.
Process and lead time from sample to production
The cleanest projects follow a predictable path: product measurements, layout review, material recommendation, prototype, approval, production, then final packing. Skip one step and the timeline usually grows longer. A supplier should ask for product dimensions, weight, surface sensitivity, carton size, and handling concerns before naming a lead time.
A realistic timing range is 1-2 business days for layout review, 3-7 business days for a prototype or sample, and about 10-20 business days for production after approval. Simple die-cut runs can move faster. Layered inserts, deep cavities, or projects waiting on material supply can take longer. Shipping sits on top of that.
The biggest schedule killer is usually missing information, not machine capacity. Late artwork, a product revision after sampling, or a vague brief like “make it fit” all create delays. A sample that looks close is not the same as an approved sample.
Prototype testing is worth the time when the product has uneven weight, fragile edges, reflective surfaces, or a finish that marks easily. The sample should be checked with the real box, the real product, and the real opening sequence. That is the only way to catch pressure points before production starts.
Before sign-off, confirm the basics:
- Exact dimensions of the product, including protrusions and attachments.
- Tolerances for the cavity and the amount of expected compression.
- Carton size and whether the insert sits in a printed or unprinted box.
- Assembly method if the insert ships in separate pieces.
- Accessory placement for cables, chargers, cards, or documents.
That list is basic on purpose. Basic details are where most foam projects succeed or fail.
Key specs that decide whether the insert actually works
Foam density is one of the first specs buyers get wrong. Lower-density foam can work for lightweight presentation items, but it becomes risky as the product gets heavier or the corners become more fragile. Higher-density foam resists compression better and tends to hold its shape under repeated handling.
Thickness, compression resistance, and cut depth work together. If the foam is too thin, it bottoms out. If it is too soft, it deforms and stays that way. If the cavity is too shallow, the item sits too high and is more vulnerable to impact. If it is too deep, the product feels buried and becomes harder to remove.
Surface finish also matters. Clean edges, consistent color, and a smooth face support premium packaging. A rough-cut insert can make an expensive product look rushed. That matters in retail packaging, cosmetic packaging, electronics, and gift sets where the opening experience is part of the purchase decision.
Quality control should cover odor, dust, and compression recovery. Foam can carry smell if the material quality is poor or curing is off. Dust can be a problem on dark products or polished surfaces. Recovery should be checked after handling, not just when the insert is fresh out of production.
If the packaging program has compliance or sustainability requirements, the material story should be explicit. Recycling expectations vary by market, and the foam should be chosen with its end-of-life route in mind, not just shipping performance. If your package also uses fiber-based components, FSC-certified materials may matter to procurement teams, and the Forest Stewardship Council keeps its certification standards clear at fsc.org.
For distribution testing, ask whether the design should be checked against relevant ISTA procedures. That is the difference between a design that looks fine and one that has actually been stressed.
The best insert usually looks plain on paper and works well in practice. That is what disciplined packaging looks like.
Common mistakes buyers make when ordering foam inserts
The first mistake is measuring from the wrong reference points. Buyers often measure the body of the product and forget handles, ports, buttons, lenses, or other raised features that change the footprint. The cavity then looks right in a drawing and fails when the item is placed inside.
The second mistake is designing for the product alone instead of the full packout. Cables, documents, caps, chargers, and spare parts all need space. If the insert ignores those pieces, they get jammed wherever they fit, which usually means the layout is neither premium nor protective.
The third mistake is chasing the lowest foam price without checking performance. Cheap foam can crush, tear, shed dust, or look worn after a few shipments. That does not save money. It moves cost into returns, claims, and replacement shipments.
A sample on a bench is not the same as a sample inside the final carton with the real product finish. Test the actual packout or the sample is only decoration.
The fourth mistake is approving the insert before the box is finalized. The foam may fit the product perfectly and still fail in the carton because board thickness, lid pressure, or headspace changed. If the outer package is part of your custom printed boxes program, the insert and carton should be approved together.
The last mistake is treating foam as an afterthought in the sourcing cycle. It is part of the packaging architecture. If it is late, the launch can slip. If it is wrong, the product may still ship, but the complaints arrive later and in larger numbers.
What to prepare before you request a quote
Accurate pricing starts with accurate inputs. If you want a useful Quote for Custom foam inserts for packaging, gather the product dimensions, weight, finish sensitivity, quantity, carton size, storage conditions, and target ship date before you ask for an estimate.
Whenever possible, send a physical sample product instead of relying only on a drawing. Photos help, but they do not show how the item balances, where the weight concentrates, or how the customer will remove it from the cavity. A real sample lets the supplier check clearance, fit, and return behavior instead of guessing.
Define the priority up front. Is the goal the lowest cost, the strongest protection, the best presentation, or a workable middle ground? That decision changes the material and construction. A premium retail box may justify EVA or layered foam. A shipping-heavy program may do better with denser PE.
If you are also specifying the carton, keep the whole system in one discussion. That matters especially for teams balancing custom printed boxes, branded packaging, and insert performance in a single launch. Splitting those decisions usually creates more work than it saves.
A useful next step is straightforward: compare one prototype, one costed production quote, and one timeline estimate before locking the design. If those three line up, the project is ready. If they do not, the structure needs another round of work.
FAQ
How do custom foam inserts for packaging differ from stock foam inserts?
Custom inserts are cut around the product, so they reduce movement and damage better than generic blocks. They also improve presentation because the item sits centered instead of floating in an oversized void.
What foam density is best for packaging fragile products?
Lower-density foam can work for light presentation items, but heavier or more fragile products usually need a denser material with better compression resistance. The right choice depends on weight, drop risk, and how much load the insert must carry.
How much do custom foam inserts for packaging usually cost?
Pricing depends on foam type, thickness, cut complexity, finish, and order quantity. Smaller runs cost more per unit, while simpler layouts usually bring the unit price down. Complex builds with multiple cavities or premium finishes cost more.
What is the usual turnaround for custom foam inserts?
Prototype timing is usually faster than full production, but exact lead time depends on design approval and material availability. Projects move faster when dimensions, product photos, and carton specs are ready on the first request.
Can custom foam inserts for packaging be made for premium gift boxes?
Yes, they are often used in premium gift, electronics, cosmetic, and presentation packaging. The design should support both product protection and the way the box looks when the customer opens it.
If the insert, carton, and finish work as one system, the packaging usually performs better in transit and looks better at the point of opening.

