Custom Gift Tag Stickers to Order for Cleaner Packaging
Custom gift tag stickers solve a common packaging problem without adding more labor to the line. They give brands the look of a small gift tag while staying in adhesive form, so a packer can apply them in seconds instead of threading string, tying knots, or managing a separate card. For small goods, seasonal sets, and ecommerce orders, that difference is usually felt in speed first and presentation second, but both matter.
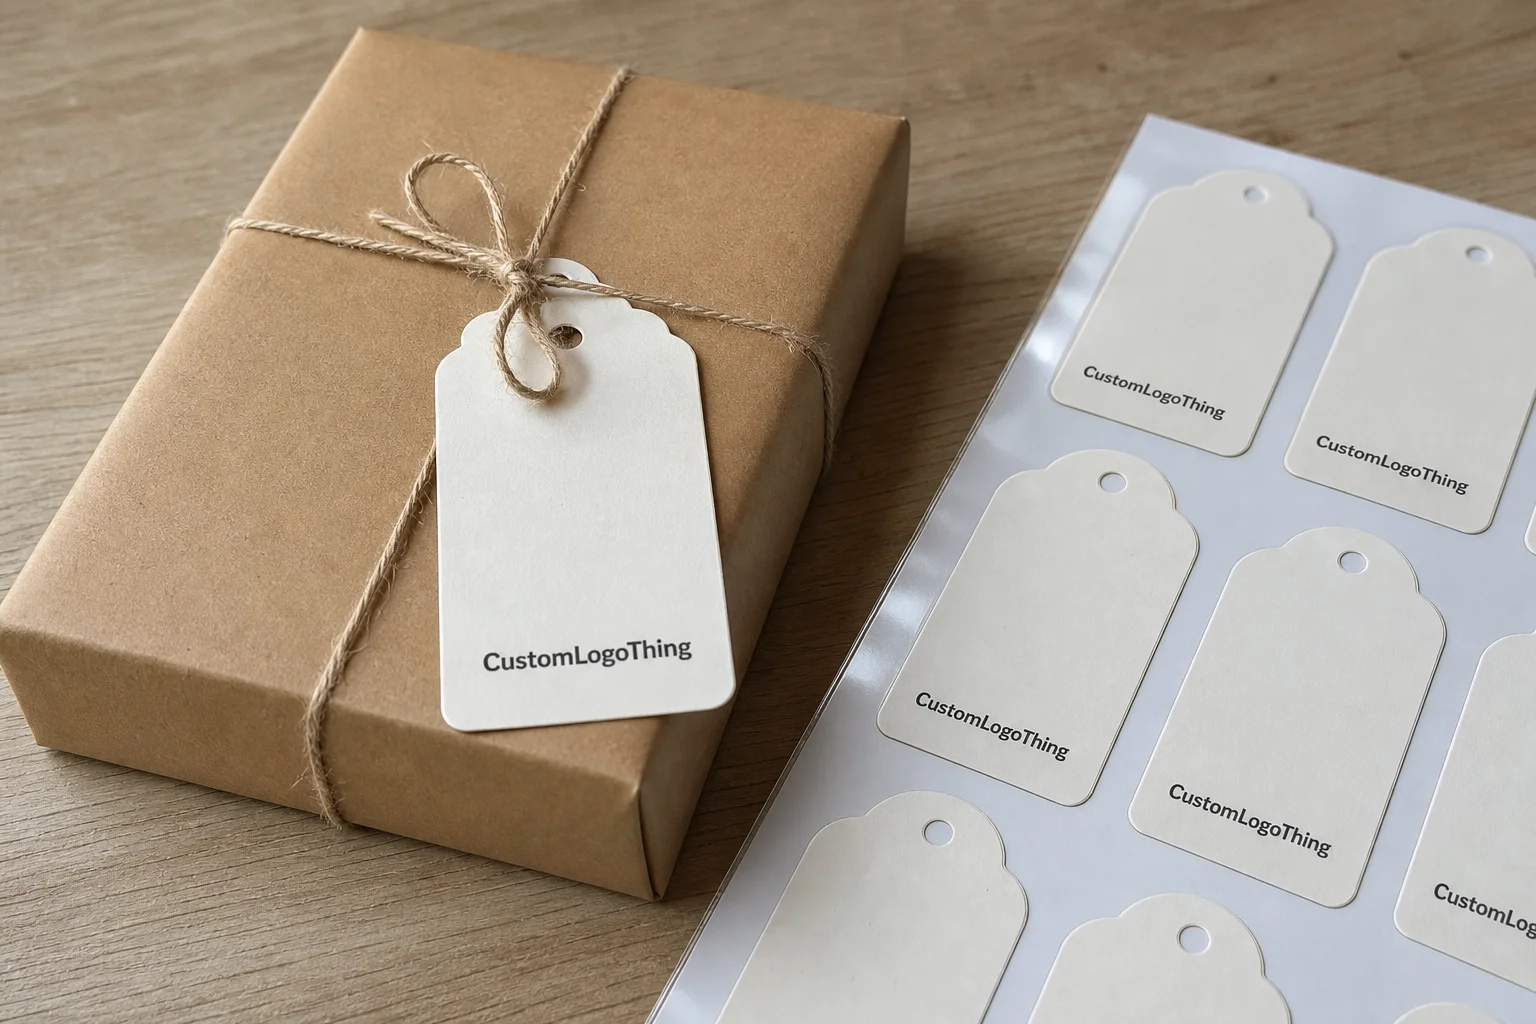
They also help packaging look deliberate. A tag-shaped sticker can close tissue wrap, identify a product, add a short message, or finish a mailer box with a neat branded detail. The strongest versions do not call attention to themselves as stickers. They look like part of the package system.
Why custom gift tag stickers solve a real packaging problem
Traditional hang tags still have a place, but they are not always the cleanest answer. If a brand is packing small accessories, folding tissue by hand, or assembling seasonal gift sets, the extra steps add up quickly. Custom gift tag stickers reduce that friction by delivering the same branded cue in a format that applies like a label instead of a separate component.
That sounds simple, and it is. The practical benefit is that the packaging line handles one piece instead of two or three. There is no string to cut, no knot to tie, and no tag to align before sealing the box. In a warehouse or retail back room, those details affect throughput more than buyers usually expect.
They are also useful where presentation needs to stay compact. A full hang tag can look oversized on a small carton or pouch, while a tag-style sticker stays proportional. It can be cut into rounded rectangles, ovals, scallops, or custom silhouettes, then applied to boxes, sleeves, envelopes, tissue wrap, or product packaging. A printed hole-punch detail or faux string graphic can make the piece read like a gift tag without the hardware.
Common use cases include:
- Small goods and accessories where a larger tag would overwhelm the package.
- Seasonal gifting where speed and consistency matter across a large run.
- Ecommerce shipping where every extra assembly step slows pack-out.
- Promo kits and event mailers that need a tidy front-facing brand mark.
- Retail packaging where the sticker supports the box design instead of competing with it.
Material choice changes the result more than some buyers expect. Matte paper creates a softer, more hand-finished look. Gloss improves contrast and color density. Writable stocks are useful if the customer or store staff needs to add a name, date, or short note. For packages that lean natural or artisanal, an uncoated or lightly coated stock usually fits better than a highly reflective finish.
A tag-style sticker works best when it solves both parts of the job: it should look intentional on the package and hold reliably on the chosen surface.
A traditional hang tag still wins in a few situations. If the brand needs a premium card stock badge, if the item must be tied through a loop, or if the piece needs to carry a longer block of copy, the separate tag format is the stronger choice. For many packaging systems, though, the adhesive version is cleaner, faster, and easier to keep consistent.
How the sticker format works in real packaging
The production process is straightforward. Artwork is printed on label stock or a paper-based face material, then die-cut or kiss-cut so the finished piece reads visually like a tag while keeping the adhesive backing intact. On the line, the difference is practical: the crew peels and applies it like a sticker, but the customer sees a tag-shaped design.
Most brands use this format in one of four ways. First, as a seal for folded tissue wrap. Second, as a closure on product pouches or sleeves. Third, as a branded note on the outside of a box. Fourth, as a front-facing identifier on retail packaging that needs a gift-ready finish. It works especially well where custom printed boxes already provide the structural packaging and the sticker only needs to add the final layer of branding.
Format choice affects handling speed and presentation:
- Sheets are efficient for hand application and smaller teams.
- Rolls suit faster manual packing or semi-automated application.
- Individual die-cut pieces create a more premium unboxing moment, but they take longer to handle.
- Kiss-cut sheets balance presentation and ease if the design has a custom contour.
The real tradeoff is between appearance and adhesion. A tag shape can look refined on screen, but the adhesive still has to bond to the actual package surface. Coated paperboard usually gives the cleanest print and the most reliable hold. Uncoated board can work well, but its fibers introduce more variation. Soft-touch laminates look excellent, though they should be tested because the surface can behave differently under pressure and temperature swings. Recycled stocks are often a good fit for packaging design goals, but they can be more porous or uneven, which affects both color and adhesion.
For shipping packs, think beyond the shelf. If the package will face vibration, compression, or temperature changes in transit, ISTA test methods are a useful reference point for secondary packaging and ecommerce cartons. The right spec still depends on the substrate, the line, and the budget, but transit testing reveals problems that artwork proofs never show.
Cost, pricing, and MOQ factors to plan around
Price for custom gift tag stickers comes down to a predictable set of variables. Size is the first one. Shape complexity comes next, because a simple rectangle is faster to cut than a detailed contour with tight corners. Then there is print method, stock choice, finish, adhesive type, quantity, and whether the order is sheeted or rolled. If the artwork needs white ink, foil, or more than one version, the cost moves again.
Setup costs are usually fixed or close to fixed, while the unit price improves as the run gets larger. That is why small orders often look expensive on a per-piece basis. The press setup, cutting, and finishing time still have to be paid for, even if the quantity is modest. Larger quantities spread those costs out and usually bring the unit price down in a meaningful way.
For a common 2-inch to 3-inch paper tag-style sticker at around 5,000 pieces, a reasonable working range might look like this:
| Format | Typical use | Estimated unit cost | Typical lead time | Notes |
|---|---|---|---|---|
| Sheeted paper stickers | Hand-packed boxes, tissue seals, small retail runs | $0.12-$0.22 | About 10-14 business days after proof approval | Good value, easy to store, simple to apply |
| Rolled stickers | Higher-volume pack stations, faster manual application | $0.10-$0.18 | About 12-15 business days after proof approval | Better for speed, but roll direction should be planned |
| Individual die-cut pieces | Premium presentation, slower assembly, event kits | $0.18-$0.32 | About 12-18 business days after proof approval | More handling time, stronger shelf or unboxing presence |
MOQ is tied to the same economics. Suppliers usually set a minimum because printing, die cutting, and finishing all have a threshold where a job becomes practical to run. That minimum can be based on area, quantity, or a standard press sheet count. It is not arbitrary. It reflects the point where the line can produce the order efficiently without wasting material and labor.
Two cost drivers are easy to miss. Special white ink on darker or transparent materials can add expense, and multiple artwork versions often require extra setup or sorting. Rounded corners are usually inexpensive, but unusual silhouettes can raise tooling complexity. If you want clean quotes, specify trim size, substrate, finish, adhesive type, and application format clearly. That is the only way to compare offers without guessing.
If the sticker is part of a larger packaging program, coordinate it with the other components. The box, label, and closure should be spec’d together rather than as separate last-minute purchases. Related options are available through Custom Labels & Tags or across Custom Packaging Products if the sticker is only one piece of the assembly.
Process and timeline: from artwork to delivery
The path from artwork to delivery usually follows the same sequence: concept, file prep, proofing, print setup, cutting, finishing, quality check, packing, and shipment. Each step is manageable on its own, but delays accumulate fast if the files are not clean at the start. Missing bleed, low-resolution logos, broken fonts, or color conflicts can stop a job before it reaches press.
That is why the first proof matters so much. It is the point where small mistakes are still inexpensive to correct. Once a design is approved and production begins, changes become slower and more expensive. In practical terms, a clean proof cycle saves more time than any rush fee can recover later.
Simple sheeted jobs usually move the fastest because they are easy to print and finish. Custom contours, foil accents, heavy varnish, and specialty materials add time. Approval delays can matter even more than production delays. If a marketing team, compliance reviewer, and operations lead all need sign-off, the order can sit longer than the press run itself.
A realistic lead time for standard work is often in the low-teens business days after proof approval. Complex finishes or large quantities can push that longer. Rush service is sometimes possible, but it should not be assumed. Shipping time sits on top of production time, so holiday gifting and launch dates need real margin.
Sampling is worth the effort whenever the order depends on color accuracy, adhesive performance, or exact shape. A flat digital proof will not tell you how the sticker behaves on coated board, textured kraft, or soft-touch laminate. A physical sample does. It also reveals whether the piece feels too small or too busy in the hand, which buyers often underestimate until they see it in context.
If the package surface is unusual, test before committing. Adhesion and appearance can change a lot between smooth board, recycled kraft, and soft-touch finishes.
From a packaging buyer’s point of view, the cleanest workflow is to approve the proof after the actual package material has been confirmed. That keeps the sticker aligned with the broader product packaging system instead of treating it as an isolated art file.
Design choices that affect readability and brand value
Good tag-style sticker design is usually restrained. The strongest pieces keep the logo obvious, the message short, and the spacing generous enough that the shape still reads clearly from arm’s length. A crowded sticker can feel cheap even with good materials. A simple one can feel premium if the proportions are right.
Typography does a lot of the work. Small formats demand strong contrast and disciplined text sizing. If the sticker is only 2 inches wide, fine script fonts and long taglines usually fail in real use. Medium-weight sans serif type, open letter spacing, and shorter copy tend to hold up better. If the sticker needs to be written on by hand, matte or uncoated stock is more practical than gloss.
Finish changes perception more than many buyers expect. Matte usually feels softer and more refined, especially in branded packaging with a natural or artisan direction. Gloss makes color pop, which can help with bright campaign graphics or high-contrast logos. Soft-touch has a premium feel, but it is not the best choice if the sticker needs to be written on, stacked tightly, or applied in humid storage.
Shape is another branding tool. A rounded rectangle looks orderly. A custom contour can make the sticker feel like a true gift tag, especially when the silhouette echoes the logo or icon. The goal is not decoration for its own sake. The goal is to make the format feel deliberate. That kind of restraint usually creates a better package impression than piling on extra effects.
Consistency matters if the sticker is part of a larger retail system. If the box uses warm kraft, the tag should not suddenly turn icy white unless that contrast is intentional. If the main carton is matte, a high-gloss sticker can look unrelated rather than coordinated. Good package branding depends on these small choices lining up across the whole set.
Common mistakes that raise cost or reduce quality
One of the simplest mistakes is choosing the wrong size. Too small, and the text becomes cramped or unreadable. Too large, and the sticker overwhelms the panel or wastes material. The right size is the one that fits the available space, carries the necessary content, and still leaves room around the edge.
Artwork without proper bleed or safe margins is another common issue. That matters even more on custom-cut tag shapes because the edge is more visible than it is on a square label. If the text sits too close to the cut line, a minor trim variation can make the whole job feel off. The fix is boring but essential: set trim, bleed, and safe-zone rules before the file goes to print.
Adhesive choice can also make or break the result. A high-tack adhesive may be ideal on rough paperboard but too aggressive for delicate wraps or premium uncoated surfaces that need clean removal. A low-tack removable adhesive may feel gentle, but it can fail on textured or recycled materials. There is no single correct adhesive for all custom gift tag stickers; the right call depends on the package surface and how the item is handled.
Color expectations need attention as well. Paper stocks, coated boards, and films reproduce color differently. A rich navy on gloss paper may print flatter on uncoated stock. A warm cream on recycled paper can shift slightly because the substrate itself changes the look. If the sticker needs to match other pieces in a custom printed boxes program, ask for a proof against the actual material instead of relying on a screen preview.
Overcomplication is the last common mistake. Metallic foil, spot varnish, custom die shapes, and multiple versions all have a place, but they should earn their keep. A simple, well-executed piece often outperforms a busy one. That is especially true in ecommerce, where the tag may only have a second or two to land before the package moves on.
Expert tips for better ordering decisions
If the order depends on color, texture, or adhesion, ask for a sample. A physical sample will tell you whether the print is legible, whether the adhesive holds on your actual package, and whether the tag shape feels right next to the product. That information is much more reliable than a PDF proof alone.
Match the format to the production line. Sheets are usually the easiest choice for hand packing and smaller teams. Rolls make sense when the pace is higher and repeat application matters. Individual die-cut pieces are useful when presentation matters more than speed. There is no universal winner, which is why the use case should be in the brief from the start.
Write the application into the quote request. Say whether the sticker will seal tissue, brand gift boxes, close pouches, or attach a removable note. That one sentence helps a supplier steer the spec in the right direction. It also reduces the chance of being quoted the wrong adhesive or release format. A good supplier will still ask follow-up questions, but the initial brief should not force them to guess.
Plan inventory around the full campaign, not just the first shipment. Seasonal programs often fail on timing because the buyer orders enough for launch day and not enough for the next production batch. If the run is for holiday gifting, product drops, or recurring retail packaging, order to cover the whole window. That is cheaper than paying for emergency reprints later.
Here is a practical checklist before requesting pricing:
- Confirm the package surface: coated board, uncoated paper, soft-touch, kraft, or recycled stock.
- Decide whether sheets, rolls, or individual pieces fit the assembly method.
- Set the approximate size and shape, including any custom contour.
- List the finish needed: matte, gloss, writable, or specialty coating.
- Estimate the quantity needed for the full campaign.
The strongest orders usually come from buyers who already know how the sticker fits into the packaging system. That means the box, tissue, label, and hand-pack workflow are all considered together. If the tag is treated as an afterthought, it tends to look like one.
Next steps for ordering the right version
The decision path is straightforward once the variables are in order. Define the package surface first, choose the application format, set the size, select the finish, and estimate the quantity before asking for quotes. That sequence keeps the conversation grounded in use rather than guesswork.
Before you reach out, gather three things: artwork files, approximate dimensions, and the intended application method. If the sticker needs to work on a textured or recycled surface, say so. If it has to match a broader package branding program, include that too. The more the supplier understands about the real use case, the more useful the recommendation will be.
For higher-risk orders, review one sample against the actual package before scaling up. That matters most with coated, textured, or recycled surfaces, where the look and hold can shift more than expected. It is a small step compared with the cost of correcting a full run.
If you are weighing custom gift tag stickers against a traditional hang tag, compare cost, lead time, and adhesive performance together. Price alone does not tell the full story. The right version should fit the brand, hold on the package, and keep the assembly process moving without friction.
What are custom gift tag stickers used for in packaging?
They are used to brand gift packaging, close tissue or pouches, and create a tag-like presentation without adding separate hang tags or string. They work well for ecommerce, boutique retail, events, and seasonal gifting where fast assembly and a polished look both matter.
What size should custom gift tag stickers be?
The right size depends on how much text or branding you need and where the piece will be applied. A good starting point is large enough to read clearly at arm’s length but small enough to fit the package panel without crowding.
How do custom gift tag stickers affect unit cost?
Unit cost usually drops as quantity increases because setup and cutting costs are spread across more pieces. Shape complexity, specialty finishes, and smaller formats can raise unit cost even when the print is simple.
How long does production usually take for custom gift tag stickers?
Timeline depends on proof approval, quantity, finishing, and whether the job is sheeted or rolled. Simple orders usually move faster, while custom shapes and specialty materials can add lead time.
Can custom gift tag stickers be used on textured or recycled packaging?
Yes, but adhesive choice matters more on textured, uncoated, or recycled surfaces. Testing a sample on the actual package is the safest way to confirm hold, appearance, and removability.

