Custom Stickers for Shot Glasses: What They Are and Why They Work
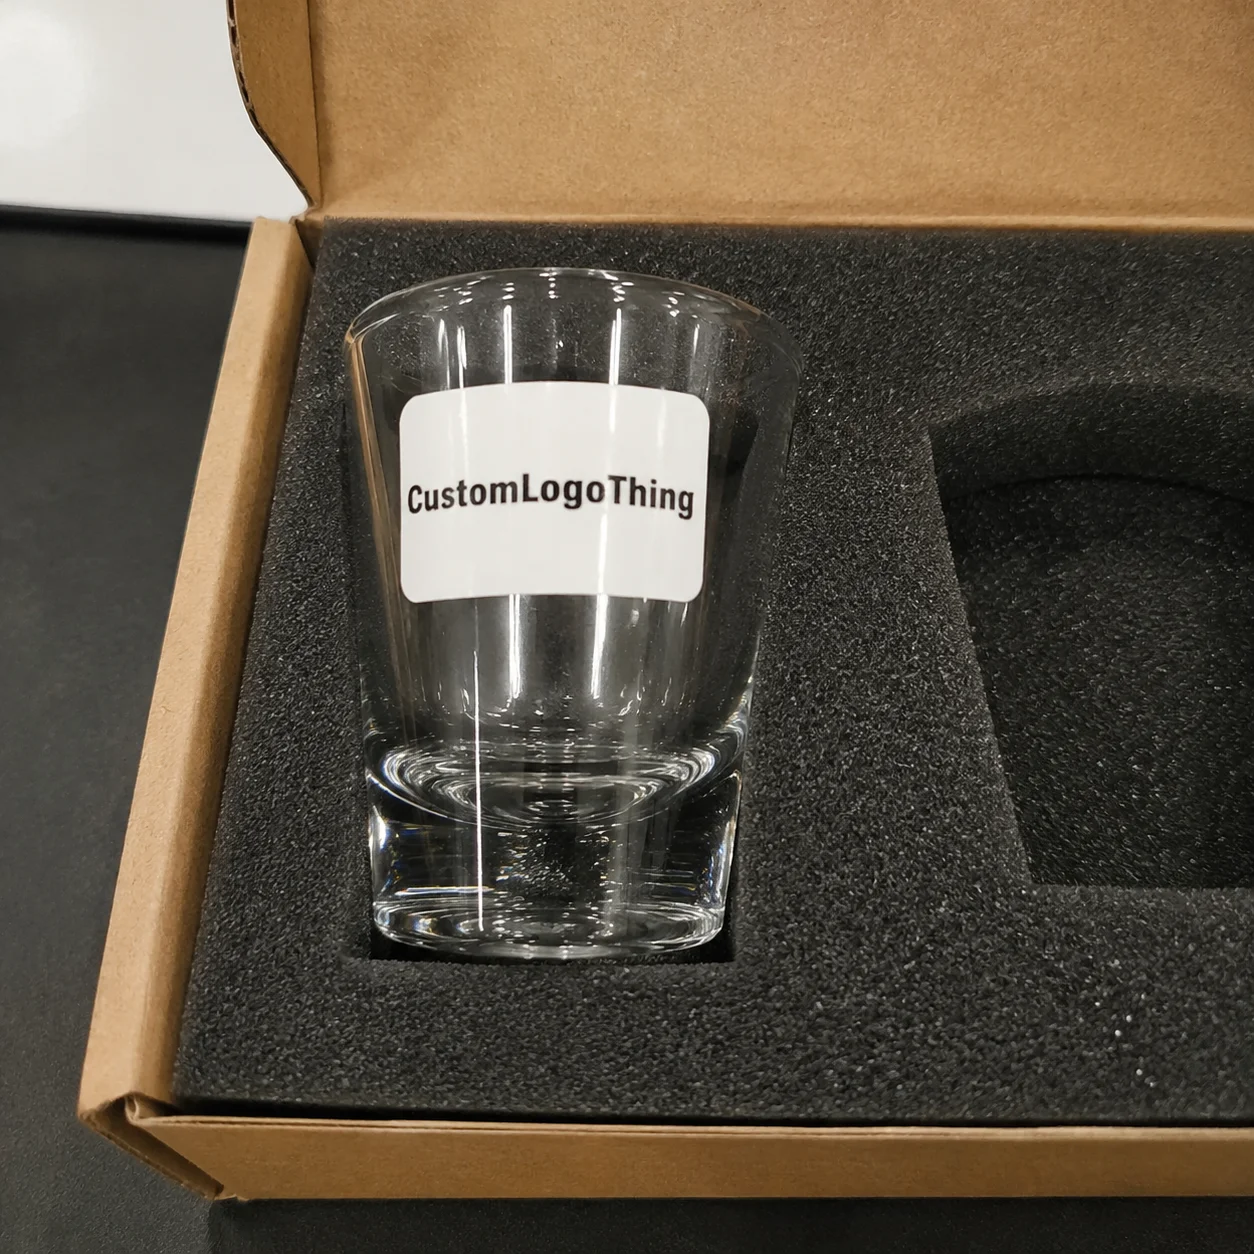
Shot glasses are awkward little surfaces to brand. They are curved, small, and often handled in fast-moving settings where a label has to look good immediately and stay put long enough to matter. That is why Custom Stickers for Shot Glasses remain such a practical option for event favors, tasting flights, souvenir sets, and retail packaging. They give you a controlled print area without the expense or lead time of decorated glass.
In most cases, these labels are used on the body of the glass, near the base, or as a small wrap around the lower portion. Some buyers want a clean logo mark. Others need event details, a date, or a short message. A few want a removable label for reusable glassware, while others need something more permanent that behaves like a durable decal. The right choice depends on how the glass will be used, washed, chilled, and stored.
The appeal is not only cost. Sticker-based branding also gives you flexibility. Artwork can be updated without restarting a glass production run, which matters for seasonal promotions, short-run retail packaging, and one-off events. If the design changes frequently, stickers are far easier to adjust than etched or printed glass.
There is also a visual advantage when the design is handled well. A small, well-proportioned label can make plain glassware feel intentional without making it look overworked. On a surface this small, restraint usually reads better than decoration for decoration’s sake.
“On small glassware, the label is carrying brand recognition, event information, and shelf appeal on a surface that gives you very little room for error.”
These labels perform best where the glass is seen up close: wedding tables, tasting rooms, drink flights, giveaway sets, and Retail Gift Packaging. They are less forgiving in dishwashers or repeated high-moisture use unless the stock and adhesive are chosen with that in mind. That tradeoff is often exactly why buyers choose this format in the first place.
How Application Works on Small Glassware
Good results start before printing. The usual workflow runs through design prep, proofing, material selection, print, die-cutting, and application to a clean, dry glass. Skip one step and the odds of wrinkled edges or skewed placement rise quickly. Shot glasses leave almost no slack; if the label is off by a few millimeters, it shows.
Curvature is the hidden constraint. A shot glass may look simple, but the printable zone can be surprisingly small once the taper and shoulder are accounted for. A design that looks fine on a flat mockup may bridge, wrinkle, or lift on the real glass. Measuring the actual glass matters more than guessing from a product photo or a general template.
Placement changes the whole read. A front label works well for a logo, monogram, or short brand line. A wrap label gives room for more copy, a pattern, or event details. A bottom mark can be subtle and polished, especially in gift sets where the branding should not overwhelm the product. Each option changes how far away the design can be read and how much weight it carries visually.
Finish also changes how the label feels in use. Gloss can make color look sharper and more saturated. Matte softens reflections and often reads better under warm indoor lighting. Clear film can create a printed-on effect, while a white-ink backing helps preserve contrast on transparent glass. For packaging that will be handled, rubbed, and transported, the same kind of practical thinking used in shipping and distribution testing applies; the label has to survive real handling, not just look good on screen.
Durability is always a specification, not a blanket promise. A laminated film with the right adhesive can handle display, hand washing, condensation, and light chilling far better than paper. But there is a difference between surviving a tasting event and surviving repeated dishwasher cycles. Buyers should ask directly how the sticker is expected to perform, because “water resistant” can mean several different things.
- Front label: best for logos, initials, and short event names.
- Wrap label: useful for longer copy or a repeated pattern.
- Bottom mark: subtle branding for premium gift sets.
Material, Size, and Design Factors That Change Results
The most important material decision is adhesive behavior. Permanent adhesive is usually the better choice for long-term branding, resale items, and glassware that will not be re-labeled. Removable adhesive makes more sense for leased glassware, reusable favors, or projects where the label needs to come off cleanly later. If the use case is not settled yet, ask for a test sheet before placing a full order.
Material choice should match the environment. Vinyl is a dependable middle ground for moisture exposure and everyday handling. Polyester is tougher and usually better for abrasion resistance. Paper can work for dry, one-time events, but it is the weakest option once condensation, ice buckets, or frequent touching enter the picture. Clear film looks refined on transparent glass, although it often needs white ink backing to keep the artwork from disappearing.
Size is where many buyers lose money. Measure the flat usable area, not just the circumference. On a shot glass, the printable zone is often smaller than expected because the curve reduces the usable edge area. A label that is too wide lifts at the corners. One that is too tall runs into a shoulder or base transition and distorts the design.
Artwork itself has limits. Tiny text turns unreadable quickly. Thin strokes can break up on curved surfaces. Low-contrast colors may vanish against clear glass, especially in dim lighting. If the label has one job, make that job obvious. Small-format branding is not the place for dense copy.
Cut style and finish also shape the final result. Kiss-cut sheets make it easier to apply multiple labels quickly. Die-cut shapes feel more tailored and can make a product set look more deliberate. Rounded corners reduce lift. A protective laminate helps resist scuffing and gives the label a cleaner feel in hand.
| Option | Best Use | Typical Strength | Typical Tradeoff |
|---|---|---|---|
| Paper label | Dry, one-time events | Lowest unit cost | Weak around moisture |
| Vinyl label | Promotions and favors | Better moisture resistance | Higher cost than paper |
| Polyester label | Reusable or handled sets | Good abrasion resistance | Usually the priciest stock |
| Clear film with white ink | Premium transparent-glass look | Strong visual integration | Needs careful contrast planning |
The same basic logic applies across branded packaging. If the use is temporary, a simpler stock often makes the most sense. If the item will be handled, chilled, or reused, the tougher material usually pays for itself in fewer failures. That is true for labels here, and it is true for Custom Labels & Tags more broadly.
Cost, Pricing, and MOQ: What Buyers Should Expect
Pricing for custom stickers for shot glasses depends on quantity, material, size, finish, color count, and whether the shape is standard or fully custom. In small runs, setup cost gets spread across fewer pieces, so the unit price climbs. Once the quantity rises, the price per sticker usually falls faster than first-time buyers expect.
For rough planning, paper labels usually sit at the low end, vinyl in the middle, and polyester or specialty clear film at the upper end. On an order around 5,000 pieces, small changes in print coverage or finish can change pricing by several cents per unit. That does not sound like much until the order scales, especially across multiple event runs or product launches.
MOQ behavior is straightforward, even when it is inconvenient. Lower quantities tend to carry higher unit pricing because proofing, setup, die-making, and finishing do not shrink much just because the run is small. Larger runs reduce per-piece cost, but only if the artwork and use case stay stable. If the design will change often, overordering creates waste rather than savings.
Hidden costs are where quotes drift. Proof revisions, rush production, specialty adhesives, and shipping all affect the final spend. Orders that involve fragile glassware moving separately from the labels can add coordination complexity as well. A complete quote request makes comparisons easier and keeps surprises down.
Before asking for pricing, have these details ready:
- Exact dimensions or a measured dieline
- Quantity and any expected reorder volume
- Artwork status, including whether files are print-ready
- Application method and surface conditions
- Use case, such as favors, retail packaging, or resale
If the sticker is part of a larger branded set, it helps to confirm whether the stock can align with Custom Packaging Products used elsewhere in the presentation. Consistency across labels, cartons, and inserts makes the full package feel more intentional.
For buyers with sustainability requirements, ask whether FSC-certified paper is available where relevant. The FSC system does not replace performance testing, but it does help when sourcing documentation matters.
Production Steps and Turnaround: From Quote to Delivery
The production flow is usually simple on paper: Request a Quote, confirm specs, review artwork, approve the proof, print, finish, and ship. In practice, the slowest step is often approval. Buyers delay when files are incomplete, when color changes come after proofing, or when the label size does not fit the actual glass.
Standard runs often move in roughly 12 to 15 business days once the proof is approved, though material choice and workload can shift that timing. Specialty materials, white ink, custom shapes, and larger volumes add time. If the order is tied to an event date, buffer matters. There is no benefit in cutting the schedule too close.
It also helps to remember that stickers and glassware may travel on different timelines. The glasses may arrive early and sit in storage. The labels may arrive first and wait for application. Either way, it is worth inspecting the shipment right away. Check quantity, cut quality, adhesive behavior, and color consistency before the full run goes into use.
For unusual glass shapes, sample sheets or a short test run are worth the cost. A steep curve, a short printable zone, or a heavy base can make a design fail in ways that a screen mockup will never show. A small test protects the full batch.
Proofing should be treated like a control step, not a formality. The best proof clearly shows the dieline, safe zone, bleed, and any white-ink areas so the buyer can compare it to the actual glass measurements. That is where a lot of avoidable problems are caught.
Common Mistakes That Waste Labels and Money
The first mistake is designing the label like it belongs on a flat bottle panel. Shot glasses are not bottles. The surface is shorter, the curve is tighter, and the readable area is much smaller than buyers often assume. A design can technically fit and still look crowded or off-center.
The second mistake is choosing paper stock for a wet environment. If the glasses sit in ice, get chilled, or are handled with condensation on the outside, paper edges can lift or wrinkle. That failure is especially frustrating because the labels may look excellent on day one and tired by the end of the event.
Third, too much text. This is a small object. Dense copy usually becomes visual clutter, and clutter makes the brand harder to read rather than easier. If the logo is the main asset, let it breathe. If the label needs to carry event details, keep the layout compact and readable at arm’s length.
Fourth, skipping a fit test on the actual glass. This is one of the easiest mistakes to avoid and one of the most common. A dieline is helpful, but it is not a substitute for the real shape. One sample applied to the actual shot glass can save an entire batch.
Fifth, ignoring how the glass will be handled. Hand washing, chilling, repeated reuse, and stacking all change performance. If the planned use is more demanding than a one-night giveaway, say so early. Better specs raise the upfront price, but they usually cost less than replacing failed labels.
Practical Tips for Artwork, Ordering, and Inspection
Start with the job the sticker has to do. Is it branding a product, tagging a favor, supporting retail packaging, or identifying a temporary event item? That single question should guide the rest of the order. A label built for a wedding favor should not be specified like one meant for a reusable bar glass.
Before sending artwork, use a print-safe checklist:
- Final dimensions and shape
- Bleed and safe zone
- Finish and laminate choice
- Adhesive type
- Quantity and reorder expectation
Ask for a proof on the actual dieline and compare it with the physical glass measurements side by side. If the label is only a few millimeters smaller than the flat zone, that is not enough margin. Those small differences matter more than most buyers realize.
Strong artwork does more than decorative work. A single bold logo, a clear wordmark, or a simple monogram usually reads better than a busy composition. On a small surface, contrast almost always beats complexity. The more time is spent trying to say, the less the label actually says.
“If the logo cannot be read at arm’s length, the design is probably doing too much.”
For teams buying across multiple SKUs, the cleaner move is to keep these labels aligned with the broader packaging system. That means checking how they sit beside inserts, cartons, gift wrap, and related product packaging so the set feels connected rather than assembled piecemeal.
The practical next step is simple: gather the glass dimensions, quantity, and handling conditions, then request a material recommendation and quote before finalizing artwork. Done well, custom stickers for shot glasses become a straightforward packaging tool instead of a trial-and-error expense.
FAQ
What size should custom stickers for shot glasses be?
Measure the flat usable area on the glass, not just the total circumference. Keep artwork compact so edges do not lift around the curve. A proof or sample on the actual glass is the safest way to confirm fit.
Are custom stickers for shot glasses waterproof?
Water resistance depends on the material, adhesive, and finish. Vinyl or laminated options usually handle condensation and light washing better than paper. For repeated wet use, confirm the sticker is rated for that environment.
Can I use clear stickers on shot glasses?
Yes, clear film can create a clean, almost printed-on look. White ink backing may be needed so the artwork stays visible on transparent glass. Clear designs work best when the logo has strong contrast.
How long do custom stickers for shot glasses take to produce?
Timing depends on proof approval, material choice, and order size. Standard jobs move faster than custom shapes or specialty finishes. Build extra time if the stickers are tied to an event date.
What is the best material for reusable shot glasses?
Durable vinyl or polyester is usually better for repeated handling. A laminate can improve scuff resistance and appearance. The right adhesive matters as much as the face stock for long wear.


