Personalized clear tote bags are showing up in more venues, retail programs, and event kits because they solve a practical problem while still giving brands a visible surface to work with. Security teams can see what is inside, organizers can move people through entry points faster, and the tote still carries a logo, a color system, or a campaign message in a way that feels deliberate rather than improvised.
That mix is the reason they have moved from a narrow compliance item into a regular packaging choice. The bag itself is simple. The value comes from the choices around it: material thickness, closure type, handle construction, and the decoration method used to turn a transparent carrier into something reusable and recognizable.
For buyers, the appeal is straightforward. A clear tote can hold brochures, bottles, samples, apparel, or onboarding materials, and it can do so in settings where opaque bags are restricted or look out of place. The challenge is choosing a construction that still feels solid in hand, prints cleanly on a transparent surface, and fits the actual use case rather than just the mockup.
Why personalized clear tote bags are suddenly everywhere
Transparent bags moved out of niche security use because they reduce friction at entry points. A guard, usher, or event staff member can check contents faster, which matters in stadium lines, trade show entrances, school checkpoints, and employee access areas where a few seconds per person adds up quickly. Faster screening is not just operational convenience; it changes how the whole arrival experience feels.
The shift is not about the clear material alone. What changed is that personalization gives the bag a second job. A plain clear tote says the carrier is following a rule. A printed or finished version says the organization planned for that rule and still cared about presentation. That difference shows up in perceived quality, especially in programs where the bag is carried in public for hours.
In practice, personalized clear tote bags are commonly used for:
- Conference attendee kits with notebooks, lanyards, and samples
- Retail giveaways that need a reusable takeaway bag
- Sports and stadium entry where visibility rules apply
- Beach or resort welcome packs
- Employee onboarding sets with water bottles, brochures, and gifts
- Hospitality and travel programs that need a cleaner presentation than a paper sack
Material choice matters more than many first-time buyers expect. PVC is still the most familiar option because it is common and usually cost-friendly. TPU tends to cost more, but it often brings a softer hand feel, less odor, and better flexibility, which can matter if the bag will be reused often or carried against clothing. The numbers on the spec sheet are not cosmetic. A 0.3 mm clear tote and a 0.5 mm clear tote behave differently in use, especially around seam strength and shape retention.
“The bag is not the branding. The bag is the platform for the branding. That distinction changes how you spec it.”
That perspective helps prevent a common mistake: choosing the most attractive sample without checking whether the bag actually survives the job. A good clear tote should support entry compliance, carry useful contents, and still look intentional after repeated handling. If it cannot do all three, it is not really solving the problem.
How personalization works on clear tote bags
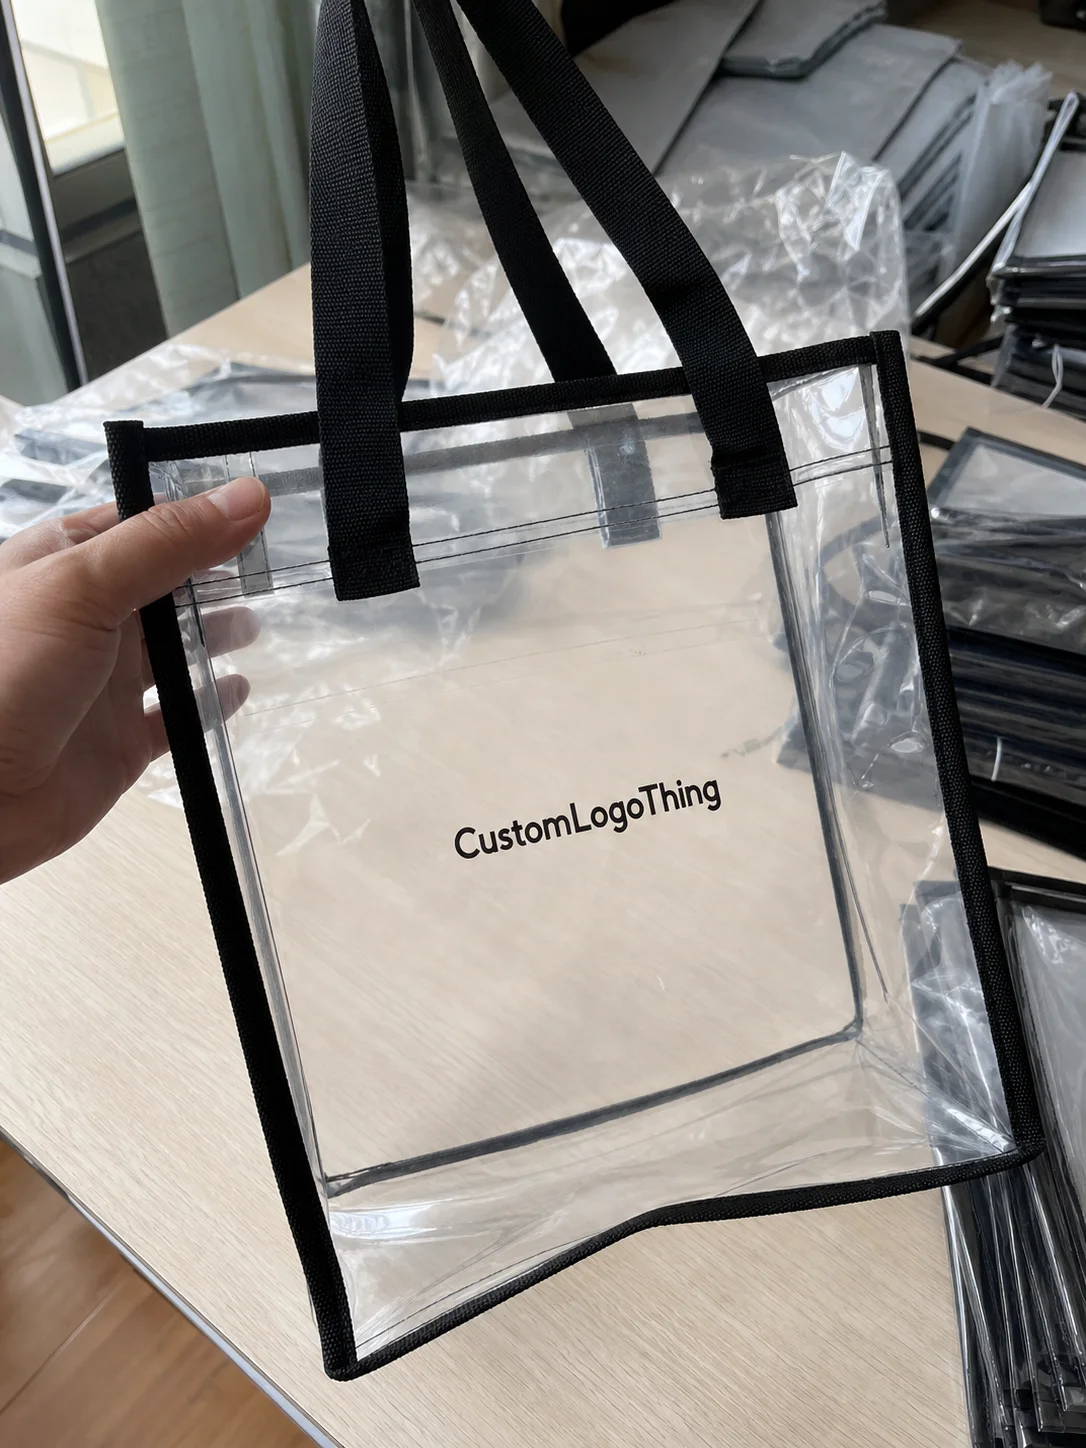
There are several decoration methods for clear tote bags, and the right one depends on artwork complexity, budget, and how much of the transparent body you want to keep visible. Screen printing remains a practical choice for bold logos and simple spot colors. UV printing can handle finer detail and small type more cleanly on clear surfaces. Heat transfer works for multi-color artwork and shorter runs, though the final finish depends heavily on the film and the application process. Patch or applique treatments create more depth and often feel more premium, especially when the tote itself should remain mostly clear. Hang tags and insert cards are the least permanent option, but they can still support a campaign without blocking visibility.
Clear material changes the design rules. On an opaque bag, contrast is forgiving. On a transparent bag, the contents and background are part of the design whether you planned for them or not. A logo that looks strong on white paper may be much less legible once the bag is filled with brochures, apparel, or dark-colored merchandise. In most cases, simple shapes, confident line weight, and readable type perform better than thin scripts or intricate details.
Construction details shape the final impression just as much as the print. Reinforced seams help the bag hold up after repeated use and keep it from feeling flimsy in the hand. Gussets affect usable volume and are worth paying attention to if the contents are bulky or irregular. Zipper closures are a better fit for security-sensitive venues, while open-top bags can be faster for quick access in retail or hospitality settings. Handle width and attachment style matter too; a tote can look attractive on a table and still feel uncomfortable once it is loaded with a water bottle, a catalog, and a few event handouts.
Artwork setup should be handled with more discipline than buyers sometimes expect. Vector files are the safest starting point, usually in AI, EPS, or editable PDF format. Pantone matching helps preserve consistency if the tote has to coordinate with other branded pieces. Leave space away from edges, seams, and folds, because print distortion can happen where the material bends or stitching changes the surface. If the bag includes a zipper tape, contrast border, or printed trim, those areas should be reserved before proofing rather than adjusted late in the process.
For buyers comparing decoration methods, the tradeoffs usually look like this:
| Method | Best For | Typical Strength | Watchouts |
|---|---|---|---|
| Screen printing | Simple logos, one to three colors | Cost-effective at scale, crisp for bold art | Fine detail can fill in or blur on clear backgrounds |
| UV printing | Small type, multi-color graphics | Better detail and image fidelity | May cost more and require tighter file prep |
| Heat transfer | Short runs and colorful designs | Flexible art handling | Durability depends on film quality and application |
| Patch or applique | Premium feel, fashion-led branding | Creates texture and depth | Higher unit cost and longer production time |
| Insert card or hang tag | Subtle branding or variable campaigns | Low visual risk on transparent material | Less permanent than direct print |
If a project involves repeated reuse or a strict presentation standard, the decoration method should be chosen with wear in mind, not only first-day appearance. A clean print that rubs off too quickly can be more expensive in the long run than a slightly higher-cost process that holds up through handling, stacking, and transit.
Key factors that affect cost, pricing, and MOQ
Pricing for personalized clear tote bags usually comes down to five variables: size, material thickness, print method, quantity, and extras. A small open-top tote with one-color print is typically far less expensive than a larger zippered bag with colored handles, a custom insert, and full-front decoration. That sounds obvious, but buyers still underestimate how quickly add-ons stack up once the spec expands beyond the base bag.
For planning purposes, a rough market range for common production runs might look like this:
- Stock-style clear tote with simple logo: about $0.90-$1.80 per unit at 1,000 pieces
- Semi-custom tote with upgraded trim or closure: about $1.60-$3.20 per unit at 1,000 pieces
- More customized build with special features: about $2.80-$5.50+ per unit depending on complexity
These ranges move with quantity. At 5,000 pieces, the unit price often improves because setup cost gets spread across a larger run. At lower MOQs, the price usually rises because the factory has less room to absorb screen preparation, color matching, labor, and waste. There is no hidden shortcut that removes that math.
Several extra costs appear often enough that they should be expected, not treated as surprises. New print screens or special color matching can bring setup fees. Freight can matter more than buyers assume because clear totes are bulky relative to their weight, which makes air shipping expensive. Rush production often carries a premium. Individual polybagging, Custom Hang Tags, and insert cards each add handling time. If the bags need to arrive looking clean and retail-ready, those choices should be confirmed early rather than added after the proof cycle starts.
Quality control affects pricing too. Clear materials show scratches, cloudiness, seam irregularities, and trapped dust more visibly than opaque bags. That does not automatically mean the factory is overcharging. In many cases, it means the inspection standard is stricter because defects are easier to spot. A tighter QC process can reduce the chance of receiving a shipment that looks fine in a carton but fails once it is unpacked and displayed.
For programs that will be handled in shipping cartons or nested with other event materials, packaging integrity can matter as much as the bag itself. Reusable bags are often distributed with printed inserts, folded apparel, or boxed kits, and the outer packaging has to protect the presentation all the way through transit. Standards and testing references from organizations such as ISTA can be useful when the shipment needs more than basic carton protection.
Process and timeline: from proof to production steps
The ordering process is usually simple on paper, but the speed depends on how complete the buyer’s information is. The typical sequence is request specs, submit artwork, receive a digital proof, approve the proof or sample, then move into production. For more customized bags, the supplier may need extra clarification on placement, trim color, closure type, or finish before final approval can be issued.
Lead time depends on both the construction and the decoration method. For straightforward branded clear totes, many orders land in the 12-15 business day range after proof approval. If the order includes a sample stage, more complex artwork, or multiple print locations, the timeline stretches. Shipping distance then adds its own layer, and that part is often outside the production window buyers focus on first.
The delays are rarely mysterious. They usually come from a few predictable places:
- Artwork arrives in a low-resolution format and has to be rebuilt.
- Color revisions continue after the proof is already circulating internally.
- The team is still deciding between zipper, snap, or open-top closure.
- Stakeholders keep asking for one more change to logo placement.
When a bag is tied to a fixed event date, the safest move is to build in buffer time for approvals. That time is not wasted. It protects the schedule from one of the most common procurement problems: everyone assumes somebody else already signed off. The closer the deadline, the less room there is for back-and-forth over details that should have been settled earlier.
For complex kits, production planning should also account for how the bag will be packed. A clear tote with an insert, a folded brochure, or a small gift item can be efficient to pack, but the sequence matters if the final presentation has to look polished on arrival. If the bag is being distributed through multiple stops, added packaging steps should be reviewed with the same care as the print itself.
Step-by-step guide to ordering the right bag
Start with the use case. A tote for stadium entry should be built differently from one used in a retail gift set. A bag for employee onboarding may need to carry a binder, a water bottle, and several flat items. A promotional giveaway might prioritize appearance and cost over load capacity. If the use case is not defined first, the result is often a bag that looks right in a mockup but feels wrong in hand.
Step 1: Define the contents. Measure the actual items, not the idealized version of them. If the bag has to hold a 12-inch brochure, a laptop sleeve, or a bottle with a tall cap, those dimensions should drive the bag size.
Step 2: Choose the construction. Open-top bags are easy to access. Zippered bags offer better containment and a more finished look. Reinforced handles are worth the upgrade if the bag will carry anything heavier than a few flat items.
Step 3: Match the decoration method to the artwork. Simple brand marks usually work well with screen printing or UV printing. If the design includes gradients, multiple colors, or fine text, ask which process will keep it readable on a transparent surface.
Step 4: Review the proof carefully. Check logo placement, text size, transparency, and edge spacing. View the proof at actual size if possible, and imagine it against real contents rather than a blank white page.
Step 5: Confirm production details. Quantity, packaging format, shipping method, and delivery window should all be locked before approval. Small misunderstandings at this stage are usually the ones that create avoidable costs later.
Step 6: If the bags will be reused often, request a sample or at least close-up photos of the material, seams, and print finish. A tote for weekly use needs a different level of durability than one handed out once at an event.
Thinking like a packaging buyer helps more than thinking like a graphic designer. The most useful question is simple: does the bag work in the environment where it will be used? If the answer is yes, the branding has a real foundation. If the answer is no, the artwork is just decoration on a weak spec.
Common mistakes buyers make with clear tote customization
The first mistake is overcomplicating the artwork. Fine lines, tiny type, and dense graphics often lose clarity on transparent material. A logo that looks sharp on a presentation board can become muddy on a clear tote because the viewer sees everything behind the bag too. Simpler artwork usually gives a stronger result.
The second mistake is under-spec’ing the bag body. A lightweight clear tote can look acceptable in a catalog and still feel fragile in hand. If the tote must carry heavier items, ask about thickness, seam reinforcement, and handle construction. A small increase in material weight often pays back through fewer complaints and fewer replacements.
The third mistake is ignoring venue rules. Stadiums and event centers may restrict bag size, tint, zipper style, or even how much opacity is created by inserts and decoration. If the bag is for a controlled venue, check the rules before approving the design. A tote that misses policy is not a branded asset; it is a compliance problem.
The fourth mistake is forgetting how visible wear will be. Clear materials show scuffs, fingerprints, and seam lines more than opaque options do. That does not make them a poor choice. It just means they need cleaner handling and more disciplined quality control if they are going to be inspected closely or reused often.
Another common miss is approving a proof without testing the carry experience. How does the opening feel? Can a hand reach inside easily? Are the handles comfortable once the bag is loaded? These are basic questions, but they are the ones that determine whether a tote ends up in regular use or gets left in a drawer after the event.
Expert tips for better branding, durability, and next steps
If the goal is clear visibility, use high-contrast design. Dark ink on a transparent body usually reads better than light ink, especially when the contents vary from one bag to the next. One strong brand cue is usually more effective than several competing ones. In practical terms, that may mean a bold logo, a colored strap, or a branded insert card rather than all three fighting for attention.
For buyers who want the cleanest presentation, request a physical sample when the budget allows. If that is not possible, ask for close-up photos of the print, seams, zipper, and handle attachment. The details reveal more than a polished render ever will, especially on a product where clarity and finish are part of the value.
Durability should match the job. Retail use, travel use, and stadium use are not the same category. A tote meant for repeated carry should have stronger seams, more reliable handle attachment, and enough thickness to resist stretching. A lightweight promo bag can be simpler, but weak construction still reflects on the brand printed on it.
For compliance-heavy projects, keep the bag specification tied to the venue requirement instead of the marketing brief. Document size, closure, and decoration area before ordering so the finished product can actually be used where it is intended. Buyers who do that avoid the most expensive revision of all: a finished bag that cannot enter the venue or serve the event it was made for.
A sensible buying process starts with the use case, then moves to measurements, material choice, decoration method, and proof review. That order keeps the conversation grounded in function instead of turning every decision into a style preference. For personalized clear tote bags, that discipline usually leads to better pricing, fewer surprises, and a bag that performs well after it leaves the warehouse.
Personalized clear tote bags are worth buying when they solve a real operational need and still carry the brand cleanly. That standard is more useful than chasing the cheapest unit price or the flashiest mockup. A good tote should be useful first, branded second, and durable enough that the person carrying it does not regret the choice.
Are personalized clear tote bags allowed at stadiums and events?
Often yes, but policies vary by venue and may limit size, tint, zipper type, or decoration coverage. Check the event rules before ordering so the bag fits entry requirements and still supports your branding.
What decoration method works best for personalized clear tote bags?
Simple logos usually work well with screen printing or UV printing. If the design is detailed or multi-color, ask for the method that keeps the artwork readable on a transparent surface.
How much do personalized clear tote bags usually cost?
Price depends on size, material thickness, quantity, print colors, and any setup or freight fees. Higher quantities usually lower the unit cost, while rush jobs and special finishes raise it.
What is the typical lead time for custom clear tote bags?
Lead time depends on artwork approval, sample needs, production queue, and shipping method. Simple orders move faster; custom shapes, special closures, or multiple print locations take longer.
How do I choose the right size for personalized clear tote bags?
Match the dimensions to what the bag will actually hold, not just the look you want. Consider width, gusset depth, handle comfort, and whether the contents need a zipper or open-top design.


