Printed Round Labels for Apparel Packaging
Printed round labels give apparel packaging a fast, finished read. The circle shape is compact, easy to place, and visually centered, so it works well on tissue wrap, garment bags, mailer seals, and small product inserts. The result depends on more than the logo. Diameter, stock, finish, adhesive, and roll format all affect whether the label looks right, applies cleanly, and stays in place.
For buyers, the label is part of the packaging system. It affects packing speed, rework, and whether the order feels retail-ready. A label that curls, lifts, or prints too dull can slow the line and weaken the brand presentation. That is why the spec should be set with the actual surface in mind, not just the artwork.
For apparel brands comparing formats, the broader Custom Labels & Tags range is useful as a reference point before committing to a specific size or stock. It makes the tradeoffs easier to compare: paper versus film, matte versus gloss, rolls versus sheets, and a permanent adhesive versus one that can be removed without damage.
Printed round labels and the first impression
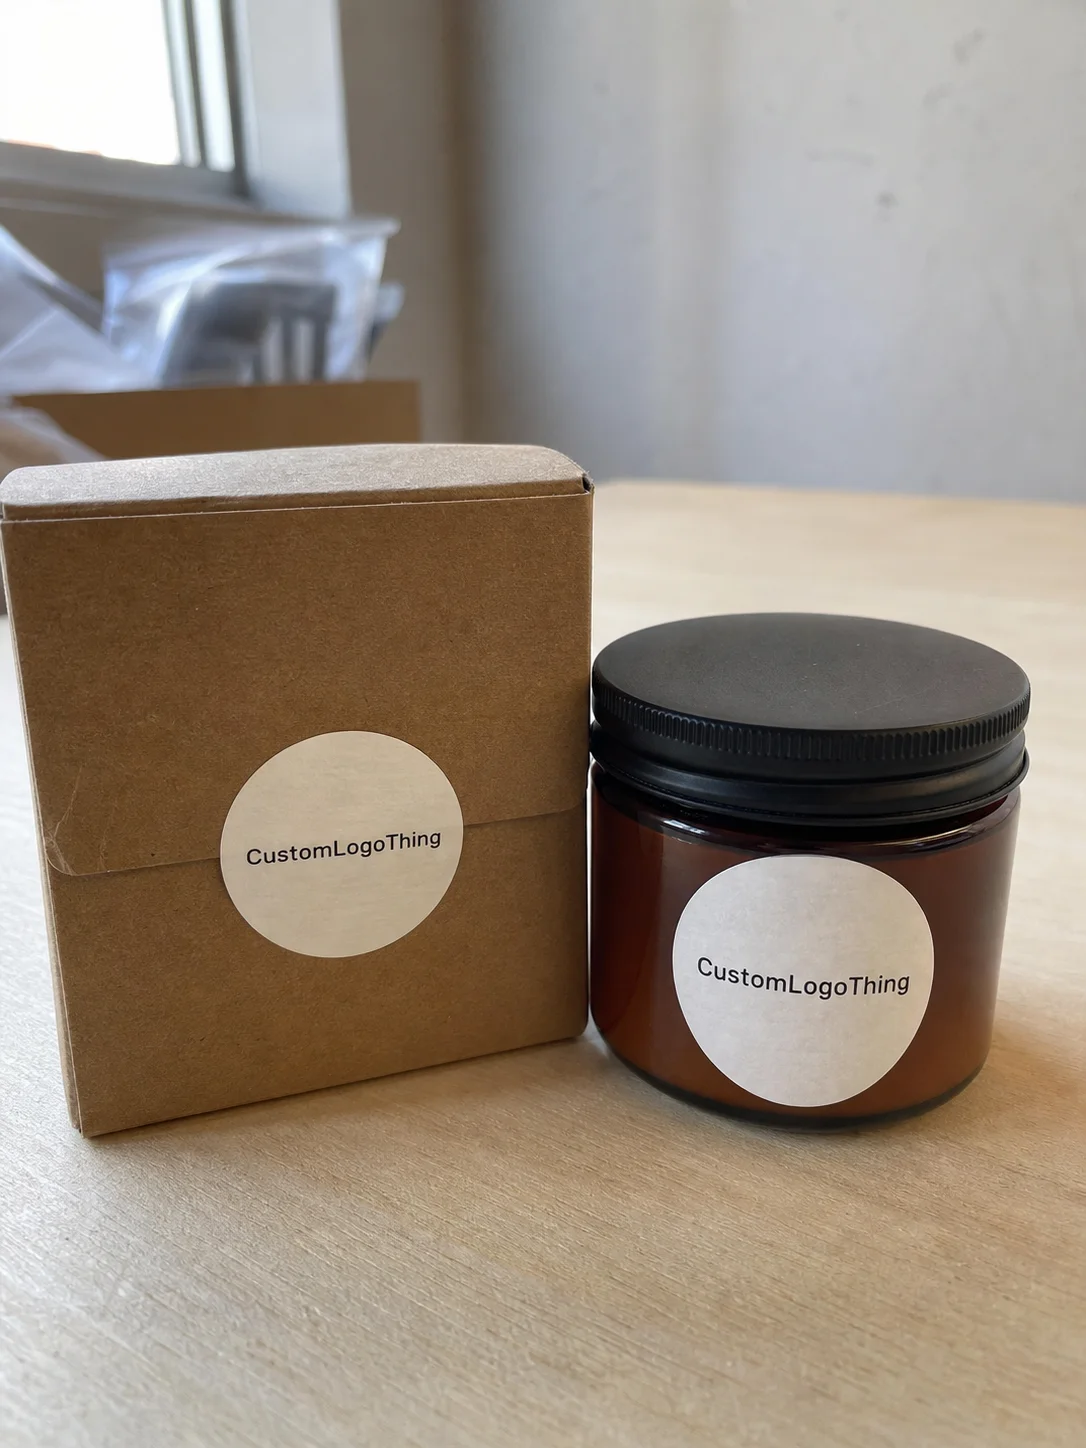
A round label reads differently from a rectangle. The shape is centered, compact, and easy to place without crowding the fold, seam, or closure point. On apparel packaging, that matters because space is limited and the label has to support the package rather than compete with it.
Geometry matters more than many buyers expect. The eye reads the center first, then the border. If the artwork is too dense for a small diameter, it looks cramped. If the same design moves to a larger circle, it can breathe. The size change alone can make the label feel premium or awkward.
Common apparel uses are practical:
- Garment bags where the label seals a fold or closure point.
- Tissue wrap where a circle replaces a taped edge.
- Thank-you seals with a logo or short line of copy.
- Size markers or internal packing stickers for workflow control.
From a production standpoint, the label has to look right, apply quickly, and stay put on the chosen surface. If it lifts, shifts, or curls during packout, the problem is operational, not cosmetic. It creates rework and slows fulfillment.
If the label needs to survive handling, friction, or heat in transit, test it on the actual surface. A swatch on a desk tells you very little.
For brands that want the same look across multiple packaging components, a well-specified round label helps unify the system. Tissue wrap, mailer seals, and insert cards start to feel related instead of assembled from separate jobs. A sloppy seal does the opposite and makes the whole package feel unfinished.
How the production process works
Production starts with the practical version of artwork: final diameter, logo file, color references, finish, and intended application. Vector art is best because it scales cleanly. High-resolution raster can work if the text is large enough, but fine lines and small type need careful prepress review.
The workflow is straightforward:
- Artwork setup and layout check.
- Digital proof or prepress proof review.
- Material and adhesive selection.
- Print method selection, usually digital or flexographic depending on quantity.
- Die cutting, kiss cutting, or slitting.
- Roll packing or sheet packing.
Proofing is where most production problems are caught or missed. A useful proof should show trim, bleed, color handling, and roll direction if the labels will be dispensed by hand. If the artwork sits too close to the edge, the circular cut can clip it. If the colors are branded, the proof is where variation should be caught before production starts.
Turnaround depends more on readiness than on optimism. Standard printed round labels on common materials can often ship in 7 to 10 business days after proof approval. Specialty film, white ink, metallic effects, or strict color matching usually push the schedule to 12 to 15 business days. Rush jobs are possible, but messy files and unusual materials slow everything down.
Roll format should be decided early. Hand application, a label dispenser, and automated application do not want the same roll direction or core size. If the format is wrong, the problem shows up at the packing table as wasted labor. That cost often matters more than the price difference on the quote.
What drives cost, MOQ, and unit price
Pricing is driven by practical variables. Material grade is one. Print complexity is another. Add finish, adhesive type, core size, roll format, and quantity, and the quote starts to make sense. Buyers who compare only the lowest number often miss the part where the cheapest option fails on the packing table.
MOQ changes the math quickly. Small runs carry more setup burden per piece, so the unit cost rises even when the design is simple. Digital production keeps low quantities workable, but once volume increases, flexographic production or another high-efficiency method usually lowers the per-unit cost. That does not make larger orders automatically better. It means the cost curve behaves more predictably at scale.
| Option | Typical unit cost at 5,000 | Best for | Tradeoff |
|---|---|---|---|
| Paper round labels | $0.03-$0.08 | Short-life apparel seals, tissue wrap, promo stickers | Less durable, weaker in humidity |
| Coated paper labels | $0.05-$0.10 | Sharper logos, cleaner color, general packaging use | Still not ideal for rough handling or moisture |
| Synthetic film labels | $0.06-$0.14 | Higher durability, better scuff resistance | Costs more and may feel less natural on kraft stock |
| Specialty finish labels | $0.10-$0.22 | Premium brand presentation, retail packaging | Higher price and longer lead time |
There is a direct way to reduce cost without weakening the label. Standardize the diameter. Keep the color count manageable. Avoid foil or heavy coatings unless the package genuinely needs them. Use a common roll format whenever possible. Decorative overspend usually comes from adding premium effects to a label that will be touched once and discarded.
For sustainability-minded brands, paper choice can matter too. FSC-certified stock is worth asking about if the rest of the packaging is moving in that direction. You can review FSC standards at fsc.org. If you are comparing shipping durability or transit handling for bundled labels and packaging, the testing logic used by groups like ISTA is also useful, especially for anything stored, boxed, and moved before use.
Materials, adhesive, and finish choices
Material is where a job either behaves or starts causing headaches. Paper works well for short-life use, especially on tissue wrap and basic apparel seals. Coated paper gives sharper print and better color definition. Synthetic film, usually polypropylene or a similar substrate, is the safer call when the label needs more scuff resistance or some tolerance for moisture.
Adhesive choice matters just as much. A permanent adhesive belongs on mailers, boxes, and other surfaces where the label needs to stay put. A removable adhesive is better for temporary branding or internal packing steps. Textured kraft, cold storage, and some soft-touch surfaces can all demand stronger tack or a more specific formulation. There is no universal adhesive that works everywhere.
Finish changes both appearance and handling. Matte looks calmer and reduces glare under store lights. Gloss gives stronger color depth and a sharper read from a distance. Soft-touch can feel premium, but it is not always the best choice if the label will be handled a lot before reaching the customer. On a small round format, finish affects readability as much as look.
Diameter affects more than visual balance. A 1 inch circle is fine for a tiny seal or size marker, but logo details disappear quickly. A 2 inch or 2.5 inch format usually gives more room for text and breathing space. Go too large and the label dominates the wrap or pouch. Go too small and the brand message disappears.
The better the surface and finish are matched, the less time your team spends fighting lifts, curls, and re-stickers.
For most apparel brands, the practical middle ground is a coated paper or light film stock with an adhesive matched to the real packing surface. That combination gives clean print, decent durability, and a price structure that still makes sense as orders scale.
Ordering checklist for a clean first run
The first run should be treated like a controlled test, not a blind leap. Start with the surface the label will touch. Tissue paper behaves differently from poly mailers. Kraft paper behaves differently from coated board. Cotton bags behave differently again. If you skip that step, you are guessing.
- Define the surface. Note whether it is paper, film, fabric, coated stock, or something textured.
- Lock the diameter. Choose the actual label size before final artwork approval.
- Set the bleed and safe area. Circular trims can clip text faster than people expect.
- Choose material and finish. Match durability to the packaging use case.
- Pick adhesive strength. Permanent, removable, or a stronger tack for difficult surfaces.
- Confirm roll or sheet format. Match the application method, hand-applied or dispenser-based.
- Approve a proof. Check color, trim, and layout before production starts.
Roll direction deserves attention because the wrong unwind can slow a packing team immediately. If the labels are used with a dispenser, the core size and unwind direction need to match the tool. That detail is not decorative. It affects labor time, and labor time affects cost.
Testing adhesion on the real packaging is not optional if the order matters. Put the label on the actual bag, wrap, or mailer, then leave it for a while. Check after an hour. Check after a day. If the surface is cold, textured, or coated, check again. That small test can prevent an entire batch from turning into rework.
For buyers moving between packaging types, the easiest way to keep specs straight is to build a simple internal spec sheet and reuse it. That sheet should travel with the quote request. It saves time, cuts revisions, and gives the supplier less room to improvise.
Common mistakes that waste money or cause weak adhesion
The biggest mistake is treating every surface as if it behaves the same. It does not. A label that sticks well to coated paper may fail on textured kraft or leave residue on a plastic bag. The issue is usually the adhesive-surface match, and it is avoidable if the surface is tested before the order is locked.
Another common failure is shrinking the design until it looks neat on screen and unreadable in real life. Tiny text, hairline rules, and crowded borders get punished on a circular format. Once the label is cut, there is nowhere to hide. If the diameter is small, keep the art simple.
Storage conditions also matter. Heat can soften adhesive behavior. Humidity can affect paper stock. Cold can make some adhesives slower to bond. If the labels sit in a warehouse before use, that should be part of the spec discussion, not an afterthought.
Cheapest rarely means cheapest. A low quote can look good until the labels curl, lift, or print too dull for the brand standard. Then the order gets reworked or replaced. That doubles labor and usually pushes the real unit cost above the better option that was skipped in the first place.
One more mistake: ignoring how the label will be handled after application. If the packer touches it immediately, the ink or coating needs to tolerate that. If the package is going through a box, courier bag, or stacked storage, more durability may be needed. The use case drives the spec. Not the other way around.
Quotes, proofs, and production planning
If you want a clean quote, send the basics up front. Size, quantity, material, finish, adhesive, format, and intended surface. Add a reference image if the design has unusual placement or color concerns. That step usually cuts down the back-and-forth that slows label orders and creates avoidable errors.
A proper proof should show more than the artwork. It should show trim, color treatment, and how the labels are laid out on the roll or sheet. If the order is going into a dispenser, the unwind direction should be visible too. For printed round labels, a proof that only shows the logo floating in white space is not enough. That is a design screenshot, not a production check.
Build the timeline backward from the launch date or packing deadline. Then add buffer for revision cycles, shipping, and any reprint risk. Simple jobs are straightforward. Specialty finishes, color matching, and new adhesive testing all add time. The calendar does not care how neat the spreadsheet looks.
From a buyer’s point of view, the best result is not the lowest quote. It is the order that lands on time, sticks to the right surface, and makes the apparel packaging feel finished. That means the final spec should be judged on performance, not just unit price.
If you are comparing options for the next run, start with the spec sheet, test the surface, and keep the Custom Labels & Tags selection aligned with the rest of the packaging system. Printed round labels are small pieces, but they carry more brand weight than most people expect.
What size should printed round labels be for clothing packaging?
Start with the surface they will land on, not a size that only looks good on screen. Smaller diameters work for tissue seals and simple brand stickers, while larger mailers usually need more room for readable text. Leave enough margin around the logo or type so the curved edge does not crowd the design.
Are printed round labels better in rolls or sheets?
Rolls are usually better for faster hand application and dispenser use. Sheets can work for smaller manual runs or when the labels are being packed for internal use. Choose the format based on how the labels will be applied, not just on what sounds cheaper in the quote.
Do printed round labels need special adhesive for apparel packaging?
Yes, because tissue paper, coated bags, kraft stock, and plastic mailers do not behave the same way. A label that sticks perfectly to one surface may fail on another if the adhesive is too weak or too aggressive. Test on the actual packing material before locking the order.
How long does a custom round label order usually take?
Timing depends on artwork readiness, proof approval, material availability, and order size. Simple jobs move faster than color-critical or specialty-finish jobs. Build in buffer time for revisions and shipping so the launch date is not riding on optimism.
What should I include when requesting a quote for printed round labels?
Include size, quantity, material, finish, adhesive, format, and how the labels will be applied. Add a reference image or brand file so the supplier can judge complexity before pricing. Clear specs reduce back-and-forth and usually produce cleaner pricing.
The practical version is simple: Choose the Right surface match, verify the proof, and order only after the spec is tight enough to survive production.


