Buyer Fit Snapshot
| Best fit | box compression strength comparison for packaging buyers comparing material specs, print proof, MOQ, unit cost, freight, and repeat-order risk where brand print, material, artwork control, and repeat-order consistency matter. |
|---|---|
| Quote inputs | Share finished size, material target, print colors, finish, packing count, annual reorder estimate, and delivery region. |
| Proofing check | Approve dieline scale, logo placement, barcode or warning zones, color tolerance, and any recyclable or compostable wording before bulk production. |
| Main risk | Vague material claims, crowded artwork, or missing packing details can create delays even when the unit price looks attractive. |
Fast answer: Box Compression Strength Comparison: Choose the Right Test should be specified like a repeatable production item. The safest quote includes material, print method, finish, artwork proof, carton packing, and reorder notes in one written spec.
What to confirm before approving the packaging proof
Check the product dimensions against the actual filled item, not only the sales mockup. Ask for tolerance on folds, seals, hang holes, label areas, and retail display edges. If the package carries a logo, QR code, warning copy, or legal claim, reserve that space before decorative graphics fill the panel.
How to compare quotes without losing quality
Compare board or film grade, print process, finish, sampling route, tooling charges, carton quantity, and freight assumptions side by side. A lower quote is only useful if the supplier can repeat the same color, closure quality, and packing count on the next order.
Box Compression Strength Comparison: Choose the Right Test for Corrugated Packaging
I still remember the first time I watched a pallet fold on a Dongguan packing line in a plant near Humen Town, where the afternoon humidity sat at 78% and the temperature hovered around 31 C. On paper, both cartons looked identical, both carried 44 ECT, and the box compression strength comparison looked tidy enough to satisfy everybody in the meeting room. Then the warehouse climbed to 78% humidity, the hot-melt bead on one seam starved by about 2 mm, and 36 master cartons turned into a crushed accordion before lunch. I was standing there with a clipboard, trying to look calm, which is hard when a stack of product starts slumping like it has given up on life. That moment stuck with me because the lab number was not wrong; it was just incomplete, and incomplete data is a dangerous thing in corrugated packaging.
That day changed the way I read carton data. A box compression strength comparison is supposed to show how much load a finished carton can hold before failure, but real distribution adds moisture, glue quality, print coverage, pallet pattern, board stiffness, and the kind of forklift driver who seems to think speed is a substitute for precision. I have seen the same spec collapse at 92 pounds in one run and survive 138 pounds in another, and the only honest answer was that the test conditions were not truly the same. In one case the board came from a 350 gsm C1S artboard insert job repurposed for a display shipper in Suzhou, which made the comparison even noisier. Honestly, I think that is where a lot of packaging teams get fooled: the sheet looks neat, the carton looks fine, and then the dock does what docks do.
If you sell packaging, ship products, or buy cartons for a brand, you need more than a lab label. You need a box compression strength comparison that matches how the box sits in storage, rides in a truck, and gets stacked by people who never read the design notes. On a run of 5,000 pieces, a carton spec can shift by only $0.15 per unit and still decide whether the pallet survives a 1,200 km lane from Shenzhen to Chengdu. And yes, those people exist in every warehouse I have ever visited, usually at the worst possible moment and often at 6:40 a.m. before the shift coffee is finished brewing. A good comparison also needs to account for stacking performance, corrugated board strength, and the difference between a clean lab result and a real shipping simulation.
Box Compression Strength Comparison: Why One Number Can Mislead You
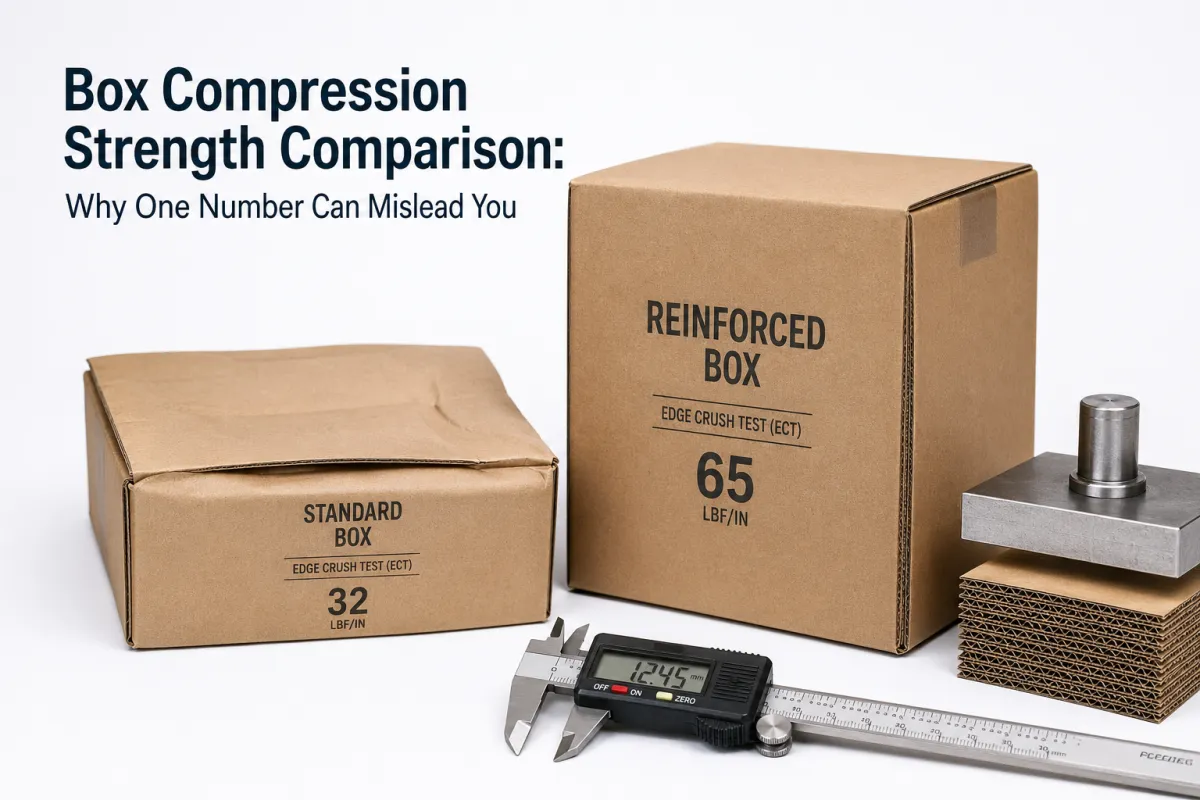
A box compression strength comparison sounds simple until you watch two cartons with the same board grade behave like they came from different factories. I saw exactly that in a client meeting in Shenzhen Nanshan, where one carton was built from 32 ECT single-wall with a neat RSC die line, while the other carried the same nominal spec, but the glue line had a thin section near the manufacturer joint and the ink coverage was heavier on one panel. Same label. Very different failure. Same headache for everyone in the room, including the procurement lead who had flown in from Hangzhou that morning on a 7:15 a.m. flight.
That is why I tell clients not to worship the BCT number. BCT stands for box compression test, and yes, it is useful. Still, a box compression strength comparison is really a comparison of how structure, board, moisture, and box design work together under load. One carton may crush because the top panel bows. Another may fail at the seam. A third may do both after sitting in a humid dock for 48 hours at 85% RH in Guangzhou. The number matters, but the failure story matters more, especially when a 160-pound result sounds good until you realize the top score cracked 12 mm deep.
In the warehouse, the truck, and the pallet stack, nobody cares that the lab machine printed a neat round number. They care whether the carton survives a static stack of 5 layers, whether the corners hold under a 24-hour dwell, and whether the load shifts when the pallet gets wrapped on the third turn instead of the second. That is why a box compression strength comparison has to connect to the actual failure you want to prevent, not just a larger number on a report. If the shipment sits 14 days in Ningbo before export, or 9 days in a Manila receiving yard, that time should be part of the comparison.
"Same spec, different box," one of my line supervisors said after we pulled apart two cartons that looked identical from 2 meters away. He was right, and the box compression strength comparison proved it once we measured the seam score depth at 1.2 mm and the moisture content at 11.8% on one sample and 14.3% on the other. I still think about that meeting every time someone tells me two cartons are basically the same.
The useful question is not, "What is the strongest box?" It is, "What box will hold your product, on your pallet pattern, in your storage climate, for the number of days you actually need?" That is the only box compression strength comparison that saves money instead of producing a prettier report. For a cosmetics brand I worked with in Foshan, the right answer was a 5 mm shorter stack height, a better glued seam, and a board upgrade from 32 ECT to 44 ECT, which beat the original target by 17 pounds and cut chargeback risk by a full freight lane's worth of stress. Anything else is just expensive reassurance.
How Does Box Compression Strength Comparison Work?
At the simplest level, a box compression strength comparison uses a compression machine with two flat platens. You place a finished carton between them, the top platen moves downward at a controlled speed, and the machine records the load until the box buckles, seam-splits, or loses its ability to carry more force. In most labs I have used in Shenzhen, Dongguan, and Xiamen, the platen speed follows the test method closely, and the operator records the peak load in pounds, newtons, or kilograms-force depending on the reporting standard. A clean run on a calibrated machine often takes 4 to 7 minutes per sample, not counting setup and conditioning.
The test itself is not magic. It is controlled crushing. ASTM D642 is the standard I hear most often for finished box compression, while ECT, or Edge Crush Test, measures the board material rather than the finished carton. That is why a box compression strength comparison stays fair only when sample prep is consistent: same board grade, same box style, same conditioning, same closure method, and the same box dimensions down to the millimeter. Otherwise, you are not comparing boxes. You are comparing paperwork, which I promise can become its own kind of misery, especially when one supplier sends samples from Dongguan and another sends a rush job from Suzhou with different caliper readings.
What the machine is actually telling you
As the load climbs, the carton can fail in a few different ways. A box compression strength comparison may show corner crush at 110 pounds, panel bulge at 124 pounds, or seam split at 98 pounds if the adhesive bond is weak. I like to record the failure mode because the number alone hides the fix. If the seam fails first, the board may be fine and the glue pattern is the problem. If the panels bow, the box footprint or flute choice is probably the real issue. If the top panel caves in like a bad tent, you probably have a geometry problem pretending to be a material problem, which happens often with 420 x 280 x 260 mm cartons.
Here is the line I use with junior buyers: BCT tells you how much load the finished box took on that machine, ECT tells you how tough the board edge is, and burst strength tells you how much pressure the paper structure can resist before rupturing. They are related, but they answer different questions. A box compression strength comparison that mixes those up turns into marketing language with a price tag, and that is a combination I would rather avoid whenever possible. If your spec sheet says 44 ECT, 180 lb burst, and a 162 lb compression target, those figures should be aligned to the same material build, not stitched together from three unrelated jobs.
If you want the test language, the International Safe Transit Association keeps the current framework at ista.org. I have sent more than one client there after a supplier swore their in-house numbers were basically the same as a real transit test. They were not, and the follow-up call was awkward in the way only packaging calls can be, especially when the shipment had already moved through a 3PL in Qingdao. A box compression strength comparison used for supply decisions should sit next to standards, not next to sales talk.
- Use identical conditioning for every sample, usually 23 C and 50% RH when you want a clean comparison.
- Measure peak load and failure mode, not just the highest number on the screen.
- Keep the closure method fixed, because tape, glue, and staples all affect the outcome.
- Separate board testing from finished-box testing, so ECT and BCT do not get mixed together.
If you compare a regular slotted container against a die-cut mailer, or a single-wall carton against a BC double-wall shipper, the results may still be useful, but they are not an apples-to-apples box compression strength comparison. You need the same geometry or at least a clear reason for the difference. Otherwise, the numbers may be accurate and the decision may still be wrong, which is a frustrating combination I have seen more than once in factories across Guangdong Province.
Key Factors That Change Box Compression Results
The biggest drivers in a box compression strength comparison are board grade, wall construction, flute profile, and carton dimensions. I have had a buyer try to save $0.04 per unit by moving from 44 ECT to 32 ECT, then call me two weeks later because the taller carton, with the same footprint, started buckling at the corners during warehouse stacking. The carton was not bad. It was simply underbuilt for a 6-high stack and a 42-pound ship weight. The math was not dramatic, but the warehouse outcome definitely was, especially after the cartons sat on a pallet in Suzhou for 11 days before dispatch.
Flute matters more than people want to admit. B-flute gives you tighter print and decent compression, C-flute adds a little more cushion, and BC double-wall can be the right answer when the load is heavy and the shipment is rough. In a box compression strength comparison, a taller box with weaker geometry can lose to a shorter box made from the same paper because panel slenderness changes the failure point. That is basic mechanics, not packaging folklore, and it is one of those truths that keeps getting rediscovered by people who were hoping for a shortcut. A 310 mm-tall carton and a 245 mm-tall carton are not the same beast, even if both came off the same flat die board.
Humidity, storage time, and recycled fiber
Moisture is the quiet killer. A box compression strength comparison done at 50% RH in a lab can look almost heroic, then the same cartons sit three days in a humid receiving area and lose 15% to 30% of their usable strength. I learned that the hard way at a seafood client in Guangdong, where the cartons looked fine on delivery morning and collapsed after an overnight hold near an open dock door. The board supplier blamed handling. The warehouse blamed the supplier. The carton blamed nobody; it simply absorbed water and carried on being a carton until it could not, after moving from 12.1% moisture to 16.9% in a single wet week.
Recycled fiber content matters too. More recycled content can still be perfectly workable, but the compression response changes, especially after storage. A box compression strength comparison between a virgin-heavy liner and a more recycled mix needs conditioning time, because the moisture equilibrium and stiffness recovery are not identical. That is also why two shipments from the same mill can test differently if one has been in storage for 10 days and the other for 40. If that sounds inconvenient, it is. Physics rarely consults procurement before making its decision, and it certainly does not care whether the cartons were produced in Ningbo or in a smaller converter outside Taicang.
Print coverage and coatings are sneaky. Heavy flood coats, laminated surfaces, and certain UV finishes can stiffen one panel while weakening another at the score line. I once sat through a negotiation where a buyer wanted full-coverage black on a shipper and a compression target of 165 pounds. The real issue was not the ink cost; it was that the print plan took away just enough board performance to make the box compression strength comparison fail by 11 pounds. That is the sort of thing that burns money in slow motion, which is somehow even more annoying than the fast kind, especially when the carton spec came from a premium branded run costing $0.28 more per unit.
For brands that need FSC claims, check the paper chain-of-custody paperwork at fsc.org. Certification does not automatically guarantee stronger boxes, and I have had to say that more than once to marketing teams who thought the logo changed the physics. It does not. It only changes the sourcing story, while the box compression strength comparison still depends on flute, liner, glue, and geometry. If your paper comes from a mill in Shandong and your converting happens in Dongguan, the documentation matters, but the compression load still comes down to board structure.
Load distribution is the last piece people skip. A pallet loaded evenly with 12 cartons per layer behaves differently than one with overhang, mixed SKU weights, or a single heavy item parked in the middle. I watched a pallet of cosmetics survive a 180-pound machine test, then fail in a truck because the actual stack had three cartons with metal pumps and one carton with airless bottles. The box compression strength comparison had been done correctly, but the shipping pattern was a mess. The machine did its job; the pallet pattern did not, and the truck from Foshan to Shanghai made the problem obvious in fewer than 500 kilometers.
Box Compression Strength Comparison: Cost, Pricing, and Tradeoffs
A box compression strength comparison costs less than a pallet failure by a mile. I have seen one retailer charge back $4,800 for a single crushed inbound pallet because the outer cartons caved and the shrink wrap tore during transfer. Against that, a $400 to $900 test program looks cheap. Even a more involved engineering round is usually pocket change compared with freight claims, rework, and the awkward call where someone asks why the carton looked strong. That question always seems to arrive after the money is already gone, often right after a receiving team in California or Johor Bahru opens the load.
My real-world pricing reference is not a fantasy spreadsheet. For a simple three-sample compression run in a Shenzhen lab, I have paid about $620, while an in-house technician check on existing equipment cost closer to $180 in labor and setup time. The box compression strength comparison gets more expensive when you need a formal report, repeat conditioning, or a redesign loop after the first samples fail. That is normal. Testing should cost money. Broken product costs more, and it tends to arrive with extra paperwork attached, plus a rerun if the samples were cut from a 2,000-piece pilot batch.
| Option | Typical cost | Best use | Tradeoff |
|---|---|---|---|
| In-house compression check | $150-$300 in labor if the machine already exists | Fast screening on two or three box styles | Less documentation and weaker traceability for supplier disputes |
| Third-party lab run | $450-$1,200 per sample set | Supplier comparison and defensible reporting | Slower turnaround and extra shipping of samples |
| Engineering review plus retest | $900-$2,500 depending on revisions | New box development or high-value freight | Best data, but not the cheapest path |
There is always a tradeoff between stronger board and smarter design. Sometimes a box compression strength comparison shows that a small footprint change, a shorter stack height, or a better glued manufacturer seam gets you the same performance as a more expensive board upgrade. I once negotiated with a mill rep from a major Korean liner supplier over a $0.05 per unit board bump, only to save $0.11 per unit by changing the carton height by 6 mm and tightening the score depth. That is the kind of number buyers remember, because it feels like actual money instead of abstract savings in a slide deck. The line change was cut in a plant outside Dongguan, and the die adjustment took 90 minutes, not a full retool.
There are cases where the board upgrade is the cheaper answer. If your product is dense, heavy, and shipped by the pallet, a move from 32 ECT single-wall to a heavier double-wall may beat any clever redesign. A box compression strength comparison should show you which side of the line you are on. If redesign buys 20 pounds and board upgrade buys 35 pounds for only $0.03 more per unit, I usually tell the client to take the stronger board and stop pretending geometry can do every job. I like clever packaging as much as anybody, but I like avoiding chargebacks more, especially on export programs moving from Ningbo to Rotterdam.
Step-by-Step Box Compression Strength Comparison Process
I like a boring process because boring saves money. A clean box compression strength comparison starts with the shipping hazard, not the carton. Define the product weight, the stack height, the warehouse dwell time, the travel route, and the failure you are trying to prevent. If the carton only needs to survive 8 days in a climate-controlled DC, you do not need the same structure as a box that will sit 21 days in a Gulf Coast warehouse and then ride a mixed freight lane. The boxes do not know your budget, but they absolutely know the environment, and a carton that can handle 148 pounds in Guangzhou may still fail if it sits beside an open loading bay in July. A realistic shipping simulation is what turns the comparison into a decision tool instead of a lab curiosity.
Next, choose 2 or 3 candidate boxes and lock the variables. Same footprint. Same material condition. Same closure. Same print coverage. I have seen teams ruin a box compression strength comparison by letting one sample use fresh-cut board and another use a carton pulled from a dusty corner after 18 days on a shelf. That is not comparison. That is sabotage with a clipboard, and I say that with love for everyone who has ever worked around a test lab. If the target carton is 420 x 300 x 260 mm and the sample is 415 x 300 x 260 mm, the result is already tainted.
How I would run the comparison in practice
First, label each sample with the board spec, flute, liner mix, glue type, and date received. Second, condition the cartons for at least 24 hours, and longer if the moisture story matters. Third, test each sample under the same compression speed and record the peak load plus the exact failure mode. A box compression strength comparison only becomes useful when someone can trace the result back to a specific sheet, a specific run, and a specific failure point. I have had to dig through mislabeled samples before, and I do not recommend the experience unless you enjoy detective work with corrugated dust on your shirt. In one case, the only clue was a faint green stamp from a converter in Zhongshan.
Then compare the result to the actual stack load. If a pallet layer carries 52 pounds per carton and you want a 3:1 safety factor, you need a box that survives something well above 156 pounds, not a carton that barely clears 159 in one lucky lab run. A box compression strength comparison should also include variance. I care about the spread between the best and worst sample, because a tight average with ugly outliers is a trap waiting for the wrong warehouse shift. The average is comforting; the outlier is expensive. If three test pieces land at 171, 164, and 149 pounds, the 149-pound carton is the one that makes your shipment nervous.
For simple samples, same-day prep is realistic if the cartons are already cut and assembled. A straightforward lab run often takes 1 to 3 days, and a redesign cycle can take 7 to 15 business days depending on tooling and proof approvals. That sounds slow until you compare it with a chargeback, a reship, and a client who wants to know why the outer shipper failed after only two weeks in distribution. A disciplined box compression strength comparison is cheaper than improvising under pressure later. It is also a lot less embarrassing than explaining a shipment failure to finance, especially when the print proof from the plant in Shenzhen was approved at 4:30 p.m. on a Friday.
Common Mistakes in Box Compression Strength Comparison
The first mistake is comparing boxes that are not actually comparable. Different dimensions, different board grades, different closures, different score patterns, and then somebody says, "The stronger one won." No. A valid box compression strength comparison needs matched geometry, or at least a clear reason for every difference. Otherwise, you are grading the package designer, not the package. I have been in that meeting, and it is not the fun kind of surprise, especially when the samples came from two different converting lines in Guangdong and one used a 3 mm wider glue flap.
The second mistake is judging a carton by appearance. Pretty print does not equal better compression. I have seen a glossy retail shipper with rich brand color fail faster than a plain kraft box because the score crush was too tight and the top panel had a weak score on one side. That is why a box compression strength comparison has to include the ugly details: seam quality, adhesive bleed, die-cut tolerances, and whether the panels were folded by hand or by machine. The ugly details are usually where the bill comes from, and they are often the reason a 400 gsm printed panel underperforms a 32 ECT kraft shipper by 16 pounds.
Three errors I see all the time
- One sample only: a single result says nothing about variance, and variance is where the real failures hide.
- Poor conditioning: if one carton sits at 30% RH and another at 75% RH, the box compression strength comparison is already broken.
- Ignoring distribution reality: warehouse stacks, trailer vibration, and mixed pallet patterns matter more than a clean demo photo.
The third mistake is trusting the average and ignoring the outliers. If three cartons test at 142, 139, and 109 pounds, the average looks comfortable. The 109-pound carton is the one I would worry about, because that is the sample likely to become the chargeback. A serious box compression strength comparison reports the spread, not just the mean. I have seen too many teams celebrate a nice average while the bottom end quietly sets up the failure, especially on export orders with 8,000 units and no spare stock.
The fourth mistake is forgetting the wet side of the business. Wet cartons lose strength fast. A box stored against a dock wall, under a leaking sprinkler line, or next to a humid compressor room can behave like a different product. I saw this at a beverage client where the cartons passed the lab and still collapsed in the staging area after 36 hours. Nobody had conditioned them to the actual storage environment, so the box compression strength comparison looked fine right up until it mattered. That is the kind of failure that makes everyone point at everyone else, usually while standing in a loading bay in Zhuhai.
Expert Tips and Next Steps After the Comparison
After enough factory visits, I have a short list of things that actually help. Build a comparison matrix with four columns: material spec, unit cost, peak load, and shipping risk. A good box compression strength comparison should fit on one page so a buyer, an engineer, and a warehouse manager can all argue from the same data. If the board is $0.07 cheaper but costs you 18 pounds of load capacity, that trade is visible immediately. If somebody tries to hide that in a longer spreadsheet tab, I usually assume they are hoping nobody notices, which happens more often than people admit in procurement meetings in Shenzhen and Dongguan.
Test under the worst realistic condition, not the prettiest warehouse snapshot. If your boxes will sit 5 days in a hot dock, simulate that. If they ride a mixed pallet with 70% fill, simulate that. The strongest box compression strength comparison is the one that makes the packaging look slightly worse before shipment and much better after delivery. I would rather disappoint a sales rep with honest numbers than impress them with a weak carton and a false promise. Sales can recover from disappointment; a crushed pallet is harder to talk away, especially when the goods are headed to a regional DC in Osaka or Los Angeles.
Work with a packaging engineer or lab partner who knows where the weak point usually lives. Sometimes it is the board. Sometimes it is the glue. Sometimes it is the design, and the carton is asking for a wider panel or a shorter span between vertical edges. An experienced reviewer can tell you in 10 minutes whether your box compression strength comparison needs a board change, a score tweak, or a full rework. That sort of judgment is worth paying for, because it keeps you from doing three expensive wrong turns before finding the right one, and that saves real time when your production slot in Foshan is only 12 to 15 business days from proof approval.
My practical next step is simple: choose 2 or 3 box options, run matched tests, and keep the winner as the baseline for the next round of box compression strength comparison. Then document the material spec, the conditioning, the failure mode, and the pallet pattern. If you do that once, you build a repeatable playbook instead of starting from zero every time a buyer asks for a cheaper carton. And if the buyer asks for just a little cheaper one more time, well, I have had to breathe slowly in those meetings too, usually while staring at a quote line that changed by $0.03 per unit and somehow caused a 40-minute debate.
Frequently Asked Questions
How do I do a box compression strength comparison for two cartons?
Use the same box size, the same board condition, and the same test setup so the box compression strength comparison is actually fair. Record the peak load, the failure mode, and whether the carton buckled at a corner, split at the seam, or collapsed across the panel. Then compare those results against your real stacking load, not against the biggest number on the lab screen. If the setup changes halfway through, the comparison stops being useful and turns into a story about how the sample prep went sideways, which is a story nobody wants to tell after a 2 p.m. production meeting.
What affects box compression strength comparison results the most?
Board grade, flute type, box dimensions, and moisture exposure usually drive the biggest swings in a box compression strength comparison. Glue quality, print coverage, coatings, and die cuts can also cut strength more than buyers expect, especially on tall cartons with narrow panels. If humidity changes between storage and testing, two identical cartons can perform like different products. I have watched that happen in real time in a warehouse near Guangzhou, and it never gets less annoying, especially when the cartons were made from the same paper mill run in Shandong.
Is BCT the same as ECT in box compression strength comparison?
No, and that mix-up causes a lot of bad decisions. BCT measures how much load a finished box can hold before failure, while ECT measures the edge crush strength of the board itself. In a box compression strength comparison, both numbers matter, but they answer different questions, so they should not be treated like interchangeable specs. If someone tries to swap one for the other, I usually ask them to define the shipment risk first and the confusion tends to clear up quickly, often once we look at a pallet plan that includes 4-high storage and a 14-day transit window.
How much does box compression testing usually cost?
Simple in-house checks are cheaper, while third-party lab testing costs more because you pay for equipment, expertise, and reporting. A clean box compression strength comparison might cost $150 to $300 in labor if the machine already exists, or $450 to $1,200 for a lab run, depending on sample count and documentation. The real cost is the one you pay later if a shipment fails, because freight claims and rework get expensive fast. I would much rather spend money on the test than on the apology, especially when the freight lane runs through Ningbo and the receiving window is only 48 hours.
How long does a box compression strength comparison take?
Basic sample prep and testing can happen the same day if the cartons are ready and already conditioned. A straightforward box compression strength comparison often finishes in 1 to 3 days at a lab, while redesign, proofing, and retesting can stretch to 7 to 15 business days. If you are changing structure, board grade, or print coverage, plan for a longer loop and fewer surprises. Packaging has a way of punishing rushed decisions, which is rude but consistent, and a new die cut from a converter in Dongguan can easily add two full days if the proof has to be revised.
The clearest takeaway is this: compare cartons under the same conditions you expect in storage and transit, then choose the design that clears your real stack load with room for humidity, handling, and normal variation. That is the point where a box compression strength comparison stops being a lab exercise and starts protecting the shipment.