Custom Logo Things
Custom 3D rubber patches make sense when the branding has to survive handling, weather, abrasion, and repeated use. Embroidery frays. Print can crack. A molded patch keeps the outline, the color blocks, and the overall read much longer on jackets, bags, uniforms, hats, and tactical gear.
They are not a fit for every artwork style. Bold icons, block lettering, and simplified marks usually translate well; delicate gradients, tiny serif type, and hairline details usually do not. That limitation is not a flaw. It is the price of durability and depth.
What custom 3D rubber patches actually are
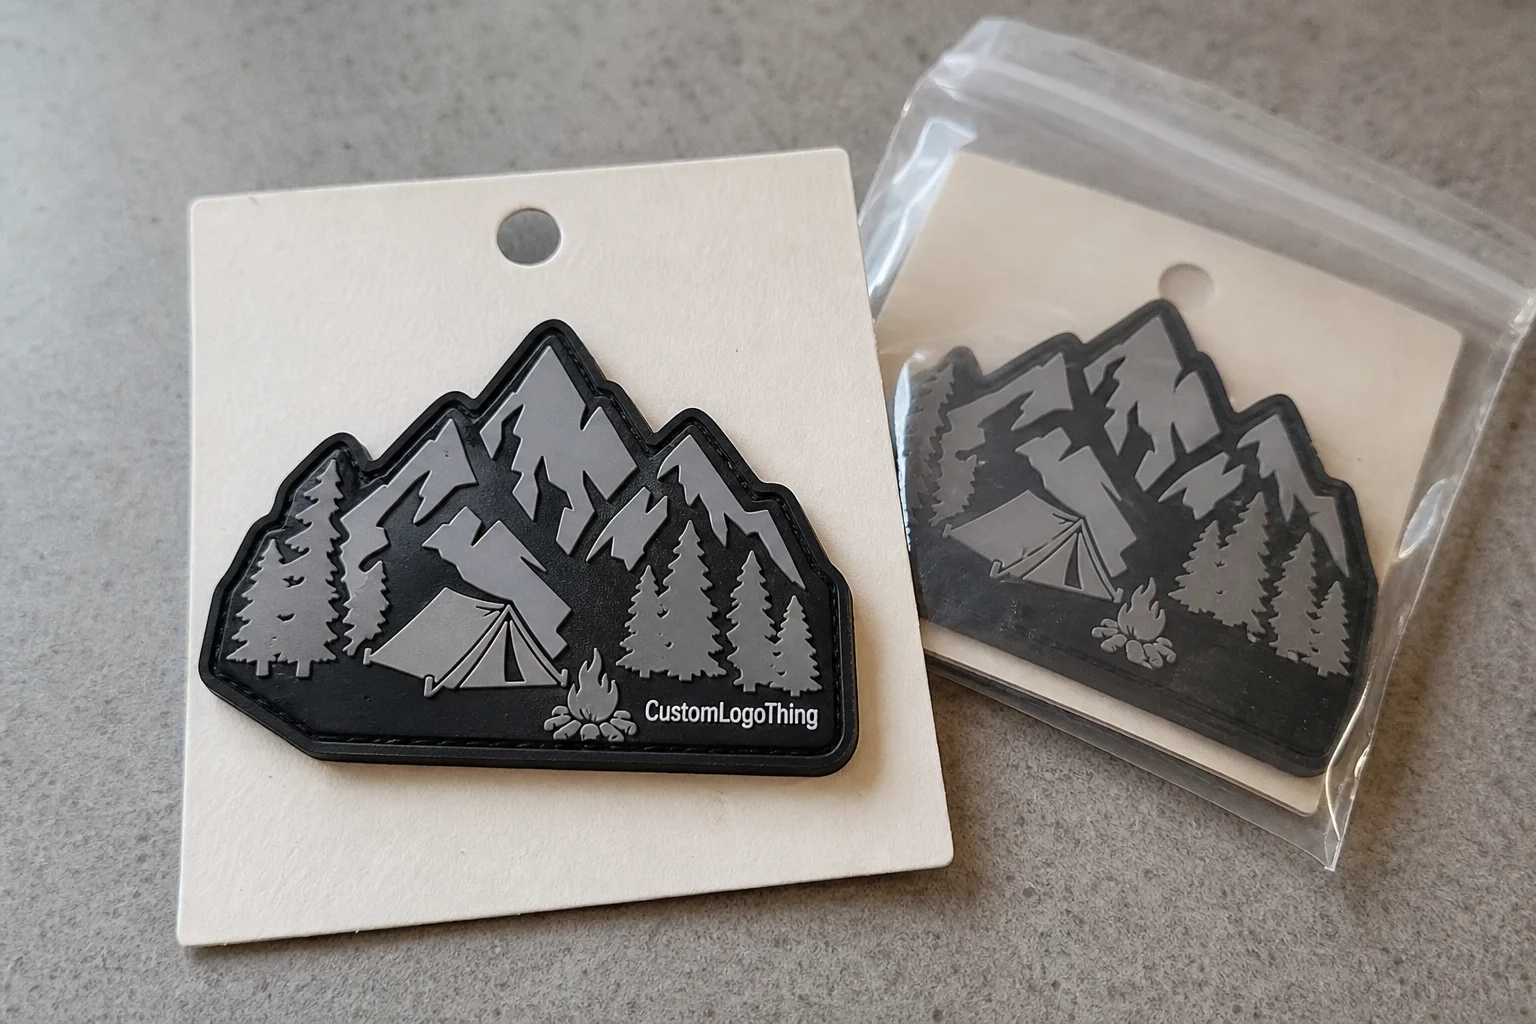
At the practical level, custom 3D rubber patches are molded badges made from PVC or silicone-style material. The design uses raised and recessed sections so the logo has actual depth, not just a printed illusion of depth. That relief is what gives the patch its visual punch and helps it stay legible from a distance.
These patches are usually chosen for gear that sees hard use: outerwear, workwear, duffel bags, backpack panels, morale patches, and structured caps. The material resists fraying, the border stays cleaner than thread-based constructions, and the colors can be separated with sharper edges than you usually get from embroidery.
The tradeoff is obvious once you look closely. Depth rewards simple artwork and punishes complexity. Fine lines, tiny text, and photo-style shading tend to disappear into the mold or crowd the design. If the logo depends on that kind of detail, a flat process such as printing or a woven label is often the better call.
A good buyer treats the patch as a product component, not decoration. That means deciding on thickness, size, border style, and backing based on how the patch will actually be used. The mockup is only useful if the spec behind it can survive production.
How the molding process turns art into a patch
The process starts with vector artwork. A factory cannot build a clean mold from a fuzzy JPG and a guess. The artwork has to be organized into layers that define what rises, what sits lower, and where each color break belongs. This is where most production issues are caught early, before material is poured or tooling is cut.
From there, the mold is made to create the raised and recessed zones. That tooling step defines the final shape, the border, and the depth of the artwork. Deeper relief can improve visibility and make the patch look more substantial, but it also adds setup complexity. More complexity usually means more labor, more tooling detail, and a higher unit cost.
Once the mold is ready, material is filled into the cavities, cured, trimmed, and finished with the requested backing. Quality differences usually show up in those last steps. Clean trimming, even fill, and sharp edges matter more than most buyers expect. If the border is crooked or the color slightly bleeds over a line, the piece reads as rushed even if the artwork itself is good.
Proofing is the point where expensive mistakes can still be avoided. A useful proof should show final size, border thickness, color sequence, and attachment method. If it only shows a polished image without those details, the buyer is approving a visual idea rather than a production spec. That is a weak position to be in.
Cost, pricing, and MOQ: what drives the quote
Pricing for custom 3D rubber patches is driven by a handful of predictable variables: size, number of colors, depth of relief, quantity, backing type, and packaging requirements. Larger patches use more material. More colors mean more setup and more opportunities for alignment problems. Stronger relief requires more detailed tooling. None of that is mysterious.
Setup fees are normal when a new mold is needed. That fee gets spread across the order, which is why small runs look expensive per piece. A 100-piece order can feel steep. A 5,000-piece order usually drops into a much better range because the tooling and prep cost are amortized across more units.
As a practical reference, a simple 2.5- to 3-inch patch with limited colors may land around $0.70-$1.40 per unit at 1,000 pieces. The same style can move closer to $0.25-$0.55 at 5,000 pieces. Add a complex outline, more colors, a premium border, or specialty backing, and the price shifts upward. Rush production does the same thing because factories still have to reserve machine time and labor.
The real lesson is that clean geometry usually beats visual clutter. Buyers often ask for something “premium” and then load the design with ten small details, thin text, and multiple color changes. That is how a patch becomes more expensive without becoming better.
| Order profile | Typical unit price | Why it costs that much | Best use case |
|---|---|---|---|
| Small run, simple shape | $0.80-$1.60 | Setup is spread across fewer pieces | Testing a new design, internal team drops |
| Mid-volume retail order | $0.40-$0.85 | Balanced tooling cost and production efficiency | Retail inserts, uniforms, merch |
| Higher-volume standard patch | $0.20-$0.50 | Better amortization of mold and labor | Large programs, repeat replenishment |
MOQ logic is straightforward from the factory side. Lower quantities are possible, but the unit price rises quickly because the same setup effort still has to be recovered. Hidden costs matter too. Reproofing after approval, split shipments, and rush freight can erase the savings from a low base price.
If the patch is part of a larger branded packaging program, the shipping carton matters as well. Many buyers now ask for recycled cartons or FSC-certified paper components for the shipment itself. FSC publishes certification guidance at FSC, and ISTA has practical standards for transit testing if damage during shipping is a concern. Even a small accessory order benefits from that kind of thinking.
Design choices that change the final look and feel
Size is a readability decision, not just a style choice. A patch that looks crisp at 3 inches can become muddy at 1.5 inches if the artwork carries too much detail. Thin borders, tiny text, and nested icons are usually the first things to fail. Buyers often find this out only after they shrink the logo too far.
Thickness changes the look immediately. A thicker patch with a defined border tends to feel more substantial and more tactical. A thinner version sits flatter and works better on lightweight garments or low-profile hats. Border shape matters too. A sharp edge usually reads cleaner; a soft edge can work for some designs, but it reduces the crisp visual punch that most people expect from custom 3D rubber patches.
Backing choice turns the patch into a real production decision. Sew-on is simple and durable. Hook-and-loop works well for removable applications, especially on tactical gear and team uniforms. Adhesive is useful for short-term placement or packaging use, but it is not a substitute for a proper attachment method on garments that will be washed. Heat-applied backing can work on stable fabrics, though the fabric itself must tolerate the temperature and pressure.
Here is a useful comparison:
| Backing type | Pros | Limits | Typical cost impact |
|---|---|---|---|
| Sew-on | Durable, simple, dependable | Needs stitching, not removable | Lowest |
| Hook-and-loop | Removable, modular, tactical-friendly | Adds thickness and cost | Moderate |
| Heat-applied | Fast application on stable fabrics | Depends on fabric and heat tolerance | Moderate |
| Adhesive | Useful for short-term placement | Not ideal for wash-heavy or outdoor use | Low to moderate |
Color matching deserves more attention than it usually gets. Exact Pantone matching should be confirmed, not assumed. Some materials hold saturated colors very well; others shift slightly depending on the pigment, finish, and mold depth. If the patch has to sit alongside strict brand colors, that needs to be stated early and verified in the proof.
Surface compatibility matters too. Stretch knits, textured fleece, and thin performance fabrics can be difficult substrates. The patch may be perfect and still fail in use if the fabric cannot support the backing properly. Match the patch to the garment, not to the presentation board.
Production steps and lead time from proof to delivery
The normal sequence is quote, artwork review, proof approval, mold setup, production, QC, and shipping. The delays tend to happen before production starts, not after it begins. Unclear artwork, missing dimensions, and last-minute design changes are the usual culprits.
For a straightforward order, proof approval to production completion often takes about 12-15 business days. Add shipping on top of that. More complicated artwork, larger quantities, or peak-season volume can stretch the schedule. If the patches are tied to a launch, uniform issue date, or retail drop, a buffer is not optional. It is the difference between on-time delivery and a messy scramble.
Rush service helps only after the file is clean. If the proof still needs corrections, an expedite fee does not eliminate the review cycle. It mainly moves the order to the front of the queue once the spec is locked. That distinction matters. A rushed wrong order is still the wrong order.
Transit time is the other place where expectations slip. Domestic shipping is one thing. International freight, customs, and split deliveries can add real days or even weeks. Planning a launch around a single promised ship date is risky unless the rest of the timeline has slack built in.
If the patch order is part of a larger packaging or merchandising program, the schedule has to match the rest of the program. A patch that arrives after the uniforms or cartons are already in circulation has limited value. The timeline needs to work as one chain, not a collection of separate promises.
Common mistakes that make rubber patches look cheap
The first mistake is overdesign. Too many tiny lines, too much text, and too many color changes create visual noise. Rubber patches work best when the shape is readable at a glance. If the most important part of the artwork disappears in the mold, the design is asking for trouble.
The second mistake is shrinking a complex logo instead of redesigning it for the patch size. A vector that looks excellent on a screen can collapse when it is reduced to a small patch. Tiny type and nested details do not become legible just because the mockup looks clean.
The third mistake is weak attachment planning. A patch can look excellent and still fail if the backing does not match the garment or the use case. Wash-heavy clothing, outdoor use, and flexible fabrics need more careful selection than a one-time event shirt.
The fourth mistake is approving a proof too quickly. Check size, border thickness, color order, edge finish, and backing one by one. A lot of buyers glance at the render, say it looks fine, and approve a spec they have not actually reviewed. That is not a production surprise. That is a review problem.
“If the logo needs three font sizes, two border styles, and six colors just to be recognizable, it probably is not a good patch design.”
The fifth mistake is chasing the lowest quote without comparing material grade, mold method, or finishing quality. A cheap batch can cost more in the end if the edges are rough, the colors are off, or the backing fails after a few uses. Good sourcing is usually boring. That is a feature, not a flaw.
Next steps for a cleaner quote and faster approval
Before requesting pricing, gather the basics: final logo file, finished size, target quantity, backing preference, and delivery deadline. If the patch will be used on more than one type of product, say so up front. A patch for outerwear may need a different backing than the same patch used on bags or hats.
Ask for a proof that shows scale, color placement, and attachment method. Not just a polished image. Pretty mockups are easy; useful proofs are the ones that reduce mistakes. If a supplier only sends a visual render and skips the production details, ask for a more specific proof before approval.
Decide what matters most before the quote goes out. Is the priority durability, visual depth, low unit cost, or the fastest turnaround? Those priorities do not all peak at once. Pretending they do usually leads to a compromised order and a longer revision cycle.
A simple approval checklist helps:
- Confirm finished size in inches or millimeters.
- Check the color count and color order.
- Verify the edge style and border thickness.
- Match the backing to the actual garment or accessory.
- Review packaging details if the patches are going into retail packaging or bundled product packaging.
If the patches are part of a larger sourcing plan, compare the request with the rest of the order. Our Custom Packaging Products page is a useful starting point if you are pairing patch production with custom printed boxes or other retail packaging pieces. The fewer mismatched schedules in a program, the fewer downstream problems.
Custom 3D rubber patches work best when the request reads like a production brief instead of a loose idea. Clear artwork, realistic sizing, a sensible backing choice, and a clean approval path usually produce a better patch than an overbuilt design with a rushed timeline. That is the practical version of the process.
What are custom 3D rubber patches made from?
Most are molded from PVC or silicone-style materials designed to keep shape and hold detail. PVC is common for bold, durable patches, while silicone is often used when a softer feel or a different performance profile is needed. The right material depends on the use case, the amount of relief, and the finish you want.
How much do custom 3D rubber patches cost per piece?
Pricing usually falls as quantity rises, but small runs carry a higher unit cost because tooling and setup are spread across fewer pieces. Size, color count, mold complexity, backing, and rush production all move the number. A useful quote needs finished size, quantity, and artwork before anyone can give a serious estimate.
How long does the production process usually take?
Lead time depends on proof approval, mold setup, production load, and shipping method. Simple orders move faster; complex designs, revisions, or rush requests slow things down. If the patches have a fixed launch date, add buffer before the order is placed.
Can custom 3D rubber patches work on any garment?
They work best on stable surfaces such as jackets, bags, hats, and outerwear panels. Stretch knits and very thin fabrics can be risky unless the backing and attachment method are chosen carefully. The garment matters as much as the patch itself.
What files should I send for a quote on custom 3D rubber patches?
Send a vector file if possible, plus the finished size, quantity, backing preference, and deadline. If the artwork is not final, include the closest brand reference and identify which elements must remain accurate. Clear input usually means fewer revisions and a faster approval cycle.