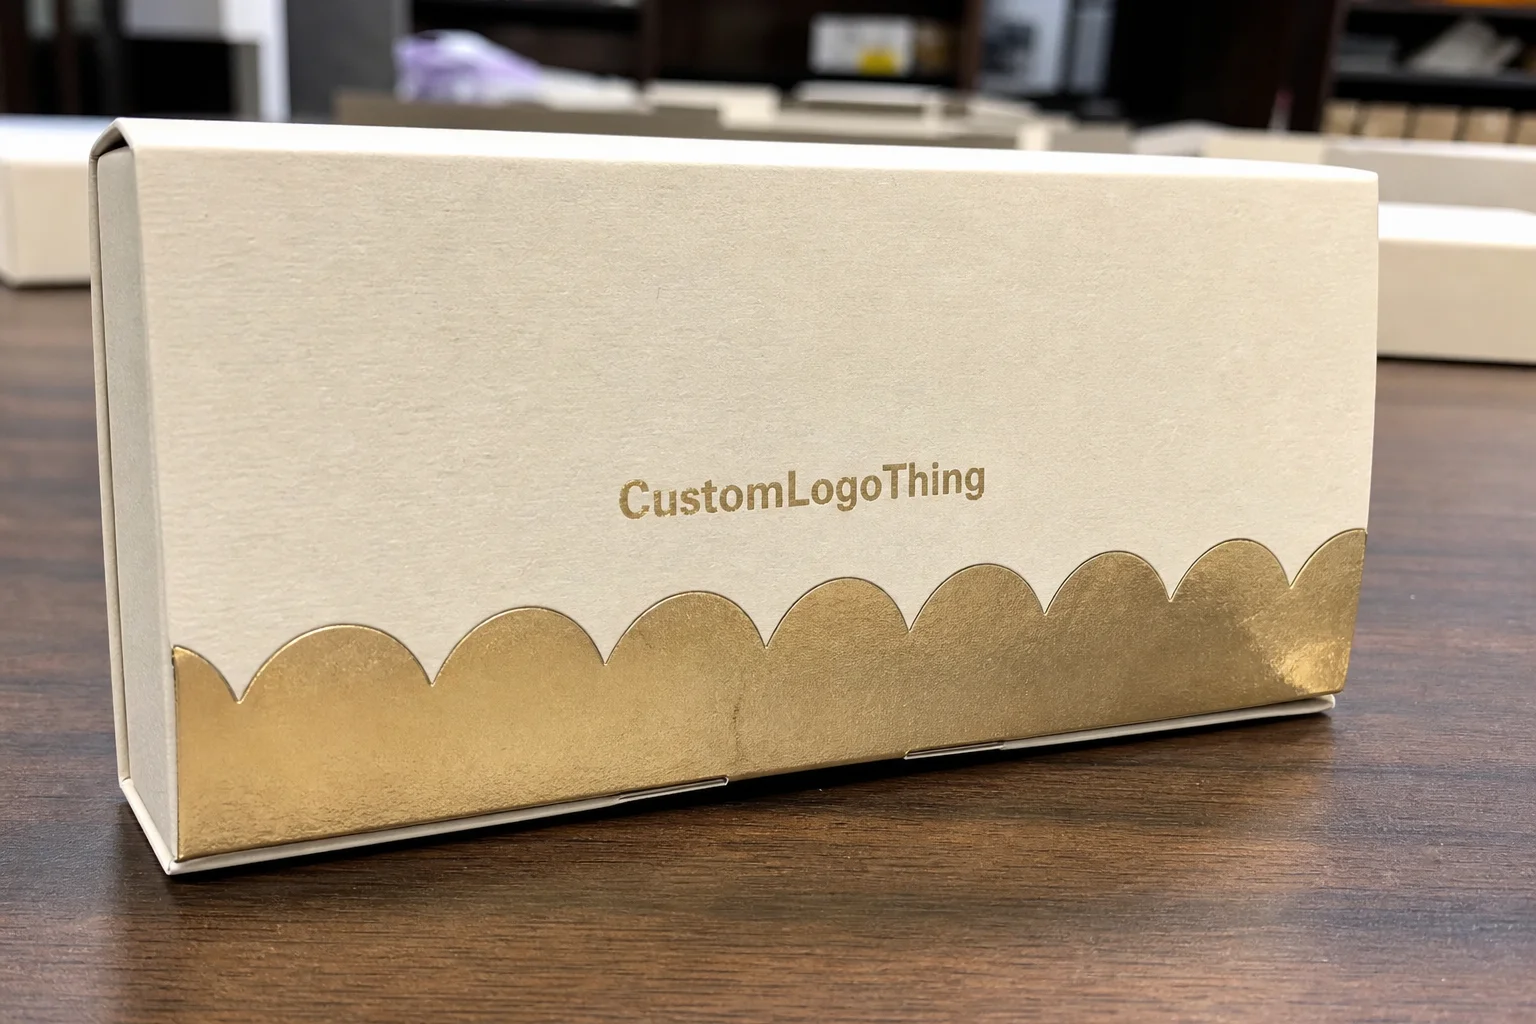
Candy sells on sight first. Taste comes later. That is why custom candy Boxes with Logo matter more than a lot of brands admit. The box is not just a shell around sugar. It sets the price expectation, signals quality, and tells the buyer whether this product belongs in a gift bag, on a shelf, or in a shipping carton.
For small confectionery brands, the packaging often does more work than the product page. A clear logo, a sensible structure, and a finish that matches the candy can make a basic assortment look polished instead of temporary. That does not mean every box needs foil, magnets, or dramatic textures. It means the box has to fit the product and the market without wasting material or budget.
Why Custom Candy Boxes with Logo Stand Out on the Shelf
Candy is usually bought fast. That leaves very little time for explanation. The packaging has to do three jobs in a few seconds: communicate flavor or variety, suggest quality, and make the buyer feel like the product is worth gifting or trying. Custom candy Boxes with Logo are built for that job. They give structure to the first impression.
Plain cartons, clear bags, and generic trays can work for commodity candy. They are less useful when the product has to look premium, seasonal, or retail-ready. A paperboard box gives you a better surface for typography, hierarchy, and finish. It also hides whatever secondary packaging sits inside, which matters more than people think. A neat exterior can make a simple product feel deliberate.
From a buyer’s perspective, the box has to answer a few basic questions without making the shopper work for it. What is this? What flavor or assortment is inside? Is it a gift item or a grab-and-go snack? A strong logo helps, but the rest of the panel layout matters too. If the design is cluttered or the text is too small, the brand ends up asking for attention instead of earning it.
That is where packaging design for confectionery gets practical. The best candy boxes are simple, readable, and honest. They do not overstate the product. They frame it cleanly and let the candy do the rest once the box is opened.
“If the box takes ten seconds to explain, the shelf has already moved on.”
Seasonal candy is especially sensitive to this. Holiday assortments, limited-edition flavors, and gift boxes often compete with more ordinary items that are stacked tightly and priced aggressively. The visual difference has to be immediate. A controlled color palette, a clear logo, and a box structure that does not look flimsy can do more for conversion than another round of copy tweaks.
How Custom Candy Box Packaging Is Built and Printed
Most Custom Printed Boxes for candy start with paperboard or coated carton stock. The board choice depends on the product weight, the amount of handling the box will take, and how much image quality the surface needs to hold. A lightweight retail pack may do fine with 300gsm to 400gsm board. A heavier gift set usually needs thicker material or a more rigid build so it does not flex at the corners or crush in transit.
The structure matters just as much as the artwork. Tuck-end cartons are common for straightforward retail candy. Sleeve-and-tray formats work well for assortments and sampler packs because the tray holds the pieces in place while the sleeve carries the branding. Seal-end cartons are useful when tamper resistance matters. Rigid boxes are the premium option, but they add cost, weight, and production steps.
Before artwork is placed, the dieline should be confirmed. That file shows folds, glue areas, cut lines, bleed, and safe zones. It is not a formality. It is the difference between a logo sitting cleanly on the front panel and a logo drifting into a fold after converting. A window opening also needs to be planned against the structural lines, not added as an afterthought.
Printing method changes the tradeoff. Offset printing is usually better for larger runs where color consistency and sharp detail matter. Digital printing can make more sense for short runs, seasonal tests, or multiple flavor variants with different SKUs. If the art uses solid brand colors, ask for color control early. Pantone references are useful when the brand color has to stay stable across reorders. If Pantone is not available, lock the CMYK values and approve them before production starts.
Finishing is where many candy brands overspend without adding much value. Foil stamping, embossing, debossing, and spot UV can improve shelf presence. They can also push the box into a more expensive category fast. Matte coating creates a calmer, more premium feel. Gloss makes bright colors pop under store lights. Soft-touch coating adds a tactile effect that works well for gift packaging. None of these finishes is automatically better. They have to support the product position and the retail setting.
For material and sourcing references, the industry bodies at the Packaging Institute and FSC are useful starting points for board standards and responsible forestry claims. For shipping simulation and distribution checks, ISTA is a practical reference because candy packaging that looks good on a desk still has to survive drops, compression, and vibration in the real supply chain.
One detail buyers sometimes miss: print quality and structural quality are not the same thing. A box can look sharp in a proof and still fail because the board is too thin, the insert is loose, or the closure is weak. The best samples test both sides of the problem.
Custom Candy Box Pricing, MOQ, and Quote Factors
Pricing for custom candy Boxes with Logo comes down to five variables: size, material, print coverage, finishing, and quantity. A small folding carton with a one-color logo is a very different job from a rigid gift box with foil, an insert, and window film. That gap is normal. More steps mean more labor, more setup, and more waste during calibration.
For rough planning, small-run folding cartons often land around $0.30 to $0.70 per unit, depending on the dimensions and print complexity. Larger runs usually come down once setup is spread across volume. Premium Rigid Boxes, magnetic closures, or custom inserts can move the unit price much higher. Those ranges are only for early budgeting, but they are useful if you need to understand whether the concept is realistically in reach.
| Box Option | Typical Use | Relative Cost | Notes |
|---|---|---|---|
| Folding carton | Retail candy, single-flavor packs | Lowest | Efficient for shelf-ready runs and clean graphics |
| Sleeve and tray | Sampler sets, seasonal gift packs | Moderate | Better presentation and a stronger unboxing feel |
| Rigid gift box | High-end confectionery, boxed assortments | Highest | Premium look, more material, more manual assembly |
Minimum order quantities vary by supplier and print method. Digital work can sometimes start in the low hundreds, which is useful for a launch test or a limited seasonal run. Offset printing usually makes more sense at higher counts because the setup cost gets diluted across volume. If the brand is still testing demand, a short digital run is often the less risky choice.
To get a cleaner quote, share the exact box dimensions, candy weight, target quantity, print colors, and whether the artwork is already in vector format. If you know the intended channel, say that too. Shelf display, e-commerce shipping, and gift retail each push the structure in a different direction. A manufacturer cannot spec the box well if the end use is vague.
For teams that want a practical starting point, the team behind Custom Packaging Products can usually narrow the spec faster when those details are sent up front. That is not a sales trick. It is how fewer revisions happen.
One more thing that affects price: the first order often carries extra charges for plates, tooling, die creation, or proofing. That is normal. It does not mean later reorders will carry the same overhead.
Custom Candy Box Production Steps and Timeline
The production path is usually straightforward if the spec is stable. It starts with concept review, then dieline confirmation, then a proof stage before printing. After proof approval, the job moves into printing, finishing, cutting, folding, and packing. If the box needs inserts or special closures, those get added during converting.
For many orders, 12 to 15 business days after proof approval is a realistic planning window. Simple jobs can move faster. Complex structures, large color areas, specialty coatings, or seasonal capacity pressure can stretch the schedule. Buyers who plan around a fixed launch date should build in buffer time. Candy may be simple. Production schedules are not.
Most delays come from preventable problems. Incomplete artwork files. Last-minute size changes. Unclear finish requests. Low-resolution logos. A box with moving goalposts is a box that will miss the press window. The smoothest jobs are usually the ones where the design is locked before production starts.
Proofing matters because screen mockups can hide real problems. A proof or white sample can show whether the closure is too tight, the logo sits too close to a fold, or the insert needs a tolerance adjustment. Those are small issues on paper and annoying issues at scale. Catch them before the full run.
Shipping validation is another practical check that gets ignored until a shipment arrives dented. Candy boxes may be light, but they can still crush, scuff, or shift in transit if they are packed badly. Test protocols from ISTA help answer a simple question: will the packaging hold its shape through handling, stacking, and movement?
Rush orders can work, but they are not free. They usually require fewer revisions, simpler finishes, and a tighter file handoff. Specialty coatings, embossing, and custom inserts add time even when the artwork itself is uncomplicated. Speed and complexity pull in opposite directions.
Materials, Inserts, and Finishes That Protect the Candy
Material choice changes both the look and the survival rate of the box. Coated paperboard is the default for most candy because it prints cleanly and folds well. If the product is heavier or meant to feel more substantial, thicker board or rigid setup materials make more sense. A premium box that buckles under pressure does not look premium for long.
Inserts deserve more attention than they usually get. Assorted chocolates, truffles, and soft candies can move around during shipping and lose their clean presentation. A simple paperboard insert may be enough for a controlled assortment. For fragile pieces or mixed shapes, a molded tray or compartment divider can protect the candy and keep the layout intact. The cost is higher, but so is the chance the product reaches the customer looking the way it should.
Windows are useful when the candy itself is part of the appeal. If the color, shape, or texture helps sell the product, a window can do the job without opening the box. The tradeoff is obvious: less panel space for graphics and a slightly more complex build. Window film also needs to be checked for clarity and placement, because a cloudy or crooked window ruins the effect fast.
Food-contact concerns matter too. Not every coating, liner, or insert is suitable for direct contact with confectionery. If the candy touches the board, the supplier should confirm what materials are approved for that use. If the box is only for secondary packaging, the spec is simpler. If the product sits against the material, the review has to be stricter.
Heat sensitivity is another common issue. Chocolate, caramel, and filled pieces can soften quickly in transit or storage. A printed box does not solve temperature problems. If the product is vulnerable, secondary packaging, insulated shipping, or a better delivery method may be part of the real solution. Pretending otherwise only creates complaints later.
From a sustainability angle, fewer components usually help. A smaller structure with no unnecessary inserts is easier to recycle and faster to pack. That said, the cheapest build is not always the right one. If the candy needs protection, the spec should prioritize product integrity first and waste reduction second. The balance has to make sense for the use case.
Common Mistakes When Ordering Branded Candy Boxes
The most common mistake is designing before the dieline is final. That usually leads to logos that land on a fold, text that sits too close to a cut line, or artwork that looks fine in a mockup and wrong in production. If the structure changes after design work is done, the artwork gets reworked. That is time and money gone for no useful reason.
The second mistake is choosing a box based on appearance alone. A structure can look elegant and still be wrong for the product. If the box cannot hold the candy safely, stack cleanly, or survive the distribution route, the pretty sample does not matter. Packaging has to do the job, not just pose for it.
Low-resolution logos cause another avoidable problem. A brand mark that looks acceptable on a website can print soft or jagged if the source file is poor. Vector artwork is the safer option. So are locked brand colors and approved type files. For Custom Printed Boxes, clean files are not an optional improvement. They are the baseline.
Buyers also underestimate inventory planning. Holiday candy can sell faster than expected and leave shelves empty. The same product can also sit too long if the run is oversized. That matters because confectionery demand tends to spike around promotions, gifting seasons, and limited releases. Overordering is expensive. Underordering can be worse if the window is short.
Skipping proof approval is another expensive habit. A digital mockup is not a substitute for a sample or press proof. Real-world fit, closure tension, coating feel, and print alignment only show up once the box is built. If the run is large or the packaging is tied to a launch, proofing is cheap insurance.
“The cheapest box is not the cheapest order if it fails at fit, print clarity, or shipping performance.”
One quieter mistake is ignoring the inside of the box. Buyers spend time on the exterior graphics and then leave the interior empty, loose, or awkwardly sized. That is how product moves in transit and presentation falls apart on opening. The inside should be part of the spec, not an afterthought.
Expert Tips for a Cleaner Order
Start with the facts: exact dimensions, candy weight, target quantity, artwork status, and intended sales channel. That single spec sheet will answer most of the questions a packaging supplier needs before quoting. It also reduces revision cycles because everyone is looking at the same information.
Ask for a structural sample or proof before full production. If the box is meant to feel premium, confirm the closure, insert fit, and logo placement. If the goal is unit cost, say that plainly so the structure can be optimized around efficient packaging rather than expensive extras. Vague goals usually produce mediocre specs.
Rank the priorities before the order goes out. Low cost, fast turnaround, and premium shelf impact are not the same thing. A box can do two of those well. Three is harder. Being honest about the tradeoff up front is better than discovering it after the proof is already approved.
Pay attention to the channel, not just the box. A retail shelf needs clear hierarchy and fast readability. E-commerce needs protection and reliable stacking. Gift packaging needs a clean opening experience and enough visual presence to justify the price. The same candy can use a different box depending on where it is sold.
When the spec is clear, custom candy Boxes with Logo stop being just a carton and start working as part of the sales system. They protect the product, support the brand, and make reorders easier because the packaging decisions are documented instead of improvised. That is the real value. Not decoration. Consistency.
If there is a final check before production, make it this: confirm the dieline, confirm the file quality, confirm the material, and confirm the end use. Miss one of those, and the job usually pays for it later.
FAQ
What are custom candy boxes with logo made from?
Most are made from paperboard or coated carton stock because those materials print well and fold into retail-ready shapes. The right board depends on the candy weight, how the box will be handled, and whether inserts or a food-safe lining are needed.
How many custom candy boxes with logo do I need to order?
Minimum order quantities vary by box style and print method. Digital runs can sometimes start in the low hundreds, while offset printing usually becomes more efficient at higher counts because setup costs are spread across more units.
How long do custom candy boxes with logo take to produce?
Simple jobs can move quickly once artwork and dielines are approved. A realistic planning window for many orders is 12 to 15 business days after proof approval, though complex structures, specialty finishes, and seasonal demand can add time.
What artwork do I need before ordering?
A vector logo, approved brand colors, and any required ingredient or legal text should be ready before production starts. A confirmed dieline is also important because it keeps the logo and other artwork away from folds, glue areas, and cut lines.
Can custom candy boxes with logo include inserts or windows?
Yes. Inserts help keep the candy in place, and windows let buyers see the product without opening the box. Both features are useful, but they add cost and sometimes extra lead time, so they should be chosen for a reason, not just because they look premium.
Are there packaging concerns for chocolate and other heat-sensitive candy?
Yes. A printed box does not solve temperature exposure. Chocolate, caramel, and filled pieces may need better transit planning, insulated shipping, or secondary packaging if the product will move through warm environments.

