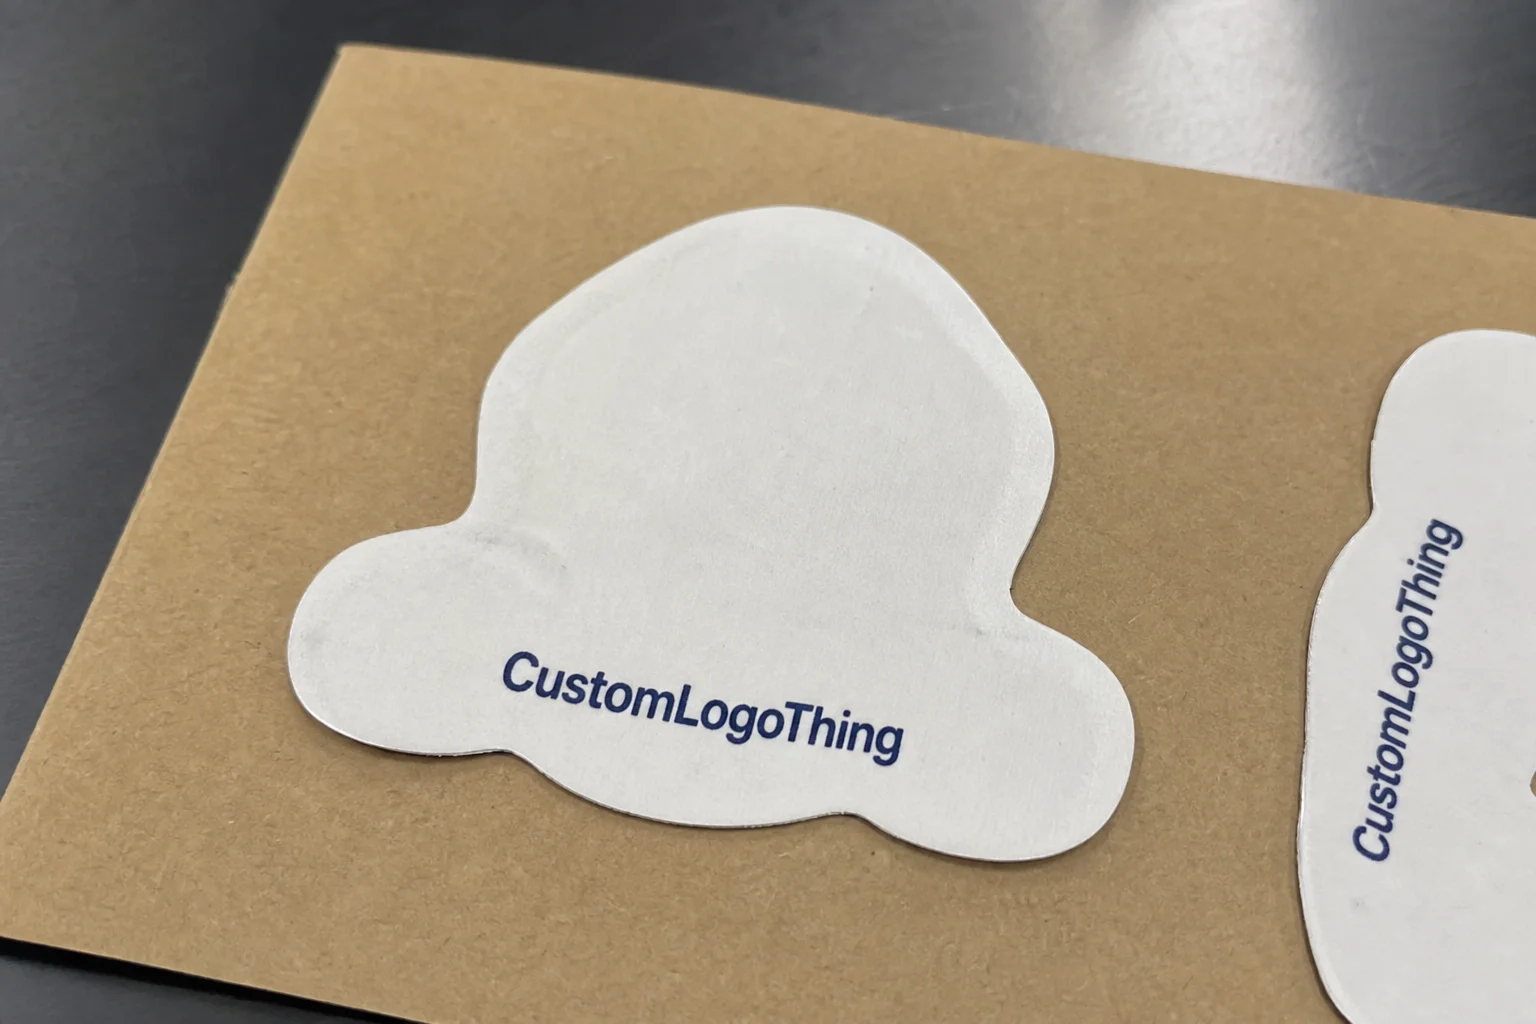
Custom clear labels are useful because they can carry branding, care details, or compliance information while staying visually quiet. On folded tees, garment bags, product inserts, and retail packaging, that low-profile look often reads as cleaner and more expensive than a heavily printed label that competes with the product itself.
The material, though, is only part of the story. Transparent film, reverse printing, white ink, adhesive strength, and surface texture all affect how the final label looks and performs. A clear label can feel polished on one package and look nearly invisible or slightly cloudy on another. That is why the spec matters as much as the design.
For apparel brands, the label is part of the packaging system, not a separate purchase. It has to work with the carton, mailer, tissue, insert, and handling conditions. If it does not fit that broader system, the premium effect disappears fast.
Why custom clear labels can make apparel look more premium
Minimal packaging usually feels deliberate. A clear label supports that effect by preserving the surface underneath instead of covering it with a block of opaque color. That is why these labels show up on branded poly bags, soft-touch cartons, shipping mailers, and insert cards where the design itself already does enough visual work.
For clothing brands, the value is practical as well as aesthetic. A folded shirt with a small, well-placed clear label looks more considered than one with a large paper sticker interrupting the presentation. The same is true for garment bags and retail packaging: the label identifies the item, but it does not take over the unboxing experience.
There is also a simple visual advantage. Clear constructions reduce the sense of clutter and let typography, logo placement, and package color do the heavy lifting. That can be especially effective for brands using restrained branding, neutral cartons, or monochrome packaging systems.
Still, “clear” does not guarantee a refined result. If the artwork is too light, the surface is too busy, or the label is applied to a textured substrate, the final effect can be hazy rather than premium. The package and the label need to be planned together.
Clear labels work best when the artwork is simple, the contrast is deliberate, and the application surface is consistent enough to support the finish.
That last point matters more than buyers sometimes expect. A clear label on a smooth black mailer, for example, can look sharp and intentional. The same construction on a soft-touch box or recycled kraft surface may need a different adhesive, more contrast, or a slightly different film to look equally good.
How the label material, printing, and adhesive work together
A clear apparel label is a small layered system. It usually includes a transparent face stock, printed artwork, adhesive, and a release liner. Each layer affects the others. If one choice is off, the final result can look cloudy, lift at the edges, or lose legibility once it is applied.
Face stock is where appearance starts. Standard clear film can work well for general packaging, while higher-clarity films reduce the hazy look that sometimes appears around the edges or under heavy ink. Matte clear softens reflections; gloss clear produces a sharper sheen but can catch glare under retail lighting or fingerprints during assembly.
Printing method changes both cost and appearance. Digital printing is often the most flexible option for short runs, variable details, and fast setup. Flexographic printing tends to make more sense at higher volumes with stable artwork. Screen printing is less common, but it can be useful when the design needs a heavier ink laydown or stronger opacity.
White ink is the most common adjustment buyers overlook. Without it, pale colors or thin type can vanish against a clear label or look weak once applied to a dark or reflective package. A white underprint gives the artwork a foundation, but it adds a production step and usually increases cost. It is worth it when readability matters.
The adhesive has to match the actual application, not just the sample sheet. A removable adhesive is usually right for temporary branding on inserts, garment packaging, or short-lived promotional use. Permanent adhesive is better for mailers, retail packaging, and any label that must stay in place through handling, transit, and display.
Surface type can change performance dramatically. A label that bonds well to smooth carton stock may behave differently on coated paper, soft-touch lamination, recycled kraft, or lightly textured films. For that reason, asking for adhesive recommendations based on the real substrate is more reliable than choosing by description alone.
Temperature and moisture also matter. If the packaging may be exposed to condensation, cold storage, or hot shipping environments, the adhesive and film should be tested with those conditions in mind. A standard label can pass a bench test and still fail in real fulfillment.
| Option | Best use | Performance profile | Relative cost |
|---|---|---|---|
| Clear film with removable adhesive | Temporary apparel packaging, insert cards, short-term branding | Clean removal, moderate hold | Lower to mid |
| Clear film with permanent adhesive | Retail packaging, shipping mailers, long-term application | Stronger hold on many smooth surfaces | Mid |
| Clear film with white ink | Light artwork, small text, premium presentation | Better readability and contrast | Mid to higher |
| Clear film with surface testing | Textured, coated, cold-chain, or uncertain substrates | Application-specific validation | Higher |
If your brand uses Custom Labels & Tags across apparel and packaging, it helps to standardize the construction notes. Keeping the same dimensions, adhesive type, and print rules for repeat jobs reduces surprises later.
That approach also makes it easier to compare labels with the rest of your Custom Packaging Products. A clear label should reinforce the packaging system, not create a one-off exception that becomes hard to reorder or match.
Key specs that affect cost, finish, and performance
Several decisions drive price, and most of them are practical. Size is one of the first. A simple rectangle or square is usually more efficient than a highly contoured die-cut because it uses material more cleanly and requires less setup complexity. Fancy shapes can look nice, but they are not free.
Quantity has a direct effect on unit cost. Smaller runs typically cost more per label because prepress, proofing, setup, and press adjustment are spread over fewer pieces. Larger runs reduce unit price, but they also increase storage needs and tie up cash, so the right quantity depends on reorder frequency and forecast confidence.
Ink coverage is another major factor. A mostly transparent design with a small logo and minimal type is easier to produce than a label that needs dense background ink, multiple colors, or broad white underprinting. Fine linework and small text can also slow down production if registration needs to be especially tight.
Finish affects both appearance and handling. Gloss clear creates a sharper, more reflective look, which can suit bright retail environments. Matte clear reduces glare and often feels more restrained. Ultra-clear constructions are designed to minimize haze, but the film quality and adhesive layer underneath still influence how invisible the label actually feels once applied.
There is no useful universal price. A small, simple run may land around $0.18 to $0.35 per label depending on size, shape, and print coverage. Larger quantities can drop below that range if the design stays simple and the application is straightforward. Add white ink, special adhesive requirements, or custom shapes, and the number moves up quickly.
Proofing is worth the time. A physical sample or pre-production proof can catch problems that screen previews miss: weak contrast, trimming issues, haze, adhesive mismatch, and distorted type near the die line. Fixing those issues before a full run is far cheaper than reprinting after the labels are already scheduled for a launch.
Before requesting quotes, answer these questions clearly:
- What exact size do you need?
- Will the label be temporary or permanent?
- Does the artwork require white ink?
- What surface will it stick to?
- Do you want gloss, matte, or high-clarity clear?
- Are you ordering one SKU or multiple versions?
Those answers usually determine most of the spec. They also help separate what is actually required from what merely looks nice in a mockup.
For apparel brands selling through both retail and direct-to-consumer channels, the label also needs to survive different handling patterns. Fulfillment teams may stack, scan, and pack these labels differently than a shop floor team would. That practical difference should be part of the spec review.
Custom clear labels process and timeline: from artwork to delivery
Most orders follow the same general path: artwork review, material recommendation, proof approval, print setup, production, finishing, inspection, and shipping. The process sounds simple enough, but clear labels tend to expose weak artwork faster than opaque labels do. Transparency leaves less room to hide mistakes.
Artwork delays are common. Missing dielines, low-resolution logos, thin strokes, and unclear color expectations all add back-and-forth. If white ink is required, the file may need separate layers for the underprint and top print, and those layers must register correctly or the artwork will shift visibly on press.
Lead time depends on whether the order is a repeat or a new build. A repeat job with approved artwork usually moves faster than a first-time order, because the material, adhesive, and layout already have a known reference point. A straightforward run may take roughly 10 to 15 business days after proof approval. More complex jobs, larger quantities, or revision-heavy projects can take longer.
That estimate is not a promise. Seasonality, press load, finish complexity, and sampling requirements can all change the schedule. If the labels are tied to a product drop, packaging refresh, or replenishment cycle, it is smarter to plan backward from the application date and leave room for a proof round.
Rush production can be possible, but it narrows the available options. Simpler artwork, fewer colors, and standard materials give the best chance of hitting a compressed timeline without compromising the result. If the label needs custom testing or a special adhesive, those requirements usually add time.
For buyers who manage compliance-sensitive packaging or large distribution runs, it can also help to think about adjacent standards. Transport testing guidance from organizations like ISTA, recycling resources from EPA recycling resources, and paper sourcing standards through FSC all sit near the packaging decisions that affect labels, even if the label itself is only one component.
Common mistakes when ordering clear apparel labels
The first mistake is assuming a clear label will always look subtle in a good way. On a busy surface, a transparent label can disappear too much and make branding hard to read. The goal is visual restraint, not accidental invisibility.
The second mistake is underestimating contrast. Light gray text, thin logo lines, and small compliance copy often need a white underprint or a stronger layout to stay legible. What looks refined on a monitor can turn faint once it is placed on a dark mailer or under retail lighting.
The third mistake is choosing an adhesive from a spec sheet alone. Real surfaces behave differently. A label that stays put on a smooth paper insert may lift on a soft-touch carton or leave residue on a coated package. Testing on the final substrate is the only reliable way to know.
The fourth mistake is sending artwork that was never built for production. If the bleed is too tight, the type is too small, or the die line is ignored, trimming tolerances can damage the design. That problem is especially visible on small labels because there is less room for correction.
The fifth mistake is ordering too few pieces. Brands often save money by planning the exact launch quantity, then pay again for a second setup later. If the label is part of ongoing packaging, it is usually better to forecast usage and leave room for the next production cycle.
A practical checklist keeps the process cleaner:
- Match the label to the actual surface, not a generic sample.
- Build enough contrast for the artwork to remain readable.
- Approve a proof on the real material whenever possible.
- Keep bleed, trim-safe margins, and line weights in spec.
- Order with reorder timing in mind, not only the first shipment.
Expert tips for a cleaner, more durable result
Good clear-label design is often more restrained than buyers expect. Strong typography, generous spacing, and a simple layout usually perform better than crowded graphics. A label with fewer elements looks more deliberate and is less likely to fail visually once the film, adhesive, and surface all come into play.
Ask for a physical sample if the finish matters to the brand. Digital mockups cannot show haze, gloss level, edge clarity, or the way a clear film behaves under fluorescent or daylight-balanced lighting. Those details are visible only on the actual material.
Testing on the real item is essential. If the label is going on garment bags, inserts, carton stock, or laminated packaging, apply it to that substrate before approving the full order. Adhesion, edge lift, and optical clarity all change once a label meets the real surface.
Keep a master spec file. Save the approved dimensions, adhesive choice, print notes, finish, and substrate description in one place. That record reduces errors on repeat runs and helps a new team member order the same label without guessing.
It also helps to think about the package as a sequence. The clear label does not stand alone; it interacts with the outer mailer, the fold of the garment, the insert card, and any printed tissue or seal. If those pieces share the same visual language, the whole package feels more intentional.
Next steps to order the right clear label for your clothing brand
Start with the application. A label for garment packaging has different needs than one used on shipping mailers or retail inserts. Once the use case is clear, the right adhesive and finish narrow down quickly.
Then collect the basics before requesting a quote: dimensions, quantity, artwork files, finish preference, and whether white ink or special adhesive testing is required. If you can describe the surface accurately, the recommendation will usually be much better because the material can be matched to the real job instead of guessed.
If you are comparing options, ask for a sample plan that includes material suggestions and a proof. That reduces the chance of a mismatch and gives you a better read on cost, timeline, and reorder behavior before production starts.
A short checklist helps keep the decision focused:
- Will the artwork stay readable on the chosen surface?
- Does the adhesive match the actual application?
- Does the finish support the brand look?
- Does the quantity fit your storage and forecast?
- Does the landed cost still work for your margin?
When those answers line up, custom clear labels can give clothing packaging a clean, understated finish without visual clutter. That is usually the point: enough branding to feel intentional, but not so much that the label takes over the product presentation.
What are custom clear labels used for in clothing packaging?
They are commonly used on apparel mailers, garment bags, product inserts, hang tags, and branded packaging where a low-visual-profile label is preferred. They add branding and information without covering the package design or competing with the clothing presentation.
Do clear labels need white ink to look readable?
Not always. White ink is most useful when the artwork includes light colors, fine lines, or small type that could disappear against the clear film or the surface underneath. A proof on the real substrate is the best way to confirm readability.
How do I choose the right adhesive for clothing-related labels?
Match the adhesive to the actual use. Removable adhesives work well for temporary packaging and inserts, while permanent adhesives are better for shipping or retail applications. Coated, textured, and soft-touch surfaces should be tested before a full run.
What affects the price of custom clear labels the most?
Quantity, size, shape complexity, ink coverage, white ink, finish, and adhesive selection are the main pricing drivers. Smaller orders usually cost more per label because setup and production preparation are spread over fewer pieces.
How long does it usually take to produce custom clear labels?
Timeline depends on artwork readiness, material selection, proof approval, and whether the order is a repeat or a new build. Simple approved orders can move faster, while jobs with white ink, special adhesive testing, or revisions usually take longer.