Loose bag stacks seem manageable until they start slowing down a counter, slumping inside a shelf tray, or getting battered in transit. At that point, custom dispenser boxes stop looking like a decorative package and start functioning like part of the operating workflow. The right carton keeps bags organized, protected, and ready to pull one at a time without tangling, curling, or collapsing.
For a buyer, the job is not complicated in theory: make the bag product easier to handle, easier to display, and easier to replenish. In practice, that takes more than artwork. Structure, board strength, opening style, print placement, and finishing all influence whether the carton works smoothly or turns into another item staff have to fight with.
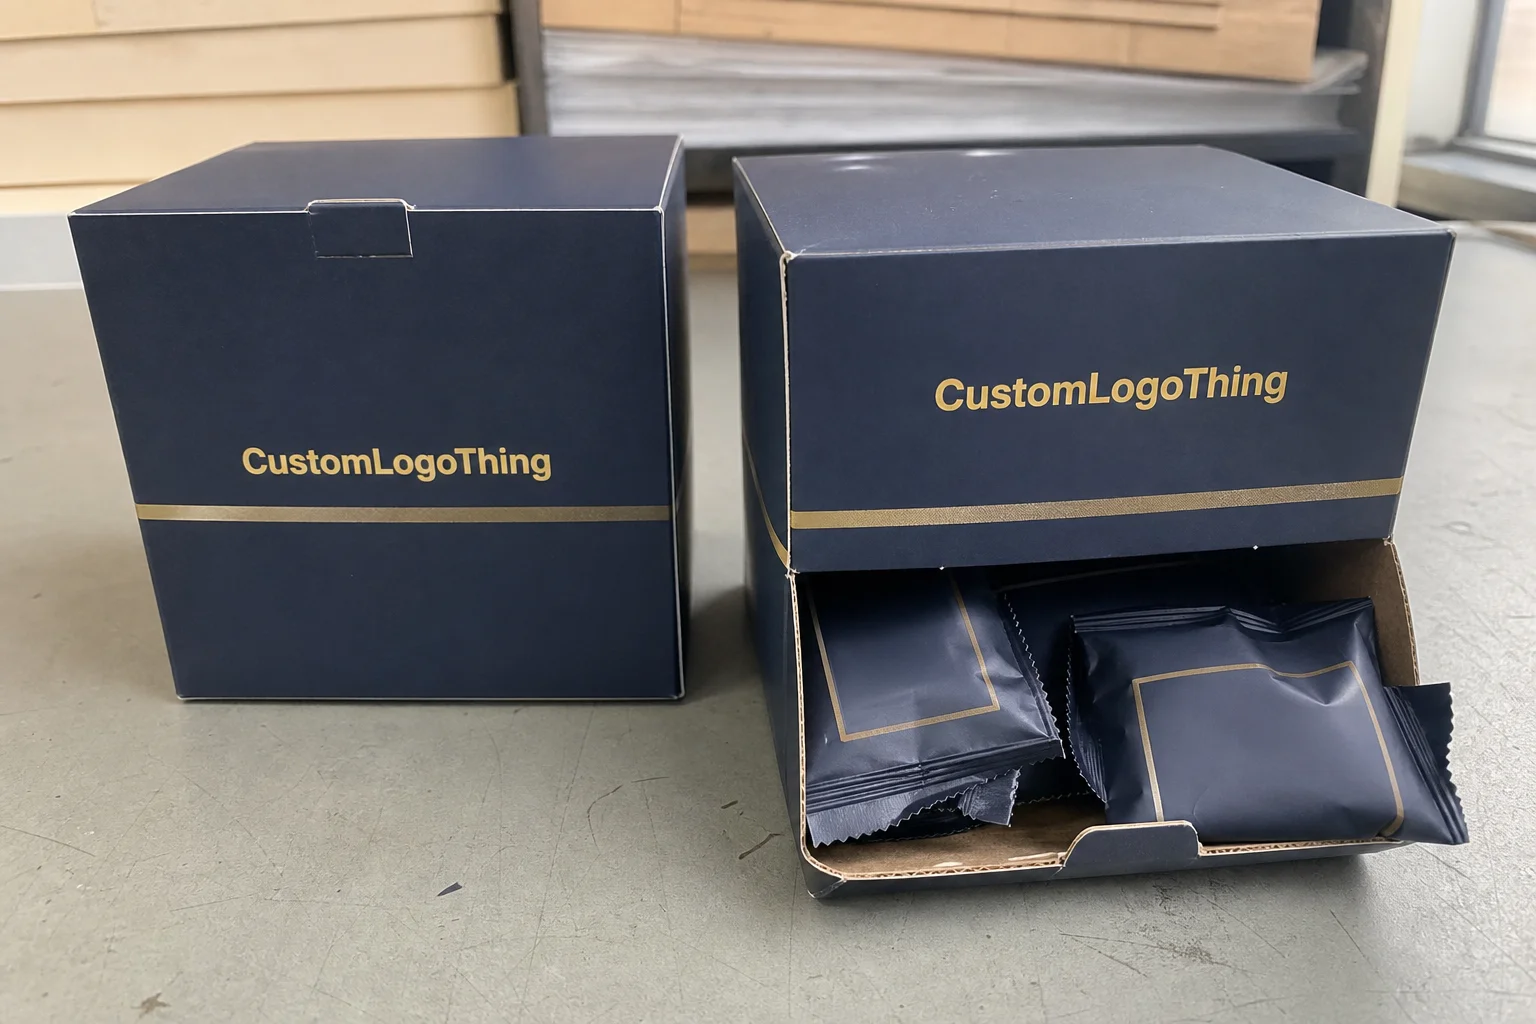
Why custom dispenser boxes solve the grab-and-go problem
Anyone who has stocked bags in retail, food service, or back-of-house storage has seen the same pattern. Loose stacks slide around, corners bend, and the first units get crushed long before the box is empty. On a busy day, that creates waste, slows refills, and leaves the display looking careless even if the product inside is fine.
Custom dispenser boxes address that by turning the carton into a controlled feed system. Instead of leaving a stack exposed in a tray or warehouse bin, the package holds the bags in a fixed position and lets each one exit through a designed opening. That opening might be a front cutout, a perforated panel, a tear strip, or a shaped slot that guides the next bag into place after the previous one is removed.
The value is not limited to appearance. A well-built dispenser carton can reduce handling steps, keep the product cleaner, and make shelf replenishment quicker. In plastic bag packaging, that matters because speed, cleanliness, and compact storage all affect daily operations. The strongest designs balance access, protection, visibility, and footprint without adding unnecessary material or awkward assembly.
A good dispenser carton is part of the product experience, not just the shell around it. If the first pull is smooth and the refill is simple, the structure is doing real work.
That said, expectations should stay grounded. Not every use case calls for a premium retail presentation. Sometimes the goal is a tidy refill station. Sometimes it is a shelf-facing carton that needs to look organized from a distance while still being practical for staff to restock during a rush. The best design reflects the actual environment instead of chasing a display idea that only works in a mockup.
How the dispensing design actually works
The mechanics matter more than many first-time buyers expect. If the opening is too tight, the first bag snags and the user pulls harder, which can tear the carton or drag multiple bags at once. If the opening is too loose, the bags spill, curl, or bunch up and the stack loses control. The right design creates just enough resistance to guide the next bag forward without letting the contents escape.
Internal dimensions are the starting point. The box has to match the bag width, folded thickness, count per carton, and whether the product is loose packed, gusseted, or on a roll. A 100-count stack of thin produce bags behaves very differently from a thicker drawstring or trash bag format, so the dieline has to be built around the actual product rather than a generic carton size.
Board strength is the other half of the equation. If the front panel collapses when the box is stacked or handled repeatedly, the opening changes shape and the feed path becomes unreliable. That is why board selection should be tied to the real use case: counter display, warehouse storage, shipping-only protection, or high-touch retail refill.
Print and coating choices influence performance as well. Heavy gloss can make a carton feel slick during handling, while a matte or aqueous finish often gives better grip and hides scuffs more effectively. A front window can improve visibility, but if it is too large or badly placed, it weakens the structure and can interfere with the feed path. The package should help the first bag present itself cleanly, not force the user to dig or shake the box.
One detail that often gets missed is how the carton behaves as it empties. A box may work well when full, then get looser and less stable after half the contents are gone. If the remaining stack loses support too quickly, the opening begins to deform and the dispensing action becomes inconsistent. That is why prototype testing should include a nearly empty state, not just a full carton on a desk.
Another factor is how the product is packed inside. Loose stacks need different support than bags folded into a flat stack or wound on a roll. If the internal hold is too rigid, the top bag cannot rise naturally. If it is too loose, the contents shift during shipping and the first pull becomes awkward. The structure should guide movement, not trap it.
Material and print choices that change performance
Board choice usually comes down to three things: strength, appearance, and cost. For lighter bag counts or shorter retail runs, a solid 16 pt to 18 pt SBS or C1S board may be enough. When the box is larger, handled often, or stacked in shipping, buyers usually move toward a heavier paperboard or a corrugated insert to keep the shape intact. There is no single ideal spec. The right one depends on how hard the carton will be worked.
For branded packaging, the print strategy should match the channel. A one-color functional carton can be perfectly acceptable for warehouse or back-of-house use, especially when the goal is fast identification and easy refill. A retail-facing line, on the other hand, may need full-surface graphics, tighter color control, and clearer hierarchy so the SKU stands out and the count can be read from arm’s length.
Here is a practical comparison of common options:
| Option | Typical Use | Strength | Visual Impact | Relative Cost |
|---|---|---|---|---|
| Light paperboard carton | Low-count, short-run, internal use | Moderate | Basic | Lower |
| Heavier SBS or C1S board | Retail display, frequent handling | Good | Clean and printable | Mid-range |
| Corrugated or reinforced structure | Shipping, high count, rough handling | High | Less refined, more protective | Higher |
Finishes deserve attention too. Matte coatings reduce glare and make typography easier to read under store lighting. Gloss coatings often make colors pop, but they can show scuffs faster. Spot UV or spot varnish can highlight a logo or key detail, though it should be used for a reason rather than because it looks impressive on a proof. The finish should support how the carton is actually touched and stored.
There are also compliance and sourcing details buyers should not skip. If the carton is used near sensitive products, ask whether the inks and coatings are appropriate for the environment. If sustainability is part of the buying criteria, look for FSC-certified board options and make sure the claim is documented, not just printed on the mockup. For material and sourcing guidance, references from industry packaging associations and FSC are useful alongside supplier specs.
Most buyers do not need complicated artwork to get strong results. Clear count, bag type, SKU color coding, and a recognizable brand panel usually do more than dense graphics. That is especially true for Custom Printed Boxes that sit on a shelf where staff and customers need to identify the right product quickly.
There is also a practical printing reality: dark solids, heavy coverage, and fine reversed text all raise the chance of rub, registration drift, or visible scuffing if the carton moves through a rough distribution path. A restrained layout is often easier to keep consistent at production volume, and consistency matters more than decoration once the boxes are in use.
Process and timeline: from dieline to production steps
The cleanest projects start with facts, not artwork. Before a quote is meaningful, the supplier needs bag dimensions, folded thickness, count per box, distribution channel, and whether the product is loose packed or roll-fed. Those details drive the dieline, the opening style, and the board spec. If the inputs are fuzzy, the project usually burns time in revisions later.
The usual sequence is straightforward: product dimensions, structural concept, dieline approval, artwork setup, proofing, sample review, and production. Problems begin when bag size or fold pattern changes after the structure has already been drafted. At that point, the box may still be printable, but the feed path can be wrong, which means the opening needs to be reworked and the timeline stretches.
Simple cartons often move faster than custom structures with windows, inserts, or specialty finishing. A straightforward utility box may pass through sampling and production with little friction, while a box with a precise front tear strip, folded insert, or selective coating asks for more testing. If the bag is a new format, a structural mockup is worth the time. A plain prototype can save an expensive mistake.
For timing, buyers should plan around proof approval, sample review, and the production queue. Even when a vendor gives a short cycle, an incomplete spec sheet will slow the schedule more than the pressroom itself. If the launch date matters, build in buffer for fit checks and transit time. That becomes especially important for retail packaging tied to a seasonal promotion or a store reset.
One practical detail: if the package has to survive shipping abuse, ask whether an ISTA test profile makes sense for the route. ISTA publishes common distribution testing procedures, which can be useful when cartons move through parcel handling, pallet stacking, or mixed freight before they reach the shelf. More information is available at ISTA.
Good project control also means checking who signs off on what. Structural fit and graphic approval are not the same thing. A beautiful proof can still fail if the carton opens too tightly or the stack shifts inside. Treat the sample as a functional test first and a brand review second. That order keeps the team focused on what the package must do before everyone starts debating color and layout.
Cost, MOQ, and unit cost drivers
Pricing is shaped by five variables: board grade, print coverage, cut complexity, finishing, and quantity. Once those are set, MOQ becomes the next major planning factor. That is not just a supplier policy issue. It affects how much stock you carry, how quickly you can launch, and whether the carton fits the cash flow plan.
Small runs make sense when a buyer is testing a new bag style, launching a pilot program, or serving a seasonal need. Larger runs usually lower the unit cost because setup is spread over more pieces. The tradeoff is storage and commitment. If the bag format may change in a few months, a cheaper unit price can turn into waste if the carton becomes obsolete.
Here is a practical cost view:
| Cost Driver | Effect on Unit Price | Buyer Takeaway |
|---|---|---|
| Heavier board | Raises cost moderately | Worth it when the box is handled often or shipped |
| Full-color print | Raises cost depending on coverage | Useful for retail packaging and strong shelf presence |
| Special die lines or windows | Raises setup and tooling cost | Only add if the opening truly improves function |
| Higher MOQ | Lowers unit price | Good for stable SKUs, less ideal for testing |
As a rough planning range, a simple custom dispenser carton at a mid-size quantity may land around $0.18 to $0.45 per unit depending on size, print, and structure, while more involved retail builds can run higher. That is not a quote, just a useful range to keep expectations grounded. The cheapest carton is not always the best value if it slows filling, crushes in storage, or creates rework on the line.
Labor is another hidden cost. A design that is awkward to fold, difficult to load, or prone to tearing can add time at packing, and that expense does not always show up in the unit price. When buyers compare options, they should ask what the total cost looks like across production, storage, handling, and display, not just the print bill.
Custom dispenser boxes tend to pay off most clearly when the package reduces touchpoints or makes replenishment faster. That is why many teams compare a lower-cost carton against a more durable option before placing a larger order. In a stable program, the slightly better structure often wins because it saves time every day the boxes are in use.
There is a second-order effect too: if the carton presents the product better, it can reduce shelf cleanup and improve the odds that the right SKU gets picked and restocked. That does not always show up as a line item, but operators notice it quickly.
Common mistakes that cause jams, damage, or weak presentation
The most common mistake is simple sizing error. Oversized boxes let the product shift, which makes the front opening look loose and unfinished. Undersized boxes pinch the stack, and then the first bag drags too hard or tears during the pull. Either way, the box fails at the one job it was supposed to do.
Weak front geometry causes trouble as well. If the opening is cut too aggressively or the fold lines are not reinforced properly, the first bag may snag on the lip and create a frustrating dispense. That friction usually gets worse as the box empties and the remaining bags lose their natural support.
Overprinting can work against function. Busy artwork, dense backgrounds, and heavy coatings sometimes hide the structural cues staff need when they are restocking quickly. The carton should still be easy to read at a glance. If it takes time to find the size or count, the design has already failed operationally.
Another mistake is approving graphics before structural fit is tested. A polished mockup does not prove that the bag will feed properly. The structure has to work first; then the branding can do its job. Finally, do not ignore how the box will be shipped and stored. A carton that looks fine on screen can warp if it is packed too tightly, stacked too high, or exposed to repeated handling during transit.
Recycling and material claims need care as well. If the board is recyclable or sourced responsibly, confirm what that means in the actual market where the packaging will be used. The EPA has useful guidance on waste, recycling, and materials management at epa.gov, and that can help teams align packaging decisions with broader sustainability goals without guessing.
Another issue is ignore-the-printer behavior: buyers sometimes approve a design from a flat PDF without checking how color blocks, fold lines, and perforations interact in the finished carton. A safe-looking graphic can hide a bad structural choice. The more the package depends on precise folds or tear points, the more the sample matters.
Expert tips for a cleaner retail display and easier refill
Start with the front panel. Design it around the actual bag width and exit point so the opening feels intentional rather than improvised. A centered, well-proportioned cutout gives the shelf a cleaner look and helps the first bag present itself naturally instead of curling into the carton.
Next, build a clear information hierarchy. Staff should be able to spot the size, count, and product type in a quick glance. That matters in busy retail packaging environments where the wrong SKU gets put back on the shelf if the front panel is confusing. If the same brand has multiple bag counts, use color bands or strong typographic differences to separate them.
I also recommend testing the carton in the real environment, not just on a design file. Put one sample on the shelf, counter, or warehouse station where it will actually live. Watch how the bags feed, how the carton stands up after a few pulls, and whether staff can restock it without extra manipulation. A small structural adjustment can make a large difference in how the next bag moves.
Think of the package as part of the operating system. It should help the person using it move faster without needing to re-stack, smooth, or force the contents. That is a practical packaging principle that often gets overlooked because people focus on the print file first and the mechanics second.
- Keep the opening centered and sized to the actual bag stack.
- Use enough board strength to protect shape under handling.
- Make the SKU and count easy to read from arm’s length.
- Test one sample in the real use location before approving the run.
Those checks usually produce a cleaner display and a better refill routine. That is the real gain with Custom Printed Boxes in this category: the carton does not just carry the product, it helps the product work better in the field.
There is also a maintenance angle. If the box is used at a station where multiple people refill it during a shift, the opening should tolerate inconsistent handling. Some designs look precise but become fragile after repeated grabs. A slightly more forgiving opening and a sturdier front panel can reduce damage over time, even if the carton seems less elegant on paper.
Next steps to spec, sample, and order with confidence
If you are ready to move, start with four decisions: measure the bag, define the count per box, decide on print needs, and confirm the actual use location. Those four answers eliminate most of the guesswork and make the supplier quote much more useful.
Ask for a structural mockup or prototype before committing to the full order, especially if the bag format is new or the opening style is unusual. A sample can show whether the first bag feeds cleanly, whether the board holds shape, and whether the carton looks right on the shelf. That one step usually prevents more trouble than it costs.
It is also smart to compare at least two options: one lower-cost build and one more durable version. That makes the tradeoff visible. Sometimes the lighter carton is enough. Sometimes the better board, stronger finish, and cleaner opening save enough time in use to justify the extra spend. In buyer terms, that is often where the real value sits.
Once dimensions, artwork, and timeline are locked, place the order with enough buffer for proofing, transit, and any final revision. If the launch is tied to a store reset or replenishment schedule, do not cut the timing too tight. Inventory pressure is a bad reason to rush packaging approval.
In the end, custom dispenser boxes should be treated as part of the bag product itself. They affect handling, display, restocking speed, and repeat sales, which is why the right box is not just packaging around the product. It is a practical tool that helps the whole bag program perform better.
What are custom dispenser boxes used for in plastic bag packaging?
They hold bags in a compact format and release them one at a time for easier grabbing, storage, and display. They are commonly used when speed, cleanliness, and shelf organization matter more than loose stacked packaging.
How do I know what size dispenser box I need?
Start with the bag width, folded thickness, and total count per box, then check how the first bag will exit the opening. A prototype is the safest way to confirm fit before production, especially if the bags are gusseted or on a roll.
What affects the price of custom dispenser boxes the most?
Board thickness, print coverage, quantity, finishing, and structural complexity usually have the biggest effect on cost. MOQ also matters because smaller runs spread setup costs across fewer units.
How long does it usually take to produce dispenser boxes?
Timeline depends on design approval, sample review, and production scheduling, so incomplete specs are the main source of delay. Simple cartons move faster, while custom openings, inserts, or special finishing add extra time.
What should I check before approving the final order?
Confirm the bag count, dimensions, opening style, artwork placement, and whether the box feeds cleanly in the real use environment. Make sure the packaging can be filled, shipped, stored, and displayed without creating jams or damage.


