Custom Foam Inserts for Tool Boxes Ordering Guide
One missing socket can waste more time than the insert cost. Same with a torque wrench that gets dinged in transit, a gauge buried under pliers, or a bit set that rolls around until nobody knows what is missing. That is the practical reason buyers ask about Custom Foam Inserts for tool boxes. Not because foam makes a drawer look cute. Because the right layout protects tools, speeds up work, and shows missing items before a job leaves the shop.
Tool foam looks simple until the drawer gets used every day. Cut a pocket. Drop in the tool. Done, supposedly. The details decide whether the insert still works after six months: foam density, drawer clearance, pocket depth, wall thickness, finger access, oil exposure, vibration, and whether the layout follows the way people actually work.
Custom Foam Inserts for Tool Boxes: What They Actually Solve
Custom Foam Inserts for tool boxes are cut foam layers made around specific tools, drawer dimensions, and work habits. They are not the same as a flat sheet of padding tossed into a drawer. A proper insert has defined cavities, controlled depth, and enough spacing to keep tools from shifting, rubbing, or hiding under one another.
The jobs are straightforward. Foam protects tools from impact and abrasion. It creates a visual inventory system, similar to a shadow board, so a missing gauge, bit, extension, or wrench stands out immediately. It also improves drawer density because tools can be nested in a planned layout instead of piled wherever they happen to fit. For field kits and maintenance carts, a clean insert also improves presentation, especially when the tool set is part of branded packaging, custom printed boxes, or organized service kits used in front of customers.
You will see this type of tool foam in rolling chests, van-mounted service boxes, mobile maintenance carts, calibration sets, electronics repair kits, aircraft-style service cases, and technician onboarding kits. The goal changes by setting. A stationary shop drawer needs fast grab-and-return access. A van kit needs vibration control. A calibration kit needs gentle support around sensitive instruments. A branded service case may need labels, color layers, and package branding that line up with the rest of the company’s product packaging.
Practical rule: the best insert is not always the thickest, darkest, or most expensive foam. The best insert matches tool weight, drawer depth, movement conditions, and the way a technician reaches for the tools during real work.
That last part gets missed. A beautiful drawer layout can still be irritating if the ratchet used twenty times a day sits in the back corner, or if a gloved hand cannot lift a screwdriver without pinching at the foam. Good packaging design starts with function. Clean presentation comes after that. Wild concept, apparently.
How Cut Foam Layouts Hold Tools in Place
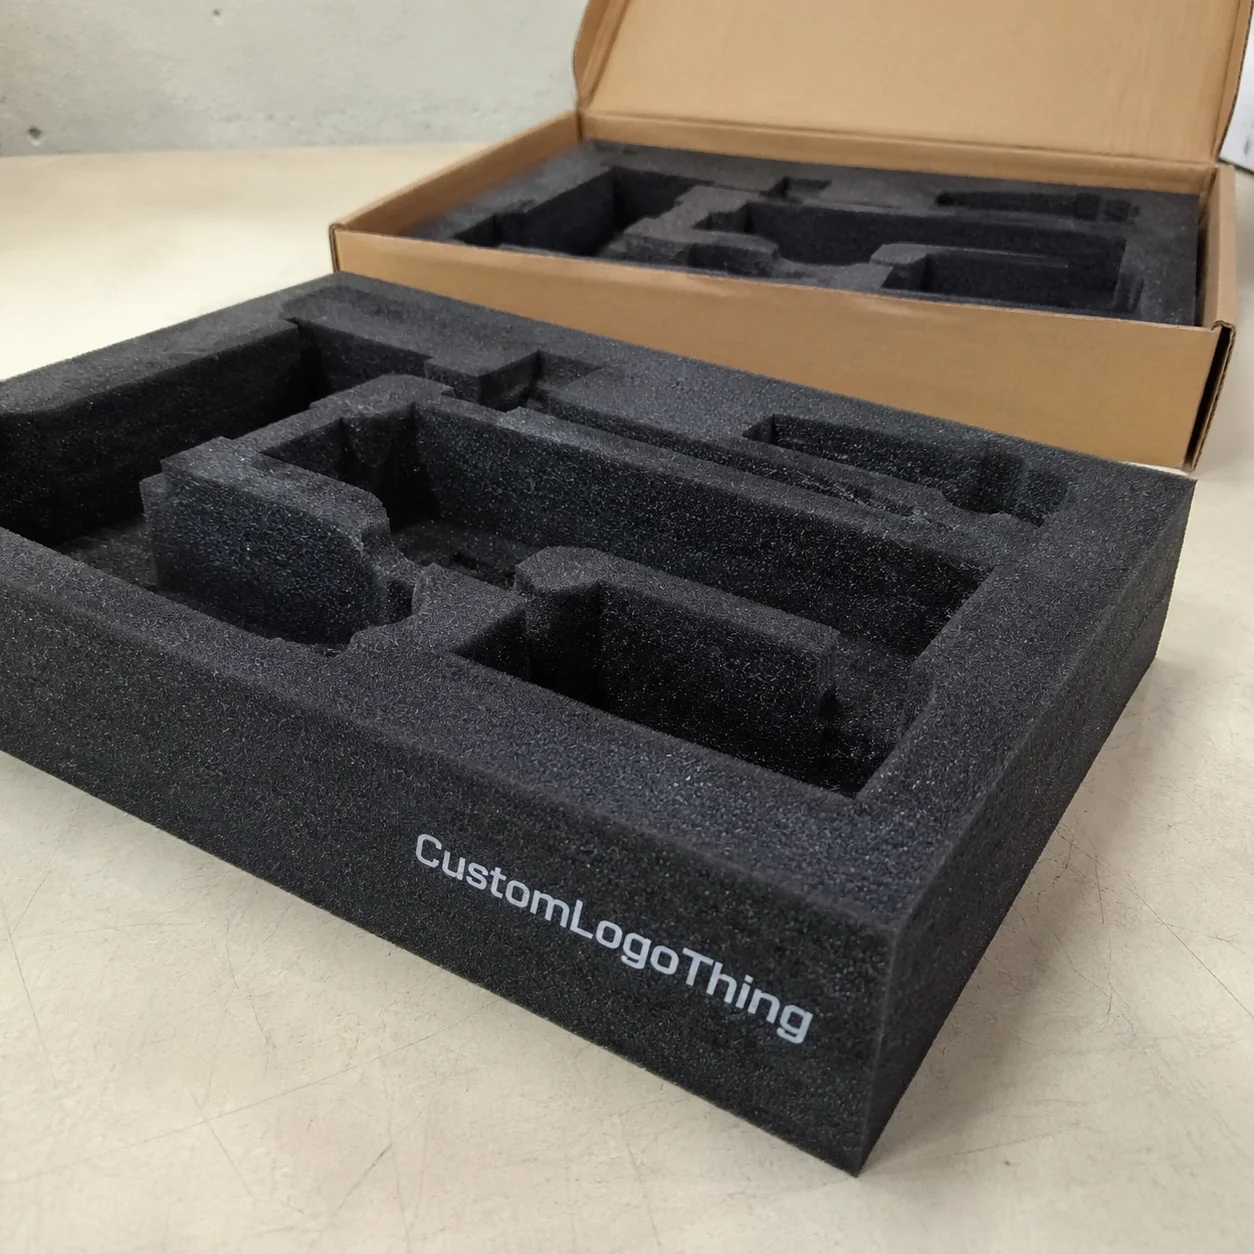
Most custom tool box inserts use a top foam layer with tool-shaped cavities. Many builds add a contrasting bottom layer, often a bright color under black or charcoal foam, so an empty pocket is obvious at a glance. That two-tone style is common for missing-tool control because the signal is instant: dark pocket means filled, color means missing.
Material choice matters. Polyethylene foam is a firm closed-cell option often used for steel tools. It supports weight, resists water absorption better than open-cell foam, and holds shape well under repeated use. EVA foam has a denser, smoother feel, cuts cleanly, and works well where appearance matters along with daily utility. Polyurethane foam is softer and more cushioning, which can make sense for delicate meters, optics, or instruments, but it is usually not the first pick for heavy wrenches, sockets, and pry bars that need long-term support.
Cutting method depends on volume, geometry, and finish expectations. CNC routing handles many tool pockets well, especially when controlled depths and finger reliefs are needed. Die cutting can be efficient for repeat shapes and larger quantities, though the tooling has to make sense for the run size. Waterjet cutting can produce clean profiles in thicker or denser foams without compressing the material as much as some mechanical methods. Laser cutting may suit certain foams and fine detail, but material compatibility has to be checked because heat can discolor, harden, or create odor in some foam types.
Fit is controlled compression, not brute force. A heavy ratchet needs support under the head and handle. A micrometer needs pressure kept away from the spindle and measuring faces. Sharp tools may need extra clearance or a liner strategy so the edge does not chew through the foam wall after repeated removal.
- Finger reliefs: half-moon or side cutouts that let a hand lift the tool easily.
- Pull tabs: helpful for flat items such as rulers, inspection plates, and thin gauges.
- Depth control: stepped pockets that keep tall and short tools usable in the same drawer.
- Orientation marks: engraved labels, arrows, or shapes that help tools return to the same position.
- Edge clearance: space around drawer sides, lids, rails, and rounded corners.
Multi-layer builds are common when tall tools, chargers, spare batteries, bits, or accessories need different depths in one drawer. A 2-inch drawer, for example, may use a 1.5-inch top layer with partial-depth cavities and a thinner color layer below. A deeper service case may use stacked layers bonded with pressure-sensitive adhesive, letting heavy items sit lower while small parts remain visible and easy to grab.
Key Specs to Confirm Before You Design Inserts
Before any supplier can design Custom Foam Inserts accurately, the drawer has to be measured as usable space, not as a catalog size. Measure the inside length, inside width, and usable height. Then check corner radius, drawer lip clearance, rivets, rails, slides, liners, latch hardware, and any obstruction that steals real foam area. A drawer listed as 22 inches wide may give you less once lips and side features are included.
Tool measurements need the same honesty. Measure the widest and tallest points, not just the handle or shank. Ratchet heads, raised buttons, molded grips, knurled knobs, rubber boots, and battery clips often drive the true cavity size. If a tool has a cord, removable probe, or protective cap, decide whether that accessory gets its own pocket or travels attached to the tool.
Tool condition matters too. Clean, dry tools are easy on foam. Oily tools, hot tools, sharp-edged tools, and tools covered in metal chips need more careful material selection and sometimes wider clearances. Closed-cell foams such as polyethylene and EVA generally handle workshop grime better than soft open-cell foams, but exposure to fuels, solvents, cutting oils, or aggressive cleaners should be discussed before production. If sustainability claims are part of the broader packaging program, review material choices against practical guidance from sources such as the EPA Sustainable Materials Management program.
Movement changes the design. A stationary cabinet can use easier-release pockets because the drawer is not bouncing down a road. A rolling cart needs better retention. A van-mounted box or shipping case needs foam density and cavity design that can handle vibration. Airline-style service kits may need tighter inventory control because tool accountability is part of the job, not a bonus feature.
Branding options should be confirmed early, not bolted on after the cut files are done. Common choices include engraved labels, printed logos, serialized kit numbers, color-contrast layers, drawer names, part numbers, and shadow-board style outlines. If the tool kits are part of a larger sales or service presentation, it may make sense to coordinate the inserts with Custom Packaging Products so the tool case, outer carton, and retail packaging feel like one planned system.
Tolerance is the quiet detail that either saves the insert or ruins it. Foam walls between cavities need enough width to avoid tearing, especially near heavy tools. As a practical baseline, very thin bridges between adjacent wrench or socket pockets are risky. Wider bridges survive daily pull cycles better. The exact spacing depends on foam type and thickness, but tight artwork on screen does not always survive rough hands in a shop.
Process and Timeline From Tool Photos to Finished Inserts
The usual workflow starts with drawer dimensions, a tool list, and photos or scans. From there, the layout is drafted, reviewed, and adjusted before proof approval. For high-value kits, mixed drawers, or tools with unusual profiles, a sample or first article may be cut before the full run. After approval, production moves through cutting, lamination if needed, labeling or engraving, inspection, packing, and shipping.
Good inputs speed everything up. Straight overhead photos help, especially when a ruler, caliper, or printed scale is visible in the frame. Tools should be clean, separated enough to show their outlines, and placed in the orientation you prefer. If every drawer is different, label each photo with the drawer number. If ten drawers are identical, say so. Repeat layouts are faster to quote and produce.
Several things slow the project down. Missing tools create guesswork. Layout changes after proofing require rework. Deep pockets may need multi-pass cutting or stacked layers. Tight drawer clearances can force extra checks. Mixed kits, where each drawer has a different tool set, need more design time than one insert repeated across many boxes.
A realistic sequence looks like this:
- Confirm the drawer’s usable interior dimensions and clearances.
- Confirm the tool list, tool orientation, and any required accessory pockets.
- Create the digital layout and review a proof.
- Cut a sample or first article if the project requires one.
- Approve the final cut file, material, color, labels, and quantity.
- Move into production, quality check, packing, and shipment.
Proofing matters because a clean screen layout is not the same as a useful drawer. The real test is whether the technician can remove every tool quickly, return it without thinking, and see what is missing. If gloves are worn, that belongs in the proof review. If a torque wrench must be grabbed by the handle from the right side, the cavity should support that motion.
Repeat orders are simpler once the final file is approved. Replacement inserts, additional drawer sets, and standardized technician kits can be reproduced more consistently because the cut file, foam type, thickness, and label information already exist. That is why many buyers standardize tool layouts across a team rather than treating every tool box as a separate one-off project.
Cost and Pricing Factors That Move the Quote
Pricing for Custom Foam Inserts for Tool boxes depends on material type, foam thickness, number of layers, cutting time, cavity complexity, drawer size, labeling, artwork, and quantity. A simple wrench drawer with 14 similar pockets usually costs less than a dense mixed drawer with pliers, sockets, bits, electronics, chargers, and three different pocket depths.
Setup and programming time are real costs. Even if you need one insert, someone still has to create the layout, clean up tool outlines, account for fit, and prepare the cut file. Higher quantities spread that setup over more units, which lowers the design cost per insert. One-off inserts can still be worth it for expensive tools or controlled kits, but the unit price will not behave like a plain sheet of foam.
| Option | Typical Use | Cost Impact | Buyer Notes |
|---|---|---|---|
| Single-layer polyethylene foam | Shop drawers with heavier hand tools | Lower to moderate | Firm support, practical durability, clean enough for most tool chests |
| Two-tone shadow foam | Missing-tool control and service kits | Moderate | Contrasting bottom layer improves visual checks |
| EVA foam with engraving | Premium field kits and branded presentations | Moderate to higher | Cleaner finish, good for labels, logos, and package branding |
| Multi-layer bonded insert | Deep drawers, chargers, mixed-height tools | Higher | Handles different depths but adds material and assembly time |
| One-off complex drawer | Specialty tool set or calibration kit | Higher per unit | Design time is spread across only one insert |
For a small, simple drawer insert, buyers often see costs driven more by setup than raw foam. Larger production runs, repeated layouts, and clean input files help control pricing. Complex one-off drawers, premium EVA, engraving, bonded layers, and tight dimensional requirements push the quote up. Anyone promising a precise number without dimensions, photos, material, and quantity is guessing. Maybe confidently guessing, which is still guessing.
Premium add-ons can be worth it, but they should earn their place. Engraved part numbers help with controlled kits. Printed branding may support a sales demo or onboarding package. Pull tabs make thin tools easier to lift. Adhesive lamination keeps layers aligned. Protective top films can help in dirty environments, although they may change feel and grip.
For a useful quote, prepare a short package: drawer dimensions, overhead tool photos, quantity, foam preference, color preference, branding needs, shipping destination, and whether all drawers are identical or individually configured. If the insert ships inside a case, carton, or product packaging program, mention that too. Coordinating foam with Custom Packaging Products can prevent size surprises later, especially when a case insert, mailer, or outer carton all need to work together.
Shipping requirements can also affect the design. If the tool kit will ship as a packed case, ask whether the full pack-out should be evaluated against handling expectations such as those discussed by the International Safe Transit Association. Foam that works nicely in a drawer may still need changes if the entire kit will move through parcel, freight, or air cargo.
Common Mistakes That Make Tool Foam Frustrating
The most common mistake is tracing tools too tightly. It feels logical: tighter pocket, better hold. Then the tool has to be pried out ten times a day and everyone hates the drawer by Friday. Foam needs enough clearance for fingers, gloves, textured handles, and slight tool variation, especially if multiple brands or replacement tools may use the same pocket later.
Ignoring drawer height is another easy trap. A tool can fit perfectly in the cavity and still rub the drawer above it when the box closes. Tall sockets, torque tools, meters with rubber guards, and molded cases are frequent offenders. Measure usable height with closure clearance in mind, not just foam thickness.
Weak foam bridges cause trouble after repeated use. Thin sections between close cavities can tear, curl, or collapse around heavy tools. Dense layouts are useful, but they need realistic wall thickness. If too much is being forced into one drawer, it may be better to split the set by workflow than shave every foam bridge down to a fragile strip.
Another mistake is organizing by appearance instead of motion. Symmetry looks good in a proof, but the most-used tools should sit where the hand naturally reaches. Sockets might belong near ratchets. Inspection gauges may need a front-edge position. Heavy tools may sit better near the rear or side depending on drawer slides and balance. Pretty is fine. Fast and repeatable is better.
Material mismatch shows up over time. Soft foam under heavy steel tools can compress and lose definition. Very rigid foam around delicate gauges can apply pressure where it should not. Oily environments may stain or degrade the wrong material. If chemicals, fuels, solvents, heat, or metal chips are part of the work area, say so before design starts.
Skipping proof review is asking for trouble. One reversed orientation, missing accessory pocket, or mislabeled cavity can be repeated across every insert in the order. A five-minute review by the person who actually uses the drawer is often more valuable than another hour of desk-side layout polishing.
Leave room for future tools if the kit is likely to grow, but do it with discipline. Blank expansion space can be useful for a planned accessory, replacement meter, or new bit set. Too much empty space defeats the point of a dense, organized drawer. The insert should be ready for real work on day one.
Next Steps Before You Request a Foam Insert Quote
Start by emptying the drawer and measuring the usable interior. Record inside length, inside width, usable height, corner radius if obvious, and any rails, rivets, lips, locks, liners, or handle hardware. If the drawer has a mat, decide whether the foam replaces it or sits on top of it, because that changes available height.
Next, group tools by workflow instead of looks. Put ratchets with sockets, meters with probes, torque tools with adapters, and inspection gauges near the front if they need fast access. Mark any required orientation with a small note before taking photos. The photo should be straight overhead, evenly lit, and include a ruler or scale reference in the frame.
Decide what job the insert has to do first. Shop organization, field transport, missing-tool control, presentation, and damage prevention all push the layout in different directions. A drawer built for daily bench work may need generous finger reliefs. A kit built for a vehicle may need tighter retention. A sales or training kit may need cleaner labels, logo engraving, and coordination with retail packaging or custom printed boxes.
Separate standard repeat drawers from unique one-off drawers. Twenty technicians using the same socket drawer is a different project from twenty individually configured tool boxes. Suppliers can quote production more efficiently when repeat layouts are clearly identified, and replacement inserts become easier later.
A simple spec sheet helps more than most buyers expect. Include quantity, drawer count, foam color, preferred material if known, branding needs, deadline, shipping destination, and exposure notes such as oils, solvents, vibration, outdoor service, or frequent vehicle transport. If the insert is part of a larger packaging design project, include any case, carton, or display requirements and review options through Custom Packaging Products.
The best projects are the ones where the boring details are clear before cutting starts. Good measurements, clean photos, realistic material choices, and a layout based on actual work habits make Custom Foam Inserts easier to quote, easier to produce, and much less annoying to use. That is the whole point. The foam should disappear into the workflow, not become another thing people complain about.
Frequently Asked Questions
What foam is best for custom tool box inserts?
Firm closed-cell foams such as polyethylene and EVA are common for tool boxes because they resist compression, support heavier tools, and cut cleanly. Softer polyurethane foam can work for delicate items, but it is usually not the first choice for heavy steel tools that need long-term shape retention. The best material depends on tool weight, drawer depth, exposure to oils or chemicals, and whether the box stays in a shop or travels in a vehicle.
How do I measure a tool box drawer for foam inserts?
Measure the usable inside length, width, and height of the drawer, not the outside of the tool box. Check for lips, rails, rivets, rounded corners, liners, and anything else that reduces the real foam area. Measure height with drawer closure clearance in mind so taller tools do not rub the drawer above it or prevent the box from closing.
Can custom foam inserts be made from photos of my tools?
Yes, photos can often start the layout process when they are taken straight overhead with good lighting and a ruler or scale reference in the frame. For higher precision, scans, CAD files, physical samples, or traced outlines may be requested. Photos should show every tool in its preferred orientation and include any accessories that need their own pockets.
How much do custom foam inserts for tool boxes cost?
Cost depends on foam type, thickness, number of layers, drawer size, tool count, cutting complexity, labeling, and order quantity. One-off inserts usually have a higher unit cost because design and programming time are spread across fewer pieces. A clear quote package with dimensions, photos, quantities, and branding needs helps reduce back-and-forth and improves pricing accuracy.
How long does it take to produce custom foam tool inserts?
Timeline depends on how complete the measurements and tool information are, how many drawer layouts are needed, and whether a sample is required. The process usually includes layout, proof approval, cutting, finishing, quality check, and packing. Repeat orders are typically faster because the approved cut files and specifications already exist.

