What Custom Glass Stickers Are Really Used For
Glass is premium real estate, and many brands still treat it like dead space. A storefront window, candle jar, bottle, mirror, display case, office door, or restaurant partition can sell, direct, warn, decorate, or reinforce branding before anyone reads a brochure. That is why custom glass stickers need more thought than “print the logo on something clear.”
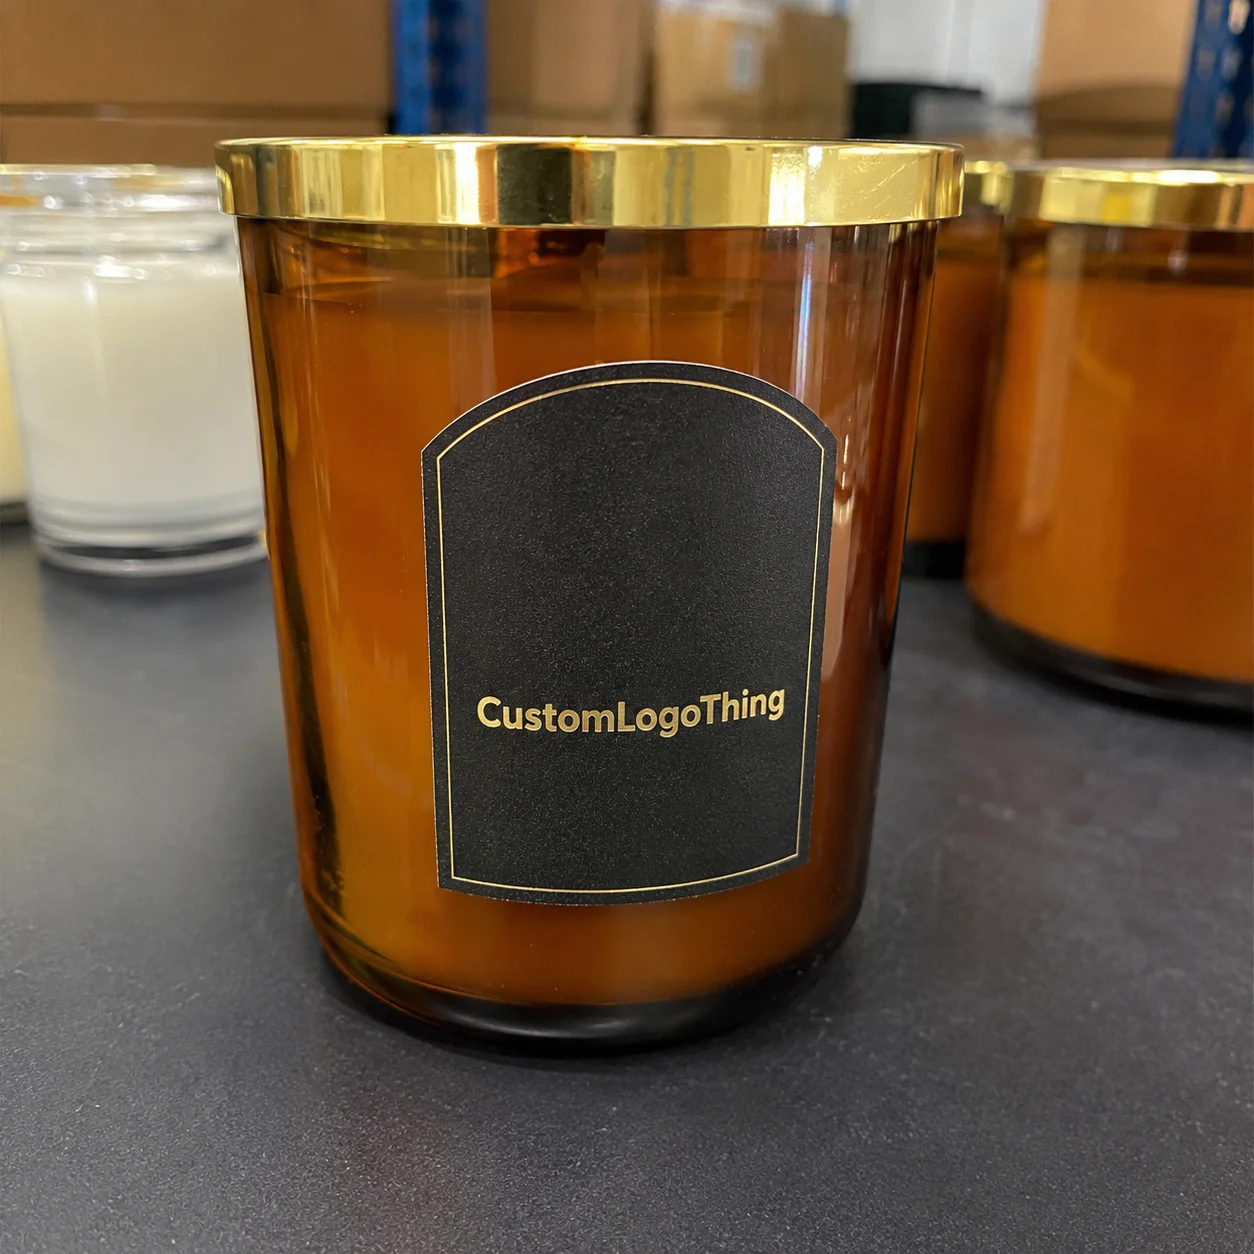
The category covers adhesive graphics made for smooth glass surfaces: window decals, clear labels, frosted decals, static clings, vinyl stickers, removable promotional graphics, and product Labels for Jars or bottles. Same family. Different jobs. Different materials. Different failure points.
Some are mostly decorative. Think seasonal retail windows, event signage, or a metallic-looking logo on a display case. Others are functional: safety stripes on glass doors, store hours, QR codes, privacy film, compliance warnings, batch labels, or ingredient labels on product packaging. A frosted office partition decal is not doing the same job as a clear candle label. Treating them the same is how buyers end up with blurry type, peeling corners, or a decal that vanishes in daylight.
Glass is unforgiving. Paper labels can curl. Cheap adhesives can haze. Low-opacity ink can disappear against reflections or dark bottle contents. Fingerprints show. Bubbles show. Crooked placement really shows. It is not a forgiving kraft mailer hiding sins under texture.
Common buyer scenarios include retail windows, beverage bottles, cosmetic packaging, restaurant doors, trade show displays, branded office partitions, candle jars, mirrors, and glass display cabinets. The sticker may need to survive refrigeration, cleaning spray, sunlight, hand oils, condensation, or constant handling. That is a lot to ask from a “simple sticker,” which is why material, adhesive, print method, size, cost, timeline, and installation plan all matter.
If the goal is polished branded packaging, the glass sticker has to look intentional. Not like a parking permit slapped on by someone already late for lunch.
How Glass Sticker Materials and Adhesives Work
A glass sticker is not one thing. It is a small stack of decisions: face material, printed ink, adhesive or cling layer, release liner, and sometimes a laminate. Each layer affects clarity, durability, removability, scratch resistance, and price. Skip one spec and the finished decal may technically stick, which is a very low bar.
Clear vinyl is popular for the “no-label” look on bottles, jars, and windows. It lets the glass or product contents show through. The catch is opacity. Clear material makes ink look more transparent unless white ink is printed behind the design. White vinyl gives stronger color and better readability because the print sits on an opaque base. Frosted film creates privacy and a sandblasted-glass effect, often used on office doors, spa windows, and decorative retail packaging. Static cling works for short-term indoor promotions where adhesive is not wanted. Polyester can be a stronger choice for labels needing chemical resistance, heat tolerance, or dimensional stability. Paper labels can work on dry indoor glass, but for wet, cold, or handled applications, paper is usually the weak link.
Adhesive choice matters just as much. Permanent adhesive is used for long-term bottle labels, jar labels, and exterior decals where removal is not the priority. Removable adhesive is better for temporary retail campaigns, seasonal window graphics, or rented spaces. Low-tack adhesive helps when glass must stay clean after removal. Static cling avoids adhesive entirely, but it is best for smooth, clean, indoor glass and shorter use periods. Humid exterior windows and static cling? That pairing can get dramatic in the worst possible way.
Inside-glass versus outside-glass application is another easy place to make a costly mistake. If a decal is applied inside a storefront window and viewed from outside, the artwork often needs reverse printing. That protects the print from rain, wind, casual picking, and street grime. Outside application is simpler to understand and install, but it exposes the graphic to abrasion, weather, and cleaning. For high-traffic retail glass, that tradeoff should be settled before production.
Ink opacity is where bargain printing gets exposed. Clear labels often need a white ink layer under logos, text, or color blocks so the design does not fade into the background. Without white ink, red can look weak, black can look gray, and small text can become a tiny ghost. Transparent does not mean cheaper. It often means fussier.
Finish options include gloss for shine and color pop, matte for reduced glare, frosted for privacy, and laminated finishes for extra scratch resistance. Lamination can add roughly 1–3 mil of thickness depending on film type, which helps durability but may affect flexibility on tight curves. Glass temperature, cleaning chemicals, condensation, and direct sun also affect adhesion. Basic physics, yet somehow still ignored.
Key Specs That Decide Whether Glass Decals Look Premium
Size and shape come first. Small jar labels need tight registration, clean die lines, and type that stays readable at arm’s length. A 1.5-inch round label with 6-point ingredient text is not “minimalist.” It is a customer service problem. Large window decals need bubble control, panel planning, proper material thickness, and sometimes application tape so the installer can place the graphic without stretching it.
Die-cut, kiss-cut, and sheeted formats all serve different workflows. Die-cut stickers follow the outside shape of the design, so they look finished as individual pieces. Kiss-cut stickers leave each sticker on a backing sheet, which makes peeling easier for staff or fulfillment teams. Sheeted stickers are useful for kits, multi-SKU label sets, or retail staff applying several graphics at once. Roll labels are usually better for product packaging lines because they feed into label applicators and keep orientation consistent.
Transparency choices change the whole design. Fully clear film creates a premium no-label effect but needs white ink planning. Clear with spot white ink keeps selected colors readable while leaving other areas transparent. Opaque white film gives the strongest color. Frosted film adds privacy. One-way view film is used for windows where visibility from one side matters. Partial transparency can look excellent, but the artwork has to be built intentionally, not exported from a design app and blessed with optimism.
Viewing direction is non-negotiable. A decal viewed through glass may need reverse printing. A sticker applied to the outside of a bottle does not. Mixing those up is a fast way to buy expensive garbage. For storefronts, confirm whether the print should face pedestrians, indoor shoppers, or both. For packaging on glass bottles, confirm whether the label wraps around a curve and whether the contents behind the label are light, dark, oily, or textured.
Durability specs should match the real use case. Indoor decals may only need basic scuff resistance. Outdoor window graphics need UV resistance, water resistance, and stronger adhesive. Bottle and jar labels may need oil resistance, refrigeration performance, and wet-hand handling. Dishwasher exposure is a different animal; unless the printer specifically confirms dishwasher durability, assume repeated hot wash cycles will shorten the label’s life. Sensible, not pessimistic.
Artwork requirements are also part of the spec. Provide vector logos, outlined fonts, high-resolution images at 300 dpi at final size, proper bleed, safe margins, cut lines, color references, and separate white ink layers for clear materials. QR codes should usually be at least 0.8 inches wide for reliable scanning, larger if printed on reflective glass or viewed through a window. For safety markings on glass doors, contrast and placement need to work at normal walking height.
Practical rule: if the sticker has to look premium on curved, reflective, wet, or sunlit glass, order a sample before the full run. A screen proof cannot show glare, opacity, edge lift, or how the label behaves on the actual container.
For broader package branding systems, keep glass stickers aligned with cartons, wraps, tags, and inserts. If you are matching labels to Custom Labels & Tags or other retail packaging, ask for color targets and material samples together. Close enough is not close when products sit side by side on a shelf.
Cost, Pricing, and MOQ Factors for Glass Stickers
Pricing usually depends on size, material, adhesive type, print colors, white ink use, shape complexity, finishing, quantity, and packaging format. If someone quotes custom glass stickers without those details, they are guessing. Cute, but not useful.
Small custom glass labels can price very differently at 100 pieces versus 5,000 pieces because setup, material waste, proofing time, and press time get spread across more units. A small digital run of 100 clear labels might land around $0.65–$1.50 per piece depending on size and finish. At 1,000 pieces, that same style may fall into the $0.22–$0.55 range. At 5,000 pieces, simple roll labels may reach $0.08–$0.25 each, while specialty clear labels with white ink, laminate, or complex cutting stay higher. These are practical planning ranges, not universal promises.
MOQ is a tradeoff. Digital printing supports lower minimums, faster test runs, and multiple designs without brutal setup costs. Larger production runs reduce unit cost, but they also require more confidence in artwork, sizing, adhesive choice, and application conditions. Ordering 10,000 labels before testing one on the actual jar is bold. Not smart. Bold.
Clear stickers often cost more than buyers expect because white ink, extra print passes, tight registration, and premium films add complexity. Transparent material can also create more waste if the job needs precise white backing. Frosted film, removable adhesive, lamination, Custom Die Cutting, individual trimming, roll formatting, and application tape for large decals can all raise the quote.
| Glass Sticker Type | Best Use | Typical Planning Range | Buyer Watchout |
|---|---|---|---|
| Clear vinyl with white ink | No-label bottle, jar, or window branding | $0.18–$0.70 each at mid-volume | Needs white ink layers for readable color |
| White vinyl labels | Strong color on product packaging | $0.08–$0.45 each depending on size | Less invisible than clear film |
| Frosted glass decals | Privacy panels, office doors, spa windows | $3–$12 per square foot for many jobs | Installation skill affects final look |
| Static cling | Short-term indoor promotions | $0.35–$2.00 each depending on size | Not ideal for humid or exterior use |
| Large window graphics | Storefront campaigns and event signage | $5–$18 per square foot before installation | May need paneling, tape, and pro install |
Quote requests should include exact size, quantity, material preference, indoor or outdoor use, glass surface, desired lifespan, artwork file, number of designs, finish, and whether the sticker is applied inside or outside the glass. For product runs, include container dimensions and whether labels are hand-applied or machine-applied.
Do not compare quotes only by unit price. Compare material, adhesive, white ink, finish, proofing, lead time, defect policy, and packing method. The cheapest decal gets expensive fast when staff spends two hours fighting bubbles or scraping adhesive residue off a storefront window.
Production Steps, Timeline, and Lead Time Expectations
The normal ordering flow is straightforward: specification review, artwork check, digital proof, sample or pre-production approval if needed, printing, finishing, quality control, packing, and shipping. Lead time usually starts after final artwork and proof approval, not when someone sends a blurry logo in a chat thread. That distinction saves everyone a migraine.
Simple digital sticker jobs can often produce in 4–7 business days after proof approval, especially for standard vinyl, basic shapes, and modest quantities. Clear labels with white ink, specialty frosted films, laminated finishes, large-format window graphics, custom dies, or high-volume orders may need 8–15 business days or more. If material has to be sourced, add time. If the design changes after approval, add time. Reality is annoying like that.
Digital proofs confirm size, layout, cut line, colors, spelling, QR placement, and print direction. They are useful, but they are not magic. A digital proof cannot fully show adhesive strength, surface glare, ink opacity, or how a decal wraps around a tapered candle jar. Physical samples are better when clarity, opacity, moisture resistance, refrigeration, sunlight, or curved glass behavior matters.
Quality control should be more than “looks fine.” Sensible checks include confirming dimensions, cut accuracy, registration between white ink and color layers, edge cleanliness, liner release, print direction, surface defects, and quantity by SKU. For roll labels, unwind direction matters if the labels feed into an applicator. For large decals, check panel order and overlap before packing. Nobody wants to discover panel two is upside down while standing on a ladder.
Common timeline slowdowns include missing vector files, unclear sizing, wrong viewing direction, late copy changes, special material sourcing, multiple SKUs, freight delays, and internal approval bottlenecks. Multiple designs can be efficient if they use the same size and material, but mixed sizes, mixed adhesives, or separate cut lines can complicate production.
Shipping and installation planning also deserve attention. Large glass decals may need to arrive rolled around a proper core, not crushed into a box like leftover wrapping paper. Some materials should acclimate to room temperature before installation, especially after cold-weather shipping. Storefront graphics may need installation before opening hours, after closing, or during a display reset. Build that into the schedule instead of hoping the manager has a spare hour and a credit card squeegee.
For a product launch, retail opening, trade show, or event, add a buffer. A practical plan includes proof review time, one real-world application test, freight cushion, and backup time if a package gets damaged. If shipping performance is critical, standards from groups like ISTA can help frame packaging and transit testing expectations. For paper components paired with labels, FSC sourcing may also matter if sustainability claims are part of the broader branded packaging program.
Step-by-Step Guide to Ordering Glass Stickers
Start by defining the job. Is the sticker for branding, privacy, promotion, compliance, decoration, or product labeling? Purpose decides material before artwork does. A temporary sale decal, a permanent jar label, and a frosted office privacy strip should not share the same spec just because they all touch glass.
- Measure the surface. Measure the exact glass area and decide where the sticker will sit. For bottles and jars, test on the real container. Curves, shoulders, seams, condensation, and fill level can change what works.
- Choose the material. Use clear vinyl for no-label looks, white vinyl for color strength, frosted film for privacy, removable adhesive for temporary campaigns, and static cling for short indoor promotions.
- Match the adhesive to the environment. Permanent adhesive suits long-term product labels and signage. Removable adhesive suits temporary retail glass. Low-tack options help when clean removal is part of the requirement.
- Confirm viewing direction. If the graphic goes inside the glass and faces outward, request reverse printing. If it goes on the outside, standard printing usually works.
- Prepare artwork properly. Send vector logos, outlined fonts, bleed, safe zones, cut line, color references, and a white ink layer if printing on clear stock.
- Review the proof slowly. Check size, spelling, cut shape, orientation, QR code scanability, print direction, and quantity. Boring details are where expensive mistakes hide.
- Test before scaling. Order a sample or short run when the decal must survive moisture, refrigeration, sunlight, cleaning sprays, oils, or curved glass.
- Plan installation. Use clean glass, proper temperature, lint-free cloths, squeegee tools, and enough time. Rushing installation makes even good printing look cheap.
For packaging design systems, compare the glass sticker against boxes, inserts, tissue, bags, and mailers. A premium bottle label can feel disconnected if the surrounding packaging looks like an afterthought. If you are building a full launch kit, review related Custom Packaging Products so the label, carton, and presentation materials work together instead of fighting for attention.
Temperature matters during application. Many pressure-sensitive adhesives perform best around 60–80°F during installation. Cold glass can reduce tack. Hot glass can make films softer and harder to control. Clean with a residue-free glass cleaner or isopropyl alcohol when appropriate, then let the surface dry completely. Do not install over dust, grease, wax, or silicone residue and then blame the printer. The adhesive is not a miracle worker.
Common Mistakes and Smart Next Steps Before You Order
The biggest mistake is choosing a sticker by appearance alone. A glass sticker has to match the surface, environment, viewing direction, and expected lifespan. A decal that looks gorgeous in a mockup may fail on a cold beverage bottle or disappear on a sunlit storefront.
Poor opacity planning is another classic. Clear stickers without white ink can look washed out, especially on windows with daylight behind them or jars filled with dark products. If the logo, text, or QR code must stay readable, ask for spot white ink or a full white backing layer. Yes, it may cost more. So does reprinting everything.
Wrong adhesive selection creates avoidable pain. Permanent adhesive on temporary retail glass can leave residue. Static cling on a humid exterior window can fail. Removable adhesive on a long-term outdoor decal may lift early. Wrong tool, wrong result. Shocking.
Artwork errors pile up quickly: low-resolution logos, missing bleed, thin fonts, tiny QR codes, no cut line, no safe margin, and forgetting that transparent material changes how colors appear. For small labels, keep critical text away from edges by at least 1/16 inch. For larger decals, allow enough bleed and panel overlap if the design is split across sections.
Installation mistakes can ruin solid production. Dirty glass, cold temperatures, trapped dust, finger pressure instead of squeegee tools, and failure to test placement before peeling the liner all lead to bubbles, crooked placement, or edge lift. For large decals, use application tape, hinge methods, and two installers if needed. Saving ten minutes on installation can cost the entire graphic.
- Measure the glass and record final sticker size in inches or millimeters.
- Photograph the application area, including lighting, reflections, and nearby edges.
- Decide inside or outside placement before artwork is prepared.
- Choose the desired lifespan: days, months, one season, or years.
- Gather vector artwork, color notes, QR codes, and required copy.
- Request a quote that includes material, adhesive, finish, proofing, lead time, and defect policy.
Custom glass stickers work best when treated like a small signage or packaging system, not a throwaway label. Confirm the specs before production: material, adhesive, white ink, viewing direction, finish, quantity, and installation conditions. Do that, and the glass surface starts to look intentional, premium, and useful instead of like a rushed afterthought.
FAQ
Are custom glass stickers waterproof?
Many vinyl and polyester glass stickers can be water-resistant or waterproof, but performance depends on material, ink, laminate, and adhesive. For bottles, jars, bathrooms, refrigeration, or outdoor windows, specify moisture exposure before ordering. Paper stickers are usually a poor choice for wet glass unless they have specialty coatings and a limited use case.
What is the best material for clear glass decals?
Clear vinyl is usually the go-to for transparent branding, while frosted film is better for privacy or decorative glass effects. Use white ink behind logos or text when colors need to stay visible against reflections, daylight, or dark contents. For short-term indoor use, static cling may work, but it is not the same as a durable adhesive decal.
Can glass stickers be removed without residue?
Removable adhesive stickers are designed to come off more cleanly than permanent adhesive stickers, especially on smooth glass. Residue risk increases with long exposure, heat, sunlight, cheap adhesive, or aggressive cleaning chemicals. If clean removal matters, say so during quoting instead of hoping the standard adhesive behaves politely.
How long do window stickers for glass usually last?
Indoor glass stickers can last months to years depending on handling and cleaning. Outdoor window decals face UV, rain, temperature swings, and abrasion, so material and laminate choices matter more. Temporary promotions should use removable adhesive or static cling, while long-term signage should use durable vinyl with the right finish.
Do I need white ink for custom clear stickers on glass?
Usually, yes, if the design includes colored logos, small text, or anything that must stay readable. Without white ink, colors on clear material can look translucent and weak, especially on windows. White ink can be printed behind selected areas or used as a full backing layer depending on the design.


