A customer lifts the foam insert, peels back tissue, or opens a molded tray. There it is: a tiny branded detail that makes the package feel planned instead of assembled in a panic. Custom inlay stickers are small, but customers judge packaging in seconds. Tiny piece. Big judgment.
Custom Inlay Stickers Are Small, But They Carry the Whole Unboxing Moment
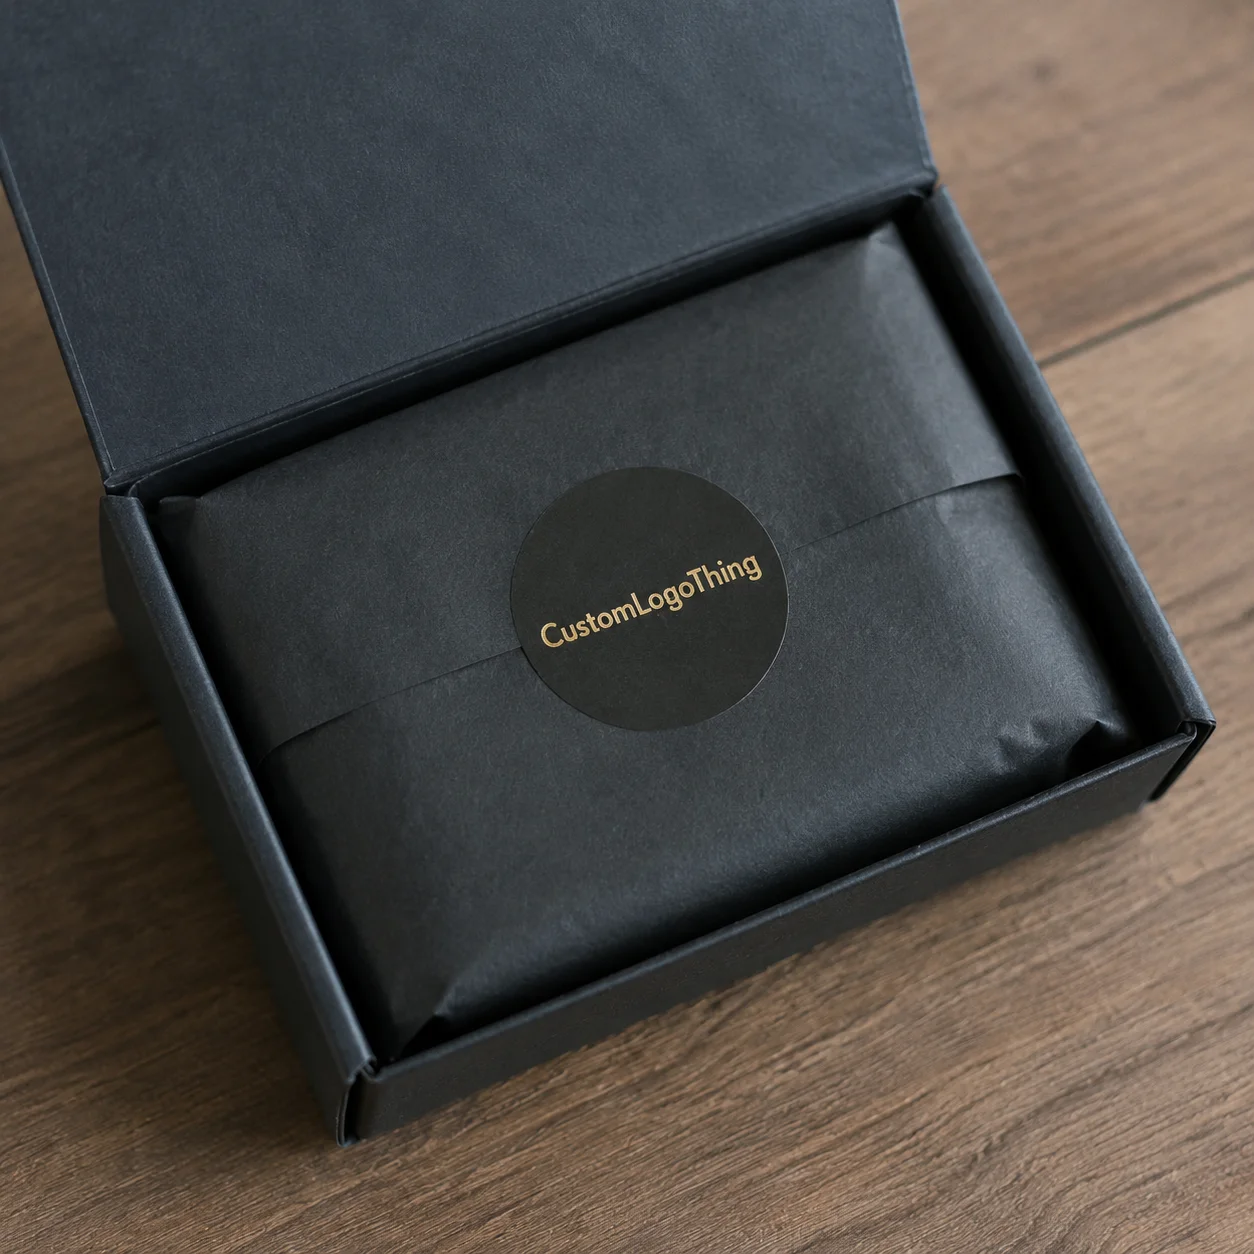
Custom inlay stickers are Printed Adhesive Labels placed inside packaging. They can sit on inserts, trays, rigid boxes, mailers, product cavities, welcome cards, protective films, tissue wraps, or the underside of a lid. Their job is usually simple: add a logo, instruction, seal, QR code, authenticity cue, care note, product detail, or small brand moment inside the package.
They are not the same as standard product labels. Exterior labels often need to survive shelf handling, compliance requirements, barcode scanning, and retail lighting from several feet away. Inlay stickers are viewed up close, touched during opening, and judged against the materials around them. A sticker that looks sharp on a white proof sheet can look cold, loud, or cheap inside a warm ivory rigid box. Packaging has context. Ignore that and the sticker will snitch on you.
These stickers show up across cosmetics, jewelry, electronics, candles, supplements, apparel, subscription boxes, handmade goods, luxury samples, and premium promo kits. A skincare brand may use a clear inlay decal on an acetate tray. A jewelry brand might use a matte gold seal inside a suede-style insert. An electronics kit may need a QR code label under the accessory tray with setup instructions. Different uses. Different specs.
From a buyer’s point of view, the best inlay stickers are designed as part of the packaging system, not as a leftover logo slapped inside the box after everything else is done. They should match the box, insert, tray, tissue, card, and product finish. That means choosing the right material, adhesive, size, finish, artwork setup, and production timeline before the purchase order goes out.
Here is the practical version: what to spec, what drives cost, where mistakes happen, and how to order without paying for a reprint because the sticker curled off molded pulp or made your Custom Printed Boxes look like a craft project. Brutal? Maybe. Useful? Definitely.
How Inlay Sticker Materials, Adhesives, and Finishes Work Together
Every sticker has three basic parts: the face stock, the adhesive, and the liner. The face stock is what customers see and touch. The adhesive decides whether the sticker stays put, peels cleanly, tears tissue, or curls at the edge. The liner is the backing sheet or roll carrier that affects application speed and handling. Simple structure. Plenty of ways to mess it up.
Paper is the economical choice for dry interior packaging. It works well on welcome cards, kraft inserts, paperboard trays, and low-friction box interiors. White paper, textured paper, kraft paper, and uncoated stocks can all work, but each one prints differently. A beige kraft sticker will not produce the same color pop as bright white coated paper. That is not a defect. That is physics doing its job.
White vinyl and white BOPP are better when moisture, oils, scuffing, or heavy handling are likely. Cosmetics, bath products, candles, and supplement packaging often benefit from film stocks because they resist humidity and abrasion better than basic paper. Clear film is useful when you want a “floating logo” effect on acetate, plastic trays, coated paperboard, or rigid box interiors. Metallic and holographic stocks bring premium shine, but they add cost and can make small type harder to read when contrast is weak.
Adhesive choice matters just as much. Permanent adhesive works for most coated paperboard, rigid boxes, and flat inserts. Removable adhesive makes sense for temporary inserts or peel-away instruction labels. Freezer-grade adhesive may be needed for cold chain items or chilled product kits. Low-tack adhesive is useful on tissue, delicate papers, and surfaces where tearing would make the unboxing feel like a minor crime scene.
Finishes change both appearance and performance. Matte finishes feel softer and quieter, which suits luxury packaging. Gloss boosts color and makes logos look sharper, but it can feel too loud inside muted retail packaging. Soft-touch laminate feels premium in the hand, though dark designs can show fingerprints. Spot UV adds contrast. Foil adds shine. Lamination adds scuff protection, especially for trays, kits, or packaging handled by fulfillment teams before the customer ever sees it.
Packaging buyer rule: adhesive testing beats wishful thinking. Every time. Test on the actual box, foam, molded pulp, tissue, acetate, or plastic insert before approving a full run.
Surface compatibility is where many jobs go sideways. Coated paperboard, corrugate, rigid boxes, foam, molded pulp, tissue, acetate, and plastic inserts all behave differently. Dust, fibers, coatings, surface energy, cold storage, and pressure during packing can all affect bond strength. Foam may compress. Tissue may tear. Molded pulp may shed fibers. Plastic may reject standard adhesive. A random office desk is not a packaging substrate. Shocking, I know.
Food, cosmetic, or medical-adjacent packaging needs extra caution. If stickers sit near open product, applicators, ingestible items, or skin-contact goods, ask about indirect contact, adhesive migration, ink safety, and applicable compliance expectations. For broader packaging sustainability and material guidance, the EPA’s sustainable materials management resources are a useful starting point. For paper-based claims, FSC-certified materials may matter; the Forest Stewardship Council explains chain-of-custody basics buyers should understand before printing logos on anything.
Key Specs to Decide Before You Ask for a Quote
Good quotes come from clear specs. Vague requests get vague pricing, and vague pricing usually becomes a surprise later. Before contacting a supplier, prepare the core details: size, shape, material, adhesive, color count, finish, quantity, roll or sheet format, packaging surface, and application method. If the sticker goes inside a box, say what kind of box. If it goes on foam, say foam. Suppliers are not mind readers, despite the industry’s charming habit of pretending otherwise.
Size is the first decision. Small logo seals are often 0.75 to 1.5 inches wide. Medium instruction stickers may be 2 by 3 inches or 3 by 4 inches. QR code labels often need at least 0.8 to 1 inch of scannable code area, plus quiet space around the code. Large tray graphics may run 4 by 6 inches or larger, especially for electronics, beauty kits, or sample sets. Full inlay branding panels can cover most of an insert, but larger areas increase material cost and make wrinkles more obvious during hand application.
Shape affects cost and brand feel. Circles, squares, rounded rectangles, and standard ovals are usually easier to quote and produce. Custom die-cut shapes can look more intentional, especially around a logo mark or product silhouette, but they require cleaner artwork and die planning. Tight interior corners, skinny extensions, and delicate cutouts can lift, tear, or slow down application. Pretty is nice. Production-friendly is nicer.
Print method depends on quantity, design complexity, and finish. Digital printing works well for short runs, multiple versions, seasonal inserts, and low-MOQ branded packaging. Flexographic printing fits larger roll quantities where setup cost is justified by lower unit cost. Screen printing or specialty processes may be used for heavy ink deposits, metallic effects, high-opacity white, or tactile coatings. If you need several SKUs with slightly different text, digital may save money even if the unit price looks higher on paper.
Color matching deserves attention. CMYK is fine for many designs, especially simple interior labels. Pantone matching matters when custom inlay stickers sit next to printed boxes, cards, sleeves, or tissue in the same color family. Close is not the same as matched, despite what some vendors like to pretend. If the brand blue appears on the box, the card, and the sticker, request a physical proof or approved color target before full production.
Small type, QR codes, and barcodes need practical limits. Keep contrast high. Avoid placing critical scans on textured kraft, holographic stock, or heavy gloss glare. For most small packaging stickers, 6-point type is already pushing it, and 4-point legal copy is a punishment nobody asked for. If the QR code drives warranty registration, setup instructions, or a campaign landing page, test it from the finished proof and again from the production sample.
Mini Spec Checklist
- Size: exact width and height in inches or millimeters.
- Shape: circle, rectangle, rounded rectangle, oval, or custom die-cut.
- Material: paper, kraft, white BOPP, clear film, vinyl, metallic, or specialty stock.
- Adhesive: permanent, removable, low-tack, freezer-grade, or surface-specific.
- Finish: matte, gloss, soft-touch, spot UV, foil, laminate, or uncoated.
- Format: rolls for faster application, sheets for kitting or small-volume packing.
- Use surface: coated paperboard, corrugate, foam, molded pulp, tissue, acetate, or plastic.
- Quantity and versions: total count plus SKU, language, or design splits.
If you are building a full branded packaging setup, compare your sticker specs against the rest of your components. Custom Logo Things also offers Custom Labels & Tags for exterior labels, hang tags, and coordinated label systems that need to match interior pieces.
Cost, Pricing, MOQ, and Unit Cost Drivers
Sticker pricing is not magic. It is driven by quantity, size, material, adhesive, finish, die shape, print method, number of versions, and roll or sheet format. The annoying part is that one change can move the price more than expected. A 2-inch matte paper circle is a different animal from a 3.5-inch clear film custom shape with white ink and spot UV.
Small digital runs have higher unit costs but lower setup pain. That makes them useful for launch tests, small subscription drops, influencer kits, and Handmade Product Packaging. Larger roll runs usually drop unit cost sharply once setup is covered. If you are using 5,000 stickers a month, do not price like a hobby brand ordering 100 sheets. Ask for roll pricing and proper volume tiers.
| Specification Type | Typical MOQ Range | Typical Unit Cost Behavior | Best Fit |
|---|---|---|---|
| Simple digital paper stickers | 100 to 250 pieces | Often about $0.18 to $0.65 each depending on size and coverage | Short runs, launch tests, small kits |
| Digital film stickers | 250 to 500 pieces | Often about $0.25 to $0.90 each for small to medium sizes | Cosmetics, bath products, moisture-prone packaging |
| Custom roll labels | 500 to 1,000+ pieces | Unit cost can drop sharply at 2,500 and 5,000 pieces | Fulfillment lines, repeated packing, higher-volume brands |
| Foil, spot UV, or specialty stocks | 500 to 1,000+ pieces | Setup and finish charges can matter more than base print cost | Premium packaging, luxury samples, gift sets |
Those ranges are not universal. Size, waste, ink coverage, supplier equipment, and material availability all matter. A tiny black logo on white paper may be cheap. A large full-bleed sticker with soft-touch laminate, foil, and a custom shape will not be. Shocking development: premium specs cost more.
Common cost adders include metallic foil, spot UV, soft-touch lamination, custom dies, split versions, rush production, color matching, waterproof films, and special adhesives. Split versions are especially sneaky. If you order 1,000 stickers but divide them into five designs of 200 each, you may not get the same pricing as one 1,000-piece design because each version needs setup, proofing, and handling.
There are smart tradeoffs. A slightly smaller sticker can reduce material waste if it nests better on a sheet or roll. A standard circle or rounded rectangle may avoid tooling. Matte BOPP can deliver a clean premium look with better durability than specialty paper. White ink on clear film may be worth paying for if the sticker sits on a dark tray. Foil may not be worth it if the sticker is hidden under tissue for half a second.
Ask for tiered quotes at 250, 500, 1,000, 2,500, and 5,000 pieces. The useful price break may not be where you expect. Sometimes 500 to 1,000 saves a little. Sometimes 1,000 to 2,500 saves a lot. For packaging buyers, tiered pricing is the fastest way to see whether you should buy for one launch, one quarter, or one full season.
Process and Timeline From Artwork to Finished Stickers
The usual production flow is straightforward: confirm specs, submit artwork, review the dieline, approve the digital proof, produce samples if needed, print, finish, cut, inspect, pack, and ship. The trouble starts when buyers skip steps or assume the printer can fix weak artwork for free. Sometimes they can. Sometimes they will charge. Sometimes they will print exactly what you sent, and then everybody gets quiet.
Simple digital sticker orders may take about 5 to 10 business days after proof approval. Custom dies, specialty finishes, color matching, adhesive testing, sampling, or larger production runs can push timelines to roughly 2 to 4 weeks. The clock usually starts after proof approval, not when someone casually emails a logo named final_FINAL_reallyfinal.ai. Buyers love learning that late.
Artwork should be production-ready. Use vector logos where possible. Outline fonts. Embed linked images. Include bleed, usually 0.0625 to 0.125 inches depending on the supplier’s dieline. Keep important text and logos inside the safe zone, often at least 0.0625 inches from the cut line for small stickers and more for larger pieces. Add CMYK values or Pantone notes. For raster images, use 300 dpi at final print size unless the supplier requests something else.
Sampling is worth the money when the surface is new, the order is high volume, the packaging launch is premium, or the sticker has scan-critical content. It is also smart for foam, tissue, molded pulp, plastic, coated stock, and any surface with texture or dust. A sample can reveal edge lift, adhesive aggression, color mismatch, scuffing, glare, and QR scan problems before thousands of pieces arrive.
Rolls and sheets affect packing operations. Rolls are usually better for repeated hand application or machine labeling because they keep orientation consistent and speed up peeling. Sheets work well for kitting, small batches, and low-volume assembly where workers apply a few stickers at a time. If a team is applying thousands by hand, ask about roll direction. A sticker facing the wrong way on the roll slows people down. Labor cost is real, even if nobody puts it on the sticker quote.
Quality control should include more than counting cartons. Check finished size, cut registration, color, finish coverage, adhesive behavior, roll direction, liner release, and scannability if QR codes or barcodes are involved. For clear stickers, confirm whether white ink printed where expected. For foil or spot UV, check alignment against the base artwork. For matte or soft-touch finishes, rub a sample lightly to see whether scuffing appears before the sticker even reaches the customer.
Shipping timing also matters. If stickers arrive after boxes, inserts, and products are already staged, your team may end up opening packed components, applying labels, and reworking cartons. That is expensive nonsense. Build the sticker timeline into the full packaging design schedule, especially if you are coordinating with Custom Packaging Products like boxes, mailers, cards, and inserts.
Common Mistakes That Make Inlay Stickers Look Cheap
The biggest mistake is choosing the sticker in isolation. The sticker has to live with the box, insert, tray, tissue, card, and product. A glossy bright white label inside a muted ivory rigid box can look like an office supply sticker wandered into a luxury set. A kraft label inside a sleek black electronics tray may look underpowered. Context decides whether the result feels premium or patched together.
Poor adhesive matching is another reliable way to create problems. Too aggressive, and it tears delicate tissue or damages coated paper during removal. Too weak, and the corners lift before the customer opens the box. The wrong adhesive can fail on textured, coated, cold, dusty, or low-surface-energy plastic materials. For molded pulp, pressure and dwell time matter because the surface is uneven and fibrous.
Sizing mistakes show up fast. Oversized stickers wrinkle on curved cavities and recessed trays. Tiny stickers disappear inside large boxes. Awkward proportions make good logos look like leftovers from another project. Before ordering, place a paper mockup inside the actual packaging. Not a screen mockup. Not a guess. A physical mockup. It takes five minutes and prevents some truly avoidable nonsense.
Color mismatch is common because interior packaging often uses off-white, kraft, grayboard, black, or specialty paper. A sticker printed on bright white film can clash with warm ivory boxes unless the artwork includes a background tint or the material is changed. Metallic finishes can shift perceived color too. If the sticker needs to match custom printed boxes or cards, request color targets and proofs.
Unreadable detail is another classic. Tiny instructions, low-contrast QR codes, hairline fonts, and over-detailed illustrations all look fine when zoomed to 300% on a monitor. Then they print at 1.25 inches wide and become decorative dust. For QR codes, use high contrast and enough quiet space. For instructions, write less. Nobody wants a novel on a sticker the size of a postage stamp.
Finish mismatch can cheapen the whole piece. Glossy stickers inside a muted luxury box can feel loud. Unlaminated paper inside a high-friction tray can scuff before the customer sees it. Soft-touch stickers can look great, but dark soft-touch finishes may show fingerprints. Foil can look premium, but too much foil on a tiny interior label can read as tacky instead of elevated. Restraint is a design tool. Wild concept.
Test on the real packaging surface. Not on your desk. Not on a sample card from six months ago. The actual tray, tissue, foam, box liner, or insert is the only surface that matters.
Next Steps Before You Order Your Inlay Stickers
Start with placement. Decide exactly where the sticker will go: under the lid, on the tray, over tissue, inside a product cavity, on a welcome card, or across a protective layer. Measure the available area. Leave margin around edges, folds, curves, and product contact points. If the sticker sits near a product, make sure it will not rub, transfer adhesive, or interfere with removal.
Next, identify the packaging surface. Coated paperboard, corrugate, foam, molded pulp, tissue, acetate, and plastic all need different adhesive thinking. Define the purpose too. Is this a logo moment, instruction label, QR code, tamper cue, authenticity mark, batch detail, or decorative seal? Purpose drives material and finish. A luxury logo mark can prioritize feel. An electronics setup sticker must prioritize clarity. A cosmetics label may need moisture resistance. A QR campaign needs scan performance first.
Prepare a simple spec sheet before asking for pricing. Include size, quantity, material preference, finish, adhesive surface, artwork files, deadline, shipping destination, and whether you need rolls or sheets. Add photos of the packaging surface if possible. For larger or premium orders, send the physical packaging component for testing. Photos help. Real material helps more.
Request two or three quote options instead of one. Ask for a budget version, a premium version, and a high-volume price break. This is how grown-ups buy packaging. A budget option might use matte paper and a standard shape. A premium option might use soft-touch film or foil. A volume option might show roll pricing at 2,500 or 5,000 pieces so you can plan replenishment instead of panic-ordering later.
Proof review is not a rubber stamp. Check spelling, logo scale, bleed, cut line, color notes, QR scanning, roll direction, and quantity before approval. Confirm the finished size, not just the artboard size. Confirm whether white ink is included on clear film. Confirm whether the finish is applied over the full sticker or only in selected areas. If something looks odd in the proof, ask. Printers can fix problems before approval. After printing, they mostly send invoices.
Custom inlay stickers work best when treated as part of the packaging system, not as an afterthought slapped inside the box five minutes before launch. Choose the placement, test the adhesive, match the finish, proof the artwork, and price the right quantity. Do that, and the inside of your package feels intentional without blowing up the budget.
FAQ
What are custom inlay labels used for inside packaging?
They add branding, instructions, QR codes, seals, authenticity cues, product details, or decorative moments inside boxes, trays, mailers, inserts, and tissue wraps. They are especially useful when the outside of the packaging is minimal and the brand experience happens during unboxing.
What material is best for custom interior stickers?
Paper works well for dry, low-friction packaging interiors and keeps costs down. BOPP, vinyl, and other films are better for moisture exposure, scuff resistance, cosmetics, bath products, or packaging that gets handled heavily. Clear film is useful when you want the packaging material to show through behind the design.
How much do custom inlay stickers cost?
Cost depends on size, quantity, material, adhesive, finish, die shape, and print method. Small digital runs usually have higher unit costs but lower setup requirements, while larger roll orders usually reduce unit cost after setup. Ask for tiered pricing at multiple quantities so you can see where the useful price break starts.
How long does production take for custom packaging stickers?
Simple digital sticker orders may take about 5 to 10 business days after proof approval. Specialty finishes, custom dies, adhesive testing, color matching, sampling, or large runs can extend production to roughly 2 to 4 weeks. Proof approval, not the first email, is usually when the production timeline begins.
Can custom inlay decals stick to foam, tissue, or molded pulp?
Yes, but those surfaces need testing because texture, dust, fibers, coatings, and compression can affect adhesion. Foam and molded pulp may need stronger or specialized adhesive, while tissue may need lower-tack adhesive to avoid tearing. Always test on the actual packaging material before placing a full production order.


