Custom Lighter Stickers Turn a Pocket Item Into Daily Branding
A lighter gets handled, borrowed, tossed into a drawer, left on a patio table, and seen again by someone who was never part of the original order. That is why Custom Lighter Stickers can carry more branding weight than their size suggests. Smoke shops, cannabis accessory brands, bars, music events, outdoor brands, novelty retailers, and merch programs use them because people actually keep lighters around.
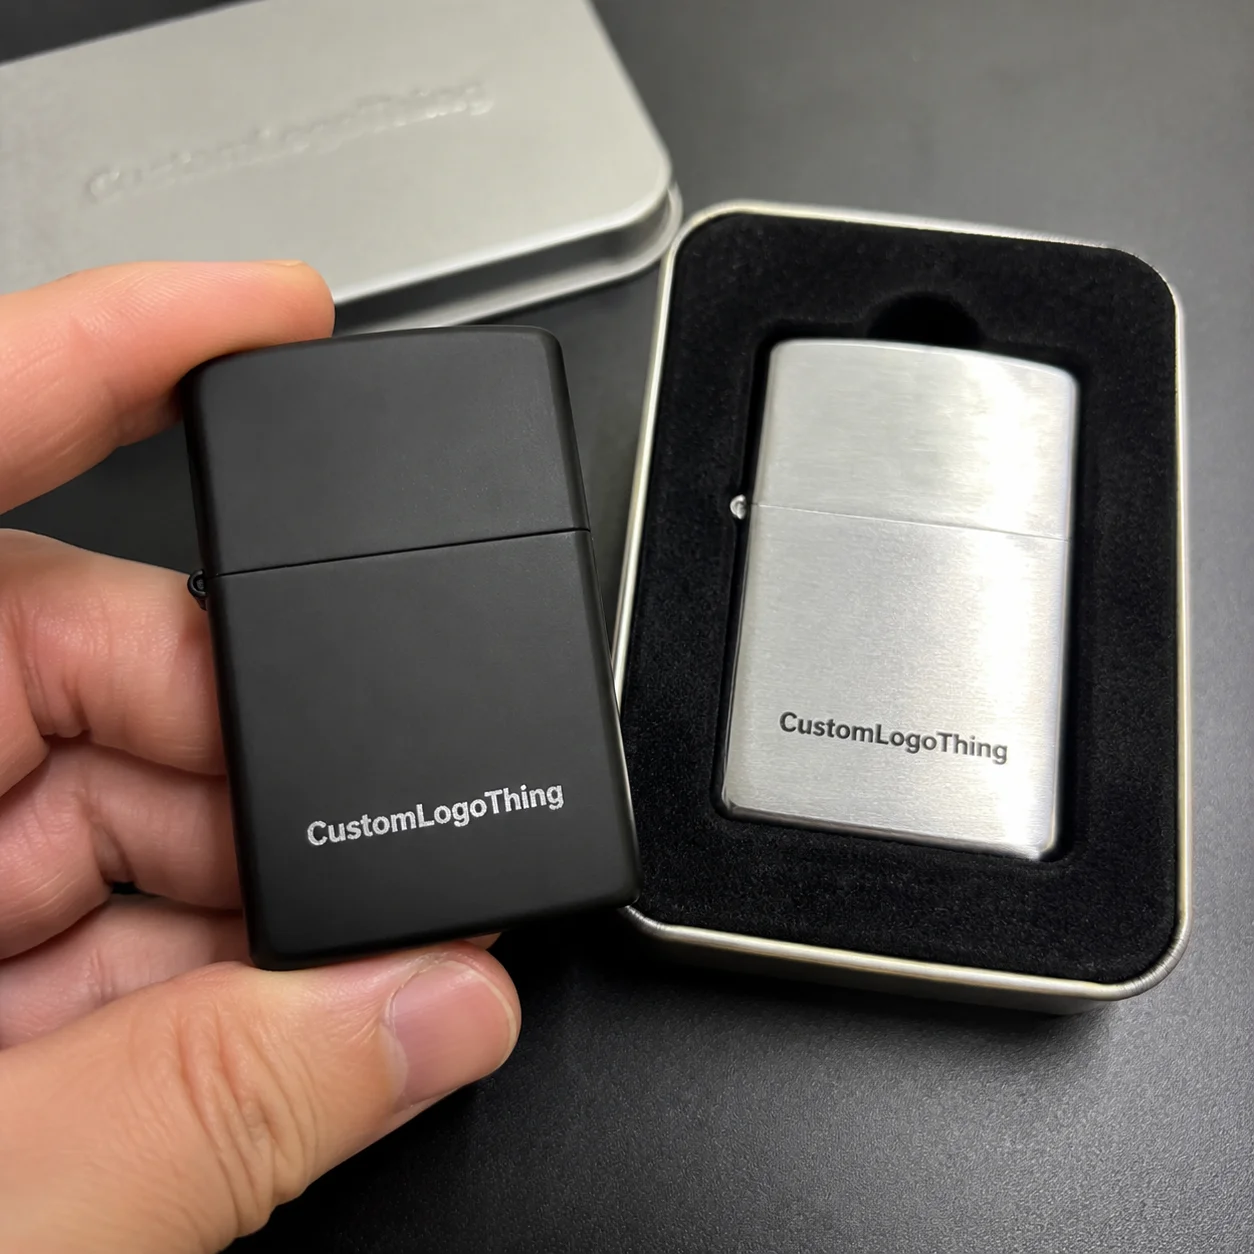
At the basic level, these are Printed Adhesive Labels sized for disposable lighters, refillable lighters, torch lighters, or lighter-style promotional items. Some are small front-panel decals. Others are partial wraps that cover the front and turn slightly around the sides. A near-full wrap gives the most artwork space, but it also demands more from the dieline, adhesive, cut tolerance, and application process.
The artwork is only part of the job. A good lighter sticker also depends on face stock, adhesive, coating, lighter surface, and how the label is applied. A sharp logo can still look cheap if one corner lifts after two days in a pocket. Annoying? Yes. Common? Also yes.
A front-panel sticker is usually the easiest choice. It has fewer alignment issues and less stress on the edges. A partial wrap creates stronger shelf presence, but the label needs to bend cleanly around the lighter body without wrinkling. A near-full wrap can look like purpose-built retail packaging when it is done well. When it is not, the seam drifts, the artwork twists, and everyone pretends not to notice.
Practical rule: design the sticker around the lighter body you are actually using, not the lighter shape you have in your head. A 1 mm shift can be obvious on a small curved item.
The details below cover materials, fit, pricing, timelines, ordering steps, and the production checks that keep a small label from looking improvised.
How Lighter Labels Work: Material, Adhesive, Ink, and Fit
A lighter label is built in layers. The face stock is the printable material: white BOPP, clear BOPP, vinyl, paper, metallic film, or holographic film. Ink sits on that surface. A coating or lamination may be added for scuff resistance, gloss, matte texture, or a more finished feel. Underneath is a pressure-sensitive adhesive, and the whole label stays on a release liner until application.
White BOPP is a strong everyday choice for custom lighter stickers because it is thin, moisture resistant, clean on roll format, and stable enough for repeat production. Clear BOPP works well when the goal is a “no-label” look, but white ink planning becomes critical on black, red, blue, dark green, or translucent lighter bodies. Vinyl adds flexibility and tougher outdoor-style durability, though it often costs more and can feel thicker. Paper is cheaper, but I rarely like it for lighters that will ride in pockets, cars, bags, or humid rooms. Paper absorbs punishment. Film resists it better.
Adhesive matters as much as the printable film. The label needs enough tack to grip plastic or coated metal, but not so much flow that adhesive squeezes out at the edges. If the lighter surface has mold-release residue, skin oil, dust, or a pebbled texture, the adhesive gets less contact area. Less contact means more corner lift.
Printing can be digital or flexographic. Digital printing is useful for shorter runs, fast version changes, and multiple designs in smaller quantities. Flexographic printing usually makes more sense for larger repeat orders because setup cost is spread across more units, and color consistency can be strong once the job is dialed in. For multi-SKU packaging programs, the right method depends on quantity, color targets, material, finish, and how often the artwork changes.
Shape causes more trouble than buyers expect. Lighters may have rounded vertical edges, slight taper, molded seams, safety labels, fuel windows, vents, and textured areas that do not accept a label evenly. Artwork should include bleed, usually around 1/16 inch or 1.5 mm, plus a safe margin so normal placement shifts do not make the logo look off-center.
For broader label planning across promotional and retail items, Custom Logo Things also offers Custom Labels & Tags that can be specified by material, finish, and use case.
Key Specs to Decide Before You Design Lighter Decals
Start with placement. A front-panel sticker gives you a clean branding area and is usually forgiving during hand application. A back-panel sticker works for secondary artwork, batch marks, QR codes, or short retail identifiers. A side strip can carry flavor names or product lines. Wrap-style decals create more visual impact, but they need tighter measurement, better alignment, and realistic tolerance planning.
Finish changes the feel fast. Gloss lamination makes colors look brighter and helps a small logo pop under retail lighting. Matte feels quieter and more modern, especially for black-and-white artwork. Soft-touch can feel premium, but on a small handled item it may show oils faster than gloss or standard matte. Metallic and holographic films catch attention quickly. They also make fine text harder to read if contrast is weak. Clear labels can look sharp on white or light-colored lighters, but they may disappear on darker bodies unless white ink is used under key artwork.
Keep the color strategy simple. A lighter does not give you the real estate of a box, pouch, or display card. Tiny patterns, thin outlines, long copy, and dense illustrations often collapse visually. One bold logo, one short phrase, or one strong graphic mark usually works better than a miniature poster. If the lighter will sit at retail, judge it from three feet away before you obsess over close-up details.
Durability requirements depend on the use case. Event giveaways may only need to look good for a weekend or short campaign. Retail lighters may sit in display trays, rub against other units, move through distribution cartons, and spend weeks in pockets or glove compartments. For that kind of use, film stock with a protective coating is usually the safer call.
Do not cover required safety markings, warning labels, ignition mechanisms, fuel windows, vents, or moving parts. This is not legal advice, and requirements vary by product and market, but from a packaging buyer’s point of view, covering functional or caution areas creates avoidable risk. Keep the label in the decorative zone.
For wraps or premium retail items, request a dieline based on the exact lighter model. Generic dimensions are fine for early estimating. They are not fine for final artwork. If the lighter body tapers even slightly, the wrap seam can drift from top to bottom.
| Sticker Type | Best Use | Application Difficulty | Typical Material Choice |
|---|---|---|---|
| Front-panel label | Logo, shop name, event mark | Low | White BOPP, clear BOPP, vinyl |
| Back-panel label | Secondary branding or short message | Low | White BOPP or paper for short-term use |
| Partial wrap | Stronger shelf presence | Medium | Film label with gloss or matte coating |
| Near-full wrap | Premium retail packaging effect | High | BOPP, vinyl, metallic, or holographic film |
Pricing, MOQ, and Unit Cost for Lighter Sticker Orders
Pricing depends on finished label size, material, finish, print method, order quantity, number of artwork versions, roll or sheet format, and whether a custom die or cutting tool is needed. A plain white film front-panel label is easier to quote than a holographic wrap with four artwork versions, custom sorting, and a deadline that was apparently discovered yesterday.
Minimum order quantity, or MOQ, is mostly about production efficiency. Small batches can often be printed digitally because setup is lighter and version changes are easier. Larger quantities usually lower the unit cost because prepress, proofing, setup, material waste, and finishing time are spread across more labels.
As a broad planning range, simple digitally printed film labels may land around $0.12 to $0.35 each at moderate quantities, depending on size, coverage, finish, and layout. Specialty materials, metallic effects, custom shapes, split runs, or very low quantities can push that higher. Larger repeat runs may drop below that range when the design, material, and production method are stable. Treat these as planning numbers, not a quote.
Roll format is usually preferred if labels will be applied with a dispenser or semi-automatic labeling equipment. Sheet format may be easier for very small hand-applied batches or kits, but peeling small labels from sheets slows people down. If 2,000 lighters are being labeled by hand, a roll with the correct unwind direction can save real labor time.
Hidden costs show up early if the order is vague. Artwork cleanup, dieline correction, expedited production, split shipments, extra proofs, specialty material minimums, and overrun for misapplied stickers can all change the total. If your team needs exactly 1,000 finished lighters, ordering exactly 1,000 labels is too tight. A 3% to 8% surplus is a practical cushion for crooked placement, damaged labels, samples, and last-minute sales needs.
For the cleanest estimate, send finished dimensions, quantity, material preference, finish, number of designs, application method, delivery ZIP code, and whether the labels need rolls or sheets. If the sticker is part of a larger branded packaging program, share the broader goal so color, finish, and presentation line up with the rest of the product line.
Production Steps and Timeline From Artwork to Finished Rolls
A typical production flow starts with artwork and lighter dimensions. The label size is confirmed, the dieline is created or checked, a proof is prepared, and the buyer reviews layout, color expectations, bleed, and safe areas. After approval, the job moves to print, coating or lamination if needed, die cutting, inspection, rewinding or sheeting, packing, and shipping.
Proofing is where most avoidable problems get caught. Low-resolution logos, missing bleed, tiny text, weak contrast, unsafe margins, and artwork that ignores the lighter’s curve should be fixed before production. I like proofs that show both the flat label and, when possible, a mockup on the lighter shape. Scale is easier to judge when the artwork is shown on the object people will actually hold.
Timelines vary by shop schedule, material availability, quantity, specialty finishes, die cutting, and approval speed. A simple digital label job may often move through production in about 5 to 10 business days after proof approval. More complex runs with custom shapes, metallic film, new tooling, or larger quantities may need 10 to 20 business days or more. Shipping time is separate.
Rush timing gets risky when the lighter model is not finalized. A buyer may approve a wrap for one disposable lighter and then switch to a slightly different body because the first lighter is out of stock. That small change can affect height, corner radius, taper, and seam alignment. If the label has already been printed, the result may be usable, but it will not be clean.
Sampling is smart for new lighter bodies, retail programs, or any wrap design. A short pilot run lets you check adhesion, alignment, finish, and handling before committing to a larger order. For retail packaging programs, basic transport testing principles from organizations such as ISTA are useful reminders: products get rubbed, stacked, shifted, packed, and handled long before a shopper sees them.
One planning rule saves headaches: finalize the lighter model first, approve the proof quickly, and order extra labels if a team will apply them by hand. The earlier those decisions are locked, the fewer surprises show up at the finishing table.
Common Mistakes That Make Lighter Stickers Peel or Look Cheap
The first mistake is measuring from photos or online product listings. Listing dimensions usually describe the whole lighter, not the usable label area. A physical lighter, calipers, and a flexible measuring tape give a better read, especially around curves and seams.
The second mistake is pushing artwork too close to the edge. On a small lighter body, a label applied 1 mm off-center can make text look crooked if the margin is tight. Safe margins protect the design from normal production and application tolerance. That does not mean the artwork has to be boring. It means the design accounts for reality.
Paper labels are another common weak point. They can work for short-term giveaways or indoor novelty use, but they struggle with moisture, friction, hand oils, and pocket wear. Film labels are usually better for items that will be carried and handled.
Over-designing hurts readability. Tiny QR codes, long compliance-style copy, thin script fonts, low-contrast gradients, and detailed illustrations can turn muddy at lighter scale. If a QR code is necessary, test it at final size on the actual material and finish. Gloss glare and curved placement can make scanning harder.
Surface preparation also matters. Dust, oil, mold-release residue, and textured plastic reduce adhesive contact. If labels are hand-applied, the lighter surface should be clean and dry. Press the label from the center outward to avoid trapped air, then apply consistent pressure along the edges to reduce corner lift.
Do not ignore the application environment. Labels applied in a cold room may not wet out as well as labels applied at moderate room temperature. Lighters stored in dusty bins need wiping before application. If workers are rushing through hundreds of units, alignment will vary. Build that into the design instead of acting shocked later.
The final mistake is ordering the exact count needed. That leaves no room for crooked placement, damaged labels, production samples, retail display pieces, or replacements. For hand application, a modest surplus is not waste. It is cheap insurance.
Build a Cleaner Lighter Sticker Order Brief
A cleaner order starts with a cleaner brief. Before asking for a price, gather the details that affect fit, production, and quoting. The goal is not to make the process complicated. The goal is to remove guesswork so your labels come back closer to what you pictured.
- Identify the lighter model: disposable, refillable, torch, metal, plastic, smooth, textured, tapered, or straight-sided.
- Measure the label area: width, height, corner radius, curve, seam position, and any safety or functional areas to avoid.
- Choose placement: front panel, back panel, side strip, partial wrap, or near-full wrap.
- Pick material: white BOPP, clear BOPP, vinyl, paper, metallic film, or holographic film based on use and budget.
- Decide finish: gloss, matte, soft-touch, clear, metallic, or specialty effect.
- Plan quantity: include extras for application waste, display samples, sales kits, and replacements.
Prepare artwork as vector files when possible, such as AI, EPS, or press-ready PDF. Outline fonts, embed linked images, include bleed, and keep important artwork inside the safe area. If you are matching other packaging elements, provide color references or existing print samples so expectations are clear. For sustainability claims or paper-based materials, credible programs such as FSC can help buyers understand chain-of-custody language, though certification availability depends on the specific material and supplier path.
Choose one primary message. A logo, shop name, event mark, product flavor, or limited-edition artwork can work beautifully. Trying to fit a full brochure onto a lighter almost never works. Small-format packaging rewards restraint.
Ask for a proof that shows the sticker flat and, when possible, mocked up on the lighter. The flat proof checks trim, bleed, spelling, and color breaks. The mockup checks scale, alignment, and how the design feels on the object. If the design is a wrap, ask how the seam is handled and whether overlap is included.
If your project includes more than lighters, reviewing related Custom Packaging Products can help labels, sleeves, inserts, and retail packaging pieces feel coordinated instead of patched together after the fact.
Custom lighter stickers are small, but the best ones are built with the same discipline as larger branded packaging: confirm the item, measure the printable area, Choose the Right material, proof carefully, and order enough to cover real application conditions. Bring those specs together before quoting, and the project will move faster, price more accurately, and finish cleaner.
FAQ
What size should custom lighter labels be?
The right size depends on the exact lighter model and whether the label is a front panel, back panel, side strip, or wrap. Measure the flat printable area with a physical lighter in hand, leaving space around edges, curves, seams, safety markings, and functional parts. For wrap-style labels, request a dieline because even a 1 mm error can make the seam overlap, drift, or sit crooked.
Are vinyl or BOPP stickers better for lighters?
BOPP is a strong everyday choice for lighter stickers because it is thin, clean-looking, moisture resistant, and works well for roll labels. Vinyl can be useful when more flexibility or outdoor-style durability is needed, though it may cost more depending on finish and order size. Paper is usually best for short-term or low-contact use, not for lighters carried in pockets or bags.
Can custom lighter decals be made with clear or metallic effects?
Yes. Clear film can create a no-label look on suitable lighter colors, while metallic, holographic, or foil-like materials can make small artwork feel more premium. Clear labels need careful white ink planning if the artwork must stay bright on dark or colored lighter bodies. Specialty materials may also affect pricing, proofing time, and minimum order quantity.
How much do custom lighter stickers cost per piece?
Unit cost depends on quantity, size, material, finish, die shape, print method, and whether the order has multiple designs. Simple digitally printed film labels may fall around $0.12 to $0.35 each at moderate quantities, while specialty materials, small runs, and complex wraps can cost more. For an accurate quote, provide finished size, order quantity, artwork count, finish preference, roll or sheet format, and delivery location.
How long does it take to produce lighter sticker rolls?
Simple digitally printed labels may take about 5 to 10 business days after proof approval, while specialty finishes, custom tooling, larger quantities, or complex wraps may need 10 to 20 business days or more. Shipping is separate. Approve artwork only after confirming the lighter model, because changing the lighter after proofing can require a revised dieline.


