Custom jewellery box packaging does more than hold a ring or necklace in place. It protects a delicate item, shapes the first physical impression, and quietly signals where the product sits in the market before the lid is lifted. A plain carton can contain jewellery; a well-specified box can make the same piece feel considered, giftable, and worth keeping.
That difference is not cosmetic alone. Buyers judge packaging with their hands as much as their eyes, and small failures show up fast: a loose insert, a lid that opens too easily, a chain that arrives tangled, or a logo that disappears into the wrap. For jewellery, those details carry more weight than they do on many other product categories because the item itself is small, valuable, and often purchased as a gift.
A box can be technically correct and commercially wrong. If it protects the piece but makes the presentation feel loose, cheap, or forgettable, the packaging has failed its job.
What Custom Jewellery Box Packaging Actually Does
From a buyer’s point of view, the main job of custom jewellery box packaging is control. The box needs to limit movement, reduce abrasion, protect prongs or clasps, and keep the product aligned so the reveal feels intentional rather than improvised. That is especially important for earrings, pendants, bracelets, and layered gift sets, where a few millimetres of extra space can lead to noise, scuffing, or a presentation that looks off-centre.
There is also a retail side to it that can be underestimated. Packaging contributes to perceived value before a customer touches the piece inside. A rigid box with a clean wrap, a fitted insert, and accurate logo placement reads differently from a thin unprinted carton, even when the jewellery itself is similar. That affects shelf presence, giftability, and sometimes return behaviour, because customers are less likely to feel they received something generic when the packaging looks deliberate.
The strongest packaging decisions usually support the product and the sales channel at the same time. A box for in-store gifting does not need the same transit resilience as a box that ships directly to consumers, and an e-commerce package should never be specified on appearance alone. For jewellery, the packaging system needs to do practical work first and brand work second, although both matter.
How the Box Structure, Inserts, and Finish Work Together
The best results come from treating the outer structure, the insert, and the surface finish as one decision instead of three unrelated ones. If the shell looks premium but the insert is loose, the package feels unfinished. If the insert is excellent but the closure is weak, the weakness shows up immediately. In custom jewellery box packaging, each part has to support the others.
There are three structures that show up often in jewellery projects:
| Structure | Typical Use | Approx. Cost at 5,000 Units | What It Does Well |
|---|---|---|---|
| Folding carton | Fashion jewellery, lightweight retail packaging, lower-cost lines | $0.18-$0.45 | Low freight cost, fast production, efficient storage |
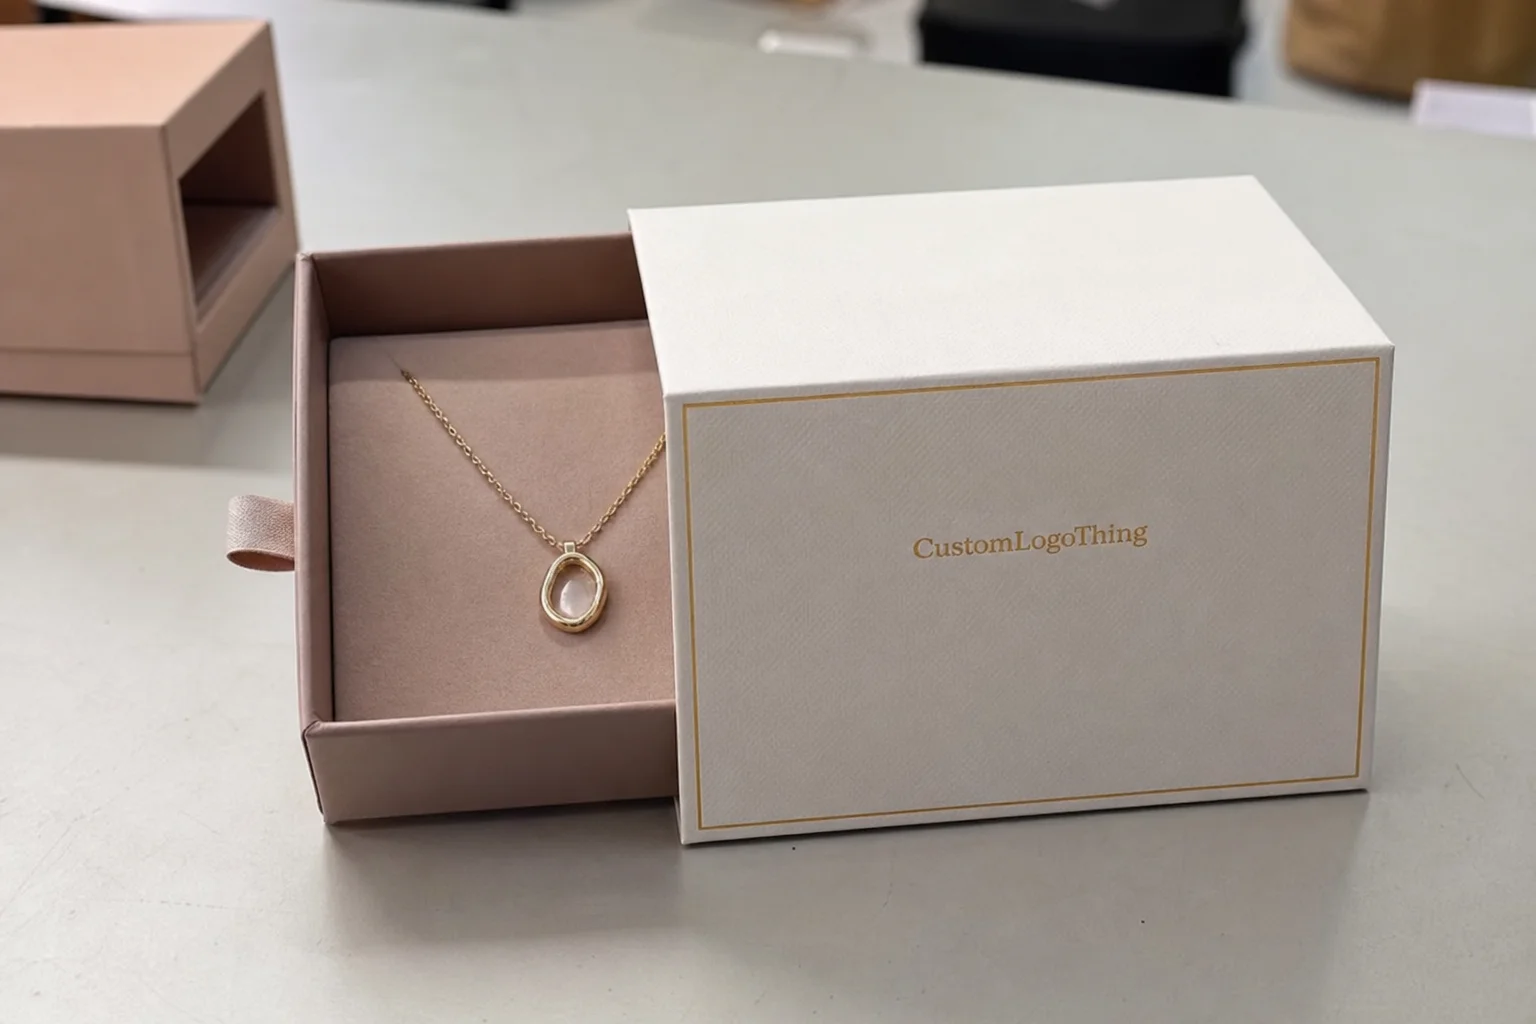
| Rigid setup box | Rings, pendants, premium gift boxes | $0.65-$1.80 | Stronger presentation, better crush resistance, higher perceived value |
| Drawer-style rigid box | Gift sets, layered product packaging, upscale collections | $0.95-$2.50 | Distinct unboxing, better compartment control, stronger brand theatre |
Insert choice matters just as much as the shell. Foam grips tightly and gives strong shock control. Velvet or flocked surfaces feel richer in hand, though they can add cost and complexity. Paperboard is cleaner for recycling and can work well for lighter pieces. Molded trays are useful when repeatability matters and the range has to be packed at scale without variation. A ring usually needs a snug, shallow nest. A necklace needs slack management so the chain does not knot. Earrings need post support and a layout that keeps them upright after transit.
Finish is where package branding becomes tactile. Soft-touch lamination creates a muted, smooth feel. Foil stamping can sharpen a logo without crowding the design. Embossing adds depth, while spot UV works best when the artwork is restrained. Too many effects often dilute the result. On smaller jewellery boxes, one strong finish usually reads better than four competing ones.
For brands comparing multiple formats across rings, necklaces, and gift sets, it helps to start from a broader packaging range rather than developing each piece in isolation. A consistent system keeps the visuals aligned and avoids the common problem of having a beautiful ring box that feels unrelated to the rest of the line.
Transit testing should also be part of the conversation, especially if the box will move through parcel networks. Shelf display and shipping survival are not the same thing. A package can look excellent on a table and still fail under vibration, compression, or drops. The ISTA framework is a sensible reference point when a buyer wants the packaging to survive handling rather than just the photo sample.
Materials, Dimensions, and Branding Choices That Matter
The first decision should be size, not artwork. For rings, bracelets, and pendants, the outer dimensions, insert depth, and internal clearance need to be fixed before the graphics are placed. A box that is too deep invites movement. One that is too tight can press on a clasp or crease a chain. In rigid jewellery boxes, a common build uses 1.5 mm to 2 mm greyboard wrapped in printed paper, though the right spec depends on weight, product type, and target price.
Material choice changes both perception and cost. Paper-wrapped rigid board gives a more substantial feel than a basic folding carton. Recycled paperboard can be a good fit for lighter lines or lower-cost retail packaging. Textured papers, soft-touch laminates, and speciality wraps add tactile value, but they also introduce setup complexity and can affect minimum order quantity. If sustainability matters, ask for FSC-certified board or paper where appropriate and check the documentation rather than assuming the supply is covered.
Branding decisions often fail at scale rather than on screen. A logo that looks balanced in a mockup may be too large on a 60 mm lid. A pale foil on a warm paper wrap may disappear in normal lighting. Typography that reads clearly on a brochure can become cramped when reduced to jewellery-box size. Packaging design needs a print mindset, not just a graphic one.
Storage and fulfilment should stay in the room too. Oversized packaging looks premium until it starts increasing carton counts, pallet use, and shipping cost. A box that is 10% larger than necessary can affect warehousing and freight in ways that wipe out the value of a fancier finish. The most efficient custom jewellery box packaging usually earns its keep by looking refined while still fitting the real operational limits of the line.
If a range includes several SKUs, a practical strategy is to standardise the outer format and vary the insert. That approach keeps the system easier to source, easier to store, and easier to scale across future collections without rebuilding the whole structure every time.
Custom Jewellery Box Pricing, MOQ, and Quote Drivers
Price is where expectations drift away from reality more often than in many other packaging projects. Buyers sometimes compare two quotes and focus only on unit cost, but the real project cost also includes sampling, tooling or plates, insert development, freight, and the time spent revising proofs. In custom jewellery box packaging, the lowest quote is not always the lowest-cost outcome.
The main drivers are usually straightforward:
- Material grade: greyboard thickness, wrap stock, and any speciality paper or laminate.
- Structure: folding carton, rigid box, drawer style, magnetic closure, or sleeve system.
- Insert complexity: foam cut-outs, velvet lining, multi-slot trays, or custom molded parts.
- Print method: one-colour print, full coverage artwork, foil, embossing, or spot UV.
- Quantity: setup costs spread out more efficiently as volumes rise.
MOQ is real, but it is not fixed across every specification. Fully Custom Rigid Boxes often become more workable around 500 to 1,000 units. More complex builds can start to make better financial sense closer to 3,000 to 5,000 pieces. Smaller orders can still be done, but the unit cost rises quickly unless the design is simplified. That is normal, and it is better to understand it early than to force a premium construction into a quantity that cannot support it.
When requesting pricing, send a clean brief. Include product dimensions, target quantity, artwork files, preferred finish, shipping destination, and the delivery window. If the box needs a magnetic closure, ribbon pull, or a specific insert material, say so at the start. Missing details create assumptions, and assumptions lead to re-quoting later.
For brands comparing several packaging formats, a single reference sheet helps separate appearance choices from cost drivers. That makes it easier to see where money is going and which parts of the spec actually improve the customer experience.
Production Steps and Lead Time: From Dieline to Delivery
The production path is usually predictable, but only if the brief stays stable. A standard project begins with the specification, moves into dieline setup, then proofing, sampling, production, inspection, packing, and shipment. If a box changes late in the process, the schedule can move quickly in the wrong direction.
- Briefing: confirm size, structure, insert, finish, and quantity.
- Dieline setup: align artwork to the actual box geometry, not a generic template.
- Proof approval: check text placement, logo scale, and colour references.
- Sample or prototype: verify fit, closure strength, and visual balance.
- Production: print, wrap, assemble, and add inserts.
- Inspection and packing: review quality, count cartons, and prepare freight.
Lead time depends on complexity. Simple boxes often move from proof approval to shipment in about 12 to 15 business days. Add foil stamping, embossing, special wraps, or custom inserts, and the timeline can move closer to 20 to 30 business days. Larger volumes take longer because assembly and inspection take longer. That is not a problem so much as the reality of how the work is done.
Most timing problems come from avoidable changes: artwork revisions after approval, vague Pantone references, insert depth changes, or switching materials after a sample has already been signed off. If the packaging is tied to a seasonal launch or retail promotion, build in extra time for proofing and at least one sample round. A rushed box usually ends up costing more than the calendar suggests.
Transit assumptions should also be clear. If the product will ship through parcel channels, ask how the structure was judged for vibration, compression, and drop risk. If the line is higher value, ask whether the box was designed with shipping stress in mind or only with shelf presentation in mind. Those are different specifications, and the difference matters once the order leaves the plant.
For sustainability claims, ask for documents instead of marketing language. FSC certificates, recycled-content statements, and material declarations should be attached to the quote or sample packet if they are part of the buying decision. Clear documentation saves time later and avoids awkward gaps during retailer review.
Common Mistakes That Make Jewellery Packaging Look Cheap
The most common mistake is also the easiest to miss: choosing a box that is too large. Extra space creates movement, and movement makes the opening feel less controlled. Even a strong ring can seem less valuable if it rattles in transit or sits off-centre in the insert. In packaging terms, dead space often becomes dead perception.
Low-contrast branding causes similar damage. A logo that blends into the wrap may feel subtle on a screen, but in real life it can read as absent. The same applies to weak print registration, fuzzy edges, and typography that is scaled down too far. Premium cues depend on precision, and small errors are visible on jewellery boxes because the formats are compact and the viewer is close.
Functional failures can do just as much harm as visual ones. Weak closures open too easily. Poor insert fit lets the piece shift. Thin board flexes when stacked. A box that photographs well but fails in transit is not a good package; it is a future complaint. That is especially true for jewellery, where a bent clasp or scratched surface can turn a packaging issue into a product issue.
A sample is not a delay. It is the cheapest way to catch a design error before it reaches a customer.
Skipping samples is the last big mistake. The cost of one prototype is small compared with a reprint, a return, or a missed retail launch. The sample is where misaligned logos, incorrect insert depth, awkward lid resistance, and colour drift under real light show up. Experienced buyers treat sampling as part of the specification, not an optional extra.
Next Steps to Specify the Right Box for Your Line
The cleanest way to move forward is to build a one-page spec sheet. Include product dimensions, item type, target quantity, logo files, preferred finishes, insert requirements, and shipping destination. If the line includes rings, earrings, necklaces, or gift bundles, note which SKUs can share an outer box and which need a different insert. That one document often prevents the back-and-forth that slows packaging projects down.
Ask for at least one sample or prototype and test it in the conditions that matter: fit, closure strength, shelf appearance, and unboxing. If the piece is meant for e-commerce, place it inside the shipper and see how it behaves. If it is meant for retail display, check how it reads next to competing product packaging on the shelf. A good package should perform in the actual channel, not just in a mockup.
Then compare quotes on an equal basis. Two suppliers can offer similar prices while quoting very different materials, inserts, or finish levels. Separate the decisions that affect appearance from the decisions that affect Cost and Lead Time. That makes the trade-offs visible, which is exactly what a packaging buyer needs when selecting custom jewellery box packaging for a launch or a refresh.
If an assortment spans more than one category, keep the range connected. A strong outer format, a consistent print language, and a family of inserts can make the whole line feel more intentional. That is where a broader packaging range can support a system instead of a one-off box.
Handled well, custom jewellery box packaging becomes part of the offer itself. It protects the product, sharpens the brand story, and helps the piece feel worth the price before the customer ever sees the jewellery inside.
How do I choose custom jewellery box packaging for different jewellery types?
Start with the item’s dimensions and fragility. Rings usually need compact presentation and a snug nest, earrings need stable post support, bracelets need space that prevents pressure points, and necklaces often need wider layouts so chains stay flat. Match the box format to the product rather than forcing every SKU into the same cavity.
What affects custom jewellery box packaging cost the most?
Material choice, box structure, insert complexity, print coverage, and specialty finishes usually have the biggest effect on price. Quantity matters too, because setup and tooling costs spread more efficiently as volumes rise. A simple folding carton and a rigid magnetic box can sit in very different cost bands even if the artwork looks similar.
How long does custom jewellery box packaging production usually take?
Simple orders often move in about 12 to 15 business days after proof approval, while more complex specs can take 20 to 30 business days or longer. Sampling, artwork revisions, and custom inserts are the usual schedule drivers. If the launch date is fixed, confirm the timeline before approving the final spec.
What is the best insert for custom jewellery box packaging?
The best insert is the one that holds the piece securely without scratching, compressing, or allowing movement. Foam offers the tightest grip, velvet adds a richer feel, paperboard can be cleaner for recycling, and molded trays work well for repeatable layouts. The right answer depends on the product and the brand position.
How can I make custom jewellery box packaging look premium without overspending?
Focus on one or two strong choices: a good structure and one refined finish usually outperform a box overloaded with effects. Keep the size efficient, simplify the print process where possible, and review samples before approving the full run. That approach gives a cleaner result and reduces the chance of paying for details that do not improve the customer experience.