Custom meat labels have a short proving window. They can look excellent on a proof and still fail the moment they meet condensation, cold plastic, a gloved hand, and bright case lighting. That is the real test: not whether the artwork sells on screen, but whether the label stays attached, stays legible, and still looks intentional after hours in refrigeration.
Custom meat labels: what has to work in the cold case
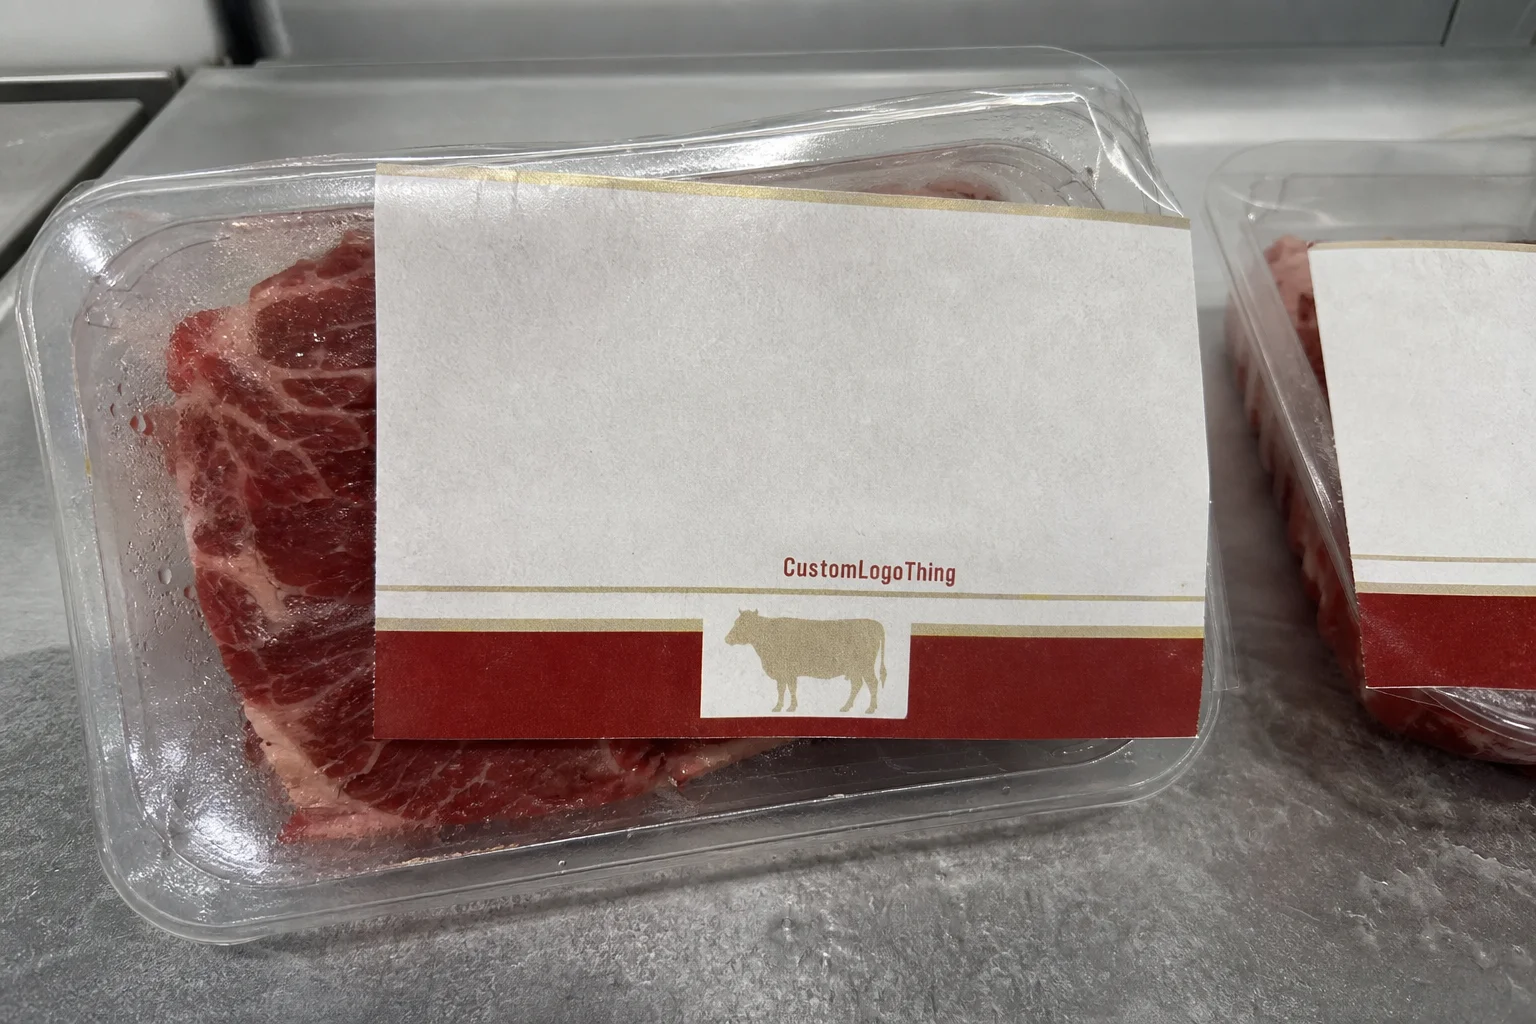
The first mistake buyers make is treating the label as a pure design exercise. It is not. In meat packaging, the label is part of the package system, which means it has to survive temperature change, handling, and the pressure of a refrigerated display. Fresh trays, butcher counter packs, vacuum-sealed cuts, and branded sleeves all behave differently, so a single construction rarely fits every use.
Under store lighting, flaws show quickly. A corner that lifts by a few millimeters or a barcode that smudges after condensation is enough to make the pack look less credible. That is why custom meat labels should be evaluated as a packaging decision first and a graphic decision second. The artwork matters, but the stock, adhesive, finish, and format decide whether the label still performs after the product has been chilled, handled, and moved across the chain.
From a buyer’s point of view, the real question is simple: will the label stay intact long enough to support the sale and the back-of-house workflow? If the answer is uncertain, the spec needs to be tightened before volume begins. That applies whether the labels are for one tray size or part of a broader line of Custom Labels & Tags used across multiple retail packs.
A good label does three jobs at once: it sells, it survives, and it keeps the product easy to handle.
The shift in thinking is small but useful. Instead of asking whether the design looks good, ask whether the construction will still work on a cold, slightly damp pack through the full display cycle. That is the difference between a label that looks fine in approval and one that actually clears the season.
Meat labels also sit in a strange middle ground between retail branding and operations. They need enough visual weight to support a purchase decision, but they also need to leave room for pricing, weight, traceability, and regulatory copy. A label that tries to do too much usually fails at the one thing the store actually needs: fast readability from a short distance.
How the label build keeps print readable and adhesion stable
Every pressure-sensitive label is a stack of materials with separate jobs. The face stock carries the print, the adhesive bonds the label to the pack, and the liner supports application before removal. If any one of those parts is mismatched to the environment, the whole label suffers. For custom meat labels, the adhesive and face stock matter as much as the artwork.
Paper can work for dry or short-life refrigerated applications, but it is less forgiving once condensation enters the picture. Film stocks, especially polypropylene or similar moisture-resistant facestocks, usually hold up better in refrigerated retail packaging because they resist softening and edge damage. That does not mean paper is wrong. It means the material has to match the real pack environment instead of assuming every cold-case label faces the same conditions.
Adhesive choice deserves real attention. A label can stick well to a dry sample and still fail on a tray with light moisture or a trace of oil residue. In testing, I look at three things: initial tack, cold adhesion, and long-term hold after the product has cycled in and out of cooler air. Suppliers should be able to explain peel, tack, and shear in plain language, not hide behind a vague “freezer-safe” claim. If the application is critical, buyers often ask for a practical comparison against ASTM-style peel methods, then confirm the result with actual pack trials.
Finish matters as well. Gloss can deepen color, but it can also throw glare under LED case lights. Matte and satin finishes often improve readability, especially on small-format packaging where the eye is already parsing product name, price, weight, and date fields. If the label carries variable data or a barcode, the finish should not reduce contrast or create reflections that interfere with scanning.
Type hierarchy should be planned early. The pack name, cut, weight, price, and any required identifiers need to be legible from a short distance. Thin letterforms and compressed tracking tend to fall apart in the cold case, especially once the label is applied to a curved or slightly uneven surface. Strong contrast and a simpler hierarchy usually outperform decorative typography.
Label build also affects line speed. If the label is too stiff, too small, or too sensitive to handling, application slows down and the error rate climbs. A pack that takes five extra seconds to label may not sound expensive, but across thousands of units that turns into labor, waste, and avoidable rework.
For buyers coordinating branded packaging across several SKUs, consistency matters. The label should look like part of the same retail system even if it is used on different tray sizes or wrapping formats. That is why many teams standardize print rules across labels, inserts, and Custom Packaging Products instead of treating each item as a one-off.
Specs that matter on shelf, in storage, and at checkout
The spec sheet should start with the pack, not the artwork. Measure the application area carefully. A label that is too large will wrinkle; one that is too small will look unfinished and force copy into cramped corners. Size, corner radius, and orientation all affect application speed and final appearance. A label with generous margins is usually easier to apply cleanly and tends to look more deliberate in the case.
Copy hierarchy matters just as much. Product name, cut, weight, price, and required identifiers have to be readable from a few feet away. In a refrigerated display, customers rarely stand and study the pack. They scan, compare, and move on. That makes small text a functional issue, not a decorative one. Bold, high-contrast typography generally performs better than thin weights or tightly tracked letters.
There are durability questions too. Will the label be wiped by gloved hands? Will it sit under condensation for several hours? Does the back room handle packs in a way that scuffs corners or rubs edges? If yes, then tear resistance and wipe resistance belong in the brief. For some operations, that means a film label with a permanent adhesive; for others, it means a paper construction with a protective varnish and a tighter application process.
The application surface matters more than many buyers expect. A smooth tray is easier to spec than a textured wrap, and a dry surface behaves differently from one that has light chill condensation. Labels That Hold on a flat sample can still misbehave on a curved pack seam or a surface with minor oil transfer. That is why sample testing on the actual package is worth more than an attractive proof sheet.
In the broader packaging world, the same logic applies to custom printed boxes and inserts: structure has to support use. Labels are simply more exposed to moisture, temperature swings, and frequent handling, so the tolerance for sloppy specs is lower.
Barcode placement deserves its own review. A code can be technically present and still be hard to scan if it is too close to a seam, too small for the print process, or crowded by surrounding copy. Checkout failures are usually blamed on the scanner first, but the root problem often starts in layout. That is an operations issue hiding inside a design decision.
Pricing, MOQ, and quote drivers buyers should compare
Price depends on more than print coverage. Material choice, adhesive performance, size, finish, quantity, and whether the job is simple or variable all change the quote. A one-color butcher label on paper stock is a very different job from a full-color branded label with a cold-temp adhesive and serialized data. Buyers comparing custom meat labels should make sure they are comparing the same spec, not just the same artwork.
Minimum order quantity changes the math. Smaller runs carry higher unit costs because setup is spread across fewer labels. As quantities rise, the economics improve, but only if the artwork is stable and the job does not need repeated changes. Variable data, multiple versions, or frequent copy updates can push labor higher even when the physical label seems simple.
| Label option | Typical use | Approximate unit price at 5,000 pieces | Notes |
|---|---|---|---|
| Paper face stock with standard adhesive | Dry or short-life refrigerated packs | $0.06-$0.12 | Lower cost, but less forgiving with condensation |
| BOPP or other film stock with permanent cold adhesive | Chilled retail packaging with handling | $0.11-$0.20 | Better moisture resistance and cleaner edge hold |
| Freezer-grade film with laminate or heavy varnish | Frozen packs or higher-scrub environments | $0.18-$0.35 | Higher durability, more setup, better protection |
Those ranges are only useful if the quote assumptions are identical. Ask for the same quantity, size, finish, print colors, shipping terms, and proofing steps across suppliers. Otherwise, the lowest number can hide a thinner stock, a weaker adhesive, or a finish that will not hold up in the case. A fair quote should also show breakpoints clearly, because moving from 2,500 to 5,000 pieces can change the unit cost more than people expect.
Die-cut shape can affect price too. A simple rectangle is easier to produce than a custom contour with tight radii or odd proportions. Plate costs, setup time, and waste all move with the shape, especially on short runs. Buyers often fixate on ink coverage, but the cut path and liner layout can be just as important to the final number.
For paper sourcing questions, FSC-certified stock may matter if the brand needs a traceable sustainability claim. If transit testing is part of approval, suppliers should understand ISTA methods or at least know how to validate packaging against shipping stress before the labels go to scale. The point is not paperwork for its own sake. It is reducing the odds of a failure after production has started.
If you are working within a tight budget, keep the first order disciplined. One size, one finish, one adhesive family, and stable artwork usually produce the cleanest launch. After that, it becomes much easier to compare alternate constructions with real data instead of guesses based on a proof.
Production steps and lead time for a smooth launch
The smoothest label launches usually follow the same sequence: brief, proof, approval, production, and test application. Delays appear when one of those steps is vague. A strong brief should list pack dimensions, storage temperature, intended surface, quantity, color expectations, artwork files, and any regulatory or traceability needs. If the label has to fit a specific application area, include a dieline or a measured drawing rather than a rough estimate.
Proofing is not a formality. It is the point where text size, barcode placement, spelling, copy hierarchy, and color balance are still cheap to fix. A PDF proof can look correct while the label still fails on an actual tray, so a supplier should help validate not only the print content but also the physical fit. That is especially useful when the pack is curved, wrapped, or exposed to a colder environment than the proof room.
Lead time depends on more than the calendar. If the artwork is still being developed, if samples are required, or if a special stock has to be sourced, the schedule stretches. Standard constructions move faster. Custom printed packaging and label work always benefits from planning time. A quote that says 12 to 15 business days after proof approval is usually more reliable than a vague promise that sounds quicker but leaves no room for sampling or corrections.
Production should include quality-control checks that are boring in the best way. Confirm ink density, registration, adhesive consistency, and die-cut accuracy. Check whether the liner releases cleanly and whether the label can be applied without wrinkles or edge curl. For repeat orders, the first run should become a reference point. Document what worked, what lifted, what scuffed, and what looked too small once it hit the case. That record saves time on the next purchase.
One more practical point: test under the same temperature shift the product will see in real use. A label applied at room temperature can behave differently once it cools. Adhesive systems often look fine immediately and then reveal their weaknesses after the first chill cycle. That delay is why real-pack testing matters more than visual inspection alone.
Common ordering mistakes that trigger reprints
The costliest mistake is approving a label from a mockup and never testing it on the real pack. A design that looks polished on screen can fail once it meets chilled plastic, condensation, or slight surface oil. That is where adhesive choice proves its value. If the label starts to curl or lift at the corners, the pack loses polish quickly, and the retailer notices.
Weak contrast is another recurring problem. Busy backgrounds, low-contrast fonts, and tiny legal copy may pass in design software, but they become hard to read in a cold case. Since retail packaging is judged in seconds, readability should be protected more aggressively than decoration. A cleaner hierarchy usually performs better than a dense layout packed with every available detail.
Low-resolution artwork and missing bleed cause avoidable delays. They can slow production or force a reprint if the files cannot be corrected in time. Barcode sizing needs the same attention. A barcode that is technically present but too small, too close to an edge, or printed over a reflective finish can create scanning problems at checkout or in inventory processing.
There is also a planning mistake that shows up every season: underestimating demand or forgetting the reorder window. If the label is tied to a promotion, a retail reset, or a seasonal cut, the team needs to plan earlier than feels necessary. Once inventory gets low, the ability to compare options, revise artwork, or test a new adhesive drops sharply.
Another common issue is spec drift. A reorder is approved with the right artwork but the wrong stock or finish because someone relied on memory instead of a documented standard. That can change glare, scan performance, or adhesion. The fix is simple: keep a master spec with the approved material, adhesive, size, and finish, then attach the most recent proof to it.
Good label buying is disciplined work. Treat the label as a production component, not a decoration. That keeps the packaging system cleaner whether the work is a single meat label, a broader branded packaging program, or a family of labels that must stay visually aligned across several products.
Next steps for testing, approval, and reorder planning
Before requesting a quote, gather the facts that affect performance: pack dimensions, storage conditions, surface type, artwork files, quantity targets, and any required copy or codes. If the label is going onto a tray, sleeve, or wrap, say so clearly. A supplier can spec the Right Stock Faster when the actual application is described in plain language.
The next move should be a small test run or sample set applied to real product under real storage conditions. Watch for adhesion after cooling, legibility under store lighting, and how the label behaves after handling. If the pack will be exposed to repeated contact, check edge lift and scuffing after several hours, not just immediately after application. That extra wait reveals more than a fresh sample ever will.
A simple approval checklist helps prevent surprises. Use it to confirm print quality, copy accuracy, barcode readability, color consistency, and how the label looks after a full day in cold storage. If the label is part of a broader rollout across Custom Labels & Tags, keep one master spec so every reorder stays consistent.
- Confirm the pack dimensions and surface.
- Lock the material, adhesive, and finish.
- Test a sample on a real product.
- Approve the proof only after checking copy and barcode placement.
- Set the reorder point before the first run is exhausted.
That last step matters more than most teams expect. If you know the breakpoints, you can plan the next order with less rush, fewer surprises, and better cost control. Buyers who want the label to stay aligned with the rest of the packaging line usually find that this kind of planning is what keeps a season orderly.
My final point is straightforward: the right custom meat labels are not chosen by artwork alone. They come from matching material, adhesive, print method, and timing to the actual pack environment, then proving the setup with a real test before committing to volume.
FAQ
What makes custom meat labels different from regular product labels?
They usually need stronger performance in cold, damp, or heavily handled environments. The face stock and adhesive matter as much as the artwork because the label has to stay put and stay readable in a refrigerated case. A label that works on a dry carton may fail on chilled meat packaging, so the test conditions need to match real use.
Do custom meat labels need special adhesive for refrigerated packs?
In many cases, yes. Cold surfaces and light condensation can weaken standard adhesives, especially if the pack has any moisture or residue. The safest approach is to choose the adhesive based on the exact storage temperature and package surface, then verify it with a real-pack test before a full order.
Can custom meat labels be used on frozen packaging?
Yes, but the material and adhesive need to be selected for freezing conditions, not just refrigeration. Frozen-pack labels should be checked for curl, edge lift, and readability after temperature swings. If thaw cycles are part of the product journey, the label should be tested through those conditions too.
What information should be printed on a meat label?
At minimum, the label should clearly show the product name and any key selling details needed by the buyer or store team. Many labels also include weight, price, lot or traceability data, barcode information, and handling cues. Local labeling requirements should always be confirmed before final artwork is approved.
How can I keep the first order of custom meat labels cost-effective?
Keep the first run focused on a stable size, finish, and artwork version so setup stays simple. Ask where the price breaks are for larger quantities so you can plan a smarter reorder later. Request samples and compare quotes using the same specs, because small changes in stock or finish can shift the unit cost.


