Texture gets noticed before copy does. On bottles, cosmetics, tech accessories, candles, and premium mailers, shoppers often register the surface first, then the logo. That is the main reason custom raised stickers keep showing up in product packaging: they make a small brand mark feel handled, finished, and intentional.
The harder question is not whether a raised decal looks premium. Many do. The harder question is whether the construction fits the product surface, artwork, order quantity, budget, and launch date. A raised label can look sharp on a candle lid and fail on a flexible pouch. It can make a glass jar feel expensive and make tiny type harder to read. The result depends on material, adhesive, coating style, curing time, print registration, and how the sticker will be applied outside the proofing screen.
Custom Raised Stickers Turn Flat Branding Into Touch
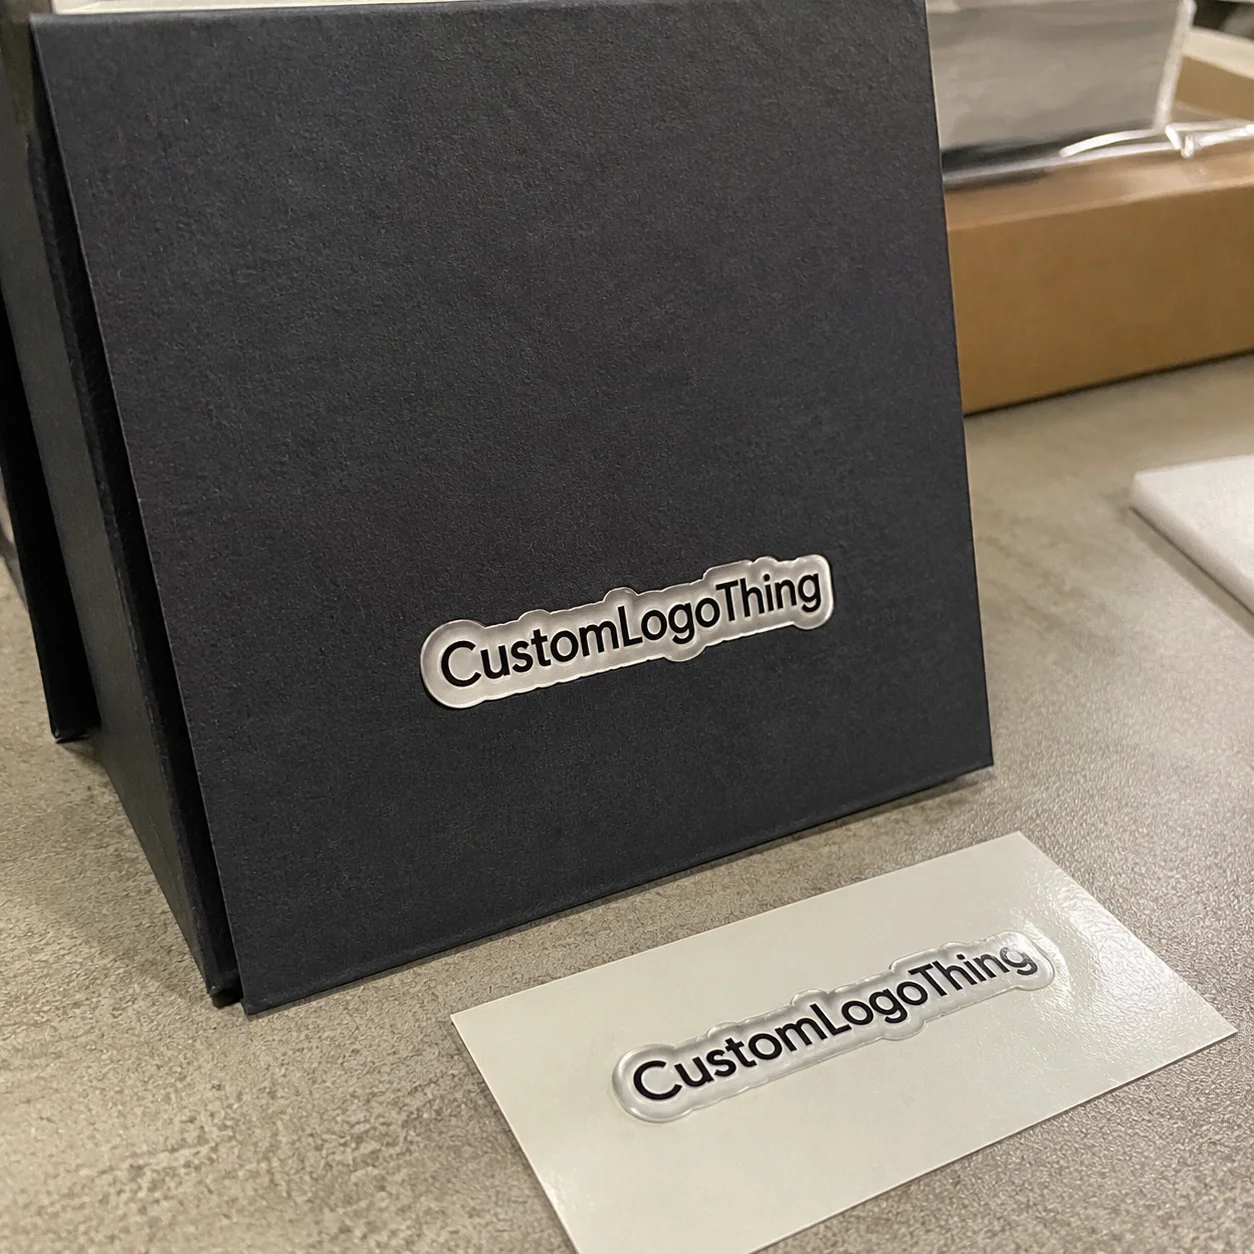
Custom raised stickers are printed decals or labels with a dimensional coating above the artwork. Most use either a clear polyurethane dome or a raised UV varnish. That coating catches light, changes how color reads, and adds a tactile surface that a flat vinyl sticker cannot create.
A flat vinyl sticker is printed and cut, then supplied on sheets, rolls, or as individual decals. It can be glossy, matte, waterproof, laminated, or outdoor rated, but the printed face stays flat. An embossed paper label is different: the paper stock itself is pressed upward or downward with a die, often for wine labels, stationery, hang tags, and premium paper packaging. Puffy foam stickers are thicker and softer, usually better suited to novelty items, children’s products, and promotional giveaways than to a crisp brand badge.
Raised stickers work best when the label is meant to act like a small plaque. Common uses include product branding on jars and bottles, limited-edition seals, retail display badges, event merchandise, warranty labels, equipment decals, candle lids, and premium unboxing details. They are especially useful when the box or container is deliberately simple. One dimensional mark can add perceived value without redesigning the whole package.
Practical callout: A raised sticker is not automatically better than a flat label. It is better when the texture supports the product story, the adhesive suits the surface, and the artwork gives the coating enough room to form cleanly.
That last point is easy to underestimate. A logo that looks elegant on a website header may be too thin for a resin dome. A delicate border may drift visually if the print and coating registration are even slightly off. Raised finishes reward strong, simple shapes.
How Raised Sticker Production Steps Create the 3D Effect
The production path usually starts with artwork review. Small details that print well do not always dome well, so the file has to be checked before material is ordered or the job is scheduled. A typical sequence is file check, material selection, printing, cutting, coating application, curing, inspection, and packing.
Each step has its own tolerance. A print shift of 0.5 mm may barely show on a flat decal. On a raised badge with a tight border, the same shift can look careless.
Doming is the process many buyers picture first. A controlled amount of clear polyurethane or resin is dispensed over the printed sticker. Surface tension helps the liquid settle into a rounded lens shape, usually stopping near the cut edge or printed boundary. Finished dome height often falls around 1.0 mm to 2.5 mm, depending on sticker size, coating chemistry, artwork shape, and production method.
Raised UV works differently. Instead of flooding the whole decal with a rounded coating, a clear varnish is printed in selected areas and cured with UV light. The profile is usually lower and more controlled than a resin dome, which makes it useful for spot texture on logos, icons, patterns, and premium packaging details.
Format matters. Die-cut individual decals are easy to hand apply one at a time. Kiss-cut sheets are efficient for small batches, sample kits, event packs, and fulfillment. Roll labels can work for higher-volume application, but the raised layer has to tolerate winding, liner release, spacing, and pressure from dispensing equipment. Not every raised construction belongs on a roll.
Raised stickers also need cleaner handling than flat printed stickers. Dust control matters because a tiny fiber trapped under a clear dome becomes very visible. Curing cannot be rushed beyond what the coating chemistry allows. Packing has to protect the dimensional face from dents, blocking, liner marks, and scuffing during shipment.
Material, Adhesive, and Finish Choices That Matter
The base material is the foundation. White vinyl is the common workhorse because it prints cleanly, hides the product surface, and handles mild curves better than many rigid films. Clear vinyl is useful for glass, acrylic, and “no-label” effects, but it often needs white ink behind the artwork so colors do not vanish against a dark bottle, amber jar, or colored liquid.
Metallic films add shine under the raised coating. They can look excellent on seals, limited editions, and luxury retail packaging, but they are unforgiving when the design is cluttered. Polyester is often chosen for tougher labels, warranty badges, tech accessories, and long-life product packaging because it offers better dimensional stability than basic paper stocks.
Adhesive choice deserves more attention than it usually gets. Permanent adhesive works for long-term branding on smooth glass, coated paperboard, metal, and many rigid plastics. Removable adhesive fits temporary campaigns, event use, and promotional applications where residue would cause problems. Stronger or more specialized adhesives may be needed for textured surfaces, powder-coated metal, low-energy plastics such as polyethylene or polypropylene, or slightly curved containers.
The surface decides a lot. Coatings, oils, mold-release agents, cold temperatures, and moisture can all weaken adhesion. Dwell time matters too: many pressure-sensitive adhesives build bond strength after application rather than instantly at full strength. A sticker that seems easy to peel after five minutes may be much more secure after 24 to 72 hours.
Finishes change the feel. A gloss dome gives the richest lens effect and often makes dark colors appear deeper. Matte base film under a gloss dome creates contrast, especially on minimalist packaging. Clear-on-clear effects can look sharp on glass, but only if the design has enough contrast to remain readable. Metallic backgrounds under clear doming can feel premium, although tiny type may suffer because light bounces through the coating.
Design geometry has limits. Tiny type below roughly 5 pt, sharp inside corners, hairline strokes, and narrow gaps can be difficult to dome cleanly because the coating needs enough surface area to hold shape. Raised UV can handle finer details than full doming in many cases, but it still has limits around varnish height, registration, and ink spread.
Indoor or outdoor use should guide the full construction, not just the top coating. Sunlight, water exposure, hand oils, abrasion, cold storage, and cleaning chemicals all affect performance. For packaged goods moving through parcel networks, buyers may also want to review distribution testing concepts from ISTA, especially if the raised label sits on an exposed corner or presentation face.
| Option | Best Use | Typical Consideration |
|---|---|---|
| White vinyl with gloss dome | Logos, badges, bottle labels, candle lids | Good opacity and strong color; common premium choice |
| Clear vinyl with white ink | Glass jars, clear boxes, acrylic products | Needs white backing for readable color on dark contents |
| Metallic film with raised coating | Limited editions, seals, luxury retail packaging | High visual impact; works best with restrained artwork |
| Polyester with permanent adhesive | Warranty badges, equipment labels, tech accessories | Better dimensional stability and durability than basic paper stocks |
Cost, Pricing, and MOQ Factors to Budget For
Raised sticker pricing is driven by finished size, shape, quantity, base material, print coverage, coating type, supply format, and artwork complexity. A 1-inch round domed logo sticker is a very different job from a 3-inch metallic die-cut badge with small islands of raised UV detail.
Custom raised stickers cost more than flat stickers because the job carries extra setup, slower handling, coating application, curing time, tighter quality checks, and more careful packing. Flat vinyl stickers can often be stacked and boxed soon after printing and cutting. Domed stickers need time for the resin to settle and harden before they can be packed without damage.
MOQ is mostly about setup efficiency. A test run of 100 pieces can be useful, but the unit cost may be high because file prep, proofing, print setup, cutting setup, and coating setup are spread across very few stickers. At 500, 1,000, or 5,000 pieces, the unit price usually becomes more comfortable if the size and construction stay the same.
As a broad planning range, small raised logo decals may land around $0.45 to $1.20 each at low quantities. Higher-volume simple shapes can sometimes fall into the $0.18 to $0.40 range. Larger decals, metallic films, unusual adhesives, outdoor-rated constructions, tight registration, or complex die cuts can push the price higher. Square inch estimates help, but they do not replace a real quote.
Send complete information the first time if you want useful pricing. Include finished size, quantity, shape, material preference, adhesive needs, indoor or outdoor use, artwork file, supply format, application method, and delivery date. If you are also sourcing Custom Labels & Tags or matching the sticker to Custom Printed Boxes, mention that early so color and finish expectations line up.
There are practical ways to control cost without weakening the brand effect. Reduce the sticker size slightly. Use a standard circle, oval, rectangle, or rounded rectangle. Raise only the logo mark instead of the entire graphic. Order a quantity that gets beyond the worst setup cost. Choose proven white vinyl or clear vinyl unless a specialty film is part of the selling point.
Artwork Setup for Clean Edges and Strong Raised Detail
Good artwork prevents most production problems. Vector PDF, AI, or EPS files are preferred for logos, cut lines, and raised coating layers because they keep edges clean at any size. High-resolution PNG or TIFF files can work for photographic art or when vector files do not exist, but they are not ideal for cut paths, small type, or precise raised areas.
A production-ready file usually needs more than the visible artwork. Bleed extends the design beyond the cut edge, commonly 1.5 mm to 3 mm depending on the process. Safe area keeps text and important details away from the cut line. The cut line tells the printer where the sticker shape ends. A white ink layer shows where opaque white should print behind color on clear or metallic films. A raised layer identifies exactly where the dome or UV texture should sit.
For dimensional detail, restraint wins. Avoid very thin raised strokes, leave space between raised elements, and choose one or two focal points. A logo mark, badge border, product name, or seal usually reads better than a fully raised block of text.
Clear doming changes color behavior. Gloss can deepen black, navy, burgundy, and forest green. It can also create a lens effect that makes metallic or dark backgrounds feel richer. The tradeoff: small light text under a thick glossy dome can lose crispness because reflections compete with the printed detail.
Proof approval should not be treated as a rubber stamp. Confirm finished size, cut shape, raised area, spelling, color expectations, material, adhesive, and supply format. If the stickers are going onto a packing line, confirm whether they arrive on rolls, sheets, or as singles. Application speed and labor cost can change quickly.
Timeline, Proofing, and Turnaround Expectations
A realistic timeline starts before production. First comes the quote request, then artwork check, digital proof, approval, production scheduling, printing, cutting, coating, curing, inspection, packing, and shipping. For many standard raised decal jobs, production may take about 10 to 18 business days after proof approval. Complex jobs, larger quantities, specialty materials, or sample rounds can add time.
The most common delays happen before the job reaches the press. Missing artwork, unclear sizing, unconfirmed quantities, and slow proof approvals can add several days without any material being ordered or printed. If a launch date is firm, appoint one person to approve the proof and make sure that person checks spelling, dimensions, and color expectations carefully.
Curing and packing cannot always be compressed. Resin needs time to level, release bubbles, and harden enough for handling. If stickers are stacked too early, the dome can mark, flatten, or pick up liner impressions. Raised UV is faster in some workflows, but it still needs proper curing and inspection, especially when the varnish layer is thick or highly selective.
Samples are smart for Premium Retail Packaging, outdoor exposure, unusual substrates, or color-critical brand work. A pre-production proof can reveal whether the adhesive likes the actual jar coating, whether the sticker lifts on a tight bottle radius, or whether the raised layer makes a logo feel too heavy. That small check is cheaper than discovering the issue after several thousand pieces arrive.
Plan backward from the date the finished goods must leave your facility, not just the date the stickers ship. Build in freight time, receiving time, application labor, and a small inspection buffer. Also confirm whether the quoted lead time begins after quote approval, artwork approval, or final proof approval. Those are not always the same milestone.
Common Mistakes That Make Raised Decals Look Cheap
Overcomplicated artwork is the mistake that appears most often in raised sticker planning. Tiny details, thin outlines, tight script lettering, and cramped secondary copy may look fine on a screen at 400 percent zoom. The finished decal is judged at hand distance. If the raised coating cannot hold a clean edge, the premium effect turns into visual noise.
The wrong adhesive can ruin an otherwise strong sticker. Edge lift, curling, and early failure usually trace back to the application surface rather than the print quality. Powder-coated metal, textured plastic, uncoated paperboard, chilled bottles, oily surfaces, and flexible pouches all create different adhesion challenges. Test on the real product surface whenever possible.
Package geometry matters too. A thick raised sticker may not behave well over a tight curve, seam, squeeze zone, or flexible pouch panel. On cylindrical bottles and tubes, smaller decals with rounded corners usually perform better than large rigid shapes. For squeeze bottles, flexible labels may be safer unless the raised sticker sits in a low-flex area.
Ordering by the lowest unit price alone can backfire. A cheaper material may save a few cents per piece, but the savings disappear if the sticker scuffs during fulfillment, lifts on the shelf, or feels mismatched with the rest of the packaging. Durability, application labor, packing method, and retail handling belong in the decision.
Inspect samples the way a shopper would. Check edge clarity, dome consistency, trapped bubbles, color accuracy, cut alignment, and adhesive performance. Apply a few samples, wait 24 to 72 hours, then rub, flex, chill, warm, or clean them in the way the product will actually be handled. For sustainability claims or paper-based packaging programs, buyers may also want to understand sourcing and certification language from groups such as FSC.
Next Steps Before You Request a Raised Sticker Quote
Before asking for pricing, gather the basics. Choose the application surface, measure the available space, decide whether indoor or outdoor durability is needed, and collect the best brand files you have. If the sticker has to match other Custom Packaging Products, include photos or specifications for those items too.
Narrow the design to one strong raised focal point. The logo mark, product name, seal, badge, or premium detail should carry the texture. Raising every line, icon, and word usually makes the sticker harder to produce and harder to read. Strong package branding often comes from one confident detail, not ten competing effects.
Test fit before committing. Print a paper mockup at actual size, cut it out, and place it on the jar, bottle, tube, box, or mailer. This low-tech step catches more problems than expected: curves that are tighter than the dieline suggested, panels that flex, caps that interfere, or labels that compete visually with the raised badge.
Send production context with the quote request. Include photos of the product surface, target quantity, preferred format, deadline, application method, and any compliance or retail handling requirements. If the sticker will face moisture, sunlight, refrigeration, abrasion, or cleaning chemicals, say so before the material is chosen.
Custom raised stickers work best when the specs are clear before production starts: finished size, quantity, shape, material, adhesive, raised coating style, artwork file, application surface, durability needs, supply format, and delivery date. Bring those details to your packaging manufacturer early. The quote will be cleaner, the proof will be more useful, and the finished decal will look like a deliberate packaging choice rather than an afterthought.
FAQs
Are raised logo stickers the same as domed stickers?
Often, but not always. Domed stickers usually use a clear resin or polyurethane coating that forms a rounded, lens-like surface. Raised logo stickers can also be made with raised UV varnish or other dimensional finishes, which may create a flatter and more selective texture.
Can custom dimensional stickers be used outdoors?
Yes, if the base film, ink system, adhesive, and raised coating are specified for outdoor exposure. Confirm sunlight, moisture, temperature changes, abrasion, and cleaning chemicals before ordering, because outdoor performance depends on the full construction.
What artwork works best for custom raised decals?
Simple logos, bold icons, badges, seals, and clean lettering usually work best because the raised coating needs enough area to form clean edges. Vector artwork with a clear cut line and a clearly marked raised layer helps prevent proofing delays.
How much do custom raised stickers cost compared with flat stickers?
They usually cost more than flat stickers because they require extra setup, coating application, curing time, inspection, and protective packing. Final price depends on size, quantity, material, adhesive, coating style, shape complexity, and whether the stickers are supplied on sheets, rolls, or as individual pieces.
How long does raised sticker production usually take?
Turnaround depends on artwork readiness, proof approval, quantity, coating type, curing requirements, and shipping method. Many standard jobs fall around 10 to 18 business days after proof approval, but specialty materials, samples, and larger runs can extend the schedule.


