A phone photo can look bright, clean, and full of life on screen, then print too dark, soft, or grainy once it becomes a sticker. That catches a lot of first-time buyers ordering Custom Stickers of Pictures. Screens emit light. Printed vinyl, paper, or film reflects whatever light is in the room. Different physics, different result.
Photo stickers are not difficult. They just punish guesswork. A good order connects the image file, adhesive stock, finish, cut shape, size, quantity, and application surface. Skip one of those details and the sticker may still arrive on time, but it may not look or behave the way you expected.
What Custom Stickers of Pictures Really Are
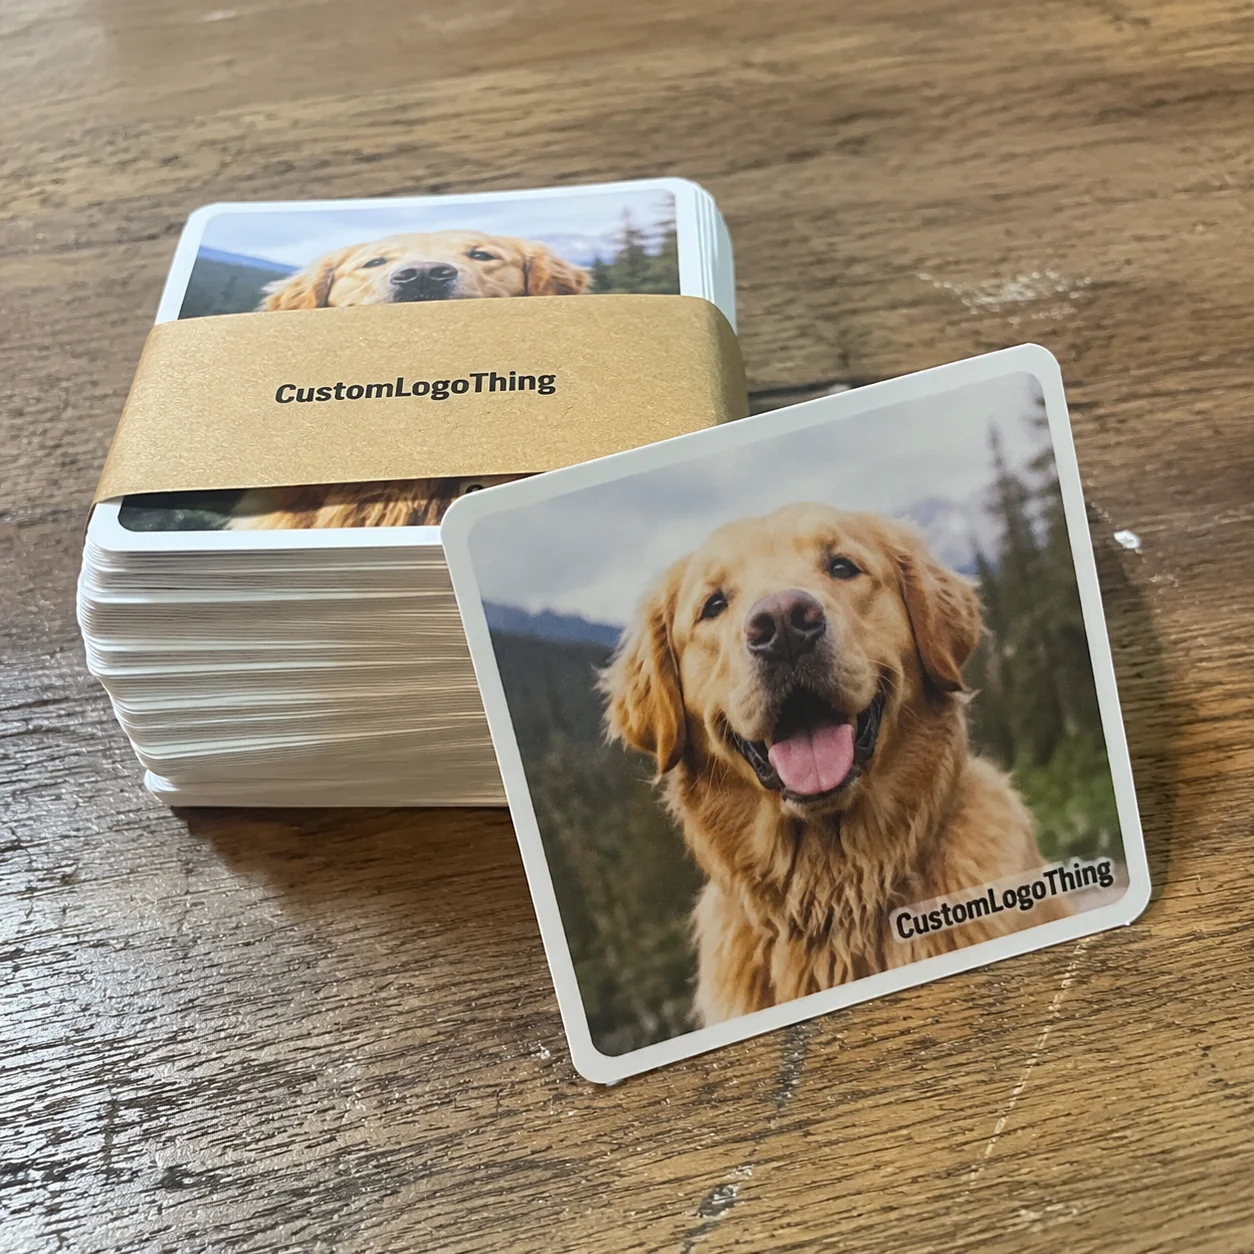
Custom stickers of pictures are adhesive labels or decals printed from photo-based artwork. The image might be a pet portrait, product shot, wedding picture, team photo, branded lifestyle image, customer-submitted design, or artwork that started as a photo. In production terms, the job is close to label printing: check the file, prepare the layout, add bleed and cut lines, print on adhesive material, finish the surface, cut the shape, then pack it for shipping or application.
Buyers use “sticker” for formats that are not identical. A photo sticker puts the image itself at the center. A logo sticker depends more on flat color and clean vector artwork. A die-cut decal follows a custom outer shape, such as the outline of a dog, product, camera, or mascot. A kiss-cut sticker is cut through the face material but left on a larger backing sheet, which makes peeling easier. A roll label is supplied on a roll for faster hand application or machine application. A packaging seal is usually simpler: a circle, rectangle, oval, or short custom shape used to close tissue, boxes, bags, mailers, or wraps.
Format matters because the same picture can have very different jobs. A 2-inch circle on a bakery box needs quick recognition. A 4-inch laptop decal can hold more detail. A small sticker sheet for planners needs tidy spacing and easy peeling. A roll label for product packaging may need a specific unwind direction, core size, label gap, and liner type if it will be applied by machine. Cute artwork does not fix a roll wound the wrong way. Annoying, but true.
Common uses include thank-you stickers, packaging inserts, event favors, merch drops, planner stickers, laptop decals, product labels, subscription box extras, promotional handouts, and branded packaging accents. A photo sticker can feel personal in a way a plain logo label does not. Still, the final result depends less on sentiment and more on matching the artwork to the material, finish, and surface.
Practical callout: If a photo has a face, product name, pet expression, or small detail that matters, keep it away from the cut edge. A safe area of at least 0.125 inch inside the trim is a sensible starting point for most small stickers.
How Photo Stickers Are Printed, Finished, and Cut
Most photo stickers are produced with digital printing. It handles short runs, multiple designs, and full-color photo detail without the plate costs tied to traditional print methods. A typical workflow starts with file review. The artwork team checks resolution, size, color mode, bleed, crop, and cut path. Then a proof is created so the buyer can approve scale, border, shape, finish, and image placement before production starts.
After proof approval, the file is managed for CMYK output and printed on adhesive stock. White vinyl is the dependable option for durable color because it gives ink a bright, opaque base. Clear film creates a transparent look, though white ink may be needed behind key photo areas if the image must stay bright. Paper is economical for dry indoor use, such as journals, gift wrap, insert cards, and short-term packaging. Metallic film, holographic film, kraft paper, and textured stocks can add character, but they also change the way skin tones, shadows, and fine details appear.
Finish choice has a large effect on photo appearance. Gloss laminate makes color look richer and deeper, especially on saturated images, food photos, colorful pets, and bright promotional graphics. Matte laminate cuts glare and gives a softer, more restrained presentation. Satin or soft-touch style finishes sit between the two, with less reflection than gloss but more depth than a flat matte surface. For premium retail packaging, that quieter finish can pair well with Custom Labels & Tags or printed insert cards.
Lamination is not only cosmetic. A protective laminate helps guard the printed image against scuffing, fingerprints, moisture, and some UV exposure. That matters for stickers on bottles, mailers, laptops, takeout packaging, coolers, and anything handled repeatedly. For broader packaged-goods testing and distribution stress guidance, the International Safe Transit Association is a useful reference point, especially if stickers are part of a larger shipping or retail presentation.
Cutting comes after printing and finishing. Die-cut stickers follow the final outer shape, so the backing is trimmed to match the sticker. Kiss-cut stickers leave the design on a larger liner, which makes them easier to peel and can protect delicate shapes. Tight crops, faces near the edge, thin outlines, and busy silhouettes are risky unless the layout includes bleed beyond the trim line and enough safe spacing inside it.
File Quality, Color, Size, and Adhesive Choices That Matter
Resolution is where many photo sticker projects either hold up or fall apart. A picture that looks fine on a phone may not have enough pixels for a clean 3-inch or 4-inch sticker, especially if it was downloaded from social media or sent through a messaging app that compressed it. For crisp photo printing, 300 pixels per inch at final size is a common target. A 3-inch square sticker should ideally use an image around 900 by 900 pixels or larger before cropping.
Use the original photo file whenever possible. Avoid screenshots, cropped profile images, and files saved from social platforms. Those versions are usually sharpened, resized, or compressed for screen display, not print. If the picture looks blurry when enlarged on screen, it will usually print soft as a sticker too. Contrast adjustment, sharpening, and light color correction can help. They cannot rebuild detail that is not in the file.
Color expectations need a reality check. Screens display RGB color with light behind the image. Most stickers print with CMYK inks or toner on a reflective surface. Bright blues, neon greens, deep reds, and shadow detail can shift. Material changes color too. Gloss white vinyl usually gives stronger contrast than uncoated paper. Clear film lets the surface underneath influence the picture. Kraft or metallic stocks can mute or tint the image unless white ink is used as an underbase.
Size should follow the image, not just the budget. Small stickers need simple compositions. A pet face, single product, or bold logo-photo hybrid can work well at 1.5 to 2 inches. Group photos, lifestyle shots, detailed portraits, and images with small text usually need 3 inches or more to stay readable. Buyers often choose the smallest size first, then wonder why the photo lost impact. There’s the trap.
Adhesive matters as much as print quality. Permanent adhesive works for most packaging, merch, notebooks, mailers, and product labels. Removable adhesive is better for temporary promotions, price labels, window use, or short-term event items where residue would be a problem. Stronger adhesives may be needed for textured mailers, recycled board, chilled bottles, powder-coated surfaces, or containers handled by many people. Low temperatures, moisture, dust, oil, and textured surfaces can weaken the bond.
| Sticker Choice | Best Use | Typical Consideration |
|---|---|---|
| White vinyl with gloss laminate | Durable photo decals, bottles, laptops, merch | Strong color, higher glare under bright light |
| White vinyl with matte laminate | Premium packaging, portraits, product photos | Less glare, slightly softer color depth |
| Paper sticker stock | Gift wrap, journals, dry indoor inserts | Lower cost, limited moisture resistance |
| Clear film | Transparent effects, glass, clear boxes | May need white ink for bright photo areas |
| Kiss-cut backing | Handouts, sticker sheets, delicate shapes | Easier peeling, larger liner area |
Shape is the last part of the file puzzle. Circles, squares, rounded rectangles, and ovals are efficient, clean, and easy to apply straight. Custom die-cut outlines feel more premium and can strengthen package branding, but they need simplified contours and a border wide enough to tolerate normal cutting variation. Very dark photos, low-contrast scenes, tiny text, and busy backgrounds often need editing before they make strong picture stickers.
Process, Timeline, and Lead Time From Photo to Sticker
A clean order starts with clear specs. Submit the photo or artwork, final size, shape, quantity, material preference, finish, deadline, and shipping location. If the sticker must go on a specific surface, say so. A glossy mailer, kraft box, chilled glass bottle, reusable plastic container, and coated retail carton may all need different adhesive decisions even if the artwork is identical.
The proofing stage is the buyer’s best checkpoint. Review the proof for size, shape, image placement, crop, border color, cut line, finish, and quantity. If there are several images, confirm the quantity for each design. An order of 1,000 stickers split across 10 pet photos is not the same production setup as 1,000 copies of one design. Each version may need separate layout, proofing, cutting, sorting, or packing.
Typical production time depends on quantity, stock availability, lamination, cutting complexity, and packing format. Small digital orders may move faster after proof approval. Larger runs, specialty films, complex die-cuts, roll labels, or multi-design orders take more handling. A reasonable planning range for many custom sticker orders is about 5 to 10 business days after proof approval, with shipping time added separately. Rush service may be available, but it can narrow material choices and raise cost.
Several things slow orders down. Low-resolution files require back-and-forth. Missing dimensions pause quoting. Multiple artwork versions need organized names. Complex cut paths take more setup than circles. Late proof approvals shift the production start. Special adhesives or laminates may need sourcing time. None of this is strange. It just needs to be planned before an event date, launch, or retail delivery turns into a deadline circus.
If the sticker is part of packaging, test the size before ordering the full run. Print the proof at actual size on a desktop printer, cut it out roughly, and place it on the box, pouch, jar, insert card, mailer, or bag. A 2.5-inch sticker may feel perfect on screen and too large on a 4-inch candle jar. Or it may disappear on a large shipper. Packaging design lives and dies by scale.
Cost, Pricing, MOQ, and What Changes Unit Cost
Sticker pricing is built from practical variables: size, quantity, material, finish, shape, number of designs, adhesive type, lamination, proofing, cutting method, and packing format. A simple 2-inch paper circle for dry packaging will not price like a 3.5-inch waterproof laminated vinyl photo decal with a detailed die-cut outline. Different material. Different finishing. Different cutting time.
Larger quantities usually lower the unit cost because setup, proofing, file prep, press handling, and packing are spread across more pieces. That does not mean the lowest unit price is always the smartest buy. If you are testing a new photo Design for Retail packaging or a merch drop, a smaller run can reduce waste and give you real customer feedback before you commit to a larger order.
As a broad planning example, small custom batches often cost more per piece because setup and handling are concentrated into fewer units. Larger standard-shape runs, especially with one artwork file, usually become much more efficient. Exact pricing depends on supplier equipment, material market, finishing method, shipping requirements, and how the stickers are packed. Treat any estimate as a planning tool, not a quote carved into stone.
| Order Scenario | Common Specs | Typical Cost Driver |
|---|---|---|
| Small test batch | 50–250 pieces, one or several photos | Setup and proofing spread over fewer stickers |
| Packaging run | 500–5,000 pieces, standard shape | Material, lamination, and application format |
| Merch-quality decal | Vinyl, laminate, die-cut shape | Durability, finish, and cut complexity |
| Multi-design order | Several photo versions in one batch | Separate proofs, sorting, and quantity control |
MOQ, or minimum order quantity, depends on the production method. Digital printing is friendly to smaller batches and testing. Larger runs become more efficient for product packaging, promotional programs, or retail-ready campaigns where the design is stable. Roll labels may have different minimums than sheeted stickers because setup, rewind direction, core handling, and liner control are part of the job.
Multiple designs can change the price even if the total quantity stays the same. Ten photos at 100 pieces each can require more file handling than one photo at 1,000 pieces. If each image has its own crop, proof, cut line, or packing count, that labor has to be included. A simple file naming system, such as “dog-sticker-2in-qty100” or “launch-photo-a-qty250,” helps prevent mix-ups. Boring? Yes. Useful? Also yes.
For an accurate quote, provide exact dimensions, quantity, material preference, finish, cut style, number of designs, deadline, and intended use. If the sticker supports a larger branded packaging program, share whether it will pair with Custom Packaging Products, mailers, cartons, jars, bags, or insert cards. Compare total landed cost, not only unit price. Shipping, rush fees, proof revisions, specialty packing, and split shipments can all change the final budget.
Common Mistakes That Make Picture Stickers Disappointing
The most common file mistake is uploading a screenshot, cropped social image, or heavily filtered photo. Filters can crush shadows, oversaturate skin tones, and create artificial sharpness that looks fine on a phone but rough in print. Compression can also create blocky edges around faces, pets, and product details. Start with the original file whenever you can.
Another common issue is placing key details too close to the cut line. Cutting equipment is accurate, but every production method has tolerance. If a face, pet ear, product corner, or logo edge sits right on the trim, a tiny shift can make the finished sticker look off. Extra bleed outside the cut and safe spacing inside the cut are cheap insurance.
Tiny text over photos is risky. On a 1.5-inch sticker, even clean type can become hard to read after printing and cutting, especially over a busy background. If text matters, simplify the photo behind it, increase contrast, or use a larger sticker. For package branding, a separate logo label may do the text job better than forcing every detail into one small photo sticker.
Finish mismatches also cause disappointment. Gloss can look bright and fun, but it may glare under event lights or retail shelving. Matte looks refined, but it can soften the punch of a colorful image. Paper feels warm and economical, but it is usually the wrong choice for moisture, chilled bottles, coolers, or handled takeout packaging. For broader sustainability decisions, the EPA’s sustainable materials management resources are useful, though sticker durability still depends on the exact construction.
Adhesive mistakes are less visible until the sticker fails. A standard indoor adhesive may lift from textured recycled mailers, low-energy plastics, cold containers, or surfaces with dust, oil, or condensation. Surface testing is worth doing for retail packaging, reusable containers, outdoor use, and semi-outdoor use. Apply a sample, wait, handle it, chill it if needed, and check the edges. The first failure point is usually an edge starting to curl.
Skipping proof review can lock in avoidable problems: wrong scale, unexpected cropping, incorrect border color, a shape that fights the photo, or a design split that does not match the quantities. If color accuracy, packaging fit, or customer presentation is especially important, order a small test batch before the full run. It costs more per piece, but it can prevent a larger mistake.
Next Steps Before You Order Photo Stickers
Start with purpose. Is the sticker a giveaway, product label, packaging seal, merch item, insert bonus, or decorative planner sticker? Purpose drives every other choice: size, shape, material, finish, adhesive, quantity, and artwork version. A laptop decal needs different durability than a paper thank-you sticker used inside tissue-wrapped orders.
Gather the original photo file, target dimensions, preferred shape, quantity range, deadline, shipping location, and surface details before asking for a quote. If the sticker goes on a box, bag, jar, pouch, bottle, or insert card, measure the available space instead of guessing. For Custom Printed Boxes or coordinated product packaging, even a half-inch difference can change the visual balance.
Before approving the proof, check three things. First, is the photo sharp at final print size? Second, are faces, pets, product edges, and text inside the safe area? Third, does the finish suit the environment where the sticker will be seen and handled? These checks take a few minutes and catch most buyer-side issues before production starts.
If you are ordering several custom stickers of pictures, use clear file names and provide quantities for each design. Keep revisions labeled so the approved proof does not get confused with an older version. Production teams move faster when order information is clean. Buyers get fewer surprises too, which is the whole point.
Before ordering, place a sample-size printout on the actual product, mailer, laptop, bottle, box, pouch, or insert card to confirm scale and visual impact. That simple test tells you more than a screen preview ever will. Stickers live in the physical world, under real light, on real surfaces, in real hands.
Photo Sticker FAQ
What photo quality do I need for custom picture stickers?
Use the original high-resolution photo whenever possible, not a screenshot or compressed social media download. For sharp results, the image needs enough pixels for the final sticker size, especially if faces, pets, products, or small details are important. If the photo looks blurry when enlarged on screen, it will usually print soft as a sticker too.
Are custom photo stickers waterproof?
They can be water-resistant or waterproof depending on the material and finish. Vinyl or film stickers with protective lamination are much better for bottles, outdoor use, coolers, mailers, or items handled often. Paper photo stickers are usually best for dry indoor uses like journals, gift wrap, inserts, and short-term packaging.
How much do stickers made from pictures cost?
Pricing depends on size, quantity, material, finish, adhesive, shape, number of designs, and whether lamination or specialty cutting is needed. Unit cost usually drops as order quantity increases because setup and production handling are spread across more stickers. The most accurate quote needs dimensions, quantity, material preference, finish, cut style, and intended use.
Can I order custom stickers from several different pictures?
Yes, but each picture may need its own proof, layout, cut line, and quantity count. Multiple designs can affect pricing if they require separate setup, printing, cutting, sorting, or packing. Clearly label each image file and provide the quantity needed for each design to avoid mix-ups.
What is the best finish for photo stickers?
Gloss finish makes colors feel brighter and can work well for bold photos, promotional stickers, and fun merchandise. Matte finish reduces glare and gives portraits, product photos, and premium packaging a softer look. For stickers that will be handled often, a laminated finish helps protect the printed photo from scuffs and moisture.


