Place two similar candle jars, honey tins, or kraft mailers side by side. The one with a small metallic seal often looks more finished before anyone reads the scent, flavor, or brand name. That is the practical appeal of gold Foil Custom Stickers: they signal care, giftability, and higher perceived value without forcing a brand to rebuild the whole box, jar, pouch, or wrap.
A foil sticker might be a simple logo mark on a black label, a round seal on a box flap, a gold border around a boutique product name, or a decorative badge on an event favor. Used well, it supports the package. Used carelessly, it looks busy, fragile, or strangely cheap. The difference usually comes down to material choice, artwork discipline, foil coverage, and how the sticker is expected to perform after it leaves the press.
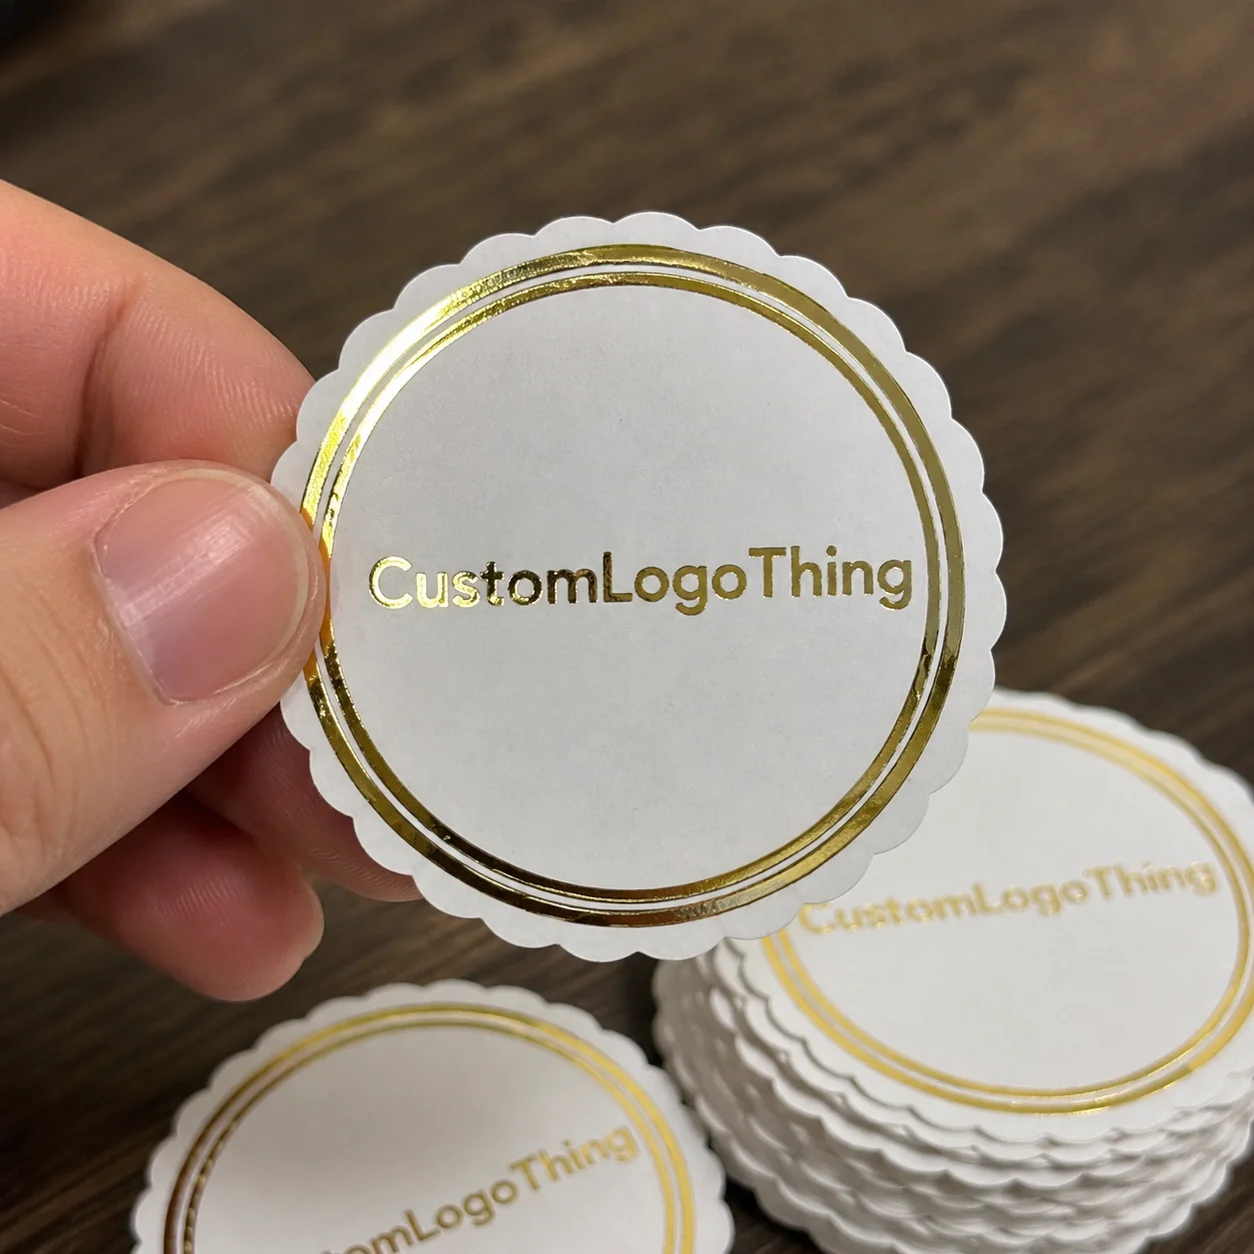
What Gold Foil Custom Stickers Add to a Product
Gold foil custom stickers are pressure-sensitive labels or decals with a metallic gold effect applied to selected areas, or less often, across the full sticker face. The construction looks simple from the outside. In production, several things have to cooperate: face stock, adhesive, ink holdout, foil transfer, die-cutting, liner release, and application behavior.
The metallic area can be a logo, monogram, border, seal, product name, icon, pattern accent, or full background. For branded packaging, foil usually works best as a controlled highlight. A 20 mm gold seal on a folding carton closure can do more for a premium impression than covering half the front panel in shine. The eye needs somewhere to land.
There are several ways to create a gold effect, and they do not behave alike. Real foil stamping uses heat, pressure, and a die to transfer a thin metallic foil onto the sticker surface. It tends to produce a crisp, bright flash, especially on smooth stocks. Cold foil transfer uses adhesive and pressure rather than a heated die, which can suit certain inline print runs. Metallic films, such as gold BOPP or PET, start with a reflective face stock, then inks are printed over or around that surface. Printed gold ink is different again; it can look warm and attractive, but it rarely has the mirror-like pop of foil.
That distinction matters. A buyer expecting a sharp champagne flash may be disappointed by flat metallic ink. Another buyer may prefer the softer look of printed gold on kraft paper. Neither option is automatically better. The right choice depends on the product, surface, budget, and brand style.
Common uses include cosmetics, candles, gourmet foods, stationery, boutique retail packaging, certificates, wine and spirits add-ons, event favors, subscription boxes, and limited-edition product drops. Foil also pairs well with Custom Labels & Tags when a brand needs a main information label plus a separate premium seal.
Practical rule: foil should earn attention. If every line, border, icon, and background element shines, the premium effect gets diluted fast.
How the Foil Effect Works on Sticker Materials
A typical sticker is built in layers. From top to bottom, it may include a protective laminate or coating, printed inks, a foil layer or metallic film surface, the face stock, pressure-sensitive adhesive, and a release liner. On roll labels, the liner and release value matter because labels need to dispense cleanly by hand or through a labeling machine. On sheets and individually cut decals, the liner still affects peeling, packing, and the first handling experience.
Hot foil stamping is the classic method many buyers picture. A metal die presses foil onto the printed sheet or roll using heat and pressure. Setup cost is higher because the die and press calibration take time, but the finish can be beautifully crisp. Cold foil can be more efficient in some production layouts because the foil adheres to a printed adhesive area. Digital foil embellishment can reduce tooling needs for shorter runs, although it has limits for coverage, substrate compatibility, and edge sharpness. Metallic BOPP or PET film is often the better route when the whole label needs a metallic base rather than isolated foil hits.
Material selection is where many sticker projects either settle into place or start to fail. White paper works well for dry indoor packaging and has an approachable cost. Kraft paper gives a handmade look but absorbs more visually, so fine metallic details may feel softer. Clear film can create a clean “no-label” look on glass or plastic, but the foil layer and white ink backing need careful planning. White BOPP is a reliable choice for water-resistant product labels, especially on cosmetics, bath products, chilled foods, and beverages. PET is often chosen when extra dimensional stability, clarity, or durability is needed.
Finish changes the way the foil reads. Gloss laminate usually gives the strongest reflective punch. Matte laminate softens the sticker and makes gold feel more restrained. Soft-touch laminate creates a useful tactile contrast, especially with raised or bright foil, though it adds cost and can show scuffs on darker colors. Unlaminated paper feels natural and tactile, but it is a poor choice for moisture, oils, abrasion, or constant handling.
Adhesive deserves as much attention as the face material. Permanent adhesive is standard for most product labels. Removable adhesive helps with promotions, temporary seals, and reusable containers, but it may not hold as aggressively on difficult surfaces. Freezer-grade adhesive is designed for cold application or cold storage, depending on the exact specification. High-tack adhesive helps with textured, low-energy, or slightly curved surfaces, although no adhesive can fully overcome dust, oil, condensation, or a poor container fit.
Design Specs That Make Metallic Sticker Artwork Print Cleanly
Metallic artwork needs discipline. Thin hairlines, tiny serif type, delicate script loops, and dense ornamental patterns may look elegant on a monitor, then fill in, break up, or show slight registration movement on press. Foil areas should be built from clean vector shapes with enough line weight and spacing to survive production. For many jobs, foil strokes should be at least 0.25 mm to 0.3 mm, with larger minimums for textured stocks or rough paper.
Use foil on the parts that deserve focus: logos, borders, monograms, badges, product names, icons, and pattern accents. Avoid putting foil on small legal copy, dense ingredient panels, nutrition information, barcode quiet zones, or QR codes. Functional information needs strong contrast and predictable readability. Foil reflects light unevenly by nature, so it is not the safest carrier for data that must scan or be read quickly.
Color pairing can make the same gold look expensive or dull. Black, deep green, navy, burgundy, warm ivory, and clean white often pair well with gold because they give the metallic area contrast. Yellow-orange backgrounds can swallow the foil visually, especially under warm retail lighting. Pale tan kraft can look excellent with gold, but the result is usually rustic-luxury rather than crisp-luxury. That may be perfect for soap, coffee, tea, or small-batch foods, and less suitable for a sharp cosmetic or tech accessory brand.
Shape and size should come from the application surface, not just the design file. Circles work well for seals and box closures because they hide slight rotation during hand application. Rectangles and rounded rectangles fit jars, bottles, pouches, and cartons. Ovals feel natural on cosmetics and specialty foods. Custom die-cuts can strengthen package branding, though sharp points, narrow bridges, and thin protrusions may lift or tear during handling.
Roll labels are best for regular product labeling, especially if hundreds or thousands of units need to be applied. Sheets are convenient for short runs, testing, and small-batch packing tables. Individually cut stickers work for inserts, giveaways, retail add-ons, and event kits. If the sticker will be machine-applied, confirm unwind direction, roll core size, gap, label pitch, and liner type before production.
Artwork files should usually be vector-based: AI, EPS, or press-ready PDF. Fonts should be outlined. Bleed commonly runs 1.5 mm to 3 mm, depending on the supplier’s template and die-cut tolerance. Safe zones should keep live text and foil details away from the cut line. The foil layer should be separated and clearly named, such as “FOIL GOLD,” with a spot color or separate plate indicator so prepress can see exactly what should shine.
Pricing, MOQ, and Unit Cost Factors to Expect
Pricing for gold foil custom stickers depends on more than square inches. The main drivers are sticker size, face material, adhesive, shape, order quantity, number of print colors, foil coverage, finishing method, setup requirements, proofing, packing format, and shipping. A simple 1.5-inch round paper seal on sheets is a very different job from a waterproof die-cut BOPP label with matte laminate, foil logo, machine-application rolls, and tight registration.
Small runs carry a higher unit cost because setup time is spread across fewer pieces. Die-cutting, foil preparation, press setup, test pulls, material waste, and quality checks exist whether the order is 250 stickers or 25,000 stickers. That is why a 250-piece run may feel expensive per label, while a 5,000-piece run often drops into a more comfortable range.
| Format | Best Use | Typical Buying Notes | General Cost Pattern |
|---|---|---|---|
| Sheets | Small batches, testing, hand application | Easy to store and peel at a packing bench; good for 100 to 1,000 pieces | Higher unit cost, lower commitment |
| Rolls | Product labeling and repeat production | Works for hand labeling or machine application; confirm unwind and core size | Better unit cost at mid to high quantities |
| Individually cut | Giveaways, inserts, event favors, retail extras | Great presentation, but trimming and packing add labor | Often costs more than rolls at the same quantity |
As a broad planning range, a simple printed sticker may land well below a foil version at the same quantity. Foil finishing can commonly add 15% to 60% or more depending on coverage and process. For example, 2-inch round foil seals in a moderate run might price around $0.18 to $0.45 per unit, while short-run specialty foil labels can exceed $0.75 to $1.50 each if the stock, die, setup, or finishing is complex. These are planning ranges, not a quote, because every supplier calculates waste, setup, press time, and freight differently.
Foil coverage is a major cost lever. A small logo hit is usually efficient. A full metallic flood, large border, or complex repeating pattern uses more material and demands tighter process control. If the budget is tight, reduce the foil area before reducing the material quality. A clean white BOPP label with a small gold logo will usually beat a cheap paper label overloaded with foil on a bottle that sees moisture.
For an accurate quote, gather the practical details in one message: size, shape, quantity, material preference, indoor or outdoor use, application surface, artwork file, desired finish, delivery deadline, and shipping location. If your foil sticker is part of a larger packaging design program, include the related Custom Packaging Products so the label, box, insert, and shipper do not feel like separate visual systems.
Process and Timeline From Artwork to Finished Stickers
The path from idea to finished stickers is fairly predictable. First, the project details are collected: size, shape, quantity, surface, environment, and desired look. Then artwork is reviewed for resolution, dieline, bleed, foil separation, and text safety. From there, the supplier recommends material and adhesive options, prepares a quote, issues a digital proof, and may suggest a physical sample if the application is risky or the finish is difficult to judge on screen.
After approval, production typically moves through printing, foil application, cutting, quality check, packing, and shipping. A straightforward job on a standard material may move faster. Specialty stocks, custom dies, unusual adhesives, high foil coverage, or roll-label machine requirements can add time. Many custom sticker orders sit in the range of 7 to 15 business days after proof approval, but complex work can take longer. Rush timing depends on material availability and how press-ready the artwork is.
Proofing deserves careful review. A digital proof confirms size, layout, copy, cut line, foil placement, and color intent. It does not fully show metallic reflection, because a screen emits light while foil reflects light. If the exact gold tone, shine level, or tactile result is critical, ask whether a physical proof or production sample is available. It may add cost and several days, but it can prevent a far more expensive reorder.
Common lead time pressure points are easy to predict: late copy changes, unclear foil layers, missing dielines, low-resolution artwork, rush approval without enough review, specialty paper substitutions, or a late switch from hand-applied labels to machine-applied rolls. Machine application is not just a packing preference. It can affect roll direction, label gap, liner strength, corner radius, and adhesive release.
Testing is especially valuable for curved jars, squeezable tubes, chilled containers, oily surfaces, and textured paper packaging. A label that looks perfect flat may wrinkle on a tapered tin or lift at the edges on a tight-radius bottle. For guidance on distribution testing and packaging performance, the International Safe Transit Association is a useful authority, especially for brands shipping fragile retail packaging through parcel networks.
Common Mistakes That Make Foil Stickers Look Cheap
The first mistake is overuse. Foil has power because it is selective. If the logo, border, headline, pattern, icon set, and background all shine at once, the sticker loses hierarchy. Stronger packaging usually has one clear metallic feature supported by quiet space and confident typography.
The second mistake is artwork that is too delicate. Extremely thin foil strokes, tiny serif letters, fragile script fonts, small reversed-out details, and tight ornamental fills can break down during production. A fine-line monogram may be possible on a smooth film with excellent registration, but the same art on textured paper can look broken or muddy. Match the detail level to the material and process.
Poor material matching causes plenty of trouble. Unprotected paper labels on bath products, chilled beverages, oily jars, or frequently handled containers may stain, wrinkle, scuff, or lift. If the product sees moisture, condensation, abrasion, or ingredient oils, use a synthetic stock such as BOPP or PET with the right laminate or coating. For sustainability claims and responsibly sourced paper choices, buyers often review standards and certification language from groups such as the Forest Stewardship Council.
Application mistakes can damage the result even when the printing is clean. Labels applied to dusty, cold, damp, textured, curved, or oily surfaces can develop lifting, tunneling, edge curl, or uneven adhesion. Most pressure-sensitive adhesives prefer a clean, dry surface and moderate application temperature, often around normal room conditions. Firm pressure matters because the adhesive needs contact with the surface, not just a light placement.
Another common issue is choosing the sticker size before testing the container panel. Jars have shoulders. Bottles taper. Tins have seams. Pouches flex. Small cartons may have fold memory near edges. A label that fits the measured width can still wrinkle if it crosses a curve or lands too close to a seam. Before ordering foil stickers in volume, print a paper mockup at actual size, cut it out, and apply it to the real container.
Decoration should not interfere with function. Barcodes need quiet zones and contrast. QR codes need clean edges and enough size for scanning. Nutrition, warning, ingredient, batch, and regulatory copy need readability. Foil around functional information can be attractive, but foil inside functional information is usually risky unless the design has been tested under real lighting and scanning conditions.
Next Steps Before You Order Foil Stickers
Before placing an order, define the sticker’s job. Is it a brand mark, tamper-style seal, product label, gift accent, certificate decal, promotional giveaway, or limited-edition badge? That answer affects material, adhesive, size, shape, and price. A decorative seal on a dry paper box does not need the same construction as a waterproof cosmetic label on a squeezable tube.
- Measure the application area: check width, height, seams, shoulders, radius, taper, and handling points.
- Choose the format: rolls for production labeling, sheets for small batches, singles for inserts or giveaways.
- Decide durability: dry indoor use, water-resistant use, freezer exposure, outdoor handling, or high-abrasion retail use.
- Confirm the surface: glass, plastic, coated paperboard, kraft, metal, pouch film, textured stock, or painted finish.
- Separate the artwork: print layer, foil layer, cut line, bleed, and safe area should be clear before proofing.
A paper mockup is a simple but valuable habit. Print the sticker outline at full size, cut it out, and place it on the actual jar, tin, tube, pouch, or carton. Look at it from shelf distance, not only from 6 inches away. Rotate the container. Check whether the label crosses a curve. Open and close the box flap if the sticker is a seal. For small containers, even 3 mm can change the balance of the design.
If the artwork is not production-ready, ask for prepress help before the quote is finalized. Converting a low-resolution PNG into clean vector art, separating foil layers, adding bleed, or adjusting type size can affect cost and timing. Clear files reduce proof cycles, and fewer proof cycles usually mean faster production.
From a packaging buyer’s point of view, the best quote request is specific but not overcomplicated: quantity, size, shape, material, finish, foil placement, application surface, deadline, shipping location, and whether hand or machine application is involved. If the sticker will coordinate with Custom Printed Boxes, retail packaging, or broader package branding, include photos or dielines from those pieces so the gold tone and visual weight make sense together.
Gold foil custom stickers work best when the shine supports the brand story, the material suits the package, and the order details are clear before production starts. Keep the foil intentional, test the fit on the real container, and give prepress clean artwork; those three habits do more for the finished label than chasing the flashiest finish on the sample sheet.
FAQ
Are gold foil label stickers waterproof?
They can be waterproof if they are made with synthetic materials such as BOPP or PET and protected with the right laminate or coating. Unlaminated paper foil stickers are better for dry, indoor packaging and may stain, wrinkle, or lift when exposed to moisture. For candles, bath products, beverages, or chilled goods, request water-resistant stock and test adhesion on the actual container.
What file format is best for metallic gold sticker artwork?
Vector files such as AI, EPS, or press-ready PDF are usually best because foil areas need crisp edges and scalable shapes. Fonts should be outlined, images should be high resolution, and the foil artwork should be separated on its own clearly named layer. If you only have a PNG or JPG, the artwork may need cleanup or redrawing before production.
Do gold foil custom decals cost more than regular printed stickers?
Yes, they typically cost more because metallic finishing adds material, setup, press control, and extra quality checks. Unit cost depends on size, quantity, foil coverage, material, shape, finish, and whether a custom die or specialty stock is needed. A small logo foil hit on a standard shape is usually more economical than a full-coverage foil design with intricate cuts.
Can gold foil stickers be used on curved bottles or jars?
Yes, but the sticker size, material flexibility, adhesive, and container curve must work together to prevent wrinkles or edge lift. Tall labels on tapered jars or tight-radius bottles may need a shorter height, rounded corners, or a more flexible film stock. Testing a paper mockup and, ideally, a production sample helps catch fit issues before ordering the full run.
How long does it take to make custom gold foil stickers?
Production timing depends on artwork readiness, proof approval, material availability, order quantity, foil method, and finishing format. Many straightforward orders take about 7 to 15 business days after proof approval, while specialty materials, physical samples, custom dies, or rush revisions can change the schedule. If the sticker must fit a new container or use a specialty adhesive, allow extra time for sampling and application testing.


