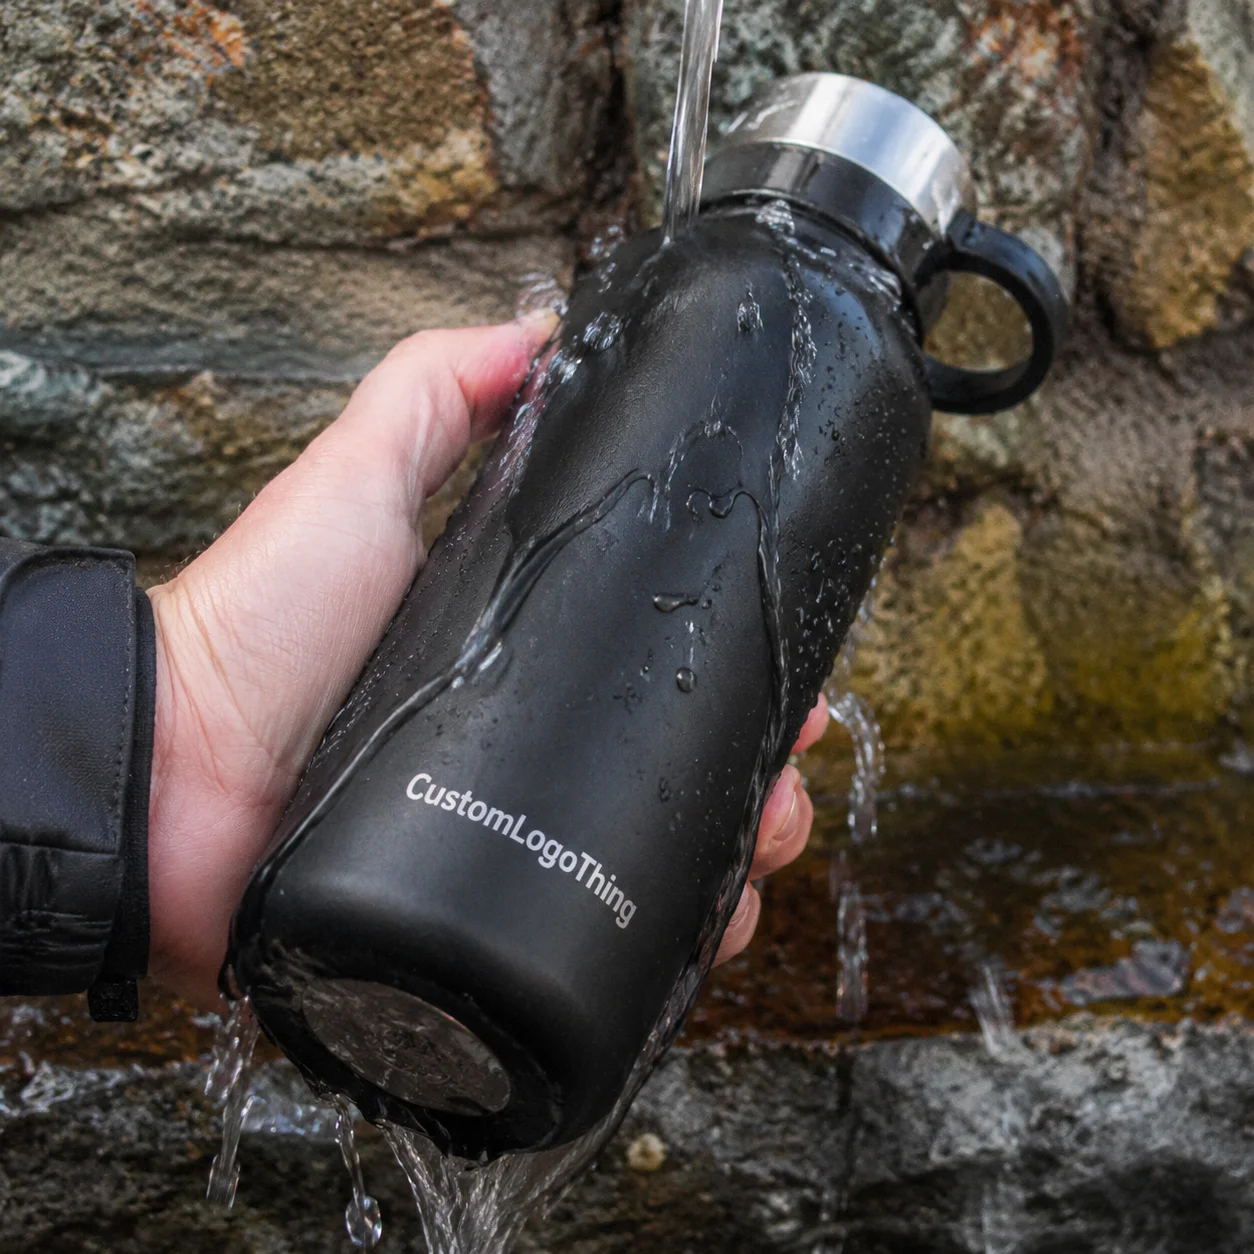
Put the same artwork on two stickers and the finish can shift the whole impression. Gloss throws light back at you and makes color feel brighter. Matte does the opposite. It softens glare, photographs more cleanly, and usually hides fingerprints better, which is why Custom Matte Vinyl Stickers keep turning up on product packaging, laptop decals, bottle labels, mailer inserts, and retail callouts.
At a basic level, these are Printed Vinyl Stickers with pressure-sensitive adhesive on the back and a low-sheen surface on the front. That matte look may come from the face material itself, or from a matte laminate applied after printing. The visual result is similar, but the performance is not always the same. A bare matte face stock for short-term indoor use is a different product from a laminated vinyl decal meant to deal with handling, moisture, and shelf wear.
That distinction matters because matte is often treated as a style choice first and a construction choice second. Buyers see the cleaner finish and stop there. The more useful question is what the sticker has to survive: rubbing in a shipping carton, condensation on a bottle, repeated handling at events, or direct light on a retail shelf. Finish changes the look. Material build changes whether the sticker still looks good a week, a month, or a year later.
Matte also comes with tradeoffs. It usually reads more refined than gloss, but it can slightly mute saturated color and make large dark solids look flatter if the file was prepared for a shiny surface. That is not a flaw. It is simply part of how low-gloss materials handle light.
The rest of the decision is practical: vinyl grade, adhesive, laminate, cut style, size, and the surface receiving the sticker. A good matte sticker feels deliberate because those details were matched to the job. A bad one may still look nice in the proof and then start lifting at the corners once it hits textured paper, low-energy plastic, or a cold bottle line.
Custom Matte Vinyl Stickers: Why the Finish Changes More Than Looks
A matte finish changes how artwork is read. Small text, QR codes, ingredient panels, and short instructions are easier to see under overhead lighting because reflections do not skate across the surface. That alone makes matte a strong fit for packaging labels, branded inserts, and information-heavy decals that need to stay legible in stores, offices, and fulfillment spaces.
It also changes the tone of the piece. Matte tends to feel quieter and more controlled, especially on minimal branding, monochrome designs, soft neutrals, and packaging systems with uncoated or lightly textured materials. On the other hand, bright promotional graphics, neon colors, and cartoon-style merchandise often feel more energetic on gloss because the reflected light adds visual punch.
There is a handling advantage too. Gloss shows smudges quickly, particularly on dark colors. Matte is not immune to scuffing, but fingerprints are usually less obvious. For hand-applied bottle decals, sticker handouts, sample kits, and inserts that pass through several people before they reach the end user, that can make the finished piece look cleaner for longer.
Common uses for custom matte vinyl stickers include:
- Laptop decals and branded giveaway stickers
- Packaging inserts and envelope seals
- Indoor bottle and jar labels
- Retail packaging callout stickers
- Short-run promotional decals and event handouts
Still, matte is not a universal answer. High-abrasion outdoor gear, oily containers, rough mailers, and surfaces that see repeated washing need more than a nice finish. A matte sticker used in those settings should be specified like a functional label, not just a decorative decal.
How Matte Vinyl Stickers Work From Material to Finished Decal
A finished sticker is a stack of layers. The top layer is the face stock, usually a white vinyl film around 2.0 to 4.0 mil thick. Ink sits on that surface. Over the ink there may be a matte laminate film or a matte coating that protects the print and controls the final sheen. Under the face stock sits the adhesive, then the silicone-coated release liner that keeps the piece stable until application.
The matte effect can come from three common approaches:
- Matte face stock, where the vinyl itself has a low-sheen surface
- Matte topcoat or varnish, which alters sheen with modest added protection
- Matte laminate, which usually adds the best scratch and moisture resistance of the three
That last option costs more, but it is often the right choice if the sticker will be rubbed, packed tightly, or exposed to spills and hand oils. A matte topcoat can be fine for lighter-duty indoor use, though it should not be treated as interchangeable with laminate.
Adhesive selection causes more sticker failures than most buyers expect. Permanent acrylic adhesive is standard for product labels, box decals, and stickers intended to stay on for the useful life of the item. Removable adhesive fits temporary signage, event graphics, short-term promotions, and surfaces where residue would be a problem. Some jobs also need specialty adhesive for colder application temperatures, stronger outdoor hold, or surfaces that are harder to bond to.
Printing method matters, but less than people assume for ordinary runs. Digital printing is the workhorse for short and mid-size orders because setup is fast, versioning is simple, and minimums stay manageable. Screen printing still has value for specialized outdoor uses, heavy spot-color work, and some exact color requirements, but it is less common on smaller sticker programs because setup costs rise quickly.
Format shapes how the sticker will be used:
- Die-cut stickers are trimmed to the final shape and delivered individually.
- Kiss-cut stickers are cut through the face stock while the backing remains intact, which makes peeling easier.
- Sticker sheets group several pieces on one liner sheet and often lower both production and packing cost.
Surface compatibility is where production theory meets real life. Smooth glass, painted metal, coated cartons, laptops, and rigid plastic are usually easy. Textured mailers, recycled fiber with dust on the surface, soft-touch coatings, some polyethylene pouches, and certain polypropylene containers are less forgiving. If a surface feels chalky, waxy, or pebbled, test it. A sticker can seem fine on day one and start tunneling or lifting after 24 to 72 hours.
The Specs That Matter: Adhesive, Thickness, Shape, and Surface Use
Thickness affects both feel and flexibility. Vinyl face stock commonly lands around 2.5 to 3.5 mil. Add a 1.0 to 1.5 mil laminate and the total build often reaches roughly 4 to 5 mil, which feels substantial without becoming too stiff for moderate curves. Go too thin and the sticker can feel cheap in the hand. Go too thick on a small radius bottle and the edges may fight the curve.
Adhesive should match the actual environment, not the product photo. A standard permanent acrylic adhesive works well on many indoor surfaces such as coated paperboard, smooth plastic, folders, glass, and cartons. Refrigerated packaging may need an adhesive that tolerates colder application conditions or later condensation. Outdoor decals need UV protection and adhesive that holds through temperature swings. Temporary handouts or window graphics usually benefit from a removable construction.
Shape has a direct effect on yield, cutting speed, and peel experience. Circles, ovals, squares, and rounded rectangles are efficient and easy to handle. Very sharp points, tiny inner cutouts, and narrow projecting tabs can create trouble during cutting and make the sticker annoying to peel. If the user has to dig at the edge with a fingernail, the format has become part of the problem.
Protective finishing deserves more attention than it gets. If the sticker will face water, friction, skin oils, sanitizer, or occasional chemical splashes, ask whether the material stack should include:
- Matte laminate for general scuff and moisture protection
- UV-resistant film for sunlight exposure
- Abrasion-resistant overlaminate for frequent handling
- Chemical-resistant surface treatment for cleaners or cosmetic spills
Artwork behaves differently on matte than on gloss. Fine black text on a light background usually looks excellent because glare is reduced. Large dark fields, subtle gradients, and heavily saturated colors need more care. They can still print well, but they often benefit from a proof review under normal lighting rather than a decision made from an on-screen mockup alone.
Size strategy also affects cost more than many buyers realize. A shift from 3 inches to 3.5 inches can reduce how many pieces fit on a sheet, and that changes unit economics quickly. On some layouts, that half inch means the difference between fitting 12 pieces and fitting 9. Measuring the actual application area first, then pricing a couple of nearby sizes, is usually worth the extra step.
Custom Matte Vinyl Stickers Pricing: What Drives Cost and Unit Cost
Pricing usually follows the same core variables: size, quantity, vinyl type, adhesive, protective finish, cut complexity, number of SKUs, packing method, and shipping speed. If a quote looks unusually low, check what has been left out. The omission is often laminate, but sometimes it is a cheaper adhesive, an unmentioned format change, or vague finishing language that leaves room for substitution later.
For short runs, digital printing keeps entry quantities accessible. Orders of 50, 100, or 250 pieces are common depending on size and format. Unit cost, of course, is highest there. A standard 3 x 3 inch die-cut matte vinyl sticker with matte laminate might land around $0.90 to $1.80 each at 100 pieces, $0.28 to $0.60 each at 1,000 pieces, and $0.12 to $0.30 each at 5,000 pieces. Clear stock, white ink, special adhesive, exact color matching, or individual retail packing can raise those numbers noticeably.
A practical format comparison looks like this:
| Format | Best Use | Typical Cost Level | Notes |
|---|---|---|---|
| Sticker sheets | Small labels, repeated designs, hand application | Lowest | Efficient layout and simpler packing usually keep cost down |
| Individual die-cut | Giveaways, inserts, merch, resale singles | Medium | Good presentation with moderate finishing and counting labor |
| Kiss-cut singles | Easy peeling, detailed shapes | Medium to high | Extra backing area and added finishing can increase cost |
| Retail-ready sticker packs | Merch sets and store displays | Highest | Packing labor often drives the price jump more than printing does |
There are a few reliable quote traps. Proof revisions beyond the first round, custom dies, PMS matching, white ink on clear vinyl, split shipments, and rush handling often sit outside a headline price. Reorders can be another point of confusion if the first job was quoted with one material stack and repeated with another. Consistency matters more than the cheapest first invoice.
For clean comparisons, send the same spec list to every supplier:
- Finished size in inches or millimeters
- Shape and cut style
- White vinyl or clear vinyl
- Matte finish type: laminate or topcoat
- Permanent or removable adhesive
- Indoor, refrigerated, or outdoor use
- Quantity breaks such as 250 / 500 / 1,000 / 5,000
- Singles, sheets, or packed sets
A short, complete specification email usually produces a better quote than a long message that never actually states what needs to be made.
Production Steps, Lead Time, and Turnaround: What the Process Really Looks Like
The production path is straightforward. The timing around it is where expectations tend to drift.
- Quote request
- Artwork review
- Proof creation and approval
- Material and adhesive confirmation
- Print setup
- Printing
- Lamination or matte coating
- Die-cutting or sheet cutting
- Inspection
- Packing and shipping
Most delays are not dramatic. They come from missing vector files, unclear dimensions, late approval, or spec changes after proof signoff. If a 3-inch die-cut circle becomes a 3.5-inch kiss-cut oval with removable adhesive, that is not a small edit. It changes material use, finishing, and sometimes tooling.
Production time and shipping time should always be separated. A lead time of 7 to 10 business days often means production after final proof approval, not door-to-door delivery. Standard domestic shipping may add another 3 to 7 business days. International freight and customs can stretch that further.
For standard digitally printed custom matte vinyl stickers, a realistic production window is often 5 to 10 business days for straightforward jobs and 10 to 15 business days for larger volumes, multiple SKUs, or specialty materials. Holiday bottlenecks, trade show season, and custom color expectations can add time fast.
If the stickers are tied to a launch, a subscription drop, or a broader packaging run, build in buffer time. A late carton of stickers is inconvenient on its own. A stalled packaging line waiting for one decal component is much more expensive.
Simple prep checklist: final size, cut style, adhesive type, surface use, vector artwork, bleed, quantity breaks, packing method, shipping address, and required in-hands date.
For higher-visibility applications, ask what inspection actually covers. Good QC is not just a quick count. It should include cut registration, color consistency within a run, laminate or coating coverage, obvious print defects, and at least basic peel checks on the intended substrate if that was part of the order discussion. Broader packaging teams sometimes use shipping protocols from ISTA to evaluate how packed items hold up in transit. Stickers may be small, but they still affect how the finished pack lands with the customer.
How to Order the Right Stickers Step by Step Without Guessing
Start with the application, not the look. A conference handout sticker and a bottle label can share artwork and still need different material builds.
Step 1: Define the environment
Where will the sticker go, how long should it last, and what will it touch? Water, sunlight, friction, refrigeration, oils, and routine cleaning all narrow the material choice quickly.
Step 2: Lock size, shape, and quantity tiers
Measure the actual panel or object, then compare two or three realistic sizes. Request quantity breaks at the same time. The jump from 500 to 1,000 pieces often changes the unit cost enough to affect the decision.
Step 3: Match the adhesive to the surface
Glass, coated cartons, smooth plastic, and laptops are usually simple. Poly bags, textured mailers, powder-coated bottles, and cold surfaces are less predictable. If the sticker supports a larger packaging system, test it on the exact substrate rather than a close substitute.
Step 4: Prepare artwork for matte printing
Vector files such as AI, EPS, or print-ready PDF are the safest route because they scale cleanly and keep edges sharp. Include bleed, usually 0.125 inch unless instructed otherwise, and keep critical text inside a safe area. Hairline rules, tiny reversed copy, and thin white outlines are all places where minor registration shift becomes visible fast.
Step 5: Review the proof like a production buyer
Check trim alignment, border consistency, barcode readability, logo spacing, and dark color behavior under matte finishing. If the artwork relies on heavy black coverage or subtle tonal transitions, ask how it tends to print on the chosen stock.
Step 6: Request a sample or pilot run for higher-risk uses
If the sticker will face moisture, handling, curved surfaces, or a tricky substrate, a small test run is money well spent. Discovering adhesion failure at 50 pieces is manageable. Discovering it at 5,000 pieces is not.
Step 7: Confirm packing before final approval
Bulk-packed singles, counted bundles, labeled inner bags, and retail-ready packs serve different workflows. If the shipment is going to a 3PL, co-packer, or event site, carton labeling and count accuracy matter more than many teams expect.
Common Mistakes Buyers Make With Matte Stickers
The most common mistake is choosing matte for the look and assuming the rest will work itself out. It will not. A sticker for a dry carton and a sticker for a reusable bottle may both be matte vinyl, but the right adhesive and protective layer can be completely different.
Another routine problem is weak artwork. Low-resolution raster files, missing bleed, hairline rules, and small reversed text are still the classic failure points. Print quality starts with file quality. Matte can reduce glare, but it cannot rescue a poor source file.
Buyers also overestimate what the word vinyl guarantees. Not every vinyl sticker is waterproof, outdoor-rated, or dishwasher-safe. Some are built for short-term indoor promotions. Others are engineered for years of exterior exposure. Ask for the expected performance of the full construction, especially if water, UV exposure, abrasion, or cleaners are part of the job. If environmental standards are being reviewed across a broader packaging program, paper components in the same system may also be checked against resources such as FSC.
Surface testing is skipped far too often. Powder-coated bottles, textured corrugate, recycled mailers, and poly films can all behave differently from smooth glass or rigid plastic. Adhesion issues often appear after a short dwell period, not immediately after application, so a quick peel test in the office is only a starting point.
One more expensive mistake is scaling too soon. A sticker that looked perfect on a monitor may be too large for the panel, too small to peel cleanly, or awkward to apply during packing. Validate the size, the material, and the handling before committing to full volume.
What Are Custom Matte Vinyl Stickers and When Should You Use Them?
Custom matte vinyl stickers are low-glare printed vinyl decals with pressure-sensitive adhesive and a matte surface created either by the face stock or by a matte laminate. They make sense when you want a cleaner, non-shiny look, better readability under bright lighting, and less visible fingerprinting than gloss usually shows. They are especially useful for branded packaging, laptop stickers, bottle labels, envelope seals, and indoor promotional decals. If the application involves moisture, sunlight, abrasion, cold storage, or textured surfaces, the finish is only part of the specification. Adhesive, laminate, and substrate compatibility matter just as much.
Next Steps: Build a Cleaner Quote Request and Test Before You Scale
If an order is coming up, gather the artwork first, define the real use case, measure the application area, and narrow the size options before asking for pricing. That gives the supplier enough information to quote an actual product instead of guessing through half the specification.
Use this quote template:
Need Quote for Custom matte vinyl stickers: size ___, shape ___, die-cut or sheeted ___, white or clear vinyl ___, matte laminate or matte topcoat ___, permanent or removable adhesive ___, indoor/outdoor/refrigerated use ___, quantity breaks ___, packed as singles/sheets/packs ___, in-hands date ___, shipping zip/postal code ___.
Samples help when you are still comparing constructions. A preproduction sample serves a different purpose. It is there to confirm the final build, color, peel behavior, and overall feel before the full run begins.
Price should be compared alongside proof quality, response clarity, lead-time realism, and whether the quote states the exact finish and adhesive. A low number with vague material language often creates more work later than a slightly higher quote with clear specifications.
For most brands, the safest path is a small validation run followed by scale once the sticker proves itself on the real surface and in the actual workflow. That is where matte vinyl performs best: not as a trend choice, but as a well-matched construction doing the job it was built to do.
Are custom matte vinyl stickers waterproof or weatherproof?
They can be, but only if the full construction supports it. Water resistance and outdoor life depend on the vinyl, ink, adhesive, and protective layer. A matte finish alone does not make a sticker weatherproof.
How long do matte vinyl stickers last outdoors?
Outdoor life varies by material grade, laminate, climate, sun exposure, and surface preparation. A laminated outdoor-rated vinyl may last several years, while a basic indoor promotional stock can fail much sooner. Ask for the expected rating of the exact construction being quoted.
Do matte vinyl stickers scratch more easily than glossy stickers?
Unlaminated matte surfaces can show wear sooner than laminated constructions. A matte laminate improves scratch and scuff resistance while keeping the low-glare look. For stickers that will be handled often, laminate is usually the safer choice.
What is the minimum order quantity for custom matte vinyl stickers?
Minimums vary by size, format, and print method. Digital printing often allows runs starting around 50 to 100 pieces, though smaller orders carry a higher unit cost. Request quantity breaks to see where pricing improves.
What artwork files work best for matte sticker printing?
Vector files such as AI, EPS, and print-ready PDF are usually best because they preserve sharp edges and scale cleanly. Include bleed, outlined fonts, and a cut line if requested. If only raster artwork is available, use high resolution at final size and check that small text remains readable.

