A little shimmer can stop a hand before it reaches the next jar, tin, pouch, or candle box. That is the practical value of Custom Sparkle Stickers: they are decorative, yes, but they also work as product labels, seal stickers, promotional decals, limited-edition markers, and premium packaging details.
The hard part is control. Shine should frame the logo, product name, scent, flavor, or buying cue; it should not bury them. Plenty of label concepts look strong on a monitor and then collapse in real life, once reflective stock, tiny type, gloss coating, and a curved bottle start competing with each other. A good sparkle label is not just a pretty surface. It is a small engineered part of the package.
What Custom Sparkle Stickers Are—and Where They Work Best
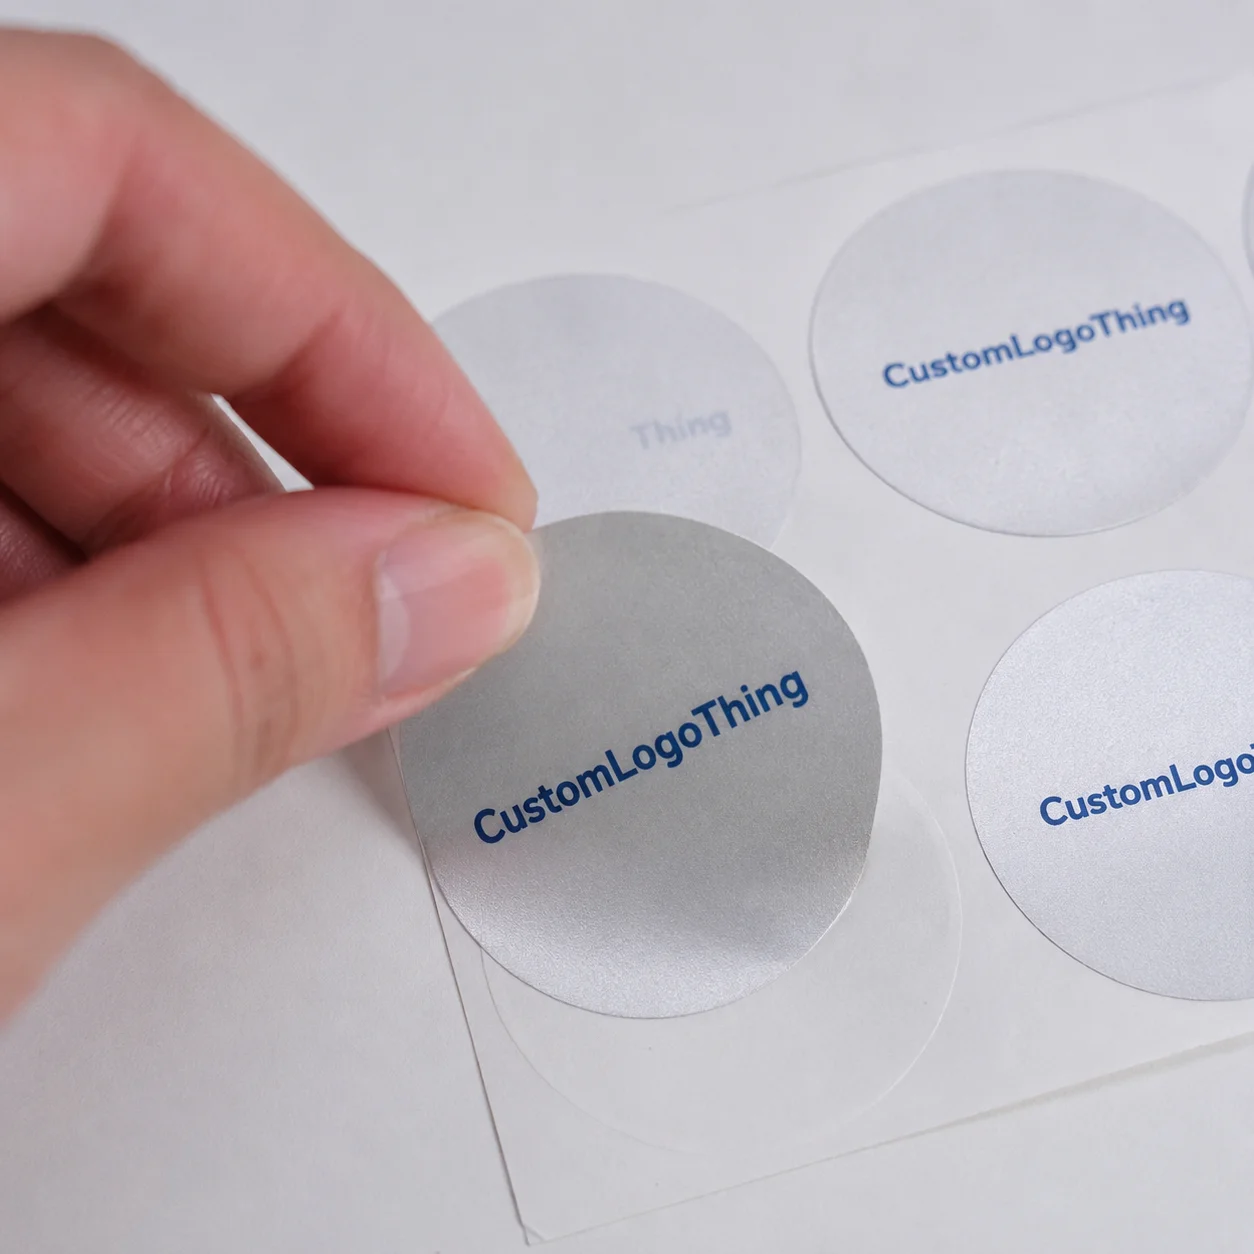
Custom sparkle stickers are printed adhesive labels or decals made with light-catching materials such as glitter vinyl, holographic film, metallic film, pearlescent stock, or clear film paired with a sparkle laminate. Unlike ordinary white paper, white BOPP, or clear film labels, the base construction contributes a visual effect before the ink even lands.
That distinction matters. Sparkle is usually a material effect, not simply an ink effect. The glitter, holographic shift, metallic flash, or satin pearl glow comes from the face stock, foil layer, specialty film, or laminate. Ink handles the controlled information: logo, product name, illustrations, ingredients, warning text, net weight, barcodes, QR codes, and color blocks. In production terms, the material creates the light play; the artwork decides how much of that light gets shown, muted, or shaped into a design feature.
These stickers work especially well on cosmetic jars, lip balm tubes, candle packaging, boutique food items, beverage labels, planner stickers, event merchandise, kids’ products, limited-edition launches, and promotional packaging inserts. A 1.5-inch holographic seal on a mailer can make a plain parcel feel more considered. A 2.75-by-3.5-inch glitter label on a small jar can create shelf impact, provided the product name and required copy stay readable.
There is a ceiling, though. If every square inch sparkles, the eye has no resting place. The logo has to fight the background. For retail packaging, sparkle usually performs better as a border, pattern, badge, burst, logo accent, or controlled background panel. Quiet areas still matter for barcodes, QR codes, batch numbers, scent names, allergens, ingredients, and compliance text.
That is where decorative work turns into functional packaging.
How Sparkle Sticker Materials Create Shine
Not all shine behaves the same way. Glitter vinyl scatters light in small, sharp flashes, which gives a bold and playful effect. Holographic film changes color as the viewing angle changes, often shifting through rainbow tones. Metallic film reflects more like foil, with a cleaner silver, gold, rose-gold, or colored-metal look. Pearlescent stock gives a softer satin glow, usually less loud than glitter and often easier to pair with fine typography.
Clear film with a sparkle laminate is another useful route. It can let the product, package color, or printed background show through while adding a controlled reflective layer on top. Paper-based specialty stocks can work for dry decorative uses, inserts, giveaways, and short-term stickers, but they deserve caution on chilled bottles, bath products, damp surfaces, or packages that will be rubbed during shipping.
Printing method depends on run size, artwork count, and finish expectations. Digital printing is common for short runs, seasonal sets, multiple designs, and test launches because it avoids some tooling costs and usually shortens setup. Flexographic roll-label production can make more sense for larger quantities, especially when labels must be applied by machine. Screen printing or specialty ink options may be used when a heavier decorative effect is required, though both Cost and Lead Time can rise quickly.
White ink is one of the most useful tools on sparkle films. On metallic, clear, or holographic materials, transparent process inks can look darker, more reflective, or less predictable than they do on white stock. A white ink layer under selected areas creates opacity, keeps brand colors closer to the approved artwork, and allows intentional “shine windows” where the base material remains visible.
Finishing changes the result almost as much as the film does. Gloss lamination increases reflection and protects the print. Matte lamination softens glare and can make a sparkle label feel more premium and less flashy. Spot UV coating can add shine only where it is wanted. Die cutting turns a standard rectangle into a contour shape that follows a logo, starburst, seal, or illustrated edge.
Adhesive deserves equal attention. Smooth glass, rigid plastic, coated paperboard, aluminum tins, and flexible pouches all accept pressure-sensitive adhesive differently. A sticker that performs beautifully on a flat candle lid may lift on a squeezable tube or wrinkle on a tight-radius bottle. For broader packaging planning, reviewing related Custom Labels & Tags can help align the label construction with the rest of the product packaging instead of treating it as a loose decoration.
Key Specs That Affect Durability, Color, and Adhesion
A reliable quote or production order should spell out the basics: material type, adhesive strength, finished size, shape, print coverage, finish, roll or sheet format, and whether the sticker is for indoor use, outdoor use, refrigeration, repeated handling, or damp conditions. These details sound routine. They decide whether the finished label looks sharp for five minutes, five months, or the full retail life of the product.
Durability comes from the whole construction. Face stock thickness, ink system, lamination, edge exposure, adhesive chemistry, and application method all affect performance. A 2 mil clear film with gloss laminate behaves differently from a 4 mil glitter vinyl with permanent adhesive. If a label will be rubbed in a shipping carton, chilled in a refrigerator, warmed under shop lights, or handled with damp hands, the spec should account for that reality.
Surface compatibility is a production-floor issue, not a theoretical one. Smooth glass usually labels cleanly if the bottle is dry, clean, and applied at a reasonable temperature. Flexible pouches need an adhesive and label size that tolerate movement. Textured kraft paper reduces contact area, which may require testing or a more aggressive adhesive. Curved bottles need the right width, height, and grain direction so the label does not bridge, wrinkle, or lift along the edges.
Color can shift on sparkle films. Transparent inks allow the reflective base to influence the printed color, which can be attractive for accents but risky for logo standards. A deep teal may become darker over silver metallic film. A warm pink may pick up rainbow movement over holographic stock. White ink backing under the logo, product name, and key color blocks helps preserve brand accuracy, while unbacked areas can be left open for shimmer.
Readability needs space. Fine type, ingredient panels, QR codes, barcodes, warning copy, and regulatory text need quiet zones and contrast. For scannable codes, a non-sparkle panel or a solid white ink block under the code is usually safer, with enough margin around it. ASTM and ISO-style testing conversations focus on performance and measurement; the buyer version is simpler. If a scanner cannot read it and a customer cannot read it, the shine is costing money.
Production callout: Digital proofs are useful for layout, cut line, spelling, dimensions, and placement, but they cannot accurately show reflectivity, sparkle density, or angle-based color movement. For exact brand color or a first order on specialty film, request a physical proof or material swatch before approving the full run.
For shipments that include finished retail goods, packaging teams may also consider transit testing and handling standards. Organizations such as ISTA publish procedures used for packaged-product distribution testing. That field is broader than sticker production alone, but it reinforces the same point: packaging has to survive the path it actually travels.
Cost and Pricing Factors for Sparkle Label Orders
Pricing depends on material, finished size, quantity, print coverage, number of artwork versions, finishing method, die shape, proofing requirements, and whether the order runs on sheets, rolls, or individually cut pieces. A 1-inch round promotional decal is a very different job from a 4-by-6-inch roll label with white ink, gloss laminate, and machine-application orientation.
Sparkle materials often cost more than standard white paper or white vinyl because the films themselves are more expensive. The job may also require white ink layers, slower press settings, tighter registration checks, lamination, and higher waste allowances. Specialty film waste is not cheap. Neither is remaking an order because the artwork did not account for opacity or the adhesive did not suit the package surface.
Unit cost usually drops as quantity increases because setup, artwork checks, press preparation, and tooling are spread across more pieces. As a rough planning range, a small digitally printed sparkle decal may land around $0.20–$0.60 each at lower quantities. Larger roll-label runs can move lower per piece as volume rises. Complex shapes, premium films, laminated finishes, white ink, and multiple SKUs can push that higher. These are planning ranges, not universal prices, because construction drives the quote.
| Option | Best Use | Typical Cost Impact | Buyer Watchout |
|---|---|---|---|
| Glitter vinyl | Bold decals, event merch, kids’ products, playful package accents | Medium to high | Small type can disappear if contrast is weak |
| Holographic film | Limited editions, cosmetics, drink labels, premium seals | Medium to high | Colors shift by viewing angle and lighting |
| Metallic film | Luxury labels, candle packaging, boutique food, gift sets | Medium | White ink may be needed for accurate brand colors |
| Pearlescent stock | Subtle retail packaging, wellness products, soft premium looks | Medium | Effect can be too quiet if artwork is low contrast |
| Paper specialty stock | Dry, short-term decorative stickers and inserts | Low to medium | Usually not ideal for moisture or heavy handling |
Minimum order quantities vary by material, production method, and finishing style. Digital sticker production is often more flexible for testing a product line, running multiple scents, or producing a short event batch. Roll-label production may have higher setup requirements, but it can be the better path for ongoing retail packaging, especially if the labels need to feed through an applicator.
To avoid vague estimates, provide the finished size, shape, quantity, material preference, indoor or outdoor use, packaging surface, number of artwork versions, and deadline. If labels will be machine-applied, include roll direction, unwind direction, core size, and gap requirements if those are already known. For a premium retail product, the extra spend on controlled sparkle, lamination, and adhesive testing can be justified. For a short giveaway, a simpler construction may be enough.
Process and Timeline From Artwork to Finished Stickers
A clean order process follows a steady sequence: define the use case, choose the base material, confirm size and shape, prepare artwork, review the proof, approve production, manufacture the stickers, finish and pack them, then ship. Skipping steps rarely saves time. More often, it moves the problem into production, where fixes are slower and more expensive.
Artwork should be prepared with vector logos when available, high-resolution images at final print size, correct bleed, safe margins, outlined fonts, and a clear cut line. For many stickers, 0.0625 to 0.125 inch of bleed is common, depending on the supplier’s requirements and die-cut style. Keep key type and logos inside the safe margin so normal cutting tolerances do not nip the artwork.
White ink instructions should be plain. A supplier needs to know which areas should print opaque, which areas should let sparkle show through, and whether white ink should sit under the entire design or only under selected art. If the print file uses spot colors for white ink, name them clearly and keep them on a separate layer. That small discipline can prevent a surprising amount of back-and-forth during proofing.
Proofing has limits. A digital proof confirms layout, size, cut line, copy, and print placement. It can catch misspellings, wrong dimensions, incorrect version counts, and barcode placement issues. A physical proof or sample is better for judging reflectivity, opacity, finish, adhesive feel, and color behavior on specialty film. For first-time custom sparkle stickers, a few extra days spent checking the material can prevent a full run that turns out too dark, too busy, or too slick for the surface.
Timeline depends on material availability, custom dies, artwork readiness, number of versions, contour-cut complexity, lamination, roll label orientation, proofing needs, and shipping method. Simple digitally printed sheet stickers may move faster than a laminated roll-label order with white ink and a custom die. Production lead time usually starts after final proof approval, not when the first inquiry is sent. That difference matters for launches, trade shows, subscription boxes, and seasonal packaging.
Build in extra time for new constructions. Adhesive testing, refrigerator checks, curve testing, barcode scans, and color adjustments can prevent expensive reprints. If the sticker is part of a larger packaging system with cartons, inserts, wraps, or Custom Packaging Products, align the timing so the label is tested on the real package, not on a random flat sample pulled from a desk drawer.
Common Mistakes That Make Sparkle Stickers Hard to Read
The most common design mistake is placing small text, thin script fonts, QR codes, or barcodes directly over high-shine areas without enough contrast or white ink support. A delicate gold script over holographic film may look elegant in a mockup. Under a store’s overhead lights, it can become a moving reflection. Use heavier type, larger point sizes, and solid backing panels for anything the buyer must read quickly.
Another mistake is assuming colors will print on sparkle film the same way they print on white paper. They often will not. Reflective substrates can shift perceived color, reduce opacity, or create a darker look under certain lighting. If brand color matters, use white ink strategically and ask for a material sample. Screens cannot reproduce the way a holographic film changes from blue to green to pink as the angle changes.
Sizing causes its own trouble, especially on curved containers. A label that is too wide for a small bottle can wrinkle, tent, or lift at the edges even if the adhesive is strong. For tight curves, reducing label width by a quarter inch can sometimes improve performance more than changing adhesive. Tubes, tins, jars, and tapered containers need measurement from the actual package, not just a product listing.
Adhesive mismatch is one of those plain, unglamorous problems that can ruin a beautiful label. Refrigerated products, oily surfaces, textured paperboard, powder-coated tins, flexible pouches, and damp application areas all need different planning. Permanent adhesive, removable adhesive, freezer-grade adhesive, and aggressive adhesive are not interchangeable terms. They describe different performance expectations.
Over-finishing is another trap. Glitter material, gloss laminate, metallic ink, dense illustration, small type, and a complex contour cut can stack together until the sticker feels busy instead of premium. The best sparkle work often shows restraint: one strong reflective feature, one clean focal point, and enough quiet space for the buyer’s eye to settle.
Skipping proofs or samples is risky for first orders. Sparkle density, finish, cut accuracy, color contrast, and adhesive behavior are easier to judge in hand. A quick rub test, scan test, and application check can reveal problems before thousands of labels are packed into cartons. For sustainability or paper sourcing questions around other parts of the package, buyers may also review resources from groups such as the Forest Stewardship Council, especially if labels are being coordinated with cartons, sleeves, or paper inserts.
Next Steps Before You Request a Quote
Before requesting a quote, gather the basics. Measure the application area. Photograph the packaging surface. Decide whether the sticker must survive moisture, refrigeration, shipping abrasion, oily hands, or outdoor exposure. Choose the desired shine level: bold glitter, controlled metallic, rainbow holographic, soft pearl, or a clear sparkle overlay. Collect artwork files early, because missing files can turn a two-day estimate into a week of guesswork.
Pick one primary goal for the sticker. Is it meant to create shelf impact, improve gift appeal, seal a package, identify a limited edition, decorate a subscription box, or function as a durable product label? That goal affects material, adhesive, size, finish, and artwork. A tamper seal has different needs than a planner sticker. A chilled beverage label has different needs than an event handout.
It helps to prepare two or three material directions instead of locking into one idea too early. Ask for pricing on bold glitter, subtle pearlescent, and holographic accent versions if those all fit the brand. Comparing options side by side makes the tradeoffs clearer: appearance, cost, durability, production complexity, and lead time. For package branding, that comparison is usually more useful than chasing the shiniest option by default.
- Measure: Record width, height, curve, and available flat space on the actual package.
- Test: Apply samples to the real surface and check edges after 24 to 48 hours.
- Scan: Test QR codes and barcodes under normal retail or warehouse lighting.
- Rub: Check whether ink, laminate, or edges show wear after repeated handling.
- Chill: For refrigerated items, test condensation, cold adhesion, and label stiffness.
Ask for guidance on white ink, lamination, adhesive, and roll direction if the sticker will be machine-applied or used on bottles, jars, tubes, tins, pouches, or folding cartons. For larger retail programs, coordinate labels with Custom Printed Boxes, inserts, and other product packaging components so color, finish, and timing stay aligned.
The strongest custom sparkle stickers start with clear artwork, the right film, the right adhesive, and enough timeline for proofing before the order goes into production. Treat the shine as a packaging feature with constraints, not an afterthought, and it can do real work: attract attention, support the brand, protect readability, and make the finished package feel more intentional in the customer’s hand.
Frequently Asked Questions
Are custom sparkle stickers waterproof?
They can be water-resistant or waterproof when made with synthetic film, durable inks, and protective lamination. Paper-based sparkle stocks are usually better for dry, short-term uses. For bottles, bath products, refrigerated items, or outdoor decals, ask for the material and adhesive to be matched to moisture exposure and handling conditions.
Can custom glitter labels still show accurate brand colors?
Yes, but color control usually requires white ink under selected artwork areas so the reflective base does not change the color too much. A physical proof or material sample is the safest option when matching brand colors on holographic, metallic, or glitter films.
What artwork files are best for sparkle sticker printing?
Vector files such as AI, EPS, or PDF are best for logos, cut lines, and clean type, while raster images should be high resolution at the final print size. Artwork should include bleed, safe margins, outlined fonts, and clear notes showing where sparkle should show through and where white ink should block it.
How much do custom sparkle decals cost per piece?
Unit cost depends on size, quantity, material, print coverage, white ink, lamination, die cutting, and whether the order is produced on sheets, rolls, or as individual decals. Larger quantities usually lower the per-piece price because setup and proofing costs are spread across more stickers.
How long does it take to produce sparkle product stickers?
Timeline depends on artwork readiness, proof approval, material availability, finishing complexity, and shipping method. First-time orders should allow extra time for material review, adhesive testing, or physical proofing before full production begins.

