Learn how Glow in the Dark custom stickers work, what affects brightness, which materials hold up, and what details to confirm before ordering.
What Glow in the Dark Stickers Really Do After the Lights Go Out
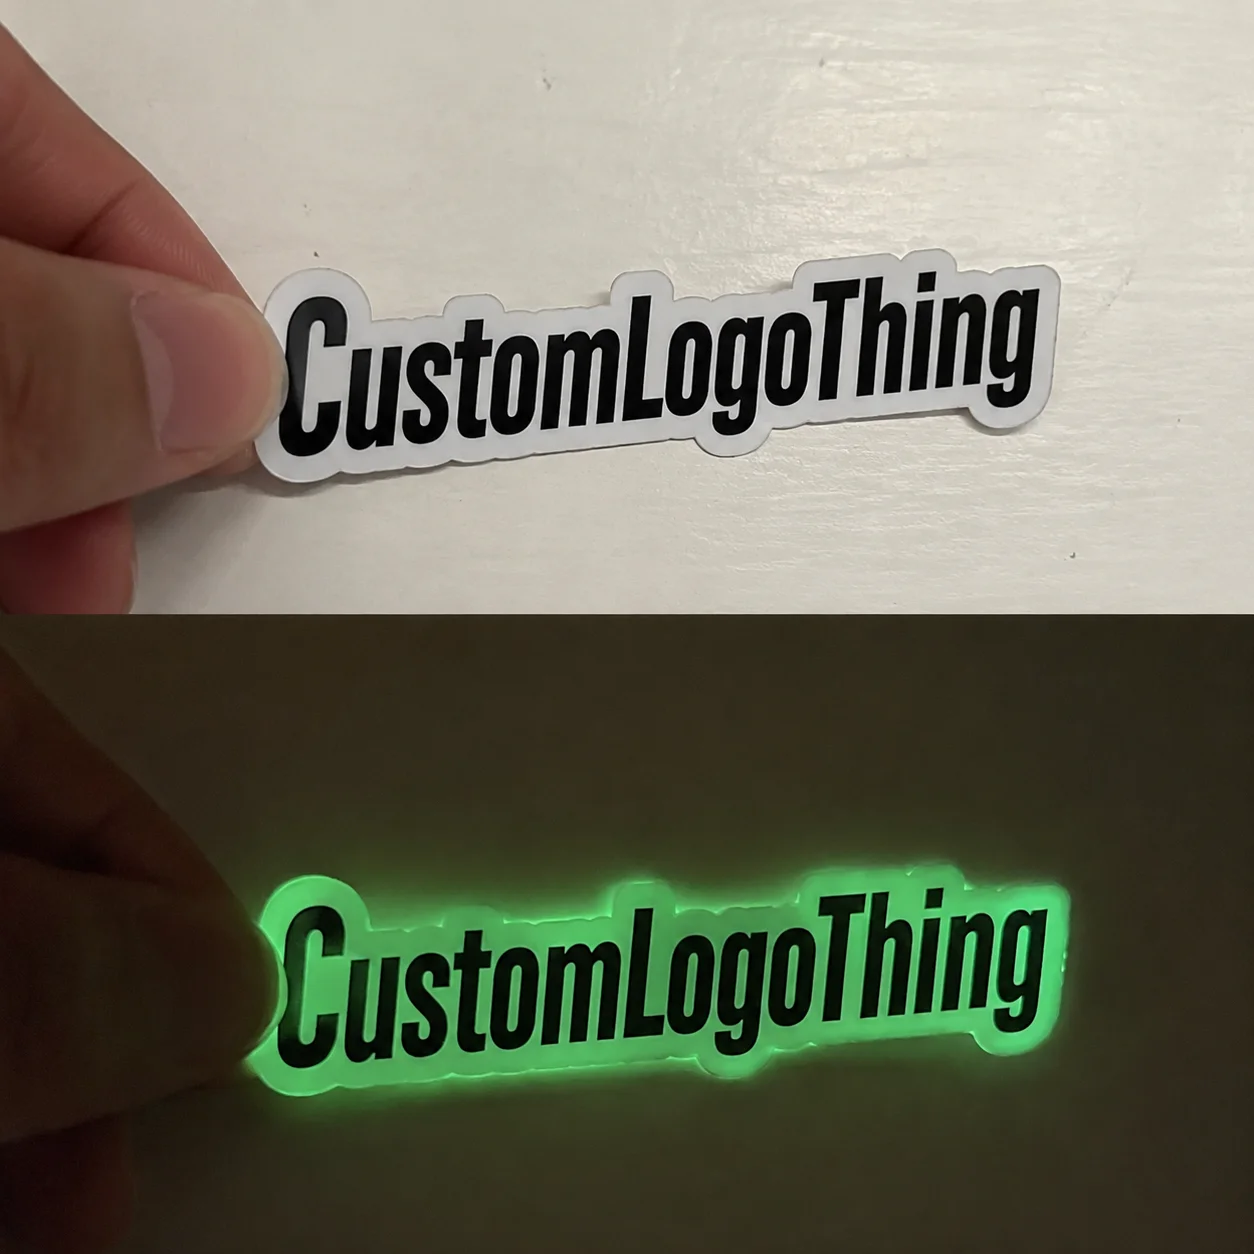
A customer opens a box, pulls out the product, notices the label, then turns off the lights. The logo still glows. That small moment turns a disposable sticker into a second brand impression. That is why buyers use Glow in the Dark custom stickers for packaging, event drops, retail merchandise, nightlife campaigns, kids’ products, and promotional labels that need more than flat ink.
They are not magic decals. They are light-charged print products with limits. A glow sticker uses photoluminescent material, usually in an ink, coating, or film layer, that absorbs energy from light and releases it slowly as visible glow in darkness. Think tiny rechargeable battery. Charge it well and it performs. Cover it with heavy black ink, hide it inside a box, or test it in a half-lit room, and the result can look weak.
The best applications are practical and interactive: packaging seals, Subscription Box Inserts, concert giveaways, limited-edition retail packaging, candle labels, toy packaging, safety markers, and branded promotional stickers. A candle brand might use a glowing moon icon on a jar label. A beverage company might add a glow detail to a neck label for cooler displays. A toy company may use glow stickers because children actually test the effect. Ruthlessly.
Set expectations early. Glow strength depends on pigment quality, ink coverage, sticker size, charge time, light source, and the darkness of the room. A 3-inch sticker with a large pale glow area will usually outperform a half-inch logo with thin glowing text. That is not marketing poetry. That is physics meeting print production.
Do not confuse glow stickers with reflective or neon stickers. Reflective stickers bounce light back toward the source, like vehicle decals. Neon stickers use fluorescent colors that look bright under daylight or UV-heavy lighting. Glow stickers store light and release it after the lights go out. Different effect. Different material. Different buying decision.
How Photoluminescent Sticker Printing Works
Photoluminescent sticker printing sounds more complicated than it needs to be. Glow particles absorb energy from sunlight, fluorescent light, or LED light, then release that energy as a greenish, bluish, or sometimes yellow glow. Sunlight usually charges the strongest. Bright white LEDs can work well. Dim retail lighting charges more slowly, which matters if the sticker sits inside a shaded display or inside Custom Labels & Tags packaging.
There are two common production approaches. One uses glow ink only in selected areas: a logo outline, moon graphic, warning icon, product name, constellation, or hidden message. The other uses a glow material as a base layer beneath the artwork, then prints standard graphics on top. The base-layer method can create a larger glowing field, but heavy ink coverage can block the effect.
That last part catches buyers all the time. White and pale artwork usually lets the glow perform better than dense dark designs. Black ink, saturated navy, deep red, and heavy CMYK coverage can act like a curtain over the glow layer. The sticker may look excellent under store lighting and underwhelming in the dark. A good prepress team will often suggest a glow-specific version of the artwork rather than simply applying glow to the existing print file and hoping for the best. Hope is not a production method.
The glow is strongest immediately after charging. Then it fades. That fade curve is normal, not a defect. For most branded packaging, the design goal should be a strong first impression during the first few minutes after lights-off, not all-night brightness. Safety labels may need a more performance-driven specification, including pigment grade, minimum luminance expectations, test conditions, and suitable standards. For transport and packaging performance more broadly, organizations such as ISTA publish useful testing frameworks, though glow intensity itself requires a separate material discussion.
Waterproofing, lamination, and adhesive choice can protect the sticker. They do not automatically make the glow brighter. A clear gloss laminate may improve scuff resistance on a bottle label. A matte laminate may reduce glare and feel more premium. Neither turns a low-pigment glow layer into a high-output one.
Specs That Control Brightness, Durability, and Adhesion
Spec sheets look dry until a sticker lifts off a cold bottle or fades before the customer notices it. For glow stickers, the key decisions are material, adhesive, finish, size, cut style, and intended use. Those choices decide whether the sticker survives a shipping box, helmet, candle jar, freezer case, laptop, or child’s lunch container.
Vinyl is the usual choice for durability. It handles moisture, handling, and curved surfaces better than paper. A common vinyl sticker range is around 3 mil to 4 mil face stock, often paired with a permanent acrylic adhesive. Paper can still work for dry indoor use, especially short-run promotions or low-cost package inserts, but it is not the first pick for water bottles, outdoor gear, or anything that will be rubbed, chilled, or splashed. Specialty films may be better for retail packaging that needs a thinner profile, clearer edge, or stronger moisture resistance.
Adhesive is not glamorous. It also causes a surprising number of failures. Permanent adhesive suits product labels, gear, and most package branding. Removable adhesive makes sense for temporary promotions, event badges, window campaigns, or stickers customers are expected to peel away. Freezer-grade or high-tack adhesives may be needed for refrigerated products, rough cardboard, textured mailers, low-energy plastics, or curved containers. If the final surface is polypropylene, powder-coated metal, kraft board, glass, coated paperboard, or a squeezable tube, say that before quoting.
Finish changes both appearance and handling. Matte feels more premium and reduces glare, which can help buyers judge the glow zone under strong lights. Gloss makes colors look sharper and may suit playful promotional stickers, but it can create reflections during photography or retail display. Soft-touch finishes can feel excellent on premium packaging, although they may add cost and need compatibility checks with the glow layer. Some coatings can slightly mute the effect. Ask before assuming.
Size matters more than most people expect. Large glow areas are easier to notice. Tiny stars, hairline outlines, and 6-point text may print cleanly but fail from a normal viewing distance. If the sticker will be seen at arm’s length, make glow elements bold. If it will be seen across a bar, event booth, retail shelf, or dark room, go bigger.
| Specification Choice | Best Fit | Typical Tradeoff |
|---|---|---|
| Glow vinyl with permanent adhesive | Bottles, jars, gear, premium product packaging | Higher unit cost than paper, better durability |
| Glow paper sticker | Indoor giveaways, dry package inserts, short promotions | Lower cost, weaker moisture resistance |
| Kiss-cut sheets | Easy peeling for events or fulfillment teams | Less retail-ready as single merchandise pieces |
| Die-cut singles | Merchandise, swag bags, limited drops | More finishing time for complex shapes |
| Roll labels | Semi-automated or automated application | Requires unwind direction and core size details |
Keep the sticker in context. A glow seal on custom printed boxes faces different abuse than a decal on a helmet. A label on a candle jar may face heat, oils, and repeated handling. A sticker on a mailer may rub against other parcels during transit. The right spec is not the fanciest one. It is the one matched to the surface, environment, and life span of the product.
Pricing, MOQ, and Unit Cost Factors to Check Before Ordering
Glow stickers usually cost more than standard printed stickers. That is not just supplier markup. Specialty pigment, extra layers, setup time, slower curing, tighter artwork handling, and more careful inspection all affect the price. If a standard full-color vinyl sticker costs less at the same size and quantity, the glow version landing higher should surprise absolutely no one.
For planning, small custom runs may start around a few dozen or a few hundred pieces, but the unit cost can be steep because setup is spread across fewer stickers. At 250 pieces, a small glow die-cut sticker might land near $0.90 to $1.80 per unit depending on size, finish, and complexity. Around 1,000 pieces, the same general category may drop closer to $0.35 to $0.85 per unit. At 5,000 pieces, a simple 2-inch to 3-inch glow vinyl sticker may fall roughly in the $0.18 to $0.45 range, depending on coverage, lamination, cut shape, and packing format. These are planning ranges, not universal quotes.
The biggest cost drivers are straightforward: size, quantity, material, number of ink colors, glow coverage area, lamination, cut shape, sheet versus roll format, and packaging. Complex shapes take more finishing time. Heavy glow coverage uses more specialty material. Roll labels may need core size, roll direction, gap, and maximum outer diameter details, especially if they will run through a label applicator.
MOQ deserves a practical conversation. A supplier may accept 100 pieces, but the price per sticker may look odd beside a 1,000-piece quote. That does not mean the supplier is being difficult. Prepress, proofing, setup, cutting, and packing still happen. The press does not care that the order is small. Annoying, but true.
Ask how pricing is calculated. Is it based on total sticker count, sheet count, roll length, die-cut complexity, or glow coverage? One quote may include lamination, while another leaves it out. One may price standard vinyl, while another includes a more durable film. Compare the specification, not just the bottom line.
Buyer reality check: paying more can make sense if the glow effect drives interaction, retail value, safety messaging, or social sharing. Paying more makes less sense if the sticker will be hidden inside a box and never charged by light.
If glow performance matters more than the lowest possible cost, request samples or a physical proof. A digital proof can show layout and placement. It cannot show actual brightness, fade behavior, texture, or how the adhesive handles a real surface.
Process and Timeline From Artwork to Finished Stickers
A clean process saves days. It also prevents the classic problem where a buyer approves a beautiful daylight design, then discovers the glow effect is buried under dark ink. The usual path for glow in the dark custom stickers is simple: define the use case, choose material, prepare artwork, Request a Quote, approve the proof, print, finish, inspect, and ship.
Start with the use case. Is the sticker for product packaging, event swag, retail merchandise, safety marking, or a seasonal campaign? Will it be used indoors or outdoors? Will it touch moisture, oils, refrigeration, sunlight, friction, or curved surfaces? Those answers influence material and adhesive before artwork enters the conversation.
Vector files are best for logos, text, and cut lines. AI, EPS, and editable PDF files usually give prepress teams the cleanest path. High-resolution raster files can work for image-heavy designs, but aim for 300 dpi at final size. Add bleed, usually around 1/16 inch to 1/8 inch depending on the printer’s requirement, and keep critical text away from the trim edge. Cut lines should be clearly marked on a separate layer. Glow areas should also be separated or labeled.
Proofing has limits. A digital proof confirms size, layout, colors, cut shape, and glow placement. It does not prove real-world glow intensity. A physical sample or production proof is better if the campaign depends on the effect. For premium branded packaging, losing three days to proofing is still better than shipping 10,000 Labels That Look flat in the dark.
Typical production for custom glow stickers may run about 7 to 15 business days after proof approval for many standard orders. Add time for physical sampling, custom dies, specialty laminates, large quantities, color matching, split shipments, or unusual adhesives. Transit time is separate. A label completed on Thursday is not automatically on a retail floor Friday morning.
Build buffer time for events, retail launches, subscription boxes, and seasonal promotions. Missed dates are expensive in packaging because everything stacks: boxes, inserts, labels, fulfillment labor, carrier pickups, and customer expectations. If the sticker is part of a broader Custom Packaging Products order, align schedules early so labels are not waiting on boxes, or boxes waiting on labels.
Quality control should include more than “does it look good under office lights?” Check cut accuracy, edge lifting, scuffs, print registration, adhesive bond, liner release, and whether the glow zones match the approved proof. For roll labels, confirm unwind direction and roll fit before sending them to a filling line. A beautiful label on the wrong unwind is still a problem. A very avoidable one.
Common Mistakes That Make Glow Stickers Underperform
The most common mistake is covering too much glow material with dark ink. The finished sticker can look sharp under daylight, especially with deep contrast and heavy color, then barely glow after charging. For glow work, negative space is not empty. It is performance area.
Another mistake is testing in the wrong conditions. A bright office, a phone flashlight, and a half-dark hallway will not tell the full story. Test the sticker after a consistent light exposure, then move it into a properly dark room. Use the same charging time for each sample if comparing suppliers. Otherwise, the test is just a guess with better lighting.
Tiny text is risky. Thin lines are risky too. They may pass print inspection but fail the human-eye test. If a customer needs to lean in from 3 inches away to see the glow message, the design is probably too delicate for a promotional sticker. Bold shapes, thicker strokes, and larger glow zones give the pigment room to work.
Surface mismatch causes a different kind of failure. Low-energy plastics, textured cardboard, oily containers, frosted glass, and tight curves may need adhesive changes. A sticker that bonds nicely to coated paperboard might lift from a squeezable plastic tube. A label that survives a dry shelf might wrinkle in an ice bucket. Tell the printer the truth about the application surface, even if it complicates the quote.
Skipping lamination can shorten the life of stickers on bottles, outdoor gear, laptops, helmets, and handled merchandise. Lamination protects print from abrasion and moisture, although compatibility should be checked so it does not dull the glow more than expected. For packaging headed into recycling streams, buyers may also want to review broader sustainability considerations from sources such as the EPA recycling guidance, especially if stickers are used heavily across a product line.
Ordering too close to launch is the final preventable error. Glow coverage, color accuracy, adhesive testing, and die-cut shape all deserve proofing time. Rushed orders can work for simple promotional decals. They are a bad bet for retail packaging where the sticker carries the logo, product claim, barcode, tamper seal, or campaign message.
Build a Sticker Brief Your Printer Can Quote Accurately
A good quote starts with a good brief. Not a novel. Just the facts a production team needs to price the job accurately and avoid assumptions. Vague requests like “2-inch logo sticker, make it glow” leave too much room for mismatch.
Include the basics first: final size, shape, quantity, material preference, adhesive type, finish, indoor or outdoor use, surface type, and deadline. If you do not know the right material or adhesive, describe the application instead. “Applied to a cold glass bottle that may sit in an ice bucket for 2 hours” is far more useful than “waterproof sticker.”
- Size and shape: Include width, height, and whether the sticker is circle, rectangle, contour die cut, or a custom shape.
- Quantity: Ask for price breaks at two or three levels, such as 500, 1,000, and 2,500 pieces.
- Glow areas: Mark which artwork should glow and which should remain standard print.
- Surface: Name the material: glass, kraft paper, coated box, plastic pouch, metal tin, helmet, bottle, or display board.
- Environment: Specify moisture, refrigeration, sunlight, abrasion, handling, or outdoor exposure.
- Deadline: Separate the needed delivery date from the launch date so production and shipping can be planned honestly.
Photos help. Send a picture of the jar, box, bag, helmet, bottle, mailer, or retail display if available. Packaging buyers sometimes assume a sticker supplier only needs the art file. In practice, the surface and handling conditions can matter just as much as the logo.
Ask three direct questions before placing the order. How long does the glow remain visible under normal test conditions? What light source charges it best? Is a sample or previous production swatch available? The answers will tell you whether the supplier understands photoluminescent printing or is simply adding a glow option to a standard sticker menu.
Compare quotes by specification rather than price alone. One supplier may quote unlaminated paper. Another may quote laminated vinyl with a stronger glow layer and high-tack adhesive. Those are not the same product. If the sticker supports retail packaging, product packaging, or branded packaging with a visible customer-facing role, the cheapest line item may become the most expensive mistake.
A clear brief helps glow in the dark custom stickers arrive brighter, stick better, and perform the way buyers expect. Give the printer the real use case, mark the glow zones, allow time for proofing, and judge samples in the dark, not under flattering showroom lights.
FAQ
How long do glow in the dark stickers glow after being charged?
Most glow stickers are brightest right after light exposure and then fade gradually. Duration depends on pigment quality, charge time, light intensity, ink coverage, and how dark the room is. For packaging and promotional use, design for a strong first impression in the first few minutes rather than expecting all-night brightness.
Are glow in the dark custom labels waterproof?
They can be waterproof if printed on vinyl or another film material and protected with the right laminate. Paper-based glow stickers are usually better for dry indoor packaging. Always specify moisture, refrigeration, ice buckets, outdoor use, or frequent handling before ordering.
Can any logo be made into a glow in the dark sticker?
Most logos can be adapted, but not every design will glow equally well. Simple shapes, bold lettering, and larger glow zones usually perform better than tiny details. Dark ink placed over glow areas can reduce brightness, so the artwork may need a glow-specific version.
What affects the cost of custom glow stickers the most?
Size, order quantity, material, glow coverage, cut shape, finish, and adhesive type are the main cost drivers. Higher quantities usually lower the unit cost because setup expenses are spread across more stickers. Physical samples, specialty laminates, and complex die cuts can add cost but may reduce launch risk.
How should I prepare artwork for glow in the dark sticker printing?
Send vector artwork when possible, especially for logos, text, and cut lines. Use a separate layer or clear notes to show which areas should glow. Include final size, bleed, safe margins, and any color references so proofing is faster and more accurate.

