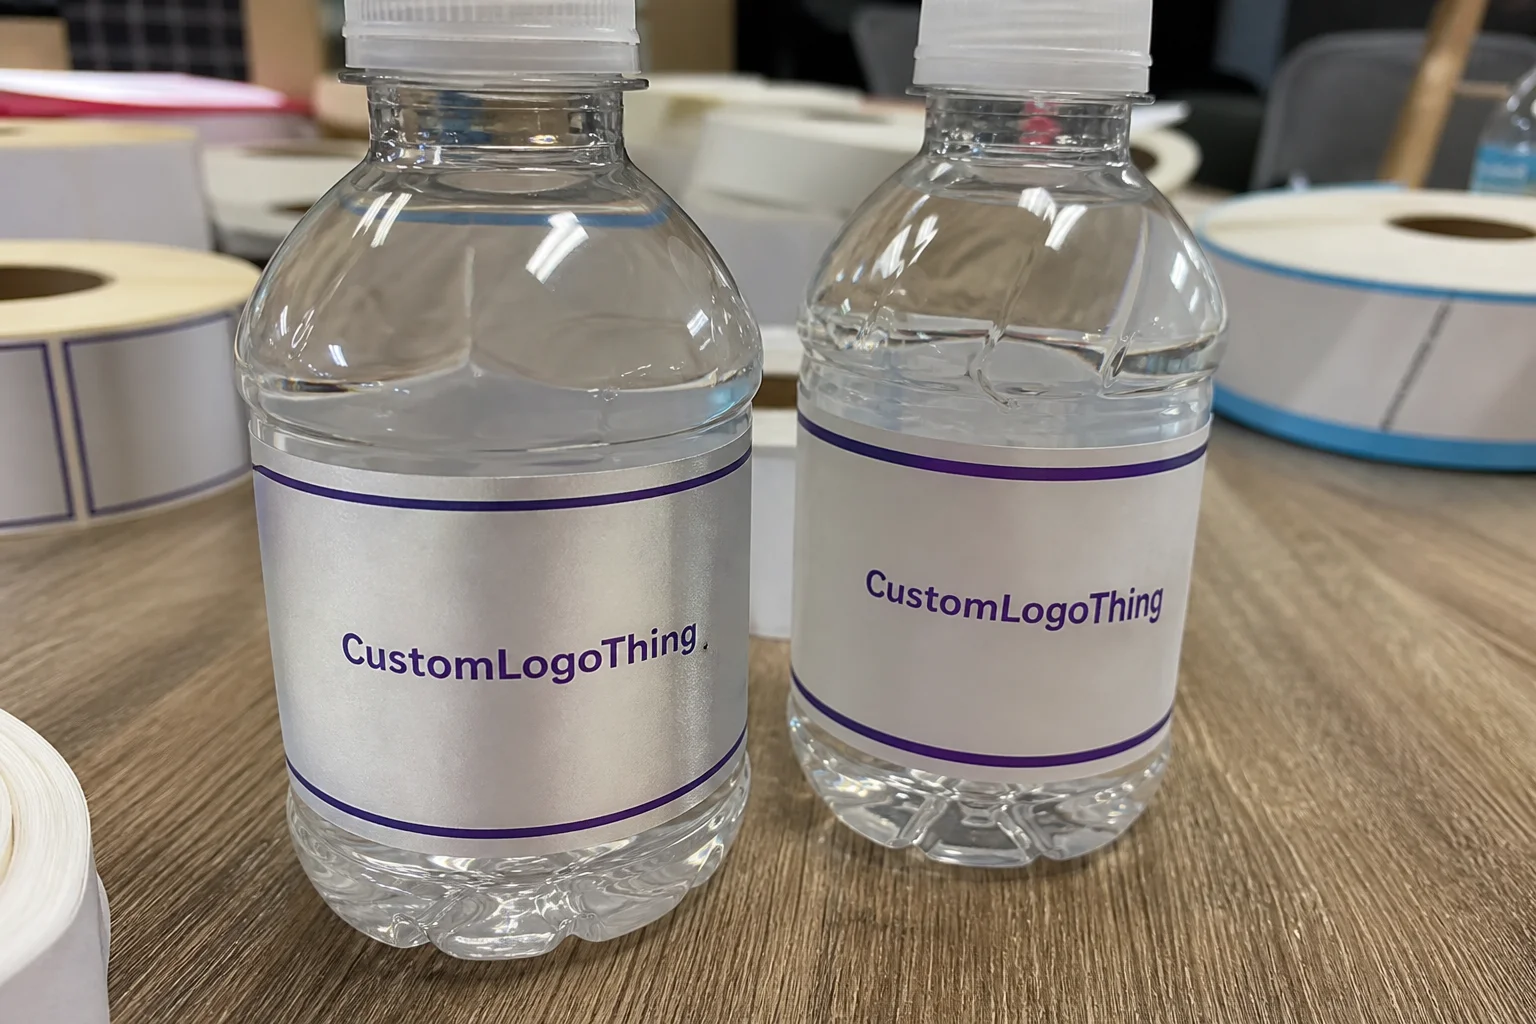
Personalized mini Water Bottle Labels do a lot of work in a very small space. They turn a basic bottle into part of the table design, a brand touchpoint, or a coordinated event detail, and because the surface is compact, every choice shows up immediately. A clean layout reads as polished. A crowded layout, or a label that does not match the bottle, looks off even if the artwork itself is attractive.
The part buyers usually underestimate is how unforgiving the format can be. On a mini bottle, there is less room for oversized type, decorative flourishes, and dense blocks of text. The label has to fit the shape, survive handling, and still look intentional from a few feet away. That means the best results usually come from simple artwork, the right adhesive, and realistic expectations about what a small-format print can support.
These labels show up in weddings, showers, hotel welcome bags, corporate meetings, tasting tables, open houses, and party favors. The use case changes, but the objective is similar: make the bottle feel like it belongs there. When the bottle is one of many items on a table, the label often becomes the piece that ties everything together.
Why mini bottle labels stand out at the table
Mini bottles are handled up close. Guests pick them up, read them, and set them back down, which gives the label a very direct audience. That is part of why the format is so effective. A good label does not need to shout; it just needs to be legible, well centered, and matched to the moment.
Personalized mini Water Bottle Labels differ from larger bottle labels because the layout has to be more disciplined. A design that looks balanced on a standard 16.9 oz. bottle can feel cramped when reduced for an 8 oz. or 10 oz. format. Text that was readable in a mockup can become too small once the label is wrapped around a curved surface, and thin script fonts often lose clarity faster than buyers expect.
There is also a presentation effect that is easy to miss in planning. Mini bottles are often lined up in rows, so inconsistencies become obvious. If one label sits slightly higher than the next, or if the seam is different from bottle to bottle, the row looks uneven. Good event styling depends on repetition, and that is where label quality and application accuracy matter as much as the artwork itself.
From a buyer’s standpoint, the strongest designs keep contrast high and details restrained. A short event name, a monogram, a logo, and a date are usually enough. Adding too many decorative elements can make the label feel busy at the exact size where clean structure matters most. The safest designs are rarely the most complicated ones.
Mini bottle labels may be small, but the expectations are not. Fit, contrast, adhesive performance, and print clarity all need to line up for the final result to look finished.
How personalized bottle labels are produced and applied
The production process usually starts with artwork setup. The label size is matched to the bottle dimensions, then the file is adjusted for bleed, margins, and safe text zones. If the bottle has a taper, molded grip, or an unusually narrow body, that shape needs to be accounted for before the print is approved. Mini bottle labels leave very little room for guesswork, so a precise spec is more valuable than a general size description.
After the layout is set, the label stock is selected, printed, finished, cut, and packed. Most personalized labels for bottled water use pressure-sensitive adhesive, which means they arrive ready to peel and apply by hand. Some are printed on paper stock for short indoor use, while others are made with film for better moisture resistance. If the bottles will be chilled, kept in ice, or handled in humid conditions, the adhesive and face stock need to be chosen with that environment in mind.
Application is straightforward on paper, but bottle condition affects the result more than many buyers expect. Clean bottles at room temperature give the most reliable bond. Cold bottles with condensation can make labels slip or lift early, and oily residue from handling can interfere with adhesion too. A label that should last through a reception can start to fail if it is applied to a wet surface or rushed onto a bottle straight out of a cooler.
Proofing is part of the production process, not an extra formality. It is the stage where size, placement, spelling, and color can still be corrected before anything is printed. On a small label, even a few millimeters make a difference. A proof should show whether the text still has breathing room, whether the logo is centered, and whether the design will hold up when wrapped around the bottle. That last check saves time and money, especially on event orders with fixed deadlines.
If your project includes multiple branded pieces, it helps to keep the artwork standards aligned across the set. Buyers often coordinate bottle labels with Custom Labels & Tags so the visual language stays consistent across favors, inserts, and table items. That kind of consistency reads as planned, not improvised.
Materials, finishes, and sizing factors that affect the final look
Material selection changes how the label behaves as much as how it looks. Paper stock is often fine for dry, indoor events where the bottles will not sit in ice for long periods. Film stock is a better fit for chilled service, condensation, and repeated handling. On a mini bottle, that choice matters because the label surface is small and there is not much extra adhesive area to compensate for moisture or edge lift.
Finish affects both appearance and readability. Gloss tends to produce brighter color and a more reflective surface, which can make logos and saturated artwork feel more energetic. Matte reduces glare and often looks calmer and more refined. Soft-touch lamination adds a velvety surface and a premium feel, but it also adds cost and is rarely necessary for a label that will be used briefly. The right finish depends less on trend and more on how the bottle will actually be used.
Sizing is where many problems start. The label width needs to match the bottle circumference closely enough that the seam lands cleanly, while the height has to stay within the flat or gently curved portion of the bottle. If the design reaches into the shoulder or into a ribbed section, it can wrinkle or release early. On a mini format, a small error in width or height is visible right away because there is so little excess space to hide it.
Safe area and bleed are also more important than they seem. Text placed too close to the edge may get trimmed or appear visually crowded once the label wraps. Thin lines can vanish, and pale type may disappear on clear plastic or a lightly tinted liquid. For bottle labels this small, the most practical design test is simple: if the key information is hard to read at arm’s length on a proof, it is probably too delicate for production.
| Option | Best use | Typical strengths | Watch-outs |
|---|---|---|---|
| Paper label | Dry indoor events | Lower cost, good print sharpness, suitable for short-term use | Less moisture resistance, can wrinkle on cold bottles |
| Film label | Cold storage, chilled service | Better water resistance, stronger handling performance | Usually costs more than paper |
| Matte finish | Elegant or understated branding | Reduced glare, easy readability | Colors may look softer than gloss |
| Gloss finish | Bright, energetic branding | Strong color impact, polished appearance | Reflective under direct lighting |
| Soft-touch lamination | Premium presentation | Distinct tactile feel, upscale look | Higher price, often more than needed for casual use |
For most chilled applications, a moisture-resistant film with a pressure-sensitive adhesive designed for cold handling is the safest spec. For dry reception tables or short indoor events, a quality paper label can be perfectly adequate and easier on budget. The right answer depends on the environment, not on the label alone.
Personalized mini water bottle labels cost and quote basics
Pricing for personalized mini Water Bottle Labels usually depends on quantity, size, material, finish, color coverage, and whether the artwork needs a custom cut. The smaller the order, the more setup time weighs on the unit cost. That is true even when the design is simple. Proofing, press setup, trimming, and packing all take time, and those steps are spread over fewer pieces on a short run.
A realistic buyer-facing price range for a basic custom label can sit around $0.18 to $0.28 per unit at 5,000 pieces, depending on coverage, material, and finish. Smaller orders usually come in higher on a per-label basis, while larger quantities reduce the unit cost. Specialty work changes the equation quickly. Rush production, stronger cold-resistant materials, heavier ink coverage, and premium coatings all add cost because they affect both materials and production time.
Quotes are easier to compare when the request is specific. The most useful information includes bottle dimensions or an actual sample bottle, quantity needed with a small overage, artwork status, preferred material, finish choice, and the shipping ZIP code. If the bottle has a taper or an unusual diameter, the quote should reflect that, because a label that works on a straight-sided bottle may not transfer cleanly to a curved one.
It also helps to ask what the quote includes. Some vendors bundle proofing and trimming but separate shipping. Others include one proof revision and basic packaging, but not artwork cleanup. Those details affect the real cost more than many buyers realize, especially on event work where the timeline is tight and there is little room for back-and-forth after approval.
Buyers planning for colder service should budget for a more durable build. A label meant to sit in ice for hours is not the same product as one used for a dry indoor table. The price difference is usually justified by better adhesion and better performance, not just by a more expensive material line item.
Production steps, lead time, and approval timeline
The production sequence is usually straightforward: inquiry, specification, proof creation, proof approval, printing, finishing, inspection, packing, and shipping. The part that affects the schedule most is not the press run itself, but how ready the artwork is when it arrives. A print-ready file with correct dimensions, clean vector logos, and properly outlined type can move quickly. A file that needs resizing, text cleanup, or logo reconstruction adds time before production even starts.
Lead time also depends on the material. Paper labels are often quicker to process than film labels with special coatings or cold-resistant adhesives. If a project needs Custom Die Cutting, that can add another layer of setup. For many standard orders, production time lands somewhere around 12 to 15 business days from proof approval, though the actual schedule depends on workload, quantity, and finishing requirements. Rush service may be available for some jobs, but it usually narrows the material and finish options.
Shipping time is separate from production time. That distinction matters more than buyers sometimes expect. A label can be completed on schedule and still arrive too late if transit is not built into the calendar. For event planning, that means the order should be placed early enough to allow for a proof cycle, a production window, and a realistic shipping cushion.
Here is a practical timing framework:
- Standard lead time: often about 12 to 15 business days from proof approval
- Rush turnaround: possible on some orders, usually at a higher cost and with fewer finish choices
- Shipping: separate from production and should be added to the event timeline
For coordinated event work, extra time is not wasted time. It gives room for one proof revision, protects against artwork corrections, and leaves space for shipping delays. Mini bottle labels are small, but they sit inside a larger planning chain that usually includes favors, signage, table settings, and beverage service. One late component can throw off the entire presentation.
Common artwork and application mistakes to avoid
The most common artwork mistake is submitting a low-resolution file and expecting it to print cleanly at mini scale. A logo that looks fine on a screen can blur or pixelate when reduced for a small label. Vector art is usually the safer option because it holds its edges at the sizes these labels require. That matters even more when the design includes small text, fine lines, or a detailed monogram.
Another common issue is ignoring the bottle shape. If the bottle tapers sharply or has molded ridges, a label can wrinkle, lift at the edges, or fail to sit flat across the full surface. Seam placement matters too. Too much overlap can crowd the design; too little can leave the wrap incomplete or visually unbalanced. The bottle and the label should be matched as a pair, not treated as separate design problems.
Moisture creates a different set of problems. Cold bottles produce condensation, and condensation weakens adhesion if labels are applied too early or on a wet surface. Labels stored in a damp room may curl before they are even used. This is one of those production details that seems minor until the first batch starts lifting at the corners. A dry application surface, clean handling, and room-temperature staging usually prevent most of the trouble.
Proofreading is another area where small mistakes become expensive. Misspelled names, wrong dates, inconsistent capitalization, and low-contrast type are difficult to fix once production starts. Transparent bottles can make pale artwork disappear, so designs need enough contrast against both the bottle and the liquid inside. A good proof should answer one simple question: can this still be read and recognized once it is wrapped around the bottle?
One practical habit helps more than most people expect. Review the label at actual size before approving it. Not on a phone screen, not just in a large layout preview, but at the size it will appear in production. That is usually when spacing errors, line weight issues, and readability problems show up clearly enough to catch them in time.
Expert tips for a smoother order and better results
Start with an actual bottle sample whenever possible. A sample gives the production team a real reference for circumference, height, taper, and usable flat area. It removes a lot of uncertainty from the quote and reduces the chance of a label that looks correct on paper but misses the bottle in practice.
Choose the material based on the conditions the bottle will face. If the bottles will sit in coolers, ice tubs, or humid service areas, film stock is usually the better call. If the event is dry and the bottles will be used quickly, paper stock can be more cost-effective. The best label is the one that fits the setting, not the one that simply looks good in a digital mockup.
Ask for a digital proof and inspect the details that actually matter: spacing, centering, spelling, margin balance, and any small text that needs to stay legible. If the design includes a date, a short quote, a monogram, or a logo mark, make sure each element still has enough visual breathing room at final size. A crowded label rarely improves after printing.
Order a modest overage. A few labels may be damaged during application, a few bottles may be swapped, and it is easier to have replacements ready than to reprint under pressure. This is especially useful for events where staff or volunteers are doing the application. Consistency matters here too. The more uniformly the labels are placed, the more polished the table will look.
For the buyer, the real standard is repeatability. One good bottle is not enough. The row needs to hold together visually, with labels placed at similar heights and seams landing in similar positions. That is what gives personalized mini water bottle labels their finished look.
Next steps: measure, quote, proof, and place your order
Before requesting pricing, measure the bottle circumference, label height, and the flat portion available for artwork. If the bottle has a taper, note where it begins so the design stays inside the printable zone. Then compare those measurements to the space needed for the logo, name, date, or short message you want to include. That step sounds basic, but it prevents most of the sizing mistakes that cause reprints.
Gather the essentials in one pass: quantity, artwork file, preferred stock, finish choice, and event date. If you are comparing options, ask whether the quoted label is paper or film, whether the adhesive is removable or permanent, and whether setup or proof fees are included. A clean comparison depends on those details being visible from the start.
Before approving production, check the proof one more time for spelling, alignment, color balance, and scale. On a mini label, small errors stand out more than they do on larger packaging. If the proof looks cramped, simplify it. If the contrast is weak, strengthen it. If the seam placement feels awkward, adjust it now rather than after printing.
It also helps to plan a few spares into the order. That cushion is inexpensive compared with a rush reprint, and it protects the presentation if a handful of labels are damaged during application. For many events, that small buffer is what keeps the display consistent from the first bottle to the last.
How do I choose the right size for personalized mini water bottle labels?
Measure the bottle diameter and the flat label area first, then leave room for seam overlap and design margins. A template or proof is the best way to confirm that the artwork fits the curved surface without stretching, crowding, or lifting at the edges.
What material works best for personalized mini water bottle labels on cold bottles?
A moisture-resistant film label is usually the safest choice for chilled or wet bottles because it handles condensation better. Paper labels can work indoors, but condensation and handling can reduce both adhesion and appearance.
How much do personalized mini water bottle labels usually cost?
Price depends on quantity, material, finish, size, and whether the artwork needs special setup or custom cutting. Smaller runs usually cost more per label, while larger quantities often reduce the unit price. For many basic custom orders at around 5,000 pieces, a range near $0.18 to $0.28 per unit is a practical starting point.
How long does production usually take for mini water bottle labels?
Timeline depends on proof approval, material choice, and the current production schedule. A standard order often takes about 12 to 15 business days after proof approval, and shipping time should be added separately.
Can I apply personalized mini water bottle labels myself?
Yes, most pressure-sensitive labels are designed for manual application. For best results, apply them to clean, dry bottles at room temperature and avoid handling chilled bottles with condensation.
Done well, personalized mini water bottle labels are a small-format detail that can raise the quality of the whole table. The strongest results come from practical choices: measured sizing, a material suited to the environment, a proof that is reviewed carefully, and enough lead time to avoid rushed decisions. On a label this small, discipline matters more than decoration, and that is usually what makes the finished bottles feel polished rather than improvised.


