Buy Custom Packaging Boxes with Foam Inserts Safely
A premium device can arrive in a beautiful box and still create a return. The logo is crisp. The lid lift feels expensive. Then one loose corner has rubbed a glossy surface into a complaint.
That is the practical reason brands buy custom packaging boxes with foam inserts. Not because foam looks fancy. Because the product needs to stay where it was placed. Good packaging controls movement, impact, presentation, and risk before the customer opens the lid.
What Custom Packaging Boxes with Foam Inserts Actually Solve
A carton does not need to look crushed for the item inside to be damaged. Small movement inside the box, repeated through parcel handling, can cause more cosmetic damage than a visibly dented shipper. A polished metal tool, glass vial, cosmetic compact, camera lens, award, or medical sample may look fine at packing, then arrive with scuffs, chips, loose parts, or pressure marks.
The problem is usually fit. Sometimes by only a few millimeters. Annoying, but true.
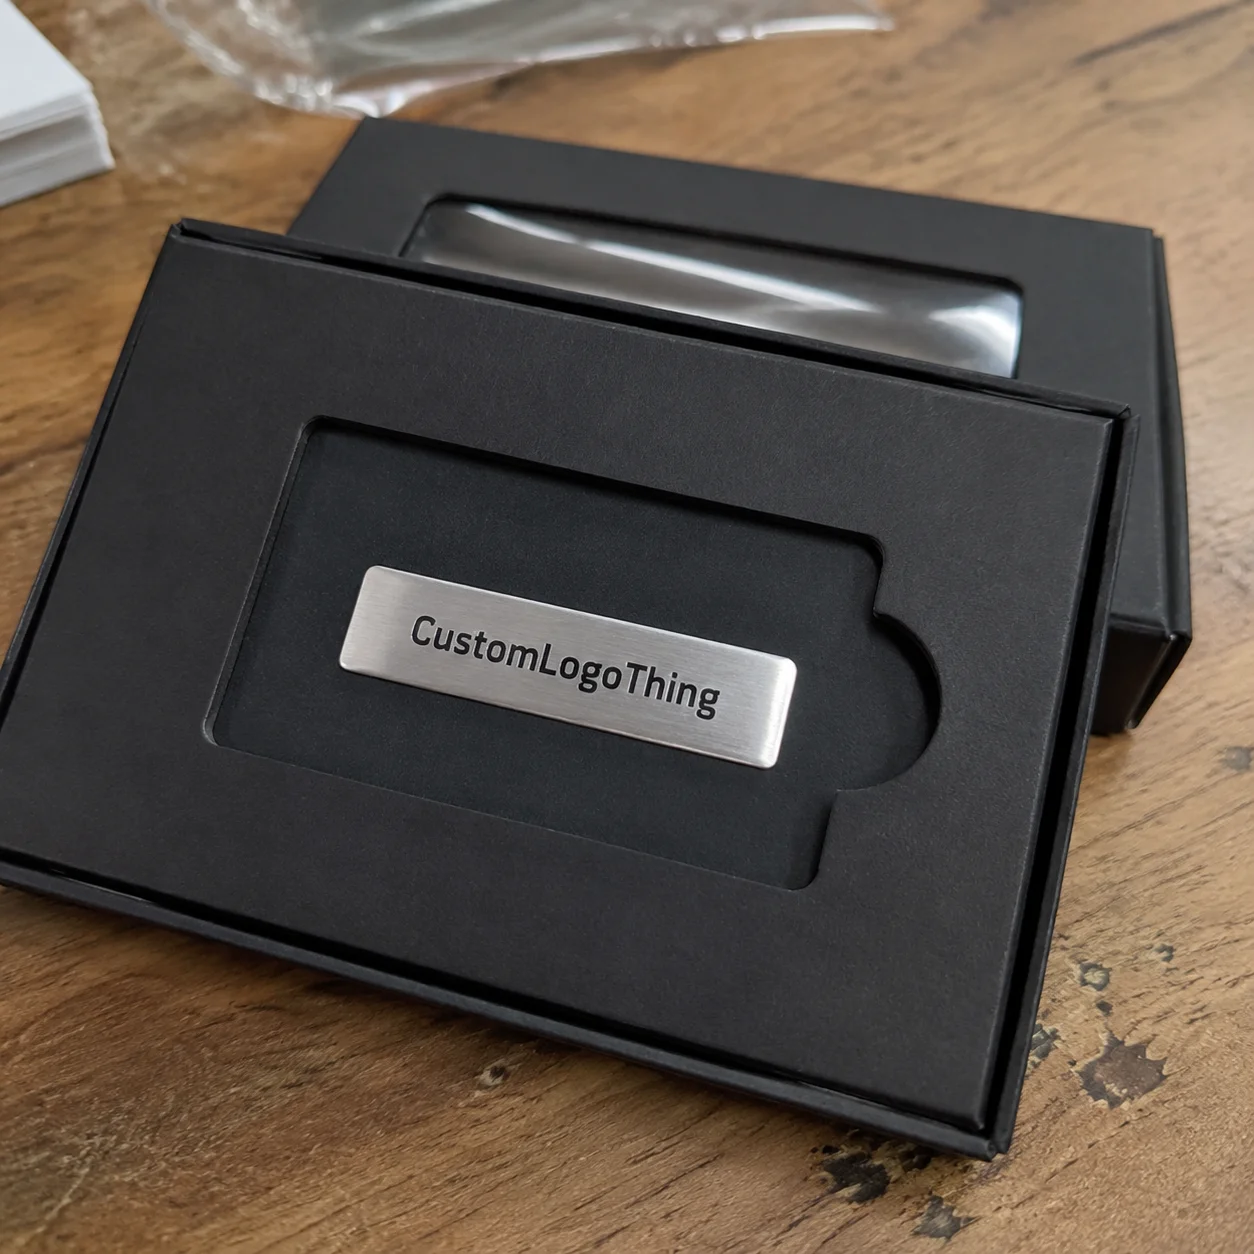
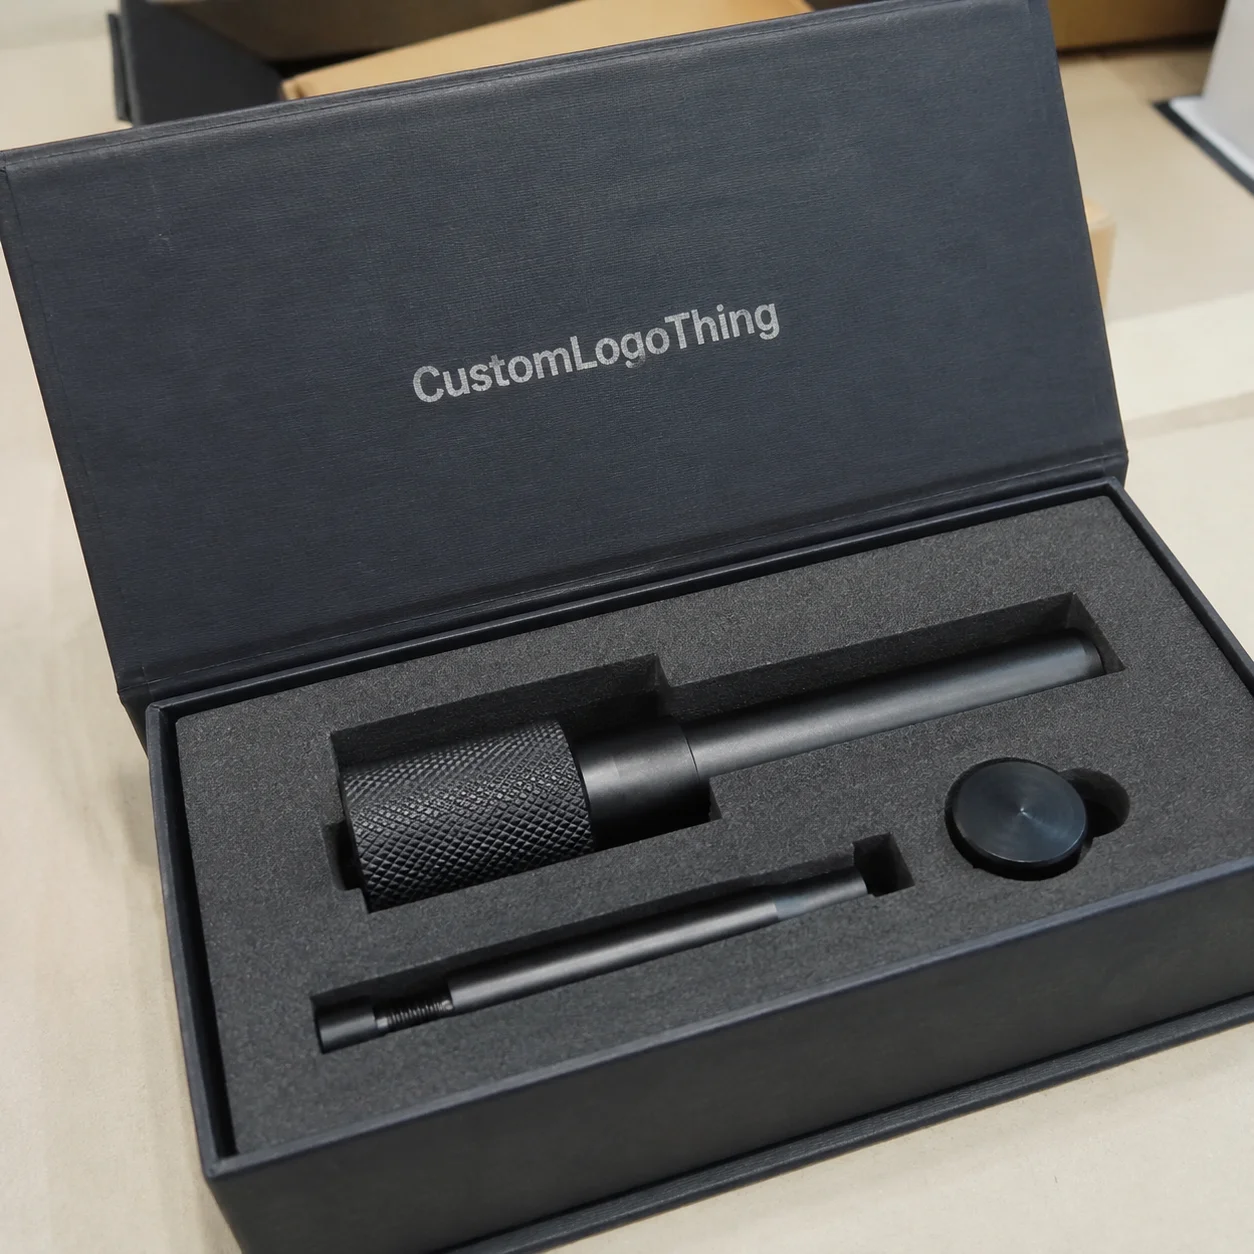
Foam insert packaging is an engineered system. The outer box handles branding, stacking strength, print quality, shelf presence, and sometimes parcel protection. The insert controls product position. It cushions impact, separates parts, and keeps the first view organized instead of chaotic.
The system may include a rigid box, folding carton, corrugated mailer, sleeve, product tray, die-cut foam insert, cavity cutout, finger notch, lift ribbon, accessory well, or top pad. A rigid setup box using 1200gsm to 1800gsm greyboard may suit Premium Retail Packaging. A 32 ECT or 200# corrugated mailer may make more sense for ecommerce. Same product, different channel, different answer.
Foam becomes most useful when at least one of these conditions applies: the item has a finish that scratches, the item has a shape that shifts, multiple parts need to stay separated, or the return cost is higher than the packaging upgrade. That covers electronics, cosmetics sets, diagnostic kits, medical devices, glassware, precision tools, awards, promotional samples, collectible products, and subscription kits with fragile parts.
Packaging callout: If the product can move, it can damage itself. If two components can touch, they eventually will. The insert’s job is to remove that guesswork.
Buyers often focus on the visible box first. Fair. Print and finish sell the brand. But the insert is what protects the promise. Better fit means fewer returns, cleaner presentation, faster fulfillment checks, and less dependence on packers improvising with tissue, bubble wrap, or random void fill. That matters once volume moves from 100 hand-packed units to 5,000 units on a deadline.
How Foam Inserts Work Inside Branded Product Boxes
Foam works by absorbing shock, spreading pressure, and preventing product-to-product contact. It also creates a controlled opening experience. A product sitting squarely in a black EVA cavity feels deliberate. The same product floating in shredded paper feels like someone packed it during a fire drill.
The common foam types are easy to mix up, so keep the differences plain:
- EVA foam: Firm, clean-edged, and common in premium branded packaging. Often used in 2mm to 10mm layers, or thicker for deeper cavities.
- PE foam: Durable and better suited to heavier products, tools, instruments, and industrial parts.
- PU foam: Softer and more cushion-like, useful when gentle compression matters.
- EPE foam: Lightweight and economical, usually more protective than beautiful.
Cavity design carries much of the performance. Too tight, and the product may scuff during insertion or frustrate customers during removal. Too loose, and it rattles. A typical clearance might sit around 1mm to 3mm per side for many rigid products, but finish, foam density, weight, shape, and removal method all change that number.
The outer box and insert need to be designed together. A sturdy foam tray cannot rescue a weak paperboard structure that collapses under stacking pressure. A premium rigid box can still fail if the foam cavity lets a glass bottle strike its cap or a neighboring accessory. For parcel delivery, many brands also need an outer shipping carton tested against recognized methods such as ISTA transit testing standards.
Presentation still matters. Foam can angle the hero product, stage accessories in sequence, reveal a logo after the lid opens, or hold a card above a device. That is packaging doing two jobs at once: reducing damage and shaping the customer’s first impression.
Sustainability is less tidy. Some foams can be recycled through specialized streams, but access varies by region and material. For simple, light products, paperboard inserts, molded pulp, or FSC-certified board may be better choices. The Forest Stewardship Council is a useful reference for buyers comparing responsible paper-based options. Foam is not always the right answer. It is the right answer when protection, precision, and presentation justify the material.
Key Specs to Decide Before You Request a Quote
A supplier can price faster when the brief contains real details. “Small bottle in a nice box” is not a brief. It is a delay wearing a hat.
Start with exact product length, width, height, weight, fragile zones, finish sensitivity, accessory count, and how the customer removes the item. Include protruding buttons, lenses, caps, hinges, handles, cables, sharp points, and flexible parts. Anything that changes the product’s outline can change the insert.
Tolerances matter more than many buyers expect. A two-millimeter measurement error can make a cavity feel premium or unusable. A cutout that is 2mm too small may trap the product. A cutout that is 2mm too large may leave visible gaps and allow movement. For high-value items, send a physical sample or CAD file before approving the structure.
Box format comes next. Mailer boxes work well for ecommerce kits and direct-to-consumer shipments. Rigid boxes create a stronger premium retail impression. Folding cartons suit lighter shelf packaging where freight cost and carton count matter. Corrugated shippers are better for heavier goods, especially if the product packaging must survive parcel delivery without a second decorative box.
Insert layout needs early thinking too. A single cavity is clean and efficient. A multi-cavity kit can organize accessories, refill parts, instruction cards, and samples. Layered foam helps with deep products. Removable trays improve access. Finger cutouts, thumb notches, and lift ribbons sound minor, but they often decide whether unboxing feels refined or awkward.
Branding choices may include custom printed boxes, printed lids, foil logos, spot UV, soft-touch lamination, colored foam, debossed cavities, belly bands, sleeves, QR cards, and instruction cards. For example, 350gsm C1S artboard with matte lamination may suit a folding carton. A rigid box might use wrapped art paper over greyboard with foil stamping. Neither is automatically better. The right spec depends on brand position, handling conditions, and budget.
If you are still comparing structures, reviewing Custom Packaging Products can help clarify whether a mailer, rigid box, sleeve, or folding carton is the better starting point. Bring photos from multiple angles, artwork files, Pantone or CMYK preferences, and any shipping test requirements into the first quote conversation. It saves days, sometimes weeks.
Cost and Pricing Factors That Change Unit Cost
Pricing usually comes from three cost centers: box material and printing, foam material and cutting, and setup costs such as dies, tooling, sampling, and structural design time. The quote is not just “box plus foam.” It is board grade, print method, finishing, foam density, cut complexity, assembly labor, packing method, and freight volume.
The largest variables are order quantity, box size, foam thickness, number of cavities, foam grade, print coverage, special finishes, and assembly complexity. A small folding carton with one EPE insert might be economical at scale. A rigid drawer box with laminated wrap, foil logo, black EVA, four cavities, a ribbon pull, and an instruction card will not be in the same neighborhood.
Larger boxes cost more twice. First, they use more paperboard and foam. Second, they increase freight, warehouse space, master carton count, and sometimes dimensional-weight charges. A box that grows from 8 x 6 x 2 inches to 10 x 8 x 3 inches may not look dramatic on a desk. Across 5,000 units, it can change pallet count and storage costs.
MOQ is mostly a setup-cost problem. Small runs are possible, but unit cost usually drops once tooling and design time spread across more pieces. A short run of 250 premium boxes may carry a painful per-unit price. At 2,000 to 5,000 units, the same structure often becomes easier to justify.
| Packaging Option | Typical Use | Relative Cost | Protection Level | Presentation Level |
|---|---|---|---|---|
| Corrugated mailer with EPE insert | Ecommerce kits, samples, light devices | Lower to mid-range | Good for parcel handling | Clean but practical |
| Folding carton with paperboard or thin foam tray | Retail packaging for lighter goods | Lower to mid-range | Moderate | Strong shelf branding |
| Rigid box with EVA foam | Premium electronics, awards, luxury kits | Higher | High when paired with shipper | Premium and structured |
| Corrugated shipper with PE foam | Tools, instruments, industrial parts | Mid-range to higher | High for heavier items | Functional rather than luxury |
As a rough buying frame, simple printed folding cartons usually cost far less than rigid presentation boxes. EVA inserts usually cost more than EPE or basic paperboard trays. Exact pricing depends on size and quantity, but buyers often see better breaks around 1,000, 3,000, and 5,000 units because setup costs spread out. Ask for good-better-best options instead of one quote. That gives you a clearer comparison between protection level, appearance, assembly time, and budget.
Process, Timeline, and Production Steps from Sample to Delivery
The workflow is usually simple: product review, structural design, quote, dieline approval, prototype, revisions, production proof, mass production, quality control, and shipping. Each step protects you from a different mistake.
The sample stage catches the expensive ones. Tight cavities. Blocked finger access. Lid pressure on a raised component. Accessories shifting in transit. A foam layer that looks elegant on screen but makes the product hard to remove. These issues show up in prototypes because real products have texture, weight distribution, and handling quirks that drawings miss.
Timeline depends on complexity. A corrugated mailer with one foam cavity can move faster than a rigid box with foil stamping, soft-touch lamination, custom-colored EVA, and a multi-layer insert. Imported specialty materials, unusual foam colors, complex die-cutting, or multiple artwork revisions add time. Clean projects have complete measurements, approved artwork, and a physical product sample ready before design starts.
Buyers need to approve dimensions, foam fit, artwork, colors, finish effects, box structure, packing method, and shipping carton count. Color approval deserves more attention than it usually gets. A black foam insert, black printed sleeve, and black ribbon can look like three different blacks under retail lighting. If branding depends on a precise color, request a drawdown, material swatch, or production proof where possible.
Production delays often come from four avoidable sources: late artwork, changed product dimensions, unavailable materials, and skipped physical samples. A product that changes thickness by 3mm after the foam dieline is approved can force a redesign. A logo supplied only as a low-resolution PNG can slow print setup. A launch deadline does not magically fix either problem.
Quality control should check more than print defects. Ask how the supplier verifies cavity size, foam alignment, glue placement, lid fit, board warping, color consistency, carton strength, and pack-out quantity. For foam inserts, the small checks matter: clean cut edges, no excessive odor, no loose particles, no crushed corners, no adhesive bleed, and no pressure marks on the product after packing.
Build buffer if the packaging supports a product launch, influencer kit, trade show, retail drop, crowdfunding shipment, or seasonal campaign. For riskier programs, ask how many units fit per master carton, what the packed carton weight will be, whether palletization is planned, and whether the full packed unit should be tested before mass production. The best packaging schedule is not the shortest one. It is the one with fewer surprises.
Step-by-Step Guide to Designing the Right Foam Insert Box
Start with the product, not the box. Identify fragile points first: glass edges, screens, caps, hinges, nozzles, polished finishes, sharp corners, soldered parts, or decorative coatings. Then decide what the customer should see first when the lid opens. Protection and presentation should be designed together, not patched together after artwork approval.
- Map the risk points. Mark surfaces that cannot be scratched, pressure points that cannot be compressed, and accessories that must not touch the main product.
- Choose the box format. Base this on shipping channel, retail display, product weight, and whether the package needs to survive parcel delivery alone.
- Select the foam material. Use EVA for premium structure, PE for heavier protection, PU for softer cushioning, and EPE for lightweight economy protection.
- Plan the cavity layout. Place the main item first, then accessories, manuals, cables, tools, cards, or samples in secondary wells.
- Add removal features. Thumb notches, pull tabs, lift ribbons, and layered trays reduce frustration, especially for deep or smooth products.
- Prototype the full pack. Shake it, tilt it, stack it, open it, repack it, and check whether the unboxing feels obvious without instructions.
The most expensive foam is not always the correct foam. Dense EVA may look excellent in a retail sample but be unnecessary for a lightweight plastic accessory. PE foam may outperform it for a heavier instrument. Paperboard may be smarter for a flat cosmetics set that needs organization more than impact absorption.
Think about fulfillment labor early. If packers need 45 seconds to align every cable into a narrow well, the packaging may cost more in labor than the quote suggests. On a 10,000-unit run, an extra 20 seconds per pack becomes more than 55 labor hours. That is real money, and it rarely appears on the packaging invoice.
Also check whether the insert can be packed consistently. A cavity that only works when the product is angled perfectly will slow the line. A layout with similar-looking wells can create mispacks. A foam tray that sheds particles near glossy surfaces may create a cleaning step nobody budgeted for. Packaging should protect the product without punishing the warehouse team.
For brands still narrowing their format, the Custom Packaging Products page is a useful starting point for matching custom printed boxes to inserts, sleeves, and mailer structures. The goal is not to make the fanciest box. It is to make a box that protects the product, supports the brand, and can be packed repeatedly without drama.
Common Mistakes That Make Foam Packaging Fail
The first mistake is designing from photos alone. Photos hide texture, weight, balance, sharp points, flexible parts, and real handling issues. A supplier can estimate from images, but a physical product sample reveals whether a cap wiggles, a cable bends awkwardly, or a glossy coating marks against foam.
Over-tight cavities are another common failure. They look tidy in a rendering. Then customers pry the item out, fingernails scrape the finish, or the foam tears after repeated removal. A premium package should not make the buyer wrestle the product. Finger access should be designed, not added late because someone finally tried to remove the sample.
Accessory movement is underestimated constantly. Small cables, caps, droppers, tools, glass parts, and printed booklets can damage the hero product when they are not restrained. Even a small metal charging tip can scuff a painted surface during carrier vibration. If accessories matter, give them their own wells or a controlled compartment.
Beauty finishes can conflict with protection. A luxury rigid box with foil and soft-touch wrap still needs board strength, correct foam density, and a shipping strategy. If it ships through parcel networks, the retail box may need a corrugated outer carton, corner protection, or void fill. A beautiful package that fails transit is still failed packaging.
Ignoring fulfillment labor creates quiet cost creep. Complicated inserts can slow packing lines, increase mispacks, and frustrate warehouse teams. A five-cavity insert may look organized, but if two accessories are nearly identical in size, packers may put them in the wrong wells unless the layout is visually obvious.
Material assumptions cause trouble too. Foam color can vary by batch. Some foams have stronger odor than buyers expect, especially when packed quickly after production. Soft-touch coatings can mark if they rub against certain materials. Adhesives can fail if the insert is bonded to a coated surface without proper testing. None of this is exciting. All of it matters.
Test the package as a full system: inner box, foam, instruction card, outer carton, label placement, void fill, master carton, pallet pattern, and final carrier handling. Standards from ISTA and ASTM are useful because they force packaging teams to think beyond the pretty sample on a conference table. Real distribution is rougher than a design review.
Build a Packaging Brief Your Supplier Can Price Accurately
A strong packaging brief reduces guessing. Gather exact product dimensions, weights, photos, fragility notes, finish concerns, and a full accessory list before asking for pricing. If there are multiple SKUs, say whether they need one universal insert or separate cavities. Universal inserts can reduce complexity, but they may compromise fit.
Define the main goal. Are you trying to reduce breakage, upgrade presentation, organize a kit, support retail display, prepare for ecommerce shipping, or improve perceived value? A supplier will make different choices for each goal. A retail-first box may emphasize print finish and shelf presence. An ecommerce-first box may prioritize corrugated strength, foam restraint, and parcel test performance.
Choose two target budget levels: one practical option and one premium option. That allows the supplier to compare materials and structures instead of guessing whether cost, protection, or presentation matters most. Good-better-best quoting is especially useful for custom packaging boxes with foam inserts because small structural changes can shift unit cost, assembly time, and unboxing quality.
- Product sample: Send one if the item is fragile, glossy, irregular, heavy, or high-value.
- Preferred box style: Mailer, rigid box, folding carton, sleeve, drawer box, or corrugated shipper.
- Foam preference: EVA, PE, PU, EPE, paperboard insert, molded pulp, or “recommend based on product.”
- Quantity range: Include estimated reorder volume, not only the first order.
- Artwork files: Provide vector logo files, dieline-ready artwork if available, colors, and finish notes.
- Delivery details: Share destination, launch deadline, retail requirements, and whether transit testing is needed.
Ask for a prototype before mass production, especially for fragile, high-value, or unusually shaped products. A digital rendering cannot prove cavity clearance, lid pressure, removal comfort, or carrier vibration performance. A physical sample can.
If you are comparing box formats and finishes, start with Custom Packaging Products and build the brief around the product’s real risks. Foam insert packaging works best when protection, presentation, Cost, and Timeline are decided together. Once the artwork is approved and the launch date is close, every structural change gets more expensive. Packaging has a nasty sense of timing.
FAQ
Are custom foam insert boxes worth it for small products?
Yes, if the product is fragile, premium, multi-piece, or prone to scratches. The insert prevents movement and improves presentation. For low-cost, lightweight, non-fragile items, a paperboard insert or molded pulp tray may be more cost-effective. Compare damage risk, return cost, customer perception, and assembly time before choosing foam.
What foam is best for custom packaging boxes with inserts?
EVA foam is often best for premium retail presentation because it feels firm and has clean-cut edges. PE foam suits heavier or industrial products that need durable impact resistance. PU foam works well for soft cushioning, while EPE foam can be a lighter-budget option for shipping protection.
How do I measure products for custom foam packaging?
Measure length, width, height, weight, and protruding parts such as buttons, caps, lenses, handles, hinges, or cables. Send photos from multiple angles and note surfaces that must not rub against foam or other items. For best accuracy, provide a physical sample or CAD file so the supplier can design proper cavity clearance.
What affects the price of custom boxes with foam inserts most?
The largest cost drivers are order quantity, box size, foam type, foam thickness, number of cutouts, print coverage, and special finishes. Setup costs such as tooling, sampling, and design work matter more on smaller runs. Asking for multiple material options helps compare unit cost against protection and presentation.
How long does it take to produce custom packaging with foam inserts?
Timing depends on design complexity, sampling rounds, material availability, artwork approval, order quantity, and shipping method. Simple box-and-insert projects move faster than rigid boxes with premium finishes and complex multi-cavity foam. Approving a physical sample early and providing complete specs reduces avoidable delays.