Cotton Tote Bags Printed: How to Order the Right Run
Cotton tote bags printed look simple until the fabric weight, print method, and construction start affecting the final result. The lowest quote can become the most expensive option if the ink bleeds, the tote collapses under load, or the handles fail early.
A tote is not just a logo surface. It has to carry weight, hold shape, and still look credible after folding, shipping, and repeated use. That is why buyers need to judge the bag as a finished product, not just an artwork placement.
Color also changes the outcome. Natural cotton gives a softer, more organic look, but it can mute some shades. White cotton usually gives the cleanest contrast, while darker dyed bags may need stronger ink coverage or an underbase to keep the design legible.
A tote only feels cheap once someone uses it. By then, thin fabric, weak stitching, and poor print coverage are no longer theoretical problems.
The buying decision comes down to a connected set of specs: bag weight, weave density, color, print process, placement, and use case. A trade-show handout bag can be lighter than a retail merch tote, but both still need to survive the first carry without looking rushed.
Cotton Tote Bags Printed: Why They Surprise Buyers
From a packaging buyer's perspective, cotton tote bags printed are a spec exercise disguised as an artwork job. The logo matters, but the bag still has to behave like a useful object. It needs enough structure to stand up, enough stitch strength to last, and enough print clarity to read at normal distance.
The most common mistake is treating the tote like a poster with handles. That works in a mockup, then fails when a thin 4 oz bag arrives limp, shows through on the reverse side, or twists under load. The quote was low, but the usable result was not.
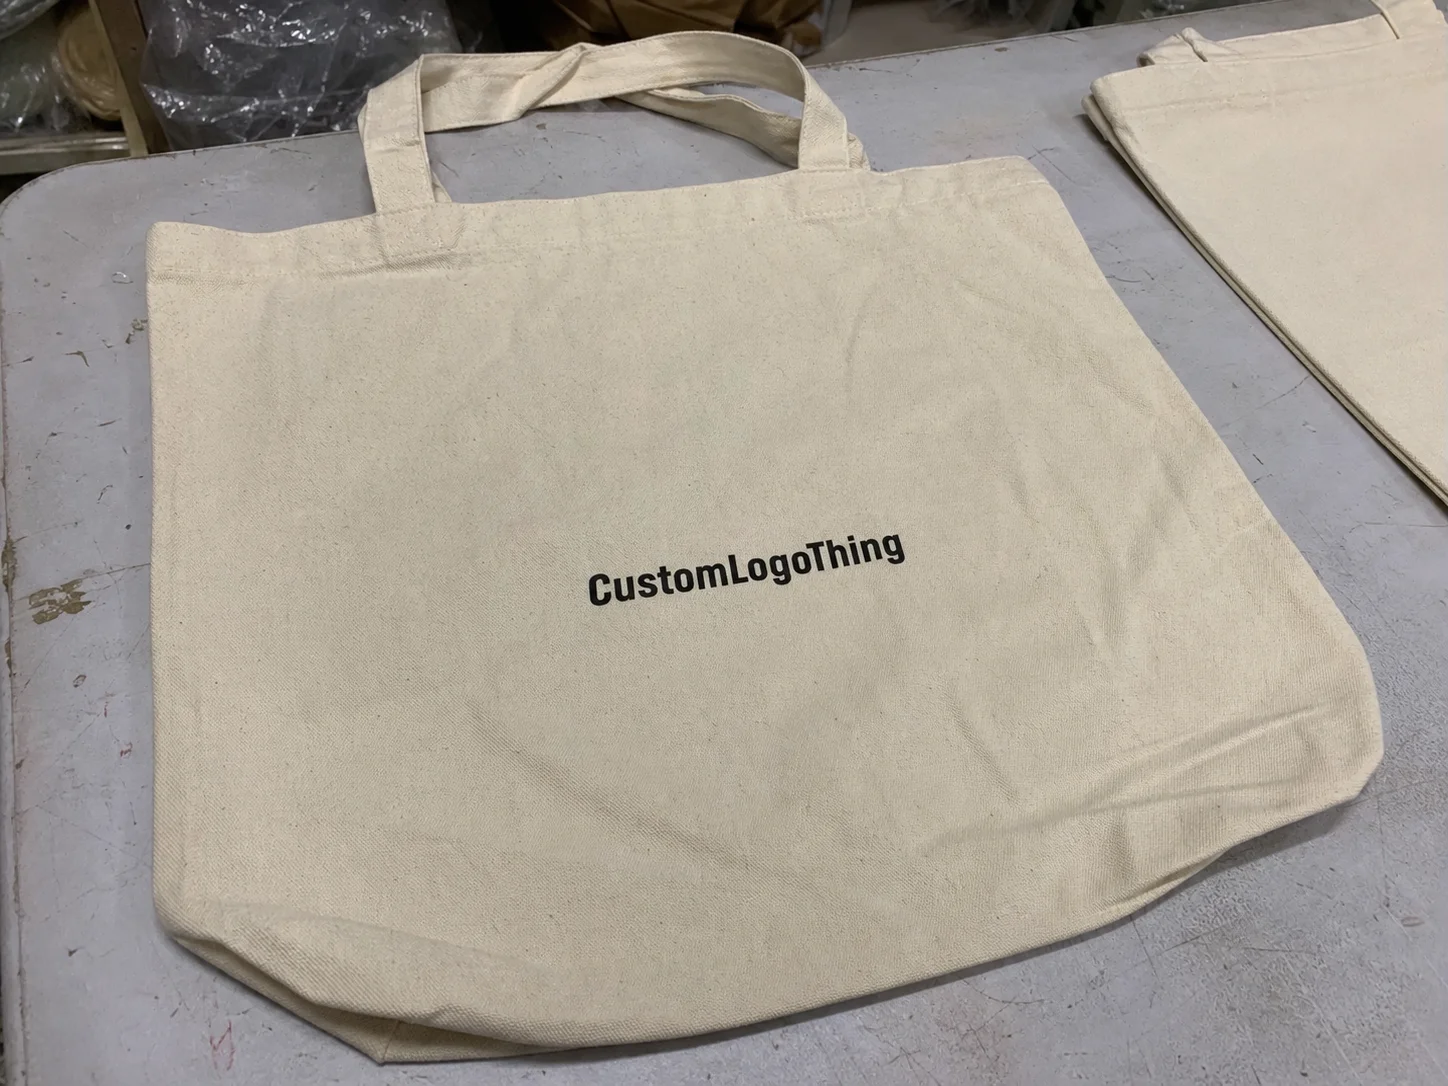
Material choice changes the look more than most art revisions do. Natural cotton can suit an earthy or casual brand, but fine lines may soften. White cotton is the safest route for contrast, while dyed fabric often needs a stronger ink layer to keep the logo readable.
Construction matters just as much. Gussets add volume, reinforced handles reduce early failure, and double stitching improves recovery after repeated use. If the design sits too close to a seam or fold, the artwork can distort, and that is hard to catch in a flat proof.
How the printing process works on cotton totes
Most suppliers will steer you toward one of three production methods: screen printing, heat transfer, or direct-to-garment. Each has a different strength, and the wrong choice usually shows up after approval, not before.
Screen printing is the most common choice for volume orders. It handles bold logos, spot colors, and larger runs efficiently, especially when the artwork is one to three colors and does not rely on tiny detail.
Heat transfer is better for gradients, small text, or lower quantities. It can reproduce artwork that would be awkward in screen print, but the finish may sit more on top of the fabric and feel less integrated over time.
Direct-to-garment is less common on totes than on apparel, and on heavier cotton it is not always the best fit. For some artwork it can work, but many programs are better served by methods designed specifically for flat goods.
Prepress is where many avoidable problems start. Send vector art if you have it. Confirm whether Pantone or CMYK is being used. Lock the print placement in inches, not in vague language. If the tote is dark, ask whether the design needs an underbase.
Proofing should be treated as a production checkpoint, not paperwork. A flat mockup is useful, but a proof scaled to the actual tote size is more reliable. For delicate artwork, a sample can catch registration issues, color drift, and placement errors before a full run begins.
The production sequence is straightforward: blank bag prep, artwork setup, printing, curing or drying, inspection, folding, packing, and carton labeling. Most delays happen at handoffs, when the file arrives late, the proof needs a correction, or the print has to be run again.
Shipping and packaging also deserve attention. If the bags are going into retail cartons, insert packs, or event kits, transit testing standards such as those published by ISTA are a useful reference point. If paper inserts or labels are part of the order, FSC certification can help keep the supply chain story cleaner.
Fabric weight, weave, and print quality factors
Fabric weight is the first spec worth checking. A 4 oz to 5 oz tote can work for brochures, flyers, or a one-day event. Move to 8 oz or 10 oz and the bag gains structure, which improves the hand feel and makes the product look more intentional.
Heavier is not automatically better. A thick bag with a loose weave can still print poorly if the surface is uneven. A tighter weave usually produces sharper edges on small type and cleaner logos with thin lines, so the weave matters as much as the artwork file.
Natural cotton can introduce variation. Lint, flecking, and small tonal differences between lots are normal, especially on unbleached fabric. White cotton generally gives the cleanest color appearance. Dyed cotton can look more premium, but the darker the base, the more the print method has to work to keep the design readable.
Construction affects the final result in practical ways. Gussets increase capacity, reinforced handles improve durability under load, and double-stitched seams hold up better after repeated use. If a print lands across a fold or too close to a seam, the artwork can distort.
For quick planning, a 5 oz or 6 oz bag is usually acceptable for a lightweight giveaway. An 8 oz to 10 oz bag is the safer middle ground for brand merch or retail promotions. A 12 oz tote is where structure, durability, and presentation begin to support a more premium price.
Cost, pricing, MOQ, and what drives your quote
Price is never just the bag. It includes fabric weight, print area, print method, color count, setup work, finishing, packaging, and freight. If a quote looks unusually simple, something is probably missing.
MOQ is often where buyers hesitate, but the logic is straightforward. Setup costs do not shrink just because the order is small, so a 100-piece run will carry a much higher unit cost than a 1,000-piece run because the setup is spread across fewer bags.
| Option | Typical use | Approx. unit cost range | Main tradeoff |
|---|---|---|---|
| 5 oz natural cotton, one-color screen print | Events, handouts, simple giveaways | $0.90-$1.80 at 1,000 pcs | Lowest entry cost, lighter feel |
| 8 oz cotton, one- to two-color screen print | Retail promos, brand merch | $1.40-$2.80 at 1,000 pcs | Better structure, moderate setup |
| 10 oz cotton, heat transfer or detailed print | Artwork with fine detail or gradients | $1.80-$3.75 at 500 pcs | More detail, higher process cost |
| 12 oz cotton, two-sided print, custom labeling | Merch, resale, premium campaigns | $2.75-$5.50 at 1,000 pcs | Strong presentation, more total spend |
Those ranges are working figures, not promises. Exact pricing shifts with print size, bag size, color count, rush timing, and any finishing requests such as folding, polybagging, or Custom Hang Tags. One-sided printing is usually cheaper than two-sided printing, and a larger imprint area often adds cost because of ink usage and setup time.
The quickest quote drivers are easy to spot: bigger print dimensions, extra colors, specialty inks, rush production, and custom packaging. If you want clean comparisons between suppliers, send the exact bag spec, the imprint dimensions, the quantity tiers, and the delivery destination. Otherwise, you are comparing estimates that may not mean the same thing.
Step-by-step ordering from artwork to delivery
Start with the use case. A retail tote needs stronger fabric, tighter print control, and usually better finish quality than a one-day event bag. Internal merch sits in the middle, while resale product demands the most consistency.
Then review the artwork. Confirm the logo file, the color values, the clear space around the mark, and whether the selected print method can reproduce the detail you want. Vector art is still the safest route for screen printing, while raster files need enough resolution to hold up on fabric.
The approval chain should stay simple: quote, proof, revision if needed, sample if needed, production, curing or finishing, packing, shipping. If a step gets skipped because the order feels easy, that is usually how a simple order becomes an expensive one.
- Define the use case and target feel.
- Set the bag size, weight, and handle length.
- Approve the artwork placement and print size.
- Confirm the print method and color count.
- Review the proof or sample before production.
- Build in a small quantity cushion for defects or overage.
- Check the shipment against the approved spec on arrival.
The last step matters because count accuracy, print consistency, and handle strength are all easy to verify when the bags arrive and harder to fix after they have been distributed. A good receiving check catches problems before they reach customers or event kits.
Common mistakes that lead to reprints and delays
The first mistake is sending low-resolution art and expecting crisp edges on fabric. Cotton hides some flaws and exposes others, so jagged lines, tiny type, and thin strokes can collapse once they hit a woven surface.
The second mistake is assuming a screen mockup equals print reality. It does not. A bright blue on a monitor can come out flatter on natural cotton, and a dark logo can disappear on a dyed bag if no underbase is used.
The third mistake is vague specs. No placement, no approved sample, no quantity cushion, no delivery window. That is how production gets forced into guesses, and guessing is not a quality-control method.
The fourth mistake is overloading the design. On a tote, restraint usually looks better. A clear logo, a readable message, and enough negative space often outperform a crowded layout with tiny copy that disappears after the first fold.
The fifth mistake is ordering too few units for the pricing structure. A small run can make sense, but it rarely gives efficient pricing. If the tote will be used across multiple events, the unit economics usually improve enough to justify a larger quantity.
Expert checks before you place the order
Before you approve cotton tote bags printed, check seven things: bag weight, bag size, handle length, print dimensions, color count, total quantity, and target delivery date. If one of those is unclear, the quote is not truly comparable yet.
Ask for one proof image that shows the artwork at actual scale on the tote. A floating logo on a white background is not enough. You need to see whether the mark sits too close to a seam, whether the proportions feel right, and whether the print area is large enough to read from a normal distance.
It also helps to ask how the supplier handles overage, spoilage, and replacements. A small allowance is normal on production runs, and a supplier that hides the issue is shifting the mismatch to you after shipment.
- Request a line-item quote, not a lump sum.
- Confirm one-side or two-side printing before proof approval.
- Check whether custom labeling or folding changes the timeline.
- Verify carton counts and carton labels before shipment leaves.
- Keep approved artwork and specs on file for reorders.
That is the clean way to buy cotton tote bags printed: lock the spec, approve the proof, and compare suppliers on the same numbers. Once those details are fixed, the project behaves like a controlled production run instead of a guessing game.
How long do cotton tote bags printed usually take?
Standard runs often take about 10 to 15 business days after artwork approval, but the exact schedule depends on print method, quantity, and whether samples are required. Add buffer time for proof revisions, specialty inks, and busy production periods. If the bags are tied to an event or launch, get the ship date before approving the final art.
What is the best print method for printed cotton tote bags?
Screen printing is usually the best fit for bold logos and larger quantities because it keeps unit costs under control and holds up well in use. Heat transfer can work for detail-heavy artwork or smaller runs, but the feel and durability may differ. The right method depends on the art, the fabric color, and how the tote will be used.
Why does the unit cost change so much on cotton tote bags printed?
Setup, print color count, bag weight, and order quantity all change the math quickly. Small orders carry a higher unit cost because setup is spread across fewer bags. Extra finishing steps, rush orders, and custom packaging also push the price up.
What should I send for an accurate quote on cotton tote bags printed?
Send the bag size, fabric weight if known, print dimensions, artwork file, quantity, and the delivery ZIP or destination. Include whether you want one-side or two-side printing and whether you need a sample first. The more exact the spec, the fewer surprises later.
Can cotton tote bags printed handle repeated use?
Yes, but only if the bag weight, stitching, and print method are chosen for repeat carrying, not just one-time distribution. Heavier cotton and stronger seam construction usually last longer and keep their shape better. If durability matters, ask for a sample or material spec instead of guessing from a catalog image.
Start with the bag spec, not the artwork. Align the fabric weight, print method, quantity, and delivery window first, then approve the proof with your eyes open.