Custom Branding Stickers Turn Plain Packaging Into Proof
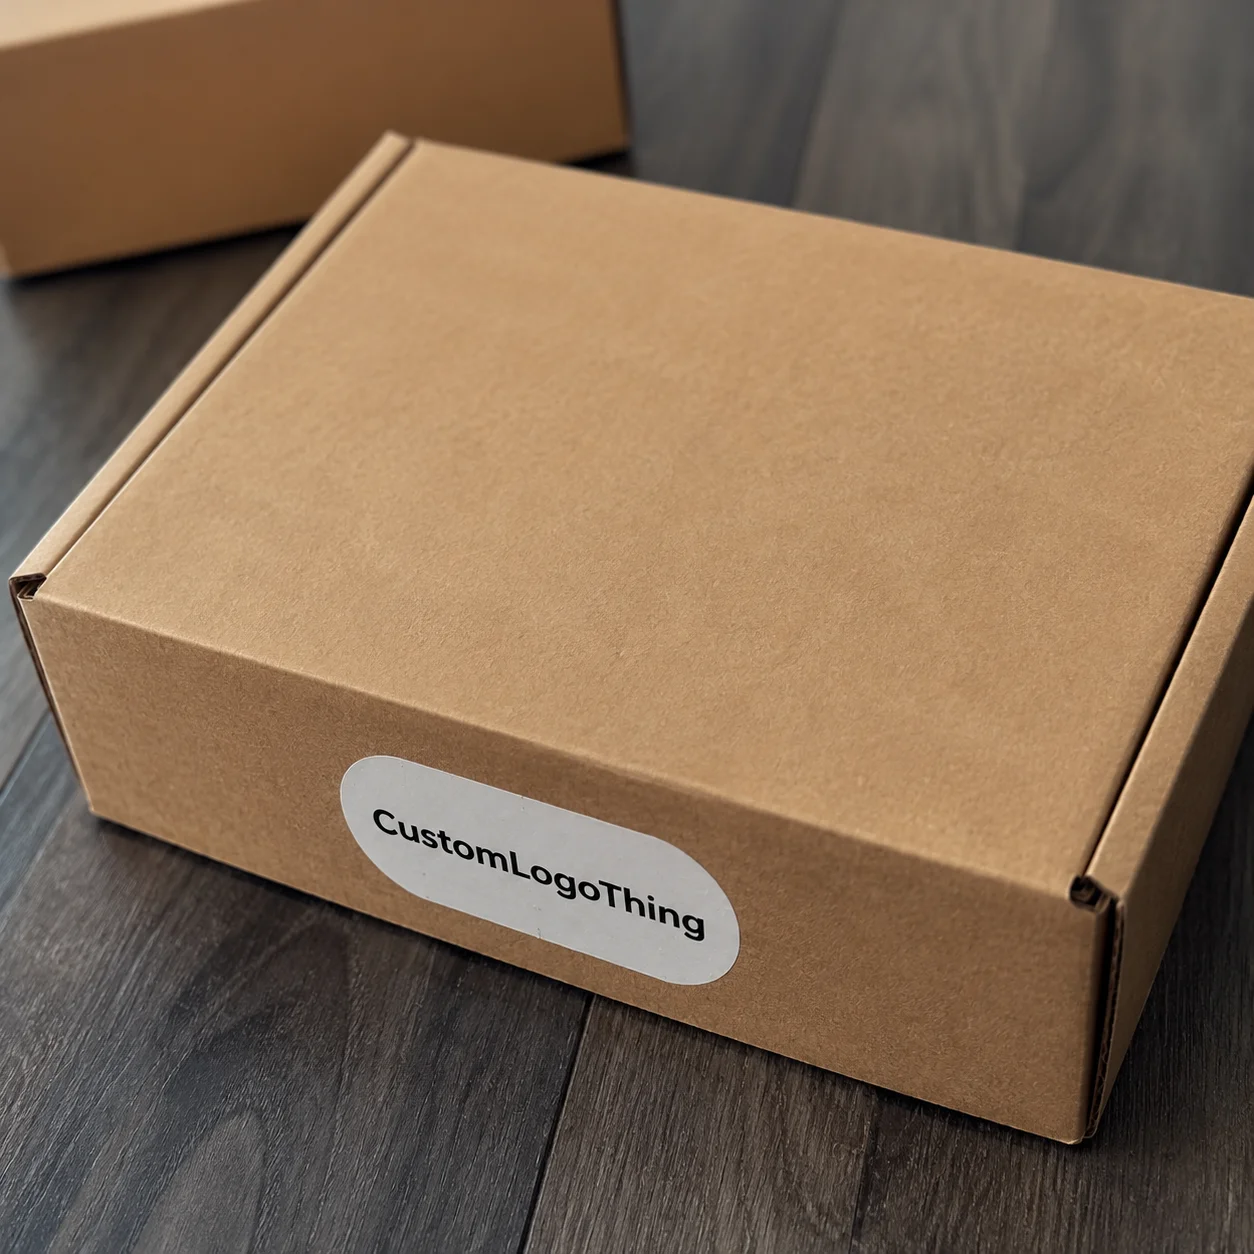
Two identical kraft mailer boxes land on a desk. One is plain. The other is sealed with crisp Custom Branding Stickers carrying a clean logo, a batch note, and a small “packed with care” message. Same box. Same product inside. Different signal.
That second package looks inspected. Intentional. Gift-ready. And the sticker may have cost only a few cents, while a fully custom printed box could require higher minimums, longer lead times, and more storage space. Packaging buyers know this tension well: brand polish still has to fit inside real constraints.
A branding sticker is a printed adhesive piece that carries a logo, message, QR code, seal, product callout, campaign visual, or compliance detail across packaging and customer touchpoints. It can close tissue paper, brand a stock mailer, turn a blank pouch into retail packaging, or add a limited-edition message without rebuilding the whole packaging system.
The category gets fuzzy fast, so here is the clean version. Branding stickers mainly support identity. Product labels identify the item and often include ingredients, net weight, warnings, barcodes, or batch data. Packaging seals close a box, bag, or wrap. Promotional decals are often meant to be kept or placed somewhere else. Informational labels carry operational or regulatory details. One sticker can do two or three of these jobs. That does not mean every sticker should.
This is why stickers are underestimated. On small orders, sample kits, subscription drops, event giveaways, candle boxes, jars, mailers, tissue wrap, and shipping cartons, the sticker may be the most handled brand surface. Not the website. Not the insert card. The sticker.
Packaging decisions are judged fast. Retail and eye-tracking research varies by product category, but the practical takeaway is consistent: people form a packaging impression in seconds, not minutes. A low-cost adhesive label can change perceived finish faster than almost any other packaging design move. For brands still testing SKUs, markets, scents, flavors, sizes, or seasonal drops, that flexibility matters.
The best use cases are usually practical: sealing tissue, branding stock boxes, labeling jars or pouches, adding batch details, creating limited-edition product packaging, supporting event giveaways, or adding QR codes to reorder pages and care instructions. If you already buy custom packaging products, stickers can bridge the gap between plain inventory and fully printed packaging without forcing you into a warehouse full of obsolete boxes. Because yes, obsolete packaging is where good budgets go to die.
How Branded Stickers Work Across Materials, Adhesives, and Finishes
A sticker is simple only from the top. Under the artwork, it is a small engineered stack: face stock, adhesive, release liner, ink system, coating, and cut shape. Change one layer and performance changes. Sometimes dramatically.
Paper stickers are the economical choice for dry, indoor packaging. Think bakery boxes, tissue seals, thank-you labels, paper shopping bags, and low-abrasion retail packaging. They print well, feel familiar, and suit brands that want a natural, craft, or low-gloss look. They are a weak choice for condensation, oils, refrigeration, repeated rubbing, or wet hands unless a protective coating is added.
BOPP, short for biaxially oriented polypropylene, is a common film label material for moisture resistance and flexible containers. It works well on jars, bottles, pouches, cosmetics, and food-adjacent packaging where water, oils, or abrasion may show up. Vinyl is tougher and more flexible, often used for decals, outdoor use, curved surfaces, and promotional stickers that people may place on laptops or bottles. Polyester is the durable option for demanding labels, especially where heat, chemicals, long shelf life, or higher abrasion resistance matter.
Adhesive choice is just as consequential. Permanent adhesive suits seals and product labels that should stay put. Removable adhesive supports temporary pricing, promotions, reusable containers, or display pieces. Freezer-grade adhesive is built for cold-chain goods where standard adhesive may stiffen or lose grip. High-tack adhesive helps on textured paper, recycled kraft, corrugate, and some low-energy plastics, though surface testing is still smart. “Permanent” is not magic. It still needs the right surface, pressure, temperature, and time.
Finishes change durability and perception. Gloss makes color pop and wipes clean more easily. Matte feels calmer and often pairs well with premium, wellness, food, and natural packaging. Soft-touch feels expensive, but it can scuff if the coating is poorly matched to the use. Clear stock can disappear against glass or plastic, but white ink may be needed behind the art so the logo does not look washed out. Metallic, holographic, spot UV, and lamination add presence, cost, and sometimes extra lead time.
Print method affects the math. Digital printing suits short runs, multiple SKUs, variable artwork, and test campaigns. Flexographic roll-label production can lower unit cost at higher volumes because setup is spread across more pieces. For broader packaging context, groups such as the Packaging Machinery Manufacturers Institute publish useful information around packaging operations, automation, and production planning.
Practical rule: a beautiful sticker still fails if it curls, smears, lifts, cracks on a curve, or refuses to bond to the actual package surface.
Format matters too. Kiss-cut sheets are convenient for small teams and assorted designs. Rolls support faster hand application and machine labeling. Die-cut singles feel more like promotional decals. Tamper-evident seals add reassurance but need careful adhesive and perforation choices. For high-volume fulfillment, roll orientation, core size, label gap, and unwind direction can be as important as artwork. The packing line does not care how nice the PDF looked.
Key Specs to Decide Before You Request Artwork or Samples
Good sticker orders begin before design. That sounds backward, but it is true. A designer can make a gorgeous 2-inch circle, yet if the sticker has to bridge a box flap with a 0.25-inch gap, survive warehouse dust, and wrap slightly around an edge, beauty alone will not carry it.
Start with size. A 1.5-inch circle can work for tissue paper or a small jar lid. A 2-by-3-inch rectangle may suit a pouch front or product information label. A 3-inch seal can anchor the opening experience on a mailer box, but it may look clumsy on a narrow candle carton. Measure the real package, not the dieline in isolation.
Shape sets the mood and affects durability. Circles feel friendly and versatile. Rectangles carry information efficiently. Ovals often suit premium food, wellness, beauty, and gift products. Custom Die Cuts can make logos, mascots, or campaign shapes more memorable, although narrow points and tiny cutouts may peel faster during handling.
Color needs technical discipline. Most sticker printing uses CMYK, while some brands specify Pantone targets for tighter color control. Screens glow. Kraft paper absorbs. Clear film changes opacity. A navy logo on matte white BOPP will not look identical to the same logo on uncoated paper. If brand color is critical, request a press proof or physical sample rather than trusting a digital PDF and hoping the printer can read your mind. Printers remain stubbornly human.
White ink deserves its own mention. On clear stock, white ink often sits under the printed design to keep colors opaque. Without it, red may turn cranberry on amber glass, black may look soft on a dark pouch, and small text may lose contrast. Clear labels can look elegant, but only if opacity is planned before production.
Test the surface. Kraft paper, coated cartons, glass, PET bottles, HDPE jars, corrugate, compostable mailers, and textured papers all behave differently under adhesive. Recycled fibers can be dusty. Compostable films can be tricky. Curved jars create edge stress. Cold surfaces slow adhesive flow. Oil from candles, cosmetics, or food can interfere with bonding.
Exposure should drive material and coating decisions. Heat, cold, humidity, oils, abrasion, condensation, sunlight, and frequent handling all change the brief. A shipping carton label faces different risks than a cosmetic jar label sitting in a steamy bathroom. For shipping performance context, the International Safe Transit Association offers testing standards that help buyers think beyond the shelf photo.
If your stickers carry barcodes, ingredients, warnings, batch numbers, or regulatory text, readability becomes a production spec rather than a design preference. Small reversed type, weak contrast, or glossy reflections can create scanning and compliance headaches. Before requesting quotes, build a simple spec sheet: size, shape, material, finish, quantity, artwork status, application surface, and usage environment. It saves emails. More importantly, it prevents bad assumptions.
Pricing, MOQ, and Unit Cost Drivers Buyers Should Know
Sticker pricing is not just square inches. That is the first pricing myth. Cost comes from material, setup, print method, ink coverage, finish, cutting, quantity, packing format, proofing requirements, and sometimes how the roll or sheet must be packed for the team applying it.
Digital printing can support low minimums, sometimes a few hundred pieces depending on size and supplier. Unit cost is higher because setup, file handling, press time, and finishing are spread across fewer stickers. At larger quantities, flexographic roll production may bring unit cost down sharply, especially for repeat artwork on standard materials.
For a simple paper circle, buyers may see rough pricing from about $0.03 to $0.12 per sticker at moderate quantities, depending on size, coverage, and finish. Small premium labels in waterproof BOPP might land around $0.08 to $0.25 each. Specialty foil, holographic film, spot UV, complex die cuts, or low-volume multi-SKU orders can push higher. These are directional ranges, not promises. Freight, artwork cleanup, proofing, and supplier location can move the number.
| Option | Typical Use | Relative Cost | Buyer Watchout |
|---|---|---|---|
| Paper sticker on sheets | Tissue seals, event kits, dry retail bags | Low | Limited moisture and abrasion resistance |
| BOPP roll label | Jars, bottles, pouches, fulfillment stations | Medium | Needs adhesive testing on flexible or oily surfaces |
| Clear film with white ink | Glass, cosmetics, premium product packaging | Medium to high | Opacity and color shifts need proofing |
| Foil or spot UV sticker | Luxury seals, limited editions, gift packaging | High | Extra setup and longer production time |
| Custom die-cut decal | Logo shapes, mascots, promotional giveaways | Medium to high | Small points and thin shapes can lift |
MOQ, or minimum order quantity, is practical rather than mysterious. A supplier has to set up files, calibrate equipment, print, cut, inspect, and pack the job. The first 250 stickers carry more administrative weight per piece than the next 5,000. That is why a quote might drop from $0.22 each at 500 pieces to $0.07 each at 5,000 pieces for the same design.
Roll labels often win at scale. They are easier to count, faster to apply, and compatible with applicators when specified correctly. Sheet stickers can be better for small batches, pop-up kits, sample inserts, and manual packaging stations where workers need a variety of designs in front of them.
Hidden cost variables deserve attention: rush fees, multiple artwork versions, barcode testing, Pantone matching, split shipments, custom dies, specialty adhesives, varnish changes, and sample rounds. If you are ordering several SKU versions, ask whether ganging artwork together can reduce setup cost or whether each version prices as a separate job.
A better quoting strategy is to request three quantity breaks: a test run, expected monthly use, and bulk reorder level. For example, ask for 500, 2,500, and 10,000 pieces. The curve tells you whether it is smarter to buy lean or hold extra inventory. The cheapest sticker can become expensive if it slows hand application, causes relabeling, or creates returns because adhesive fails.
Process and Timeline From File Prep to Finished Stickers
The typical path is straightforward: define specs, submit artwork, receive a quote, approve a digital proof, request a physical sample if needed, enter production, inspect, pack, and ship. The problems usually appear when teams skip one of those steps because the sticker feels “small.” Small components can still delay a launch.
Artwork prep should be clean. Send vector logos, usually AI, EPS, or editable PDF files. Outline fonts. Add bleed, commonly 0.0625 to 0.125 inch depending on the supplier. Keep critical text inside a safe margin. Use high-resolution images at 300 dpi at final print size. For clear stock, label white ink layers clearly. For barcodes, check quiet zones and minimum size before proof approval.
Digital proofs catch layout issues, spelling mistakes, cut lines, bleed problems, and obvious color concerns. They do not fully reveal material feel, adhesive grip, opacity, scuff resistance, or how matte varnish behaves on a dark ink field. Physical samples are worth the time for recycled kraft, flexible pouches, frozen goods, cosmetics, candles, glass jars, or outdoor exposure.
Timelines vary. Simple digitally printed paper or BOPP stickers may take roughly 5 to 10 business days after proof approval, depending on the supplier’s queue. Foil, custom die-cut, laminated, multi-SKU, or roll-label jobs can land closer to 10 to 20 business days. Physical sampling adds time. Rush production may be possible, but it can increase cost and reduce room for testing.
Changes after proof approval are the classic delay. A logo swap, QR code update, new Pantone target, or revised copy can restart prepress. Specialty materials can also stretch timing if the stock is not on hand. The more unusual the adhesive, film, liner, or finish, the earlier it should be discussed.
Shipping and receiving details matter more for operations than marketing teams expect. For machine application, specify roll orientation, core size, outside roll diameter, label gap, and unwind direction. For hand application, confirm whether sheets, rolls, or singles will reduce labor. A sticker that takes 12 seconds to peel instead of 4 seconds can add real labor cost over 5,000 packages.
Build timeline buffer before launches, trade shows, subscription drops, and retail deliveries. Stickers often sit near the end of the packaging chain, after boxes, inserts, and product fill schedules. That means they inherit everyone else’s delays. A smart brief protects the schedule.
If your team is still comparing broader packaging formats, Custom Logo Things’ Custom Labels & Tags category is a logical place to align sticker specs with hang tags, product labels, and branded packaging components.
Common Mistakes That Make Sticker Branding Look Cheap
The most visible mistake is scale. A 1-inch sticker can look lost on a 10-inch mailer. A 4-inch sticker can overwhelm a small jar lid. Print a paper mockup at actual size and place it on the package before approving artwork. It is low-tech and brutally useful.
Adhesive mismatch is next. A sticker that performs beautifully on smooth glass may lift from recycled kraft, cold pouches, oily tins, textured mailers, or dusty corrugate. Adhesive needs contact, pressure, and time to flow into the surface. If the package is cold, rough, curved, or contaminated, standard permanent adhesive may not be enough.
Edges create failure points. Sharp corners, narrow points, and intricate die cuts look sharp in a dieline, but they can peel faster on curved containers or packages handled repeatedly. Rounded corners often survive better. For seals that bridge a flap, test whether the sticker cracks, tents, or pulls loose when the package flexes.
Artwork errors are painfully common: low-resolution logos, missing bleed, tiny text, thin reversed type, weak contrast, and overcomplicated layouts. A sticker is not a brochure. If the finished size is 1.5 inches, every word must earn its space. QR codes also need enough size and contrast to scan after printing, coating, and application.
Finish mismatch can cheapen good packaging design. A glossy sticker on an earthy matte box may feel disconnected unless the contrast is intentional. A soft-touch label on a rugged corrugate shipper may look premium, or it may look fussy. The right answer depends on the brand identity and the surface around it.
Operational mistakes are less glamorous but more expensive. Ordering sheets when the packing team needs rolls adds handling time. Choosing the wrong unwind direction can stop an applicator. Forgetting to test peel speed can slow fulfillment. Buying 20,000 campaign-specific stickers for a short promotion can leave dead inventory, while under-ordering evergreen brand seals can create emergency reprints.
Inventory planning should separate evergreen branding from seasonal messaging. Keep core logo seals flexible. Put limited offers, event dates, launch copy, and promotional claims on smaller batches. That keeps reorders efficient and reduces obsolete stock. For examples of how packaging choices affect presentation across different product categories, the packaging case studies page can help frame tradeoffs.
Build a Smarter Sticker Order Brief
A good sticker brief does not need to be fancy. It needs to be specific. Before requesting pricing, gather the package surface, sticker purpose, dimensions, shape, material preference, adhesive need, finish, quantity, application method, and deadline. Add photos of the package if the surface is textured, curved, coated, recycled, oily, chilled, or flexible.
- Purpose: seal, brand, inform, promote, identify, or decorate.
- Surface: kraft paper, coated carton, glass, plastic, corrugate, pouch film, or compostable mailer.
- Size and shape: measured against the real package, not guessed from a screen.
- Material and adhesive: paper, BOPP, vinyl, polyester, removable, permanent, freezer-grade, or high-tack.
- Finish: matte, gloss, soft-touch, clear, metallic, holographic, spot UV, or laminated.
- Operations: sheets, rolls, singles, hand application, machine application, roll core, unwind direction, and deadline.
Order sample materials before committing to a large run, especially for recycled paper, flexible pouches, cold products, candles, cosmetics, food packaging, or outdoor use. Samples do not need to be perfect production replicas to be useful. Even a blank material sample can reveal stiffness, opacity, edge behavior, and adhesive grip.
Test under real conditions. Apply by hand. Stack packages. Rub the sticker against another carton. Chill or warm the product if that reflects storage. Leave the sticker in place for several days and check corners. If the package ships, run a small transit test or at least simulate friction and compression. Packaging failures rarely announce themselves during the first five minutes.
Separate evergreen and seasonal needs. One minimal logo seal can support routine package branding all year. A second, more detailed label can carry product information, launch copy, QR codes, or promotional storytelling. That structure keeps your base inventory useful while giving marketing room to move.
For a cleaner quote, send dielines, vector logo files, Pantone targets if applicable, photos of the application surface, quantity ranges, desired delivery date, and any applicator requirements. If the sticker must work with Custom Printed Boxes, jars, pouches, mailers, or retail displays, say so. Suppliers quote more accurately when they understand the whole packaging system.
Before ordering custom branding stickers, match the design ambition to the surface, handling conditions, budget, and timeline. The goal is not just a pretty label. It is a sticker that performs like part of the package, not a last-minute patch.
Frequently Asked Questions
What are custom brand stickers used for in packaging?
They are used to seal tissue, brand plain boxes or bags, label products, highlight promotions, add QR codes, and make small-batch packaging look professionally finished. For many small brands, custom branding stickers bridge the gap between stock packaging and fully custom packaging.
How much do custom logo stickers usually cost?
Cost depends on size, quantity, material, finish, shape, adhesive, and print method. Basic paper stickers can cost only a few cents at higher quantities, while waterproof films, foil, spot UV, custom cuts, or small runs cost more. Request multiple quantity breaks because unit cost often falls sharply at higher volumes.
What material is best for branded packaging stickers?
Paper works well for dry indoor packaging, including tissue seals, paper bags, and simple product boxes. BOPP, vinyl, or polyester are better for moisture, oils, flexible containers, refrigeration, abrasion, or heavy handling. The best choice depends on the application surface and storage conditions.
How long does it take to produce custom packaging stickers?
Simple digitally printed stickers can move quickly after proof approval, often within about 5 to 10 business days depending on the supplier’s schedule. Specialty finishes, custom dies, physical samples, large runs, roll-label requirements, or multiple SKU versions can add time.
Can custom branding labels be applied by machine?
Yes. Machine application is common for roll labels, but buyers must specify roll format, core size, label gap, unwind direction, outside roll diameter, and applicator requirements before production. Those details prevent feeding, spacing, and orientation problems during labeling.


