A custom bubble mailer sits between a plain pouch and a corrugated box. It adds light cushioning, supports branded presentation, and keeps shipping weight and bulk lower than a carton. For apparel, books, beauty products, accessories, and small kits, that balance often makes the package easier to fulfill and less expensive to ship.
The real decision is not whether the mailer can be printed. It is whether the size, material, and closure suit the item inside. A good-looking mailer that is too small, too loose, or too weak will create damage, returns, and wasted freight. Packaging only helps when the structure matches the product and the route.
Bubble mailers are useful when the contents need modest protection and a cleaner customer-facing finish. They are less appropriate for heavy, fragile, sharp, or irregular items that need rigid support. In those cases, a box with inserts is usually the safer choice.
What a Custom Bubble Mailer Is and Why It Beats Plain Pouches
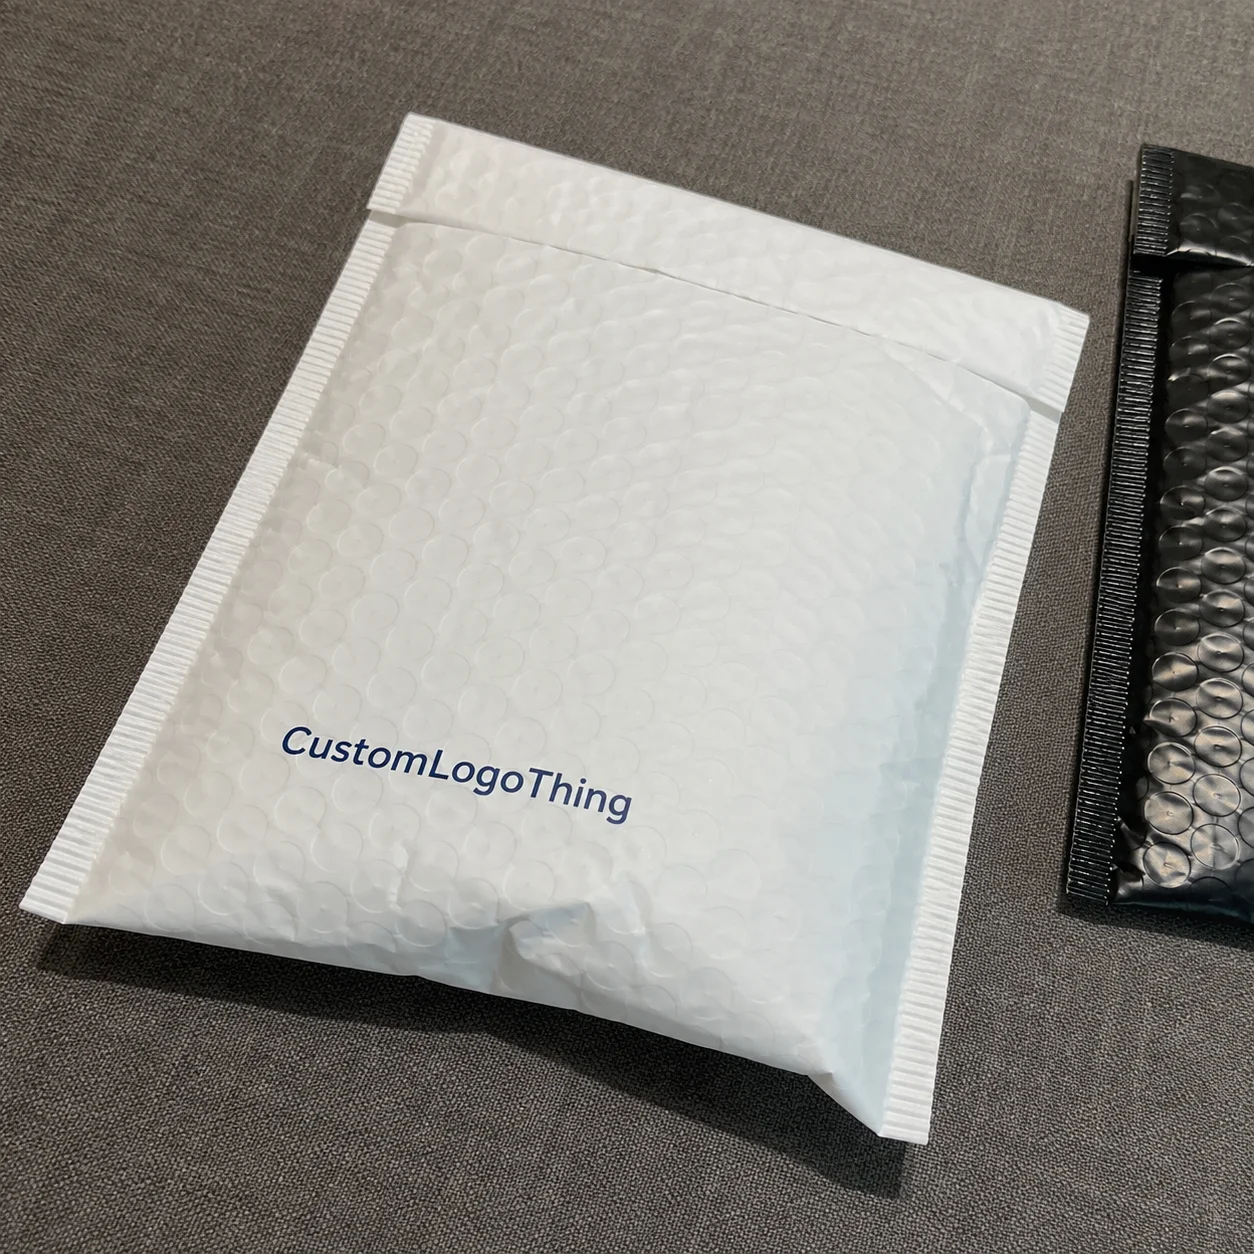
A custom bubble mailer is a padded shipping envelope with a printed outer layer and an inner bubble cushion. The outer face can be kraft, poly, metallic, or another specialty material, while the bubble lining helps absorb minor shocks and reduce scuffing during transit. The closure flap seals the load and keeps the package compact.
Compared with a plain poly pouch, the mailer adds protection and a more finished appearance. That matters when the package itself is part of the customer experience. It also matters in operations, because a mailer that combines branding and basic cushioning can replace two separate packaging layers in some use cases.
The limits still matter. Bubble cushioning is useful for abrasion resistance and light impact control, but it will not protect glass, ceramics, or sharp-edged products without additional internal packing. If a product can shift enough to punch through the envelope or crush at the corners, the format is wrong.
Typical uses include:
- Soft goods like shirts, socks, and folded apparel
- Books, journals, and printed kits
- Beauty and personal care items with moderate protection needs
- Accessories, cables, and small tech add-ons
- Samples, gift packs, and subscription inserts
A package that arrives intact costs less than a package that needs to be replaced.
That is why buyers should weigh return rates, replacement labor, and shipping rework alongside the unit price. A plain-looking package is not automatically cheaper if it increases damage or forces extra handling.
How the Mailer Structure Protects Products in Transit
The bubble layer absorbs some of the force from drops, stacking pressure, and conveyor handling. It is not a guarantee against rough treatment, but it does reduce everyday wear compared with a non-padded envelope. For lightweight products, that can be enough to prevent scuffs, corner dents, and minor transit damage.
The outer layer affects resistance and appearance. Kraft surfaces usually read more natural and understated. Poly surfaces are typically better against moisture and often support sharper print. Metallic films create a more premium or promotional look. Paper-based specialty structures can support sustainability goals, but their exact construction still needs review because the label alone does not reveal performance.
Fit matters as much as material. If the mailer is oversized, the product shifts and the package looks loose. If it is too small, insertion becomes difficult, seams take stress, and the seal may fail under handling. The best size is the one that holds the packed item securely with room for the flap to close without strain.
For performance-minded buyers, transit testing is worth asking about. Organizations such as ISTA publish shipment test methods that help compare packaging under realistic handling conditions. For broader waste-reduction guidance, the U.S. EPA provides information at epa.gov. Those references are useful when reviewing protection claims or disposal assumptions.
Material, Size, and Branding Factors That Change the Final Fit
Material choice changes durability, print quality, moisture resistance, and hand feel. Kraft-facing works well for a natural look. Poly-facing supports brighter graphics and stronger resistance to damp routes. Metallic finishes can create a premium impression, but they should be used with restraint. Specialty paper-based builds may fit an eco-positioned brand, though the exact materials should still be confirmed.
Size selection should start with the packed product, not the bare item. A folded sweater, a book bundle, and a boxed cosmetic set may weigh similarly but occupy different space. The mailer needs to fit the actual packed shape, the bubble thickness, and the seal allowance. Oversizing wastes material and can increase postage. Undersizing stresses the seams and makes the shipment harder to pack consistently.
Branding should support the structure rather than dominate it. A single-color logo may be enough for a clean, controlled look. Full-coverage artwork works when the brand identity depends on illustration or a more expressive retail presentation. Matte finishes usually feel softer and more restrained, while gloss finishes show color more vividly but can reveal handling marks sooner.
A few structural details deserve review every time:
- Closure strength so the flap stays secure after repeated handling
- Bubble density so the cushioning does not flatten too quickly
- Tear resistance at the seams and opening edge
- Water resistance if the route may expose the parcel to moisture
If the product needs more protection than a padded envelope can realistically provide, move up to a box instead of trying to solve the problem with heavier graphics or a stronger-looking finish. Some brands pair a custom bubble mailer with inserts or cards from Custom Packaging Products. Others choose Custom Poly Mailers when cushioning is less important and shipping cost matters more.
| Option | Typical Strength | Typical Use | Tradeoff |
|---|---|---|---|
| Kraft bubble mailer | Good cushioning, natural look | Apparel, books, soft goods | Less moisture resistance than poly |
| Poly bubble mailer | High moisture resistance, vivid print | Beauty, accessories, retail shipments | Less paper-like presentation |
| Metallic bubble mailer | Strong shelf appeal, premium feel | Promotions, influencer kits, gifting | Can feel flashy if overused |
| Paper-based specialty mailer | Natural look, brand-forward appearance | Eco messaging, curated mail programs | Needs close review for durability |
Custom Bubble Mailer Pricing, MOQ, and Unit Cost
Pricing depends on size, material, print coverage, color count, finish, and quantity. A simple one-color run on a standard size will usually cost less than a fully printed mailer with custom dimensions or specialty film. For mid-volume orders, a practical ballpark is often $0.18 to $0.45 per unit, while smaller runs usually land higher and more complex builds can move above that range.
MOQ matters because setup costs have to be spread across the run. Lower quantities generally mean higher unit prices and fewer customization options. That does not make short runs a bad choice, but it does make them less efficient. Seasonal launches, test programs, and limited campaigns often justify a smaller order, provided the buyer understands the cost impact.
Look at landed cost, not just the quoted unit price. Freight, sample fees, setup charges, and reprint terms can change the final number meaningfully. A quote that looks inexpensive can become costly once shipping and corrections are added. The useful question is what the package will cost once it is approved, produced, shipped, and used.
Before approving a quote, check the basics:
- Confirm the exact dimensions and material construction
- Verify whether printing, setup, and sampling are included
- Ask for freight cost and transit timing separately
- Review the proof method and acceptable color tolerance
- Confirm what happens if the run arrives off-spec or fails inspection
Packaging decisions should account for the full operating picture. If a mailer tears, scuffs badly, or allows product damage, any savings on the quote can disappear quickly. One return can erase the margin from several shipments, so the lowest price is not always the best choice.
Production Steps and Lead Time: From Proof to Delivery
The production sequence is usually straightforward. Artwork review comes first, followed by a digital proof. If the job needs it, sample approval comes next. Then production starts, quality checks happen during and after the run, and the finished mailers are packed for shipment. Delays usually come from unclear artwork, wrong dimensions, or late changes to the print layout.
Lead time depends on whether the mailer is in stock, semi-custom, or fully custom. A run using standard sizes and materials can move faster than one that needs special film, custom dimensions, or full-wrap graphics. A common production window is 12 to 20 business days after proof approval, and freight time should be added separately.
Preparation keeps the process moving:
- Provide final artwork in the correct format
- Share the exact packed dimensions of the product
- Include Pantone targets or color references if needed
- Confirm the shipping destination and receiving schedule
- Decide on finish, closure style, and print coverage early
Clear specifications reduce revision cycles and improve consistency between proof and production. If color control matters, ask how the print is matched and what tolerance is acceptable. If the mailers are part of a retail or subscription program, repeatability becomes a practical issue, not just a visual one.
For paper-based options, certification may matter. If the brand needs chain-of-custody documentation or verified sourcing claims, ask for the actual paperwork. The point is not to collect certificates for their own sake. The point is to know what the mailer is made of and whether the claim can stand up to review.
Common Ordering Mistakes That Cause Returns and Reprints
The most common mistake is sizing the mailer around the product name instead of the packed item. A sweatshirt, a folded T-shirt, and a book set may sound similar, but they do not package the same way. If the mailer is too tight, seams are stressed and insertion becomes difficult. If it is too loose, the contents shift and the shipment looks careless.
Overbranding can create a different problem. More ink does not always improve the package. A busy surface can distract from the product and make the design feel less controlled. In many cases, a cleaner layout with deliberate spacing looks more premium than a full-coverage design.
Skipping samples is still a fast way to waste money. A screen proof cannot fully show how a material feels, how a finish catches light, or how the seal behaves under pressure. Paper, film, metallic layers, and adhesives can all perform differently once they are turned into a real shipping package.
Common post-order issues include:
- Choosing a size that pushes parcels into a more expensive postage tier
- Using a seal that fails under automated packing pressure
- Ignoring moisture exposure on common shipping lanes
- Forgetting to confirm label placement and scan visibility
Carrier handling is rougher than many teams expect. Packages are dropped, stacked, slid, and compressed. That is why simple transit checks are useful before scaling. If a mailer cannot survive reasonable handling in your own facility, it is unlikely to improve in the carrier network.
Next Steps for Choosing the Right Mailer
Start with the product dimensions, the shipping method, and the expected monthly volume. Those three inputs narrow the field quickly. Then decide what the mailer has to do most: protect the product, carry the brand, or balance both. That answer points you toward the right material and the right amount of print coverage.
If possible, compare two quote versions. One should be the most cost-conscious option that still does the job well. The other should reflect the finish, print coverage, or material quality you would choose if you had more flexibility. Seeing them side by side makes the tradeoffs easier to judge.
If the shipment is fragile, color-sensitive, or tied to a premium launch, order samples or a short run before committing to volume. That small step can reveal issues with fit, closure, print tone, and durability before the order becomes expensive to correct.
For many brands, a custom bubble mailer is the middle ground between protection, presentation, and shipping cost. The best results come from a clear spec, realistic pricing, and a timeline that includes both production and freight.
What can I ship in a custom bubble mailer?
It works best for lightweight items such as apparel, books, cosmetics, accessories, and small retail goods. Avoid heavy, sharp, or highly breakable products unless you add extra internal protection.
How do I choose the right size custom bubble mailer?
Measure the packed product, not the bare item, and allow for the bubble layer plus a clean seal. The smallest size that fits safely is usually the best starting point because it reduces waste and keeps postage under control.
What affects custom bubble mailer pricing the most?
Material type, size, print coverage, color count, and order quantity usually drive the biggest changes in cost. Setup fees, samples, freight, and special finishes can shift the total more than buyers expect.
How long does production usually take?
Turnaround depends on artwork complexity, quantity, and whether the material is in stock. A common production window is 12 to 20 business days after proof approval, and freight time should be added separately.
Can a custom bubble mailer be recycled or eco-friendly?
Some versions use recycled or paper-based outer layers, but recyclability depends on the exact build and local waste rules. If sustainability matters, ask for the material specification and disposal guidance before approving the order.