Buyer Fit Snapshot
| Best fit | Custom Corrugated Mailer Inserts projects where brand print, material claims, artwork control, MOQ, and repeat-order consistency need to be specified before quoting. |
|---|---|
| Quote inputs | Share finished size, material target, print colors, finish, packing count, annual reorder estimate, ship-to region, and any compliance wording. |
| Proofing check | Approve dieline scale, logo placement, barcode or warning zones, color tolerance, closure strength, and carton packing before bulk production. |
| Main risk | Vague material claims, crowded artwork, missing packing details, or unclear freight terms can make a low unit price expensive after revisions. |
Fast answer: Custom Corrugated Mailer Inserts: Design, Cost, Fit should be specified like a repeatable production item. The safest quote records material, print method, finish, artwork proof, packing count, and reorder notes in one written spec.
Production checks before approval
Compare the actual filled-product size with the drawing, then confirm tolerance on folds, seals, hang holes, label areas, and retail display edges. Reserve space for logos, QR codes, warning copy, and material claims before decorative graphics fill the panel.
Quote comparison points
Review material grade, print process, finish, sampling route, tooling charges, carton quantity, and freight assumptions side by side. A quote is only useful when the supplier can repeat the same color, closure quality, and packing count on the next order.
Custom Corrugated Mailer Inserts: Design, Cost, Fit sounds simple until a product has to survive vibration, compression, and a delivery network that does not care how carefully the box was packed. Custom corrugated mailer inserts do more than fill empty space. They hold the product in place, keep components from colliding, and turn a mailer into a controlled internal structure instead of a hollow shell.
The difference appears quickly on the packing line and again at the customer’s doorstep. A carton can pass a basic strength check and still fail in practice if the item shifts, tilts, or rubs against the walls during handling. Packaging teams see this often. The insert is not decoration. It is load control, presentation, and damage prevention working together.
Cosmetics, candle sets, subscription kits, electronics accessories, and small retail products all benefit from a fit that repeats cleanly from one order to the next. That is why brands investing in branded packaging, product packaging, and higher-end retail packaging often begin with the insert and build outward from there. A precise internal layout makes the rest of the pack easier to standardize. For a wider look at packaging formats, many teams also compare solutions in Custom Packaging Products, Custom Poly Mailers, and Custom Shipping Boxes.
What Custom Corrugated Mailer Inserts Actually Solve
The core job of custom corrugated mailer inserts is easy to describe and harder to get right: they create a product-specific interior that keeps items where they belong. That can mean one item in a fixed cradle, a full set separated into compartments, or several pieces locked into a packout order that matches how the customer should receive them.
Many teams think of inserts as cushioning. Cushioning matters, but it is only one part of the equation. A better insert manages position, limits movement, supports weight, and gives the outer box a shape That Actually Works under shipping stress. Loose fill can hide a gap. It cannot stop a product from moving. The insert is what solves the motion.
That matters most for hard surfaces, glass, polished finishes, printed labels, and parts that can scratch each other before the box even leaves the facility. It also matters for kits with a bottle, cap, card, scoop, or accessory that must arrive in a specific arrangement. The insert imposes that arrangement. It also helps the packout team place parts the same way every time, which reduces rework and keeps fulfillment from drifting into improvisation.
Common use cases include:
- Cosmetic kits with jars, droppers, or compacts
- Candle sets where vessels and lids need separation
- Subscription boxes with multiple small components
- Electronics accessories such as cables, adapters, and small devices
- Retail packaging for small goods that need a snug, repeatable fit
The strongest inserts do something subtle: they make the box feel intentional the moment it opens. That helps package branding, but it also protects the product. An item that starts in the correct position is less likely to migrate during transport, and migration is where many transit failures begin. A carton can look fine on the outside while the contents quietly work loose inside it.
A box that looks full is not the same as a box that is actually secure. Real protection starts when the product has a defined home inside the shipper.
How Custom Corrugated Mailer Inserts Work Inside the Box
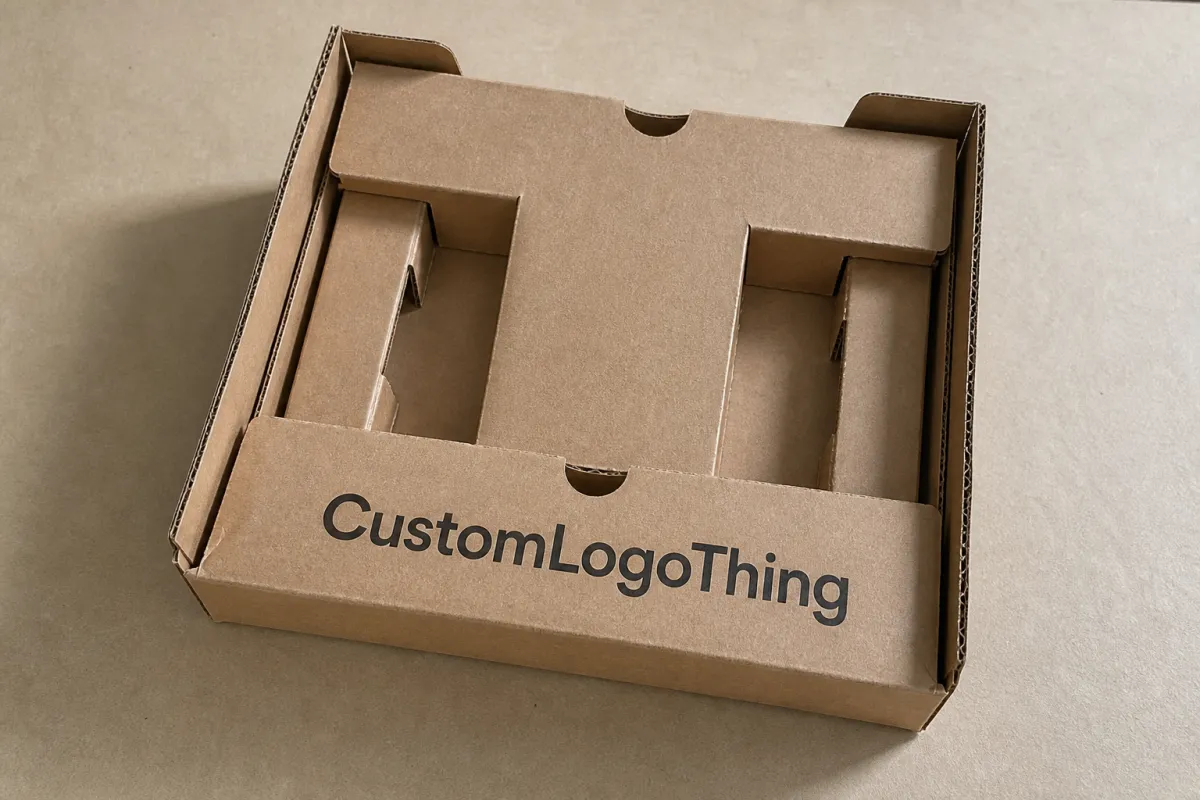
Most inserts rely on score lines, tabs, slots, partitions, die-cut openings, and folds to create a precise cradle for one or more products. On a flat dieline, those features can look almost too plain to matter. Once assembled, they become the geometry that controls movement inside the mailer.
Corrugated board does two useful things at once. It gives structure and absorbs energy. Pressure or impact gets spread across the insert instead of landing on one vulnerable point. The insert also keeps the product from colliding with other items or with the walls of the box. That mix of spacing and support is what turns a standard shipper into something much more predictable.
The insert has to work with the outer box, not against it. Tuck-top mailers depend on fold geometry and internal friction. Roll-end mailers bring more structural lock at the ends and can tolerate certain load patterns better. Shipper-style boxes may need stronger walls, internal partitions, or locking features that carry more of the burden. The insert should respect those mechanics and reinforce them.
Simple products often need only a one-piece insert with a few die-cut openings. Heavier sets, taller items, and multi-part kits usually need more structure: locking tabs, dividers, center panels, or reinforcement where the load actually lands. A bottle with a narrow neck, for example, may not need extra cushioning at all. It may need a deeper capture point so the closure stays down and does not strike the top panel of the mailer.
Here is a useful way to think about it:
| Insert Feature | Best Use | Typical Benefit | Tradeoff |
|---|---|---|---|
| Die-cut cradle | Single item or repeatable SKU | Fast packout, clean presentation | Less flexible for product variation |
| Partitioned insert | Multi-item kits and sets | Prevents item-to-item contact | Uses more board and assembly time |
| Tabbed lock insert | Heavier products or tighter shipper fit | Improved retention and rigidity | Can raise die-cut complexity |
| Reinforced load point | Bottles, jars, dense accessories | Better support under compression | May increase material cost |
Those categories are starting points, not rules. A 4 oz cosmetic bottle, a glass candle vessel, and a metal component can look similar on a spec sheet and behave very differently in transit. Weight distribution, fragility, and the route from pack station to destination decide the final structure.
For teams working on packaging design, this is the point where the internal build matters as much as the printed exterior. A beautiful outer box does not rescue a product that wanders inside it. The presentation falls apart before the branding is even seen if the insert does not control movement.
Design Factors That Shape Fit, Strength, and Unboxing
Fit begins with real measurements, not catalog numbers. Measure the actual product, then account for closures, caps, labels, handles, protrusions, and any feature that changes the true footprint. A jar might measure 2.5 inches across the base and 2.8 inches across the lid. That 0.3-inch difference can decide whether the cavity is secure or merely tight.
Clearance matters, but excess clearance creates its own problems. The goal is enough room for insertion and manufacturing tolerance, not enough room for the product to drift. That becomes more important when the product is irregular, hand-assembled, or carries a small part that extends beyond the main body. A fragile tip, a pump, a latch, or an applicator belongs in the measurement review from the first draft.
Board selection changes performance in ways that are easy to overlook until the sample is in hand. Flute profile, caliper, and liner strength all affect rigidity and appearance. Thin board can work for a light kit. A denser or taller item usually needs a stiffer structure to resist crush. In many projects, the board choice becomes a trade between cost, visual quality, stacking strength, and how polished the insert looks when the carton opens.
Product weight and center of gravity deserve equal attention. A tall bottle behaves differently from a flat accessory. A dense metal part behaves differently from a lightweight cosmetic jar. If the center of gravity sits high, the insert may need deeper capture points or a more locked base. If several items share one box, the layout should keep the weight centered so the pack does not tip during handling.
Unboxing goals matter, though they should not push the structure into overdesign. Some brands want the product concealed until the final reveal. Others want a framed presentation that shows every item neatly as soon as the lid opens. Both can work. The better question is how to create a premium experience without using unnecessary board or making the pack awkward to assemble.
Sustainability belongs in the same discussion. The most efficient insert is usually the one that uses the least board while still protecting the product. More material is not automatically better. Strong product packaging often comes from removing empty cavities, cutting away excess layers, and shaping the insert to the real ship profile instead of the idealized one.
If environmental claims are part of the brief, align the material story with recognized standards and sourcing programs. Resources from the Forest Stewardship Council help teams evaluate fiber sourcing, while the EPA offers useful context on waste reduction and packaging efficiency. Good insert design tends to support both protection and material discipline at the same time.
One practical detail gets missed more often than it should: the pack has to work after the first inspection, not just on the sample bench. A cavity that is technically correct but slow to load can create bottlenecks in fulfillment. That kind of friction shows up in labor, not in CAD, and it usually becomes visible only after the first thousand units.
Custom Corrugated Mailer Inserts Process and Lead Time
The process usually starts with discovery. A supplier or structural packaging team should ask for product dimensions, photos, weights, fragile points, shipping conditions, and the style of outer box. From there, the first layout is drafted, then prototyped, then tested. If the sample behaves the way the shipping lane demands, the project moves toward production approval.
Speed depends on the quality of the input. Product drawings help. So do sample units, fill weights, dimensional tolerances, and clear notes on how the kit is packed today. If the item has separate parts, include all of them. If the product has to fit a specific mailer size, say that early. That detail often changes the structural direction entirely.
A structural prototype is not the same thing as a final production sample. A prototype validates fit, fold logic, and basic retention. A production sample should reflect the final material, cut pattern, and assembly behavior closely enough to support sign-off. Small differences matter. A quarter-inch shift in a tab location or a tighter score line can move a sample from barely acceptable to genuinely clean in production.
Lead time depends on several variables:
- Dieline complexity and the number of folds or locking features
- Whether the insert uses standard tooling or custom cutting requirements
- Board availability and any specific caliper or flute selection
- Print requirements, if the insert is printed or branded inside
- Whether the project needs multiple rounds of prototypes
Simple designs move faster because they need fewer revisions and less structural development. Multi-compartment kits, tight-tolerance inserts, and heavy-load designs take more time, especially if the team is still refining the unboxing sequence. Fragile, premium, or high-volume products usually justify more time in the sample stage. Fixing a fit problem after a run has started is far more expensive than solving it in the prototype phase.
For brands building out broader packaging systems, this is also the point where custom printed boxes and insert design should be reviewed together. The insert should not arrive as an afterthought once the outer box is already locked. Internal structure and mailer dimensions belong in the same conversation because that is how you avoid wasted voids, awkward assembly, and inconsistent presentation.
Lead time also depends on whether the pack requires a toolmaker, a corrugator, or a converted sample from existing tooling. Those are not interchangeable steps. A design that uses a common flute and simple die-line may move through sampling quickly. A design that needs unusual locking geometry, a custom fit around a fragile closure, or extra print registration will take longer.
Custom Corrugated Mailer Inserts Cost, Pricing, and MOQ Basics
Pricing for custom corrugated mailer inserts usually comes down to five practical drivers: board type, insert size, cut complexity, number of compartments, and total quantity. Print coverage can influence cost too, especially if the insert carries branding, instructions, or color treatment on the inside surfaces. More steps usually mean more cost.
Unit cost tends to fall as volume rises because setup and tooling get spread across more pieces. A simpler insert at a lower quantity can still beat a more complicated design at scale if the geometry stays clean. That is one of the less intuitive truths in packaging: a one-piece cradle can cost less than a multi-part assembly that uses slightly less board but far more labor.
Minimum order quantities exist for practical reasons. Tooling carries a setup cost. Press and die preparation take time. Material use becomes more efficient when the sheet layout is planned across a larger run. MOQ also keeps custom work priced as custom work instead of treating every request like a one-off sample. The exact minimum varies by design and supplier capability, so it makes more sense to treat MOQ as a function of complexity than as a fixed number.
Here is a practical way to compare cost pressure points:
| Cost Driver | Lower-Cost Direction | Higher-Cost Direction | Why It Changes Price |
|---|---|---|---|
| Board selection | Standard corrugated grade | Heavier or specialty board | Material cost and stiffness increase together |
| Insert geometry | Simple cradle or sleeve | Multi-compartment locking design | More cuts, folds, and setup time |
| Quantity | Higher volume | Low-volume custom run | Setup spreads across fewer units at low volume |
| Assembly | One-piece fold | Glued or bundled components | Labor adds cost and handling steps |
| Tolerance | Generous fit window | Tight-tolerance capture | Closer tolerances demand more control and testing |
Special reinforcement also affects pricing. If the product is dense, has a high center of gravity, or needs extra locking at stress points, the insert may need more board or a more complicated die-cut pattern. Secondary operations can add cost too, such as gluing, bundling, or packaging the insert in a way that speeds downstream assembly.
When requesting a quote, send the product dimensions, target quantity, ship method, and any prototype information you already have. If the product is awkward or fragile, include photos from multiple angles. If you have a sample unit, send it. That one item can prevent a quote based on guesswork. For purchasing teams comparing retail packaging options, the most accurate quote usually comes from a real sample, a real ship size, and a real packout method.
For reference, organizations such as ISTA publish useful packaging test guidance that helps teams think beyond simple fit and toward shipping performance. A low unit price is not a savings if the insert creates damage, repacks, or customer complaints.
One caution here: the cheapest design on paper is not always the cheapest to run. If the insert slows packing by just a few seconds per unit, that labor cost can outweigh the savings from thinner board or a smaller dieline. Packaging buyers who track throughput usually catch this early, and the ones who do not tend to discover it after launch.
Common Mistakes That Create Damage or Waste
The most common error is measuring too loosely and assuming void fill will handle the rest. It rarely does. Loose fill can help with minor gaps, but it does not stop a product from shifting, tipping, or rubbing under vibration. If the fit is wrong, the product still moves, and movement is the root cause of many transit failures.
Overbuilding is the other common trap. A heavier or oversized insert can increase shipping cost, consume more board than necessary, and slow down packing. Teams sometimes try to solve every risk with more material. That often creates a box that is harder to close, harder to store, and more expensive than the product can justify.
Product variation gets underestimated all the time. A unit may match the spec sheet, while the real production sample differs slightly because of caps, closures, coatings, molded parts, or manual assembly. Even a small dimensional shift can change the way the insert behaves. Final measurement should always use the actual production version, not only the drawing.
Another mistake is designing for one shipping lane or one test event only. The pack has to survive the full route: pick, pack, pallet handling, courier sorting, truck vibration, and final delivery. A structure that looks excellent in a single drop test can still fail if it is weak in compression or if the product has room to settle during a longer route.
Communication gaps between structural design and branding teams can create avoidable problems too. An insert may protect well but look awkward, slow down packing, or break the visual flow of the unboxing experience. That shows up most often in projects that mix branded packaging with performance goals but never fully reconcile the two. The result is a pack that works technically and frustrates the people who use it every day.
None of those issues are rare. They are signs that the insert was designed from only one angle. Better results come from combining fit, protection, packout speed, and appearance into a single packaging decision.
There is also a quieter risk: spec drift. A team approves one prototype, then substitutes a different closure, a slightly heavier container, or a new decorative sleeve later in the schedule. The insert that fit the first version may no longer be right. That is how a good design becomes a field problem without anyone intending it.
Expert Tips and Next Steps for a Better Insert Spec
Start with a product audit. Measure the item, note every fragile point, count each component, and identify which surfaces should never touch the corrugated board. If the product has glass, plated metal, glossy coating, or a delicate closure, spell that out in the brief. The more specific the input, the less likely the final insert will leave room for surprises.
Build the specification around shipping reality, not shelf display alone. Ask how the pack moves through fulfillment, storage, and carrier handling. Does it ride on a conveyor? Is it stacked on a pallet? Is it a subscription item that goes out in high volume? Those details change the optimal structure. A beautiful insert that slows packout can cost more than it saves.
Ask for a prototype early. A physical sample exposes things drawings do not show, especially pressure points, awkward assembly steps, and unnecessary board. More than one project has looked perfect on a screen and then revealed its weak point the moment the product went into the cavity. A sample is not a formality. It is a decision tool.
Testing and feedback should come before production, especially for fragile, premium, or high-volume products. If the project matters, validate the fit with a real sample and, when possible, use a test plan that reflects the actual route. Drop performance, vibration resistance, and compression behavior are all worth checking when the product value is high enough that one damaged unit matters.
If you are preparing a quote request, gather these items first:
- Exact product dimensions and weight
- Photos of the product from multiple angles
- Notes on closures, handles, caps, or fragile points
- The target quantity and replenishment expectations
- The mailer or outer box size, if already selected
- Any sample or dieline you already have
That checklist usually saves time and sharpens the first quote. It also helps the packaging partner decide whether the best answer is a one-piece insert, a partitioned structure, or a deeper custom build inside a larger mailer system. In many cases, the most effective solution is the simplest one that still controls movement and supports the product without excess material.
Approached that way, custom corrugated mailer inserts become more than a protective add-on. They become the part of the pack that protects the product, reinforces the brand, and keeps fulfillment predictable from one order to the next. That is the real value of custom corrugated mailer inserts: a better fit, a cleaner presentation, fewer damage claims, and a packaging system that behaves the same way in the warehouse as it does in the customer’s hands.
The most useful next step is simple: build your brief from the actual product, the actual shipping lane, and the actual packout method. If those three pieces line up before quoting starts, the insert is far more likely to work the first time.
What do custom corrugated mailer inserts do better than loose fill?
They lock the product in place instead of only cushioning the empty space around it. That reduces rubbing, tipping, and part-to-part impact during transit, and it often improves packout speed because each item has a defined home inside the box.
How do I size custom corrugated mailer inserts for a fragile product?
Measure the item exactly, including closures, handles, and any raised details, then leave only the clearance needed for easy insertion and manufacturing tolerance. If the item is brittle, premium, or irregularly shaped, prototype the fit before production so the cavity matches the real product, not the drawing.
What affects the pricing of custom corrugated mailer inserts the most?
Board grade, insert size, and the complexity of the cut pattern usually drive the biggest changes. Higher quantities typically lower the unit cost because setup is spread across more pieces, while dividers, locks, and glued assemblies can add labor and material cost.
How long does the process take for custom corrugated mailer inserts?
Simple designs usually move faster because they need fewer revisions and less tooling complexity. Lead time increases when the insert needs prototyping, testing, or custom cut features, so having samples, dimensions, and quantity goals ready can shorten the development cycle.
What should I send to get an accurate quote for custom corrugated mailer inserts?
Send product dimensions, photos, weight, and any fragile areas that need support. Include the target quantity, shipping method, and whether the insert must fit a specific mailer style, and share a sample unit or dieline if possible so the quote reflects the real fit and build.

