What Custom Rub On Stickers Are Really For
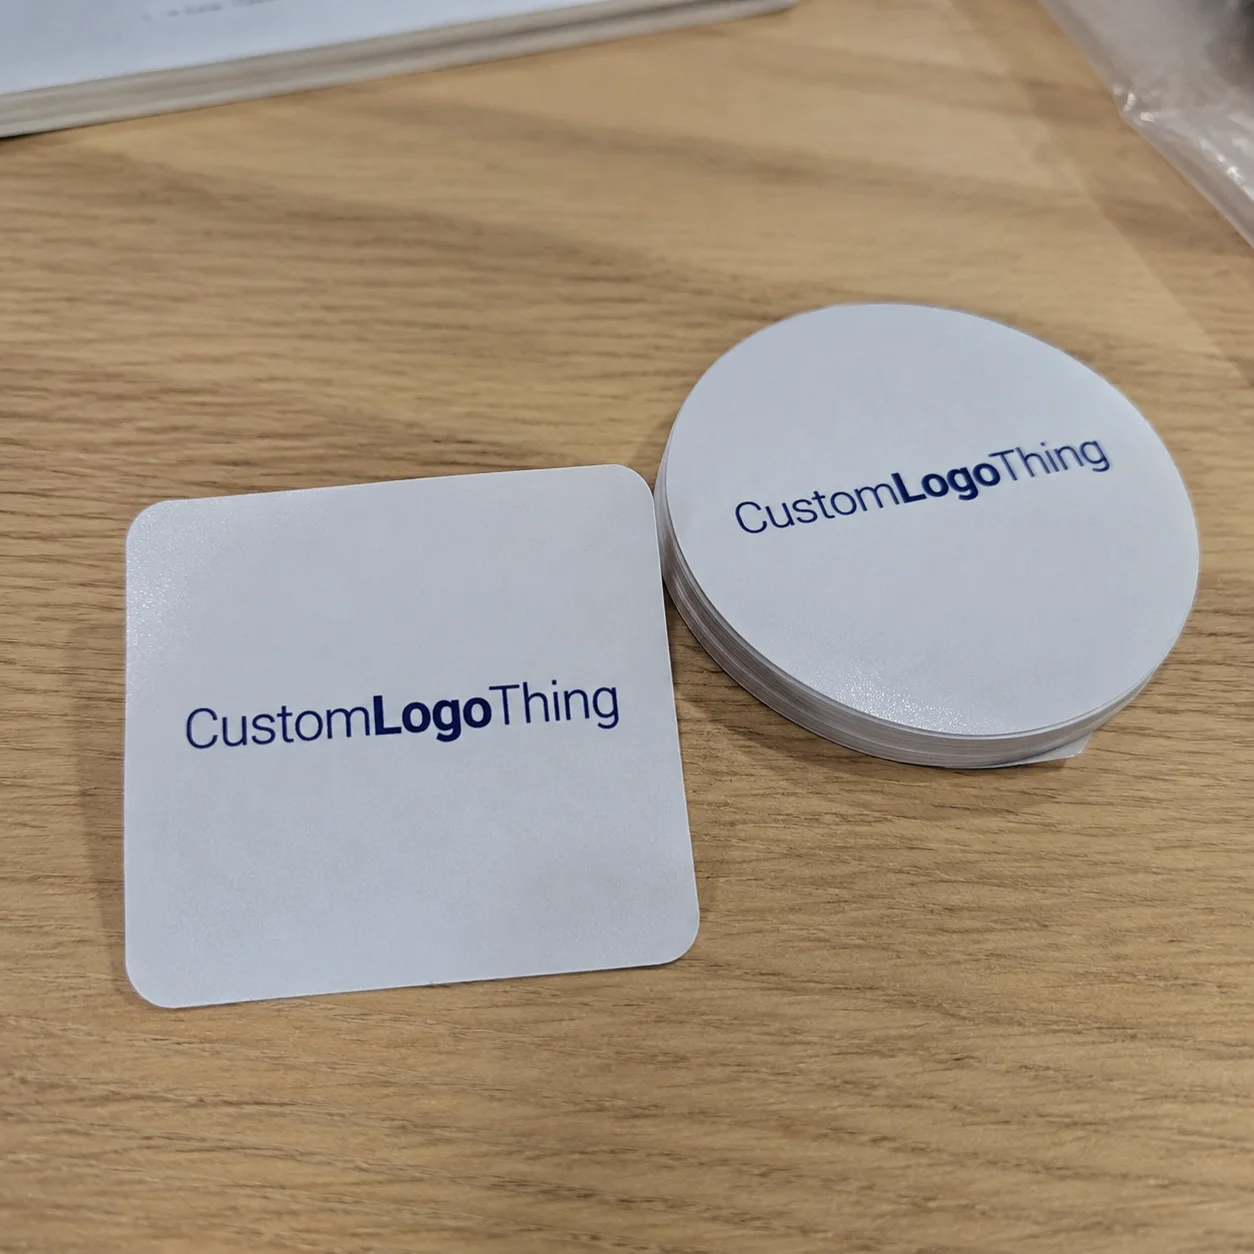
The cleanest sticker on a candle jar, glass bottle, promo card, mailer insert, or cosmetics box may not look like a sticker at all. That is the point of custom rub on stickers: they give packaging a printed-on mark without the obvious border of label film.
Technically, they are dry transfer decals. Printed artwork sits on a carrier sheet, then moves onto the target surface under pressure. No water. No heat press. No thick face stock. You position the transfer, rub it down with a burnishing tool, and peel away the carrier. If the release is clean, the logo looks painted, screen printed, or foiled directly onto the product.
They are not the same as paper stickers, vinyl decals, or water-slide decals. Paper stickers are cheap, fast, and useful for ingredient panels, barcodes, seals, and promotional labels, but the edge is visible. Vinyl decals are tougher and better for outdoor exposure, equipment, and hard-wearing surfaces, but they still have thickness. Water-slide decals can sit very thin, yet they need moisture, drying time, and careful handling. Rub on transfers win when the goal is a low-profile graphic with minimal edge visibility.
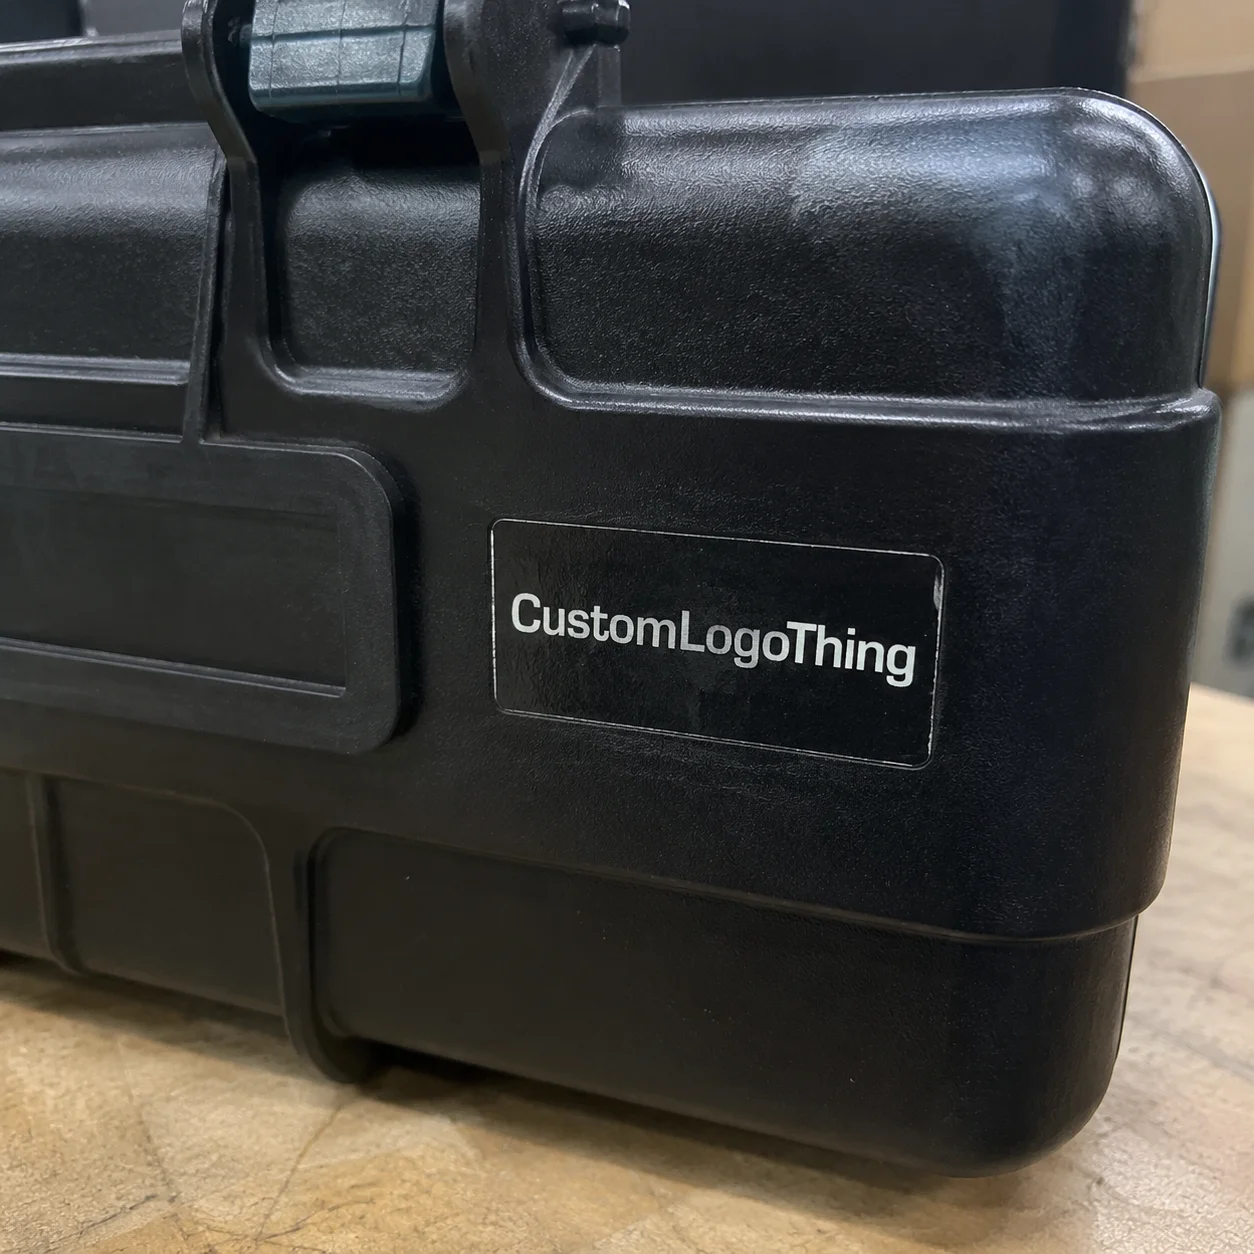
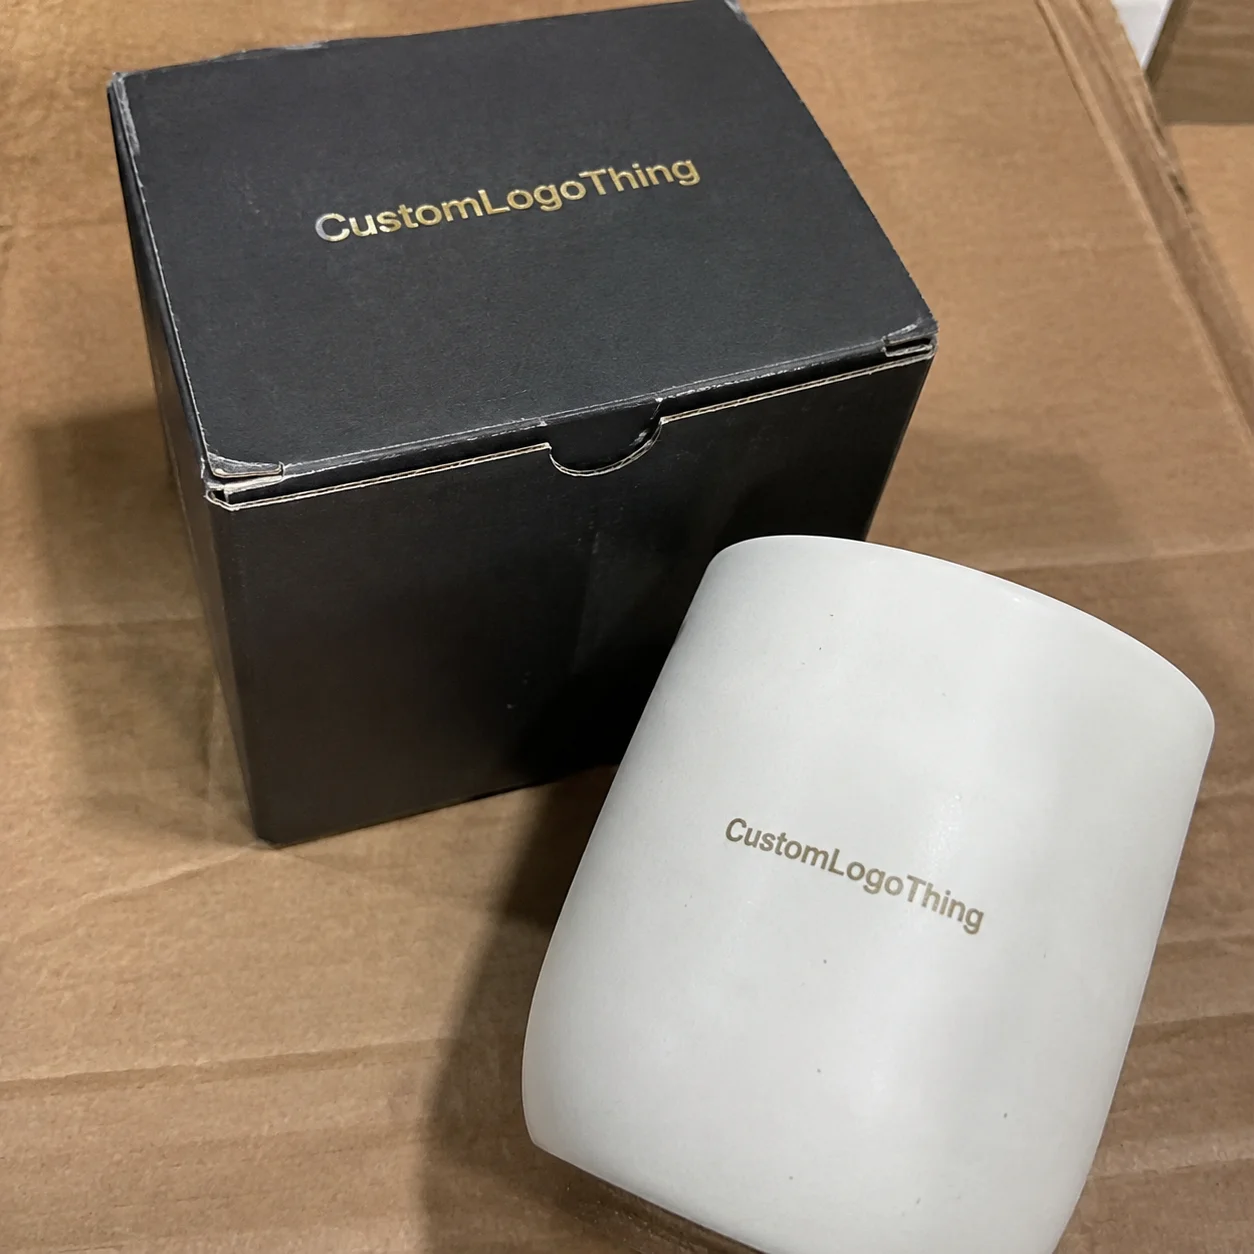
Best-fit uses include boutique branded packaging, product samples, short-run prototypes, event merchandise, drinkware accents, stationery, premium unboxing inserts, and limited retail packaging where a standard label feels too bulky. They work especially well for small logos, monograms, corner marks, decorative borders, and brand details on rigid surfaces.
Set expectations before ordering. These transfers can look excellent, but they are not magic armor. If the surface is oily, dusty, flexible, damp, heavily textured, or constantly handled, performance changes quickly. That is not a supplier conspiracy. That is material behavior doing what material behavior does.
The practical work happens before production: artwork cleanup, surface choice, sizing, proofing, application testing, and realistic waste planning. Skip those steps and the order becomes a guessing game with shipping charges. Nobody needs seven emails to explain “make my logo 38 mm wide.”
How Rub On Transfers Work on Packaging Surfaces
A rub on transfer is built in layers. The visible artwork sits on a carrier film with a release layer. During application, firm pressure breaks the artwork free from the carrier and helps it bond to the packaging surface. The pressure matters because the artwork is not sitting on a large cushion of adhesive like a normal sticker.
The application sequence is simple, not idiot-proof. Clean the surface. Position the sheet. Hold it steady. Burnish with firm, even pressure using a squeegee, bone folder, or flat plastic edge. Peel slowly at a low angle. If one letter or line has not released, lay the film back down and rub that area again.
Practical rule: finger pressure is usually inconsistent. Use a burnishing tool if you care about clean release, especially on logos with small text, thin strokes, or separated design elements.
Surface energy affects performance. You do not need a chemistry lecture to buy decals, but you do need to know that glass, coated paperboard, rigid plastic, metal, and sealed wood behave differently. Ink needs a clean, stable surface to grab. Smooth glass may accept a small logo beautifully. Dusty kraft paper may fight you. Soft-touch laminate can be unpredictable. Some plastics carry mold release, silicone residue, or surface oils that ruin adhesion unless cleaned properly.
Curves add another complication. Slight curves can work well with small designs on jars, tubes, and bottles. Tight bottle shoulders, heavy texture, pebbled paper, fabric, and soft pouches are risky. Nicely risky, if we are being polite. If the surface flexes under pressure, the transfer can crack, miss details, or lift later.
After application, give the decal time to settle before heavy handling. Many buyers test immediately by attacking the mark with a thumb like they are trying to erase evidence. Do a gentle rub test after application, then check again after 24 hours. For higher-risk product packaging, test the exact surface, finish, storage condition, and handling routine before approving a larger run.
Artwork Specs That Decide Whether Transfers Look Premium
Rub on decals expose bad artwork fast because there is no label background to hide behind. Fuzzy raster edges, tiny gaps, distressed textures, and uneven line weights become obvious once the design sits directly on glass, paperboard, or metal. That “vintage rough logo” made in a free app? Dangerous territory.
Vector artwork is the safest format for logos, icons, monograms, borders, and type. Send AI, EPS, SVG, or print-ready PDF files with outlined fonts when possible. Raster artwork can work, but only if it is high resolution, clean-edged, and sized correctly. A 900-pixel logo pulled from a website is not a production file. It is a polite cry for help.
Minimum line thickness depends on the supplier’s process, ink system, and release behavior, but the same guardrails show up often. Avoid strokes below 0.25 mm unless confirmed. Keep reversed text larger than 6 pt, preferably 7 pt or more. Leave enough spacing between isolated dots, tiny stars, and thin script details. If the artwork has delicate disconnected pieces, ask whether the design can release cleanly during hand application.
Color choices matter. Solid spot colors usually look cleaner than complex gradients. Black, white, metallic gold, metallic silver, and bold brand colors are popular because they read well on many surfaces. White transfers on clear glass can look premium. Black on frosted jars can look sharp. Pale beige on kraft may disappear under normal retail lighting, which is a very expensive way to learn about contrast.
Size the design for the actual package, not the artboard on your screen. A 25 mm logo may be perfect on a 2 oz jar but too timid on a 12 oz bottle. A 60 mm transfer might look good on a flat mailer insert and become annoying on a curved container. Leave at least 5-10 mm of open area around the graphic for burnishing clearance and clean peeling.
Ask for a proof that shows final size, color callouts, transfer sheet layout, and application notes. For any project with real money attached, request a sample, a short test batch, or at minimum a pre-production photo against a ruler. Transfers often ship on sheets, so include trimming margins and spacing between designs. A practical sheet layout might leave 6-10 mm between logos so staff can cut and handle each piece without touching the printed area.
Cost, MOQ, and Unit Pricing for Rub On Decals
Pricing for custom rub on stickers depends on artwork complexity, number of colors, sheet size, quantity, finish, proofing needs, application testing, and custom layout work. Suppliers often price by sheet, not only by individual decal, because setup, printing, curing, inspection, and packing still happen on small orders. Shocking, I know.
Small custom runs have higher unit costs because setup is spread across fewer pieces. A batch of 100-250 small single-color transfers may land around $1.00-$3.50 per usable decal depending on sheet efficiency and proofing. At 500-1,000 pieces, simple designs may drop into the $0.45-$1.25 range. At 2,500-5,000 pieces, well-laid-out single-color or two-color transfers can sometimes sit around $0.18-$0.65 each. Specialty metallic effects, extra colors, tiny details, and awkward sheet layouts push that upward.
| Branding Option | Typical Best Use | Common Cost Pattern | Main Tradeoff |
|---|---|---|---|
| Rub on transfers | Painted-on look for jars, cards, boxes, and rigid packaging | Higher setup cost, better unit cost at volume | Needs careful hand application and surface testing |
| Paper stickers | Fast labels, promos, seals, and short-run package branding | Often lowest cost, especially in rolls | Visible label edge and less premium texture |
| Vinyl decals | Durable logos, outdoor use, bottles, equipment, and windows | Moderate cost, varies by cut complexity | Thicker film and more visible edge |
| Direct printing | Large-volume bottles, boxes, tins, and rigid components | Efficient at scale, costly for setup | Less flexible for small batches and prototypes |
For a useful quote, send finished decal size, sheet size if you have one, quantity, color count, target surface, packaging use, expected handling, and deadline. “Need logo stickers, how much?” is not a quote request. It is a guessing contest.
Hidden cost traps are common. Changing artwork after proof approval can trigger new setup charges. Ordering exactly 500 pieces for 500 packages leaves no room for hand-application mistakes. Rush production costs more. Skipping surface testing can turn a cheap order into a disposal problem. Delicate artwork may need specialty handling, which can raise cost or reduce yield.
Compared with alternatives, paper stickers are cheaper and faster, vinyl decals are tougher, and rub on decals win when the target is a no-label look. If you are also comparing labels for ingredient panels, hang tags, or outer cartons, review Custom Labels & Tags alongside transfers so each packaging job gets the right material.
Order 10-15% extra for hand application. If staff are new to burnishing transfers, lean toward 15-20% extra for small runs. Waste is not failure. Waste is normal production math wearing a boring hat.
Production Steps, Timeline, and Turnaround Expectations
A typical order follows a predictable path: submit artwork and specs, confirm the surface and use case, receive a quote, approve a digital proof, produce a sample or full run, inspect, pack, and ship. The cleaner your brief, the faster the order moves. Funny how that works.
Simple repeat orders can sometimes produce in 5-8 business days after proof approval, not counting shipping. First-time custom transfer projects commonly need 10-18 business days because proofing, surface review, production setup, curing, inspection, and packing all take time. If testing is needed on your actual material, add several days. If the order has metallic effects, multiple colors, or tight registration, add buffer.
Orders slow down for boring reasons: missing vector files, unclear dimensions, no target surface information, last-minute color changes, vague deadlines, and buyers saying “standard size” as if that means anything. Standard to whom? A lip balm brand, a coffee roaster, and a candle maker do not share one magical logo size.
Build buffer before a launch, market, subscription box drop, trade show, or retail delivery. Custom Rub On Transfers are not the item to order the night before a product shoot. For a serious launch, samples should be in hand 3-4 weeks before final assembly. That gives time to test, adjust size, reorder if needed, and train whoever is applying them.
Surface testing belongs early. A decal can be made correctly and still fail on dusty kraft, oily glass, silicone-coated paper, soft-touch laminate, or flexible pouches. Packaging standards bodies spend so much energy on testing because real handling is messy and repeatability matters. For broader package testing context, the International Safe Transit Association is a useful reference, especially if finished goods ship through parcel networks.
Use approval checkpoints. Verify size on the actual package. Confirm color contrast under real lighting, not only on a glowing laptop screen. Test application by the person who will do the job. Document the method: surface wipe, drying time, tool used, rub pattern, peel angle, and inspection step. For larger retail packaging runs, one written application sheet can prevent a lot of crooked logos and quiet swearing.
If you are building a broader packaging system with inserts, labels, boxes, and branded components, compare the transfer with other Custom Packaging Products before locking the final assembly. Sometimes the cleanest solution is a rub on logo. Sometimes it is a printed sleeve, belly band, or Custom Printed Box. Use the option that fits the job, not the one that looked coolest on a mood board.
Common Mistakes That Cause Peeling, Smudging, or Bad Release
The biggest mistake is applying transfers to dirty, oily, dusty, damp, or textured surfaces and then blaming the decal. The surface usually has receipts. Wipe glass and metal with a suitable cleaner, let it dry fully, and avoid touching the application area afterward. For paperboard, check coating, dust, and fiber texture before committing.
Poor pressure technique causes missing letters and broken lines. People rub only the center, use fingertips, shift the sheet, or peel too fast. A better method is to hold one edge down, burnish from center outward, cover every stroke of the design, then peel slowly at a low angle. If a corner lifts with the carrier, stop. Lay it back down and rub again.
Bad artwork choices create bad transfers. Tiny serif type, hairline strokes, low-resolution logos, distressed textures, and oversized solid blocks can all cause trouble. Fine details may not hold during release. Large solids may need more pressure and can reveal uneven rubbing. A logo that prints fine on a 70 mm paper label may not behave the same as a 25 mm dry transfer decal.
Skipping tests on final packaging is another classic. A transfer that works beautifully on sample glass may behave differently on coated cardboard, frosted jars, powder-coated metal, or soft-touch laminate. If your package uses FSC-certified paperboard, recycled stock, or specialty coatings, test the exact board and finish. The Forest Stewardship Council is useful for understanding certified paper sourcing, but certification does not tell you whether a dry transfer will release cleanly on a specific coating.
Storage matters too. Keep sheets flat, dry, clean, and protected from heat and humidity. Do not leave them loose on a production table like office scrap paper. Dust can interfere with application. Bent sheets make positioning harder. High humidity can affect handling. A simple poly bag, rigid mailer, or flat storage folder is cheap insurance.
Durability expectations need honesty. Rub on decals are decorative transfers. They may resist light handling and minor moisture depending on ink, finish, and surface, but they are not automatically dishwasher-safe, outdoor-rated, or abrasion-proof. For bath products, refrigerated goods, drinkware, or heavily handled samples, test hard before scaling.
Use a quick troubleshooting framework. If the transfer will not release, check pressure, tool choice, and sheet movement. If it peels later, check surface prep and compatibility. If edges look messy, check artwork limits, line thickness, and print quality. If results vary between staff members, the process is not documented well enough.
Next Steps Before You Order Rub On Branding
Before ordering custom rub on stickers, make the decisions that affect production. Choose the exact surface. Measure the application area. Decide final artwork size. Prepare vector files. Pick colors. Set quantity. Define the deadline. If any of those are fuzzy, your quote will be fuzzy too.
- Surface: glass, coated paperboard, rigid plastic, metal, sealed wood, or another exact material.
- Size: final decal width and height in millimeters or inches, not “small” or “medium.”
- Artwork: vector logo, outlined fonts, color callouts, and any minimum line concerns.
- Quantity: order count plus 10-15% extra for setup, testing, and hand-application waste.
- Use case: decorative packaging, promo card, sample jar, drinkware accent, or product display.
- Deadline: required in-hand date, not only the event date.
Make a simple test plan before committing. Apply samples to the real package. Wait at least 24 hours. Rub lightly. Check edge lift. Inspect color visibility under shop, warehouse, and daylight conditions. Photograph results so you can compare versions instead of relying on memory, which is famously terrible during launch week.
Brief the manufacturer with product photos, surface material, packaging dimensions, artwork file, quantity range, desired finish, use environment, and whether staff will hand-apply each decal. If you have ASTM packaging test requirements, ISTA transit concerns, or retailer handling rules, mention them early. Rub on decals may be only one part of the full packaging design, but they still need to survive the real handling path.
Ask direct questions. What surface prep do you recommend? What is the minimum line thickness? Can you test my material? What is the realistic turnaround after proof approval? How many extras should I order? Can the sheet layout make application faster? A good supplier can answer clearly or tell you what needs testing. Vague optimism is not a spec.
Also compare transfers against other sticker formats when durability, speed, or cost matters more than the no-label look. If you need ingredient panels, compliance marks, barcodes, or bulk carton identification, traditional labels usually make more sense. If you want a premium logo mark on a jar lid, insert card, box corner, or rigid promotional item, rub on transfers can be exactly right.
The best results come from treating custom rub on stickers like a production component, not an afterthought tossed in after the box design is locked. Decide the surface, confirm the artwork, test the application, and order enough extras. Do that, and the final mark looks intentional instead of improvised five minutes before packing.
Frequently Asked Questions
Are custom rub on stickers waterproof?
They can resist light handling and minor moisture depending on the ink, finish, and surface, but do not assume they are waterproof without supplier testing. For drinkware, bath products, refrigerated packaging, or damp storage, test the exact exposure conditions before placing a full order. If the item needs dishwasher, outdoor, or heavy abrasion resistance, vinyl decals or specialty labels may be safer.
What surfaces work best for rub on transfer stickers?
Smooth, clean, rigid surfaces usually work best, including glass, coated paperboard, sealed plastic, metal, and some finished wood. Textured paper, soft-touch coatings, oily plastics, silicone-coated surfaces, fabric, and flexible pouches can be risky. Always test on the final packaging material, not a similar-looking substitute from a drawer.
How much do custom dry transfer decals cost?
Pricing depends on quantity, sheet size, color count, artwork detail, finish, proofing, and turnaround speed. Small runs usually have higher unit costs because setup and production checks are spread across fewer pieces. For a useful quote, provide final size, artwork, quantity range, target surface, deadline, and whether you need samples first.
Can rub on logo stickers be applied by hand?
Yes, most are hand-applied using firm pressure from a burnishing tool, squeegee, or similar flat edge. Consistent pressure matters more than brute force. Rushing the peel ruins many transfers. For larger production runs, train one or two people and document the exact application method so results stay consistent.
How long does it take to produce custom rub on transfers?
Simple approved artwork can move faster, while first-time projects need time for quoting, proofing, testing, production, packing, and shipping. Rush orders may be possible, but artwork changes, specialty finishes, or surface testing can extend the timeline. Build in extra time before launches, trade shows, subscription box deadlines, or retail deliveries.