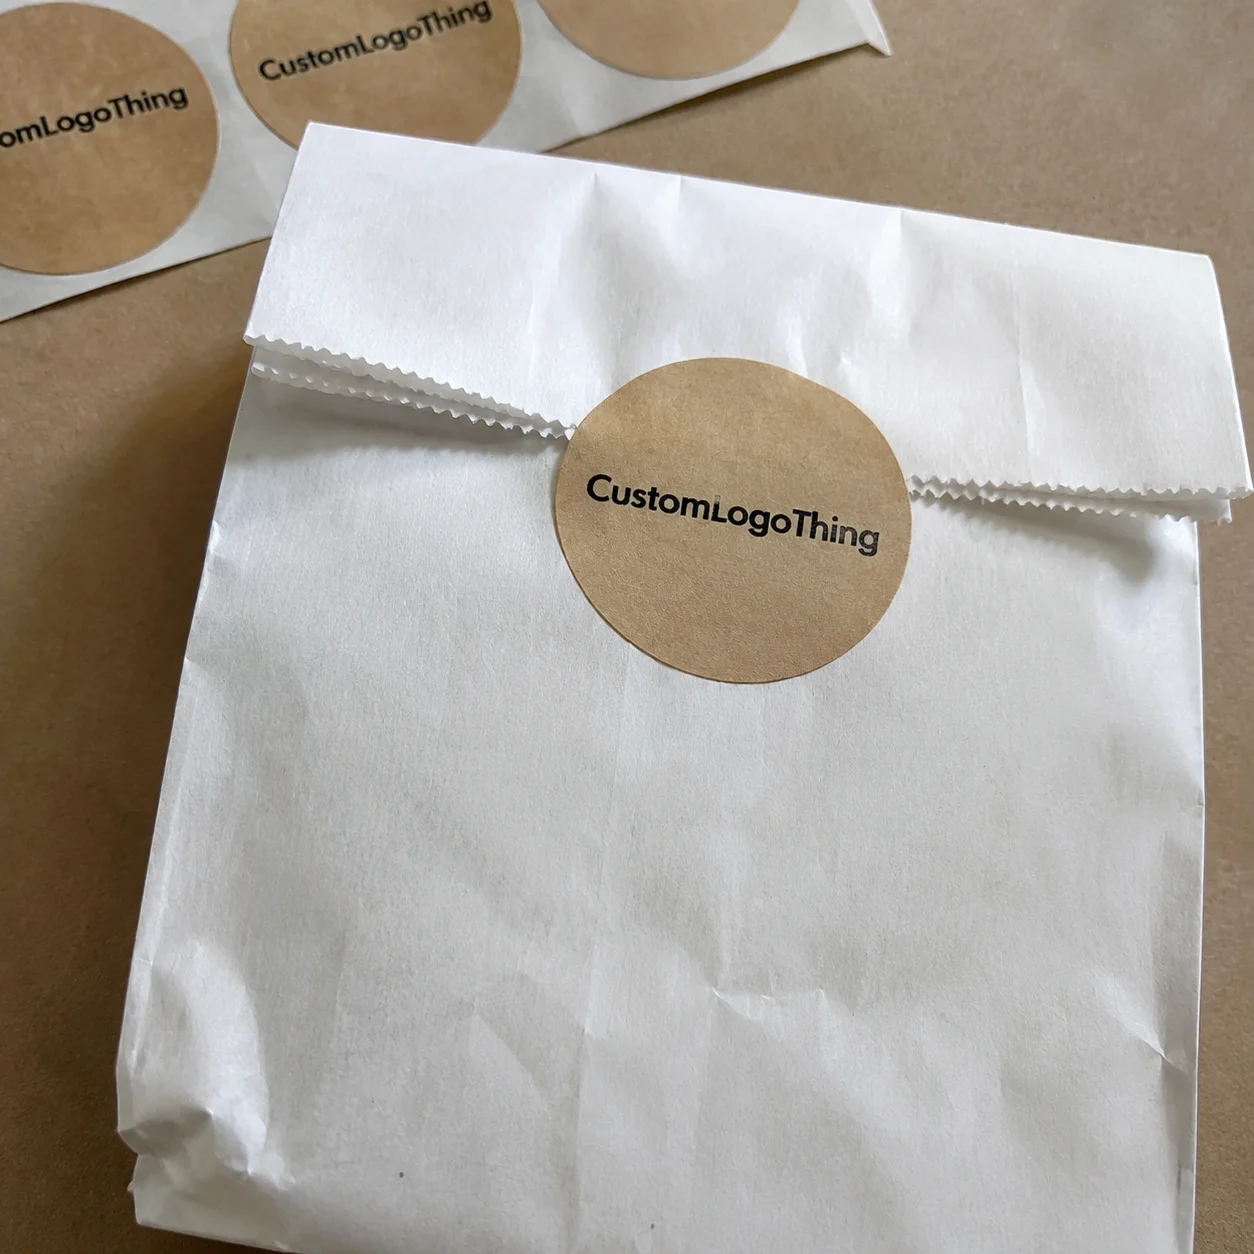
A plain kraft takeout bag leaves the counter. One round logo sticker closes the fold, and suddenly the bag looks intentional, branded, and worth photographing. That is the quiet value of custom stickers for your business: they are low-cost brand carriers that customers physically touch.
Stickers get underestimated because they are small. Bad assumption. A 2-inch label on a candle jar, a 3-inch die-cut sticker in an event tote, or a branded seal on a shipping box can do the work of package branding without the cost of fully custom printed boxes. Better still, stickers sometimes keep working after the first sale. They migrate to laptops, water bottles, notebooks, toolboxes, storage bins, and checkout counters.
That sounds simple. It is not quite that simple.
A sticker that peels, wrinkles, smears, scans poorly, or looks cheap under store lighting is not a branding win. It is a tiny printed apology. The right sticker spec depends on surface, temperature, moisture, handling, lifespan, application speed, and the level of polish your product needs.
Custom Stickers for Your Business Are Tiny Ads With Shelf Life

Custom business stickers are printed adhesive pieces made to match a company’s logo, message, shape, finish, application method, and surface requirements. That last part matters. A sticker for a dry paper shopping bag has a very different job from a label on a refrigerated juice bottle or a warning sticker on a metal tool case.
Buyers often group these products together, even though they behave differently in production:
- Promotional stickers: giveaways for events, mailers, subscription boxes, retail counters, and campaign inserts.
- Product labels: branded and informational labels for jars, bottles, tins, pouches, cartons, and boxes.
- Seal stickers: closures for tissue wrap, envelopes, shopping bags, clamshells, bakery boxes, and folding cartons.
- Packaging stickers: logo marks, batch labels, QR code stickers, short-run seasonal branding, and product variant labels.
- Warning or instruction stickers: safety labels, handling notes, installation guidance, compliance copy, and use instructions.
- Loyalty or event stickers: collectible designs, badges, limited-edition inserts, and branded swag pieces.
From a packaging buyer’s point of view, the economic appeal is obvious. Fully custom bags and printed boxes can be excellent, but they usually require higher order quantities, longer lead times, more storage space, and a bigger commitment to one design. Stickers let a business upgrade stock packaging without rebuilding the entire packaging program.
If you already buy standard mailers, jars, bakery boxes, pouches, paper bags, or retail cartons, stickers can add branding for a few cents to a few dimes per piece, depending on size, material, quantity, and finish. They also help with short runs. Seasonal scent? Limited flavor? Event-only design? Stickers are often the practical answer.
Still, “cheap” should not be the goal. Cheap and wrong costs more than slightly more expensive and correct. A paper label on a chilled bottle may wrinkle. A glossy sticker over a tight curve may lift at the edge. A tiny QR code may scan during design review and fail once printed, laminated, and stuck onto a textured surface.
Practical rule: if the sticker touches the customer, closes the package, carries product information, or affects retail presentation, treat it as part of the packaging system.
That shift in thinking prevents a lot of waste. Stickers are not just decoration. They are small packaging components with adhesive, print, material, and handling requirements. Ignore those requirements and they will absolutely make themselves known later. Usually at the worst possible time.
How Sticker Materials, Adhesives, and Finishes Work
A sticker looks simple from the top, but the construction has layers. The face stock is the printable material. Beneath it sits the adhesive layer. Under that is the liner, usually a release-coated paper or film that lets the sticker peel away cleanly. Add ink, coating, and sometimes lamination, and you have a small engineered product pretending to be simple.
Paper is usually the economical choice for indoor, dry, short-term use. Think bakery box seals, thank-you stickers, envelope closures, product bands, or promotional labels for handouts. Paper can look warm and tactile, especially on kraft packaging or textured retail packaging. It also prints nicely for many brand styles.
Paper does have limits. It does not love water, oil, abrasion, condensation, or repeated handling unless it is coated, laminated, or used in a protected environment. Use paper for dry boxes and bags. Be much more cautious with paper on refrigerated products, bath products, oily jars, and anything customers may handle with damp hands.
Vinyl is tougher. It is common for outdoor stickers, laptop decals, water bottle giveaways, hard-wearing promotional pieces, bumper stickers, and labels that need better moisture resistance. It tends to hold up better against handling and exposure, especially with the right laminate.
BOPP, short for biaxially oriented polypropylene, is a common packaging label material because it is thin, stable, moisture-resistant, and suitable for many bottles, jars, personal care items, and food packaging applications. Clear BOPP can create a “no-label” look on glass or smooth plastic. It needs careful artwork planning, though, because transparent material changes color behavior. White ink may be needed behind certain graphics to keep colors from looking dull or translucent.
Specialty stocks have their place. Textured papers suit premium candles, wine-style labels, boutique foods, and gift packaging. Metallic films can work for cosmetics, beverages, supplements, and limited launches. Holographic materials create instant shelf drama. Freezer-grade label stocks are built for cold-chain products. Destructible or tamper-evident materials may be needed for security or warranty applications.
The prettiest option is often the riskiest option if nobody has checked the actual use environment. A soft-touch label on a luxury box may feel expensive. On a lotion bottle handled every morning, it may show oils and scuffs faster than expected. A textured label may look gorgeous in a sample book and behave badly on a tight jar radius.
Adhesive choice is where many orders succeed or fail. Permanent adhesive is designed to stay put. Removable adhesive is meant to come off more cleanly. Repositionable adhesive gives a little forgiveness during application. Freezer-grade adhesive is formulated for cold conditions. High-tack adhesive grips rough, dusty, low-energy, or difficult surfaces more aggressively. Low-tack adhesive suits temporary promotions or delicate surfaces.
Surface compatibility is not theoretical. Cardboard absorbs and flexes. Kraft paper can be dusty or fibrous. Plastic mailers may use slick low-surface-energy films. Glass is smooth but can sweat under refrigeration. Metal tins may be curved, cold, or slightly oily from handling. Fabric moves and sheds fibers. A sticker that behaves beautifully on a flat coated carton may wrinkle on a small curved jar within minutes.
Finishes add another decision layer. Matte reduces glare and often feels understated. Gloss increases shine and color pop. Soft-touch feels premium but can show rubbing, fingerprints, or oil. Metallic foil and holographic effects create high visual impact, though they raise cost and proofing complexity. Spot UV highlights selected areas. Embossed effects add dimension. A weather-resistant laminate protects ink from moisture, abrasion, and sunlight better than an uncoated surface.
Start with the environment. Then choose material, adhesive, and finish. That order saves money.
Key Specs That Decide Whether a Sticker Looks Professional
Size is the first visible decision and one of the easiest to misjudge. A 1.5-inch circle may be perfect for sealing tissue wrap but too small for a QR code. A 4-inch laptop sticker may be great as a giveaway but ridiculous on a small candle box. For box seals, common sizes often sit around 1.5 to 3 inches. Jar and bottle labels may range from 2 by 3 inches to 4 by 6 inches, depending on container diameter, copy requirements, and design style.
Shape changes both cost and perception. Squares and rectangles are efficient because they use material well and are easy to finish. Circles feel friendly and work beautifully as seals. Ovals suit jars, bottles, tins, and apothecary-style packaging. Die-cut shapes make logos more memorable, but intricate cuts can slow production, increase waste, and create fragile points that lift during application.
Color accuracy deserves a sober conversation. Screens glow. Ink does not. A bright blue on a laptop may print darker on matte paper, flatter on uncoated stock, or different on clear film. If a brand color is critical, supply Pantone references or print-ready CMYK values and ask what color tolerance is realistic. For retail launches or premium packaging, a physical proof can be worth the added cost because a digital proof confirms layout, not material behavior.
Artwork files matter more than buyers want them to. Vector files such as AI, EPS, or print-ready PDF are preferred for logos and cut paths because they scale cleanly. Raster images should usually be 300 dpi at final size. Bleed commonly runs about 1/8 inch beyond the trim line, though supplier specs vary. Safe margins keep text and logos away from the cut edge. Fonts should be outlined or embedded. Cut lines should be clearly marked, often as a separate spot color or named path.
Readable text is another quiet trap. Ingredients, warnings, batch codes, country-of-origin statements, net weight, safety copy, and instructions may need minimum sizes depending on product category and market. If the sticker carries required product information, do not treat typography as a design afterthought. Tiny copy may look elegant in a mockup and become useless in print.
For shipping and transport packaging, testing standards from organizations such as ISTA can be useful when labels must survive handling, vibration, compression, or temperature shifts as part of a full packaging system. Not every sticker needs formal testing. But if failure affects shipping, safety, compliance, or retail acceptance, test more than vibes.
QR codes and barcodes need contrast, clean edges, and enough size to scan after printing and lamination. A QR code under 0.8 inch can work in some cases, but it becomes less forgiving once gloss, curvature, texture, glare, or poor lighting enters the picture. Test scans from several phones before approving a bulk run. Also test after the sticker is applied to the final surface, not just from a PDF proof.
Format affects labor. Roll stickers are efficient for fulfillment lines, labeling guns, dispensers, and higher-volume hand application. Sheet stickers are useful for lower quantities, mixed designs, office use, and small promotional runs. Individually cut stickers are best for giveaways, event bags, retail inserts, and mailer surprises.
If staff need to apply 2,000 stickers in a day, liner choice and peelability become labor costs. Sticker spacing on rolls, unwind direction, liner stiffness, and adhesive grab can change packing speed. People tend to ignore this until someone is standing at a table, fighting a liner for three hours.
The best test is physical. Place a paper mockup on the real package. Wrap it around the jar. Stick it to the mailer. Put it in the refrigerator. Rub it. Scan it. Open the sealed bag. A five-minute test can prevent a 5,000-piece mistake.
| Sticker Use | Typical Material | Common Format | Buyer Watchout |
|---|---|---|---|
| Box seal or tissue closure | Paper or BOPP | Roll or sheet | Check peel speed and adhesive strength on kraft or coated board |
| Jar or bottle label | BOPP, vinyl, or clear film | Roll | Test on curves, condensation, oils, and refrigeration |
| Laptop or giveaway sticker | Vinyl with laminate | Individually cut | Confirm scratch resistance and clean die-cut edges |
| QR code promotion | Paper, BOPP, or vinyl | Sheet or roll | Scan after print, laminate, and final placement |
Pricing, MOQ, and Unit Cost: What Changes the Quote
Sticker pricing is driven by size, material, finish, quantity, shape complexity, print method, setup requirements, packing format, and shipping destination. A 2-inch round paper sticker on rolls is not priced like a 4-inch waterproof die-cut vinyl sticker with matte laminate and individual cutting. Obvious, yes. Still ignored constantly.
MOQ means minimum order quantity. It is the smallest quantity a manufacturer can produce efficiently for a specific process, material, or finish. Digital printing may allow lower quantities, sometimes starting in the low hundreds. Foil, custom die-cutting, screen printing, specialty adhesives, or unusual materials may require higher minimums because setup time, tooling, and material waste have to be absorbed.
Unit cost usually drops as quantity rises because proofing, setup, machine calibration, and finishing time are spread across more pieces. For simple logo stickers, a small batch may land around $0.20 to $0.60 per piece depending on specs. Larger runs can move into the $0.03 to $0.15 range for straightforward sizes and materials. Premium finishes, large dimensions, waterproof laminates, variable data, and individual cutting can push costs higher. These are planning ranges, not a guaranteed quote.
The hidden math is failure. A paper label on a refrigerated drink may wrinkle or peel, leading to rework, waste, and damaged brand perception. A film label that costs several cents more may prevent relabeling, returns, or messy retail presentation. Custom stickers for your business should be judged by total performance, not just unit price.
Add-ons change the quote quickly. Custom Die Cuts require more finishing control. Metallic foil and holographic effects add material and process cost. Lamination adds durability. Waterproof or freezer-grade materials cost more than basic paper. Variable data, such as unique QR codes or serial numbers, adds file handling and inspection requirements. Individually cut stickers need extra finishing. Rush production and expedited freight can wipe out savings from a low unit price.
Small orders make sense for new product launches, prototype packaging, seasonal promotions, event testing, uncertain demand, and artwork that may change. If the logo, product claim, ingredients, barcode, or legal copy is not stable, do not buy a year’s worth of stickers to save two cents each. Dead stock is still cost. It just sits there quietly making you annoyed.
Larger runs make sense for stable branding, repeat product packaging, subscription boxes, fulfillment operations, and established retail lines. If you apply the same 2-inch seal to 8,000 boxes every quarter, buying in a more efficient quantity can reduce reorder friction and improve consistency.
Quote requests should be specific. “Logo stickers” is too vague. “2-inch round matte BOPP sticker, permanent adhesive, supplied on rolls, full-color print, 5,000 pieces, for kraft mailer closure” gives the supplier enough information to price intelligently. One inch of size, one finish upgrade, or one format change can materially change the quote.
Process and Timeline: From Artwork to Finished Stickers
A clean ordering process starts with the use case. Define the surface, size, material, finish, quantity, and deadline before artwork is finalized. Then upload the artwork, Request a Quote, review the proof, approve production, and wait for printing, finishing, inspection, packing, and shipping. Simple in theory. Less cute when the deadline is Friday.
During prepress, files are checked for resolution, bleed, safe margins, color setup, cut paths, and readability. A good prepress review may flag thin lines, low-resolution logos, text too close to the trim edge, missing white ink layers, or a die line that cuts through part of the artwork. That review protects both buyer and manufacturer.
Digital proofs confirm layout, spelling, size, shape, and cut lines. They do not perfectly predict physical color, texture, opacity, adhesive performance, or how a clear label will look on amber glass. For stickers that carry important package branding, treat the proof as a checkpoint rather than a crystal ball.
A physical sample or press proof is worth considering for large orders, premium finishes, exact brand colors, retail launches, or difficult surfaces. If the label goes on a squeezable tube, an oily jar, a chilled bottle, a curved tin, or textured paperboard, the sample may answer questions a screen cannot. ASTM testing methods can also be relevant for adhesives, abrasion, and label durability, depending on the application and risk level.
Typical timelines vary. Simple digitally printed stickers may be produced in a few business days after proof approval. More involved orders with die-cutting, lamination, foil, specialty stock, variable data, or large quantities may take 7 to 15 business days or longer. Freight adds time, especially for bulky roll shipments, international shipping, or tight event deadlines.
Buyers control several bottlenecks: late artwork, missing logo files, unclear dimensions, multiple revision rounds, absent Pantone references, and approving a proof before testing the size on the package. The fastest way to lose a week is to discover after proofing that the label is too wide for the bottle curve.
Work backward from the launch date, event date, fulfillment schedule, or packaging line start. Add buffer. Rushing can limit material choices, increase shipping cost, reduce proofing time, and create avoidable application problems. A sticker is small, but if it is required to ship product, it can hold the whole order hostage.
Common Sticker Ordering Mistakes That Waste Budget
The most common mistake is ordering based on appearance alone. A nice matte finish and a pretty die-cut shape are not enough. The sticker still has to match the surface, temperature, moisture level, handling, and lifespan required. A label for dry soap boxes and a label for refrigerated sauce bottles should not be specified the same way.
Undersized stickers create a different problem. Logos lose detail. QR codes fail. Ingredient panels look crowded. Disclaimers become unreadable. Buyers often design on a large screen, then approve artwork that shrinks poorly at final size. Print a paper mockup at 100% scale before ordering. Low-tech. Extremely effective.
Oversized stickers can also waste money. They may wrinkle on curved containers, overpower small packaging, or increase material cost without adding brand impact. On small jars, a label that looks elegant in a flat PDF may buckle once wrapped around the radius. Curved surfaces punish excess width.
File mistakes are painfully common: low-resolution screenshots, missing fonts, no bleed, incorrect cut lines, RGB artwork with no print consideration, and logos copied from websites. If you are building a serious packaging design system, keep a folder with vector logos, brand colors, approved typography, barcode files, and final label templates. The fewer file mysteries, the fewer production surprises.
Application workflow gets ignored too often. A sticker that looks excellent on a sheet may be slow to peel at a packing station. If one employee applies 1,000 closures per shift, even a two-second delay per sticker becomes more than half an hour of labor. Rolls, liner release, unwind direction, and sticker spacing are operational details, not trivia.
Adhesive mismatch is another budget leak. Removable stickers may fall off if used as box closures. Permanent stickers may damage surfaces or annoy customers if used on reusable containers. High-tack adhesives may be necessary for rough corrugate but overkill on smooth glass. Ask for the adhesive that matches the job, not the strongest adhesive available.
Over-ordering looks smart on a spreadsheet until the logo changes, a product claim gets revised, a barcode is updated, or a regulation affects copy. For food, cosmetics, supplements, and safety-related products, label information can change faster than expected. For broader sustainability guidance around packaging decisions, the EPA’s sustainable materials management hierarchy is a useful reference because waste reduction starts before anything is printed.
For first runs, new surfaces, or new finishes, order a small test batch or request samples when possible. Business stickers are inexpensive compared with many packaging components, but thousands of unusable stickers still hurt.
What to Prepare Before Requesting a Quote
Before asking for pricing, define the sticker’s job in one sentence. “Seal a kraft mailer.” “Label a refrigerated glass bottle.” “Promote a QR code at an event.” “Add a logo to stock retail bags.” That sentence steers material, adhesive, finish, format, and quantity.
Gather practical inputs: packaging samples, logo files, brand colors, product photos, measurements, target quantity, deadline, and examples of stickers you like or dislike. If you already use Custom Labels & Tags, compare the current material and adhesive against the new use case rather than assuming one spec fits everything.
Mock up the placement before production. Cut plain paper to the proposed size and tape it to the jar, bottle, bag, mailer, or box. Check proportions from arm’s length and close up. If the sticker includes a QR code, scan it in the planned location. If it wraps around a curve, check for edge lift and wrinkling. If it seals a bag, open the bag and see how the sticker tears.
Choose two or three spec options for quoting. For example: paper versus BOPP, matte versus gloss, roll versus sheet, standard shape versus die-cut. This gives you a real cost-performance comparison. It also helps avoid the false choice between the cheapest option and the most premium option.
Identify who will apply the stickers and how fast they need to work. A retail team adding 200 stickers by hand has different needs from a fulfillment line applying 10,000 closures per week. Roll direction, liner stiffness, gap between stickers, core size, and peel release can affect labor. Packaging is physical. People have to handle it.
If stickers are part of a wider packaging update, review them alongside your Custom Packaging Products so the full brand presentation stays consistent. A premium label on a flimsy box can feel mismatched. A basic seal on luxury retail packaging can undersell the product. Package branding works best when the sticker, container, insert, mailer, and label hierarchy agree with each other.
Review the proof slowly. Check spelling, dimensions, safe margins, cut line alignment, barcode scans, QR scans, color references, and any legal or product copy. Ask one person who did not create the artwork to review it too. Fresh eyes catch boring mistakes, and boring mistakes are the expensive ones.
Ordering custom stickers for your business becomes easier when the quote is built around real use conditions, not guesswork. Prepare artwork, package dimensions, target quantity, deadline, surface details, and the sticker’s actual job before contacting a manufacturer. You will get a cleaner quote, a better product, and fewer surprises on packing day.
FAQ
What are the best custom stickers for small business packaging?
Paper stickers work well for dry indoor packaging such as boxes, bags, envelopes, and tissue seals. Vinyl or BOPP stickers are better for moisture, rubbing, refrigeration, or longer shelf life. For mailers and boxes, logo seals often give the highest visual impact for the lowest packaging change. For jars, bottles, and retail products, test the material and adhesive on the actual container before ordering a large run.
How much do custom business stickers usually cost?
Cost depends on size, quantity, material, finish, shape, print method, and whether you need rolls, sheets, or individually cut stickers. Simple small batches may cost a few dimes per sticker, while larger straightforward runs may drop much lower per piece. Foil, holographic film, lamination, waterproof materials, variable data, and custom die cuts usually increase the quote.
How long does it take to make custom stickers for a business?
Timeline depends on artwork readiness, proof approval, material availability, quantity, finishing steps, and shipping method. Simple digitally printed stickers can often move faster than complex die-cut, laminated, foil, or specialty material orders. Build in buffer time for proof revisions, sample testing, and freight if the stickers are tied to a launch, retail delivery, or event.
What file format should I use for custom logo stickers?
Vector files such as AI, EPS, or print-ready PDF are preferred for logos, cut lines, and clean edges. High-resolution PNG or TIFF files may work for raster artwork, but screenshots and low-resolution web images usually print poorly. Include bleed, safe margins, fonts converted to outlines, and any Pantone or brand color references.
Are waterproof stickers necessary for every business?
No. Waterproof stickers are only necessary when the sticker faces moisture, refrigeration, ice buckets, outdoor exposure, frequent handling, or cleaning. Indoor paper stickers can be more cost-effective for dry boxes, bags, envelopes, and short-term promotional use. If failure would affect product presentation or customer trust, test a water-resistant or laminated option before ordering in bulk.