Custom Surfboard Stickers: Design and Order Better
A surfboard sticker has a harder job than most outdoor labels. It deals with UV, saltwater, board wax, sunscreen oils, sand abrasion, rail rub, pressure dents, board bags, roof racks, and hands that are not exactly gentle.
That is where many orders go wrong. A decal that looks sharp on a laptop, bottle, or shop counter can start lifting after one saltwater session if the adhesive, laminate, and placement are wrong. Good artwork helps. It does not save the wrong material.
For buyers, the goal is not just “waterproof.” That word gets thrown around until it means almost nothing. The real question is whether the sticker can survive the exact surface, curve, wear zone, and handling pattern it will face.
What Custom Surfboard Stickers Actually Do on the Water
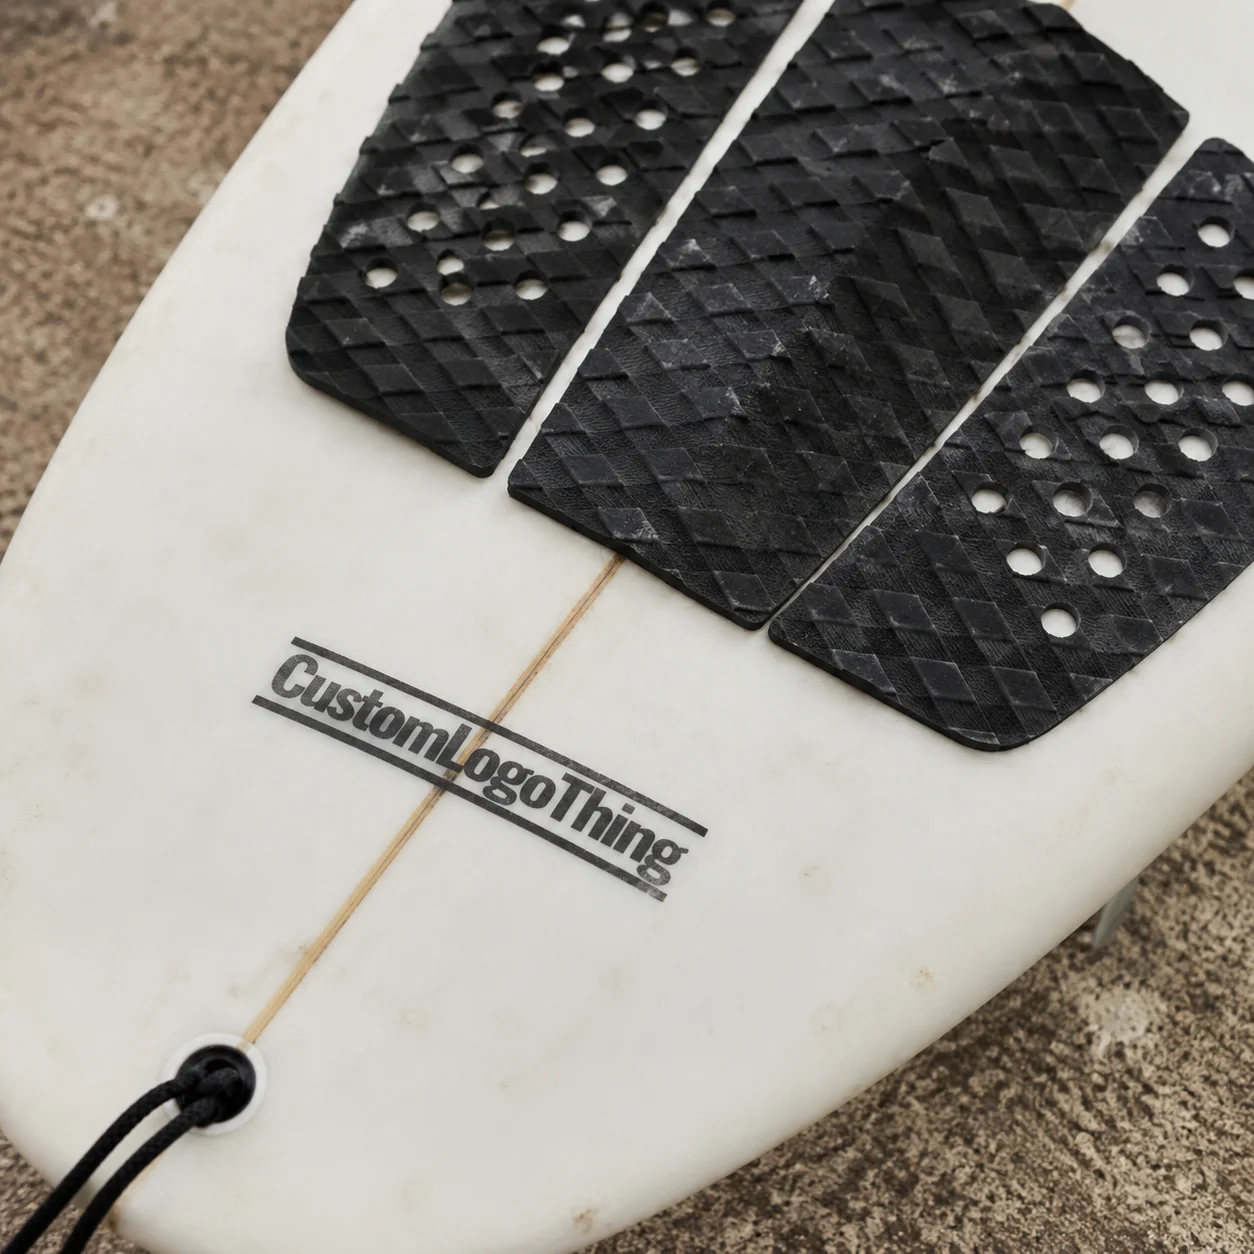
Custom surfboard stickers are branded, decorative, sponsor, identification, event, rental, or retail decals made for boards, fins, board bags, surf schools, competitions, shapers, and merch kits. Some sit on the clean underside of a board for visibility in photos. Others mark rails for owner identification. Surf schools may need numbered labels for rental boards that get dragged over sand twice a day. Different jobs. Different specs.
Placement changes everything. A logo on the underside of a fiberglass board is mostly fighting water, sunlight, and edge abrasion. A decal near a deck pad is fighting wax, feet, leash cords, pressure, and grit. A rail sticker has another problem: curve stress. Flat film does not love wrapping around curved surfaces. Physics, annoyingly, still applies.
Standard promotional vinyl can look fine at first because the face film prints cleanly and the adhesive grabs a smooth surface. Then salt crystals collect along the edge. Wax residue blocks full adhesive contact. Board flex works against a large decal. Sand creates micro-scratches. Rails hit racks, vans, straps, and board bags. Failure usually starts at the edge, not the center.
Practical rule: do not buy surfboard decals like ordinary giveaway stickers. Treat them as small outdoor labels built for water, abrasion, sunlight, and curved surfaces.
From a production point of view, the decision comes down to four variables: adhesive, laminate, shape, and placement. Get those right and custom surfboard stickers can support sponsor visibility, rental control, shop branding, retail inserts, or event kits without looking tired after the first few sessions.
There is also a difference between a sticker made for a surfboard and a sticker sold to surfers. The first is specified around performance. The second may be a nice-looking merch item that belongs on a water bottle, cooler, laptop, car window, or board bag. Both have value. Confusing them is how buyers end up disappointed.
How Surfboard Decals Work: Materials, Adhesive, and Laminate
A typical surfboard decal has five parts: face film, printed ink, adhesive, backing liner, and sometimes a protective laminate. Simple stack. Complicated behavior.
White vinyl is the common workhorse. It gives strong color contrast, covers board graphics underneath, and suits sponsor logos, shop marks, QR-coded identifiers, and rental labels. Clear vinyl can look cleaner on white boards or minimalist artwork, but it needs planning. On tinted resin, dark rails, wood veneer, carbon-look finishes, or busy board graphics, clear film without white ink can make the design vanish. Very elegant. Also unreadable.
Holographic and specialty films work for retail merch, limited drops, event packs, and brand kits. They cost more, and they need proofing because color shifts under sunlight and over curved surfaces. Waterproof BOPP works well in many label applications, especially packaging, but high-flex surfboard zones often benefit from outdoor-grade vinyl with laminate instead.
Waterproof and weather-resistant are not the same thing. Waterproof means the material resists water exposure. Weather resistance also accounts for UV, abrasion, temperature changes, adhesive aging, and outdoor wear. For board use, weather resistance matters because sunlight and edge abrasion often damage decals before water alone does.
Adhesive choice depends on the board surface. Smooth fiberglass or epoxy gives the decal a better chance. Painted surfaces vary because the sticker is only as secure as the paint layer underneath it. Textured traction areas are unreliable. Wax-contaminated zones are worse. Even a premium adhesive cannot bond properly to a film of wax, sunscreen oil, salt, and dust.
Laminate is the protective layer. Gloss laminate boosts color and often looks closer to a polished board surface. Matte laminate cuts glare and can feel more refined in retail packaging, but it may show wax smears, fingerprints, and abrasion differently. A heavier laminate can help in rougher placements, though thicker construction may be less forgiving around tight curves.
Ink system matters too. Outdoor-friendly inks and proper curing reduce scuffing, fading, and solvent-related problems under laminate. If the ink is not fully cured before lamination, trapped solvents can weaken the adhesive stack or create visual defects. Nobody wants bubbling because production was rushed. Rush orders are useful. Magic is not included.
Packaging teams already think this way with Custom Labels & Tags: substrate, ink, adhesive, finish, and use environment all affect performance. Surfboard decals follow the same logic, except the test includes saltwater, sand, wax, and board flex.
Key Specs That Decide Whether Board Stickers Last
Start with size. Small sponsor logos often run 2 to 4 inches wide. Rail marks may be slimmer, sometimes 0.75 to 1.5 inches tall, because they need to sit on a curved area without wrinkling. Nose decals can be larger, but they face more handling. Underside graphics may run 6 to 12 inches wide when visibility in photos matters. Fin box labels and QR-coded rental identifiers are usually compact because scanability, not drama, is the job.
Shape is the next decision. Die-cut decals follow the artwork outline and feel more custom. Kiss-cut stickers stay on a backing sheet, which makes application easier for small logos, team sets, and multi-design packs. Circles, ovals, rectangles, and rounded rectangles are cheaper to cut and easier to align. Sheeted sticker sets work well for surf schools, teams, shops, and brands that need several small designs together.
Rounded corners are not just a design preference. Sharp points lift faster. On rails, noses, and deck areas, a small corner radius can make the difference between a clean edge and a little flap that catches sand until the sticker looks wrecked.
Color contrast needs more attention than it usually gets. White boards are forgiving. Tinted resin, dark rails, patterned boards, carbon-look finishes, and wood veneers are not. If the artwork sits on clear vinyl, ask whether white ink is needed behind the design. White ink adds cost and setup complexity, but it can be the difference between a readable logo and a ghost image.
Finish affects appearance and maintenance. Gloss can blend with polished fiberglass and make colors feel brighter. Matte reduces glare in photos, which can help sponsor marks and retail visuals, but it may reveal wax residue or handling marks sooner. There is no universal best finish. There is the finish that fits the board, the artwork, and the abuse level.
Before quoting, prepare the basics: final dimensions, quantity, artwork format, brand colors if available, bleed, safe area, cut line, and intended placement. Vector files such as AI, EPS, SVG, or print-ready PDF usually create fewer problems than screenshots or social media downloads. A 300 DPI raster file can work for some designs, but tiny sponsor text, thin outlines, QR codes, and tight cut paths are less forgiving.
Curved rails and noses create stress because flat film does not naturally want to wrap around compound curves. Smaller segmented graphics often outperform one oversized piece. That is not a design compromise. It is a survival strategy.
| Placement | Typical Size Range | Best Material Direction | Main Risk |
|---|---|---|---|
| Underside logo | 6–12 inches wide | White vinyl with gloss laminate | UV exposure and edge abrasion |
| Rail identifier | 0.75–1.5 inches tall | Flexible vinyl, rounded corners | Curve stress and rack rub |
| Deck near pad | 2–4 inches wide | Laminated outdoor vinyl | Wax, foot abrasion, pressure |
| Rental QR label | 1.5–3 inches wide | White vinyl with protective laminate | Scan failure from scratches |
| Retail merch sticker | 2–5 inches wide | White, clear, or specialty film | Lower durability need, higher visual expectation |
Pricing, MOQ, and Quote Factors for Surfboard Sticker Orders
Sticker pricing is not linear. Unit cost usually drops as quantity rises because setup, proofing, material waste, cutting time, and packing labor are spread across more pieces. A 50-piece order absorbs nearly the same proofing effort as a 500-piece order, so the smaller run often looks expensive per sticker.
As a planning range, simple small vinyl decals may land around $0.35 to $1.20 per piece at moderate quantities, depending on size, finish, and order details. Larger laminated decals, white ink, specialty film, Custom Die Cuts, or multi-version sheets can push higher. Very small high-volume stickers may cost less. Freight, rush production, sampling, and individual bagging change the math quickly.
Major quote drivers include sticker size, material, laminate, shape complexity, number of artwork versions, white ink, specialty finishes, packing style, proofing requirements, and shipping speed. A 3-inch circle on white vinyl is straightforward. A 9-inch die-cut holographic sponsor logo with white ink, gloss laminate, and five athlete name versions is a different production job.
MOQ depends on the supplier’s equipment and material setup. A surf school ordering rental board labels has different economics from a shaper testing ten logo decals before a product launch. For small tests, digital printing may make sense. For larger programs, ask for quantity breaks at 100, 250, 500, and 1,000 pieces instead of asking for one price and hoping it tells the whole story.
Sheeted stickers can reduce handling cost when several small graphics are ordered together. Instead of packing ten tiny designs separately, the printer can place them on one sheet with kiss cuts. That format works for team kits, sponsor packs, retail inserts, and branded packaging bundles that include decals with other surf accessories.
Consultant’s view: the cheapest sticker is not always the lowest-cost option. If it peels, needs replacement, or makes a sponsor logo look cheap after one session, the real cost is higher than the invoice.
There are also quote details buyers forget to mention. Will the decals be counted loose, sheeted, or individually packed? Do they need application instructions? Are there multiple ship-to locations? Is the deadline a preferred date or the day before an event? Printers price production work more accurately when those details are clear early. Surprises near shipment are expensive, which is deeply shocking to absolutely no one in print production.
For broader merch and product packaging programs, it can help to quote surf decals alongside Custom Packaging Products. Combining stickers with custom printed boxes, hang tags, insert cards, or retail packaging keeps logo files, color targets, and launch timing in the same workflow.
Process and Timeline: From Artwork to Ready-to-Apply Stickers
A clean order flow prevents most delays. Define the use case first. Confirm material. Submit artwork. Review the proof. Approve production. Then the stickers print, cure if needed, laminate, cut, inspect, pack, and ship. Simple on paper. Messy when the buyer sends a low-resolution logo and says, “Make it around 4 inches.”
A useful proof should show size, cut path, safe area, material, finish, color notes, and quantity. If the sticker has white ink, the proof should make that layer clear. If the decal is die-cut, the cut line should be visible enough for approval. If the placement is curved, review the proof with that surface in mind. A flat PDF does not warn you when a decal is too big for a rail.
Common slowdowns include missing dimensions, low-resolution logos, unclear cut lines, late color changes, specialty materials, split shipments, and inconsistent artwork versions. Sponsor packs are especially prone to delays because every logo may arrive in a different format. One brand sends vector art. Another sends a 600-pixel PNG copied from a website. Production can improve some files, but rebuilding messy artwork takes time and may add cost.
For planning, simple vinyl decals can often move faster than multi-version specialty orders with white ink or custom sheets. A straightforward repeat order may take only a few business days after proof approval. More complex work can require 10 to 15 business days or longer depending on sampling, material availability, finishing, quality checks, and shipping distance. Rush work is possible in some cases, but it reduces the margin for proofing errors.
Surf events, competition kits, and retail drops need buffer time. Build in time for sampling, application testing, and weather-dependent delivery delays. If the stickers are part of product packaging or event kits, one late component can hold up the whole shipment. Small printed pieces create large launch problems. Ask anyone who has waited on labels while finished products sit packed in cartons.
Quality control should be more than counting pieces. Check color consistency, cut registration, laminate coverage, edge cleanliness, liner release, surface scratches, and packaging condition. For QR labels, scan samples after printing and lamination, not just from the digital proof. For die-cut work, inspect tight corners and small details. Those are the spots that reveal weak setup first.
Testing matters. Apply one sticker to an actual board surface before ordering thousands. Leave it for several days if possible. Rinse it. Handle it. Put it in a board bag. Check the edges after exposure. That modest test can reveal edge lift, weak contrast, scanning issues, finish concerns, or size problems before the full run arrives.
For durability thinking, buyers can borrow discipline from transport and packaging standards. Organizations such as ISTA focus on testing packaged products through distribution stresses, while groups such as FSC set standards for responsible paper sourcing. Surfboard stickers are not judged by those same standards directly, but the mindset is useful: define the exposure, then specify against it.
Common Mistakes That Make Surf Stickers Peel or Look Cheap
The first mistake is application over contamination. Wax, dust, salt residue, sunscreen oils, damp rails, and polishing compounds all interfere with adhesive contact. The board must be clean and dry. Not mostly clean. Clean. A quick towel wipe after a session rarely does enough.
Oversized decals on curved rails are another frequent problem. Flat vinyl can tolerate some curve, but compound curves create tension. That tension pulls at the edge. Once an edge lifts, saltwater and sand do the rest.
Clear material without white ink is a quieter mistake. The buyer approves the artwork on a bright white screen, applies it to a tinted or patterned board, and wonders why the logo has no punch. Screens lie because they back everything with light. Boards do not.
Artwork causes plenty of weak results too. Tiny text, thin lines, missing bleed, low-resolution screenshots, and sponsor logos taken from social media all reduce the final result. If a QR code is included, test the printed size before rollout. A code that scans on a monitor may fail after lamination, glare, curve, and abrasion are added.
Placement errors are expensive because the sticker may be well made but poorly located. Decorative decals placed in high-wear foot zones will age faster. Stickers near board bag contact points, roof rack straps, leash rub areas, or hand-grip zones see more abrasion. A rental fleet label should prioritize readability and repeat handling over dramatic placement.
Storage matters before application. Unapplied stickers left in heat, humidity, or direct sun can develop liner curl, adhesive changes, or handling problems. Keep them flat, cool, dry, and out of sunlight. Many pressure-sensitive materials perform best when applied at moderate room temperature, often around 60°F to 80°F, though the exact range depends on the adhesive system.
- Do not apply over wax: remove residue fully and let the surface dry.
- Avoid sharp corners: rounded edges reduce lift risk on rails and noses.
- Check contrast: clear decals may need white ink behind the design.
- Use print-ready art: vector files reduce fuzzy logos and uneven cut paths.
- Match placement to wear: foot zones punish even strong laminated vinyl.
Build a Sticker Spec Before You Order
Before requesting a quote, build a simple specification. It does not need to be fancy. It does need to be complete enough for the manufacturer to price the real job instead of guessing.
- Board type: fiberglass, epoxy, painted, carbon-look, textured, or another surface.
- Placement zone: underside, rail, nose, deck, fin area, board bag, or retail kit.
- Sticker size: width and height in inches or millimeters.
- Quantity: include likely reorder volume if the first run is a test.
- Material preference: white vinyl, clear vinyl, specialty film, or open to recommendation.
- Finish: gloss, matte, or heavier protective laminate.
- Artwork file: vector PDF, AI, EPS, SVG, or high-resolution raster file.
- Deadline: event date, retail drop date, or shipping cutoff.
- Shipping address: one location or split shipments.
Photograph the board area with a ruler or tape measure in frame. That one photo helps the supplier spot scale issues, curve risks, and placement conflicts early. It is especially useful for rails, noses, and unusual board shapes where a flat proof can be misleading.
Separate must-haves from nice-to-haves. Waterproof durability may be non-negotiable. Holographic film may be optional. A matte finish may be preferred for packaging reasons, while gloss may be better for the board surface. Clear priorities make quoting faster and reduce back-and-forth.
For larger programs, request a digital proof and consider a small test batch. Rental fleets, surf schools, sponsor activations, and multi-location retail programs should not skip that step. A 25-piece test can prevent a 2,500-piece regret.
The best surf sticker orders start with a boring question: where will this thing live? If the answer includes saltwater, sun, wax, sand, and curve stress, the quote should reflect that reality. Before ordering custom surfboard stickers, confirm the surface, exposure, quantity, artwork quality, and timeline so the final product is built for how the stickers will actually be used.
FAQ
Are custom surfboard decals waterproof enough for saltwater use?
They can be, if made with water-resistant vinyl or a similar film, durable inks, and an adhesive suited for smooth board surfaces. Saltwater resistance also depends on proper application, clean surfaces, edge protection, and avoiding wax-contaminated areas.
What is the best material for custom surfboard stickers?
Outdoor-grade vinyl with a protective laminate is often the safest choice for durability, color stability, and water exposure. Clear vinyl works well for subtle graphics, but white ink may be needed if the board color or artwork background reduces contrast.
How do I apply surfboard stickers so they do not peel?
Clean the board with a suitable residue-removing method, let it dry completely, position the sticker carefully, and press from the center outward. Avoid water exposure until the adhesive has had time to bond. Do not apply over wax, sunscreen residue, damp rails, textured traction, or heavily curved areas unless the sticker is sized for that placement.
How much do custom surf stickers cost per piece?
Cost depends on size, quantity, material, laminate, cut shape, artwork versions, specialty effects, packing, and shipping speed. Simple small vinyl decals may fall around $0.35 to $1.20 per piece at moderate quantities, while larger or more complex decals cost more. Ask for quantity breaks before locking the order.
Can custom surfboard stickers be removed without damaging the board?
Many vinyl stickers can be removed from smooth board surfaces with careful heat and slow peeling, but results depend on adhesive strength, age, surface condition, and finish. Test removal gently and avoid sharp tools that can scratch fiberglass, epoxy, paint, or protective coatings.