Buyer Fit Snapshot
| Best fit | Shipping Jewelry in Poly Mailers Safely projects where brand print, material claims, artwork control, MOQ, and repeat-order consistency need to be specified before quoting. |
|---|---|
| Quote inputs | Share finished size, material target, print colors, finish, packing count, annual reorder estimate, ship-to region, and any compliance wording. |
| Proofing check | Approve dieline scale, logo placement, barcode or warning zones, color tolerance, closure strength, and carton packing before bulk production. |
| Main risk | Vague material claims, crowded artwork, missing packing details, or unclear freight terms can make a low unit price expensive after revisions. |
Fast answer: Shipping Jewelry in Poly Mailers Safely: Material Claims, Seal Quality, and Freight Cost should be specified like a repeatable production item. The safest quote records material, print method, finish, artwork proof, packing count, and reorder notes in one written spec.
Production checks before approval
Compare the actual filled-product size with the drawing, then confirm tolerance on folds, seals, hang holes, label areas, and retail display edges. Reserve space for logos, QR codes, warning copy, and material claims before decorative graphics fill the panel.
Quote comparison points
Review material grade, print process, finish, sampling route, tooling charges, carton quantity, and freight assumptions side by side. A quote is only useful when the supplier can repeat the same color, closure quality, and packing count on the next order.
I still remember the first time I watched a tray of sterling stud sets survive a 1,400-mile regional route without a single bent card, even after being sorted through a hub outside Louisville at 2:10 a.m. No heroic carton. No mountain of filler. Just a tight pack, a rigid insert, and a mailer doing quiet, competent work. That was the moment I stopped treating a guide shipping jewelry in poly mailers setup like a bargain-bin shortcut and started treating it like a packaging system with rules. Movement was the difference. Not brand prestige. Not luck. Movement.
For brands shipping lightweight necklaces, bracelet stacks, earrings, and small gift sets, guide shipping jewelry in poly mailers is really about control. The outer package should not be doing all the heavy lifting. You are building a compact shipping format that protects the item inside, keeps the order under a useful weight threshold, and still opens with enough polish that the customer does not feel like they received a shrug in the mail. That balance matters in ecommerce shipping, especially when fulfillment speed, dimensional weight, and customer presentation are all tugging in different directions. A package that weighs 3.8 ounces instead of 5.2 ounces can move into a lower rate class on many domestic lanes, and that difference adds up faster than most sellers expect.
Can you guide shipping jewelry in poly mailers safely?
Yes, if the jewelry is flat, stabilized, and protected by a rigid insert or backing card. The outer mailer should contain the package, not compensate for loose parts. That usually means an anti-tarnish pouch, a snug fit, and a seal that stays closed through sorting, weather, and handoffs. Once the item can no longer move, guide shipping jewelry in poly mailers becomes a practical shipping method instead of a gamble.
Why guide shipping jewelry in poly mailers can work
Plenty of jewelry shipments fail because the pack is sloppy and full of empty space, not because the poly mailer itself is a bad idea. I visited a small wholesale operation in New Jersey, just off the Route 1 corridor near Edison, where the owner blamed every damaged order on the carrier until we watched the packing table together. The culprit showed up fast: a delicate chain was sliding inside a bag that was too wide by nearly 2 inches, and the backing card was thin enough to crease with the pressure of a fingernail. Once the pack was tightened up, guide shipping jewelry in poly mailers moved from questionable to repeatable. Funny how that works.
The basic logic is simple. Poly mailers are best for compact, low-profile jewelry orders that can be stabilized with a rigid insert, an inner pouch, and a strong seal. Fashion jewelry, slim bracelets, stud sets, small pendant necklaces, and subscription-style assortments usually fit that description. A flat pack with a 2.5 mil to 3 mil tear-resistant mailer can handle normal transit abuse very well if the item inside does not move around. I have watched a snug mailer outperform a small box because the box had too much dead air inside and the necklace kept knocking into the corners like it was trying to escape. On a per-unit basis, that difference can be the gap between a $5.40 parcel and a $7.85 parcel on certain USPS zones.
Guide shipping jewelry in poly mailers also fits neatly into a broader shipping mix. A brand may use these packs for everyday jewelry, use a box for a premium gift set, and reserve a more rigid format for heavy statement pieces or items with loose stones. That is not indecision. That is packaging engineering with a pulse. The method shines when the order is light, flat, and predictable, and when the brand wants to keep material cost down without making the delivery feel flimsy. A 10-piece assortment of lightweight hoop earrings may ship beautifully in a printed poly mailer, while a 72-gram collar necklace often needs a more rigid carton.
"If the piece can be immobilized, the mailer can be enough. If it can slide, bend, or rattle, the pack is wrong before it ever leaves the table."
Many brands get this wrong by buying one packaging format and forcing every SKU into it. I have seen that movie, and it ends with bent ear wires and avoidable refunds. A better approach maps the product line by shape, brittleness, and value, then decides which items suit guide shipping jewelry in poly mailers and which ones need a shipping box. If you already source branded packing components, the right mix of Custom Packaging Products can make that decision easier to run day after day. A 4 x 6 inch card can work for studs, while a 5 x 7 inch card is often better for layered chains that need more spacing.
There is one hard limit, and it deserves to be said plainly. Loose stones, heavy statement designs, and highly fragile pieces may need more rigid packaging than a mailer can reasonably provide. Guide shipping jewelry in poly mailers is strong for compact orders, but it is not a magic answer for every SKU. Honestly, I think the best shipping program is the one that protects the item first and saves a few cents second, not the other way around. Saving money on postage means very little if the customer opens a package full of regrets. A $0.22 mailer that causes one $34 replacement wipes out the savings from 20 clean shipments.
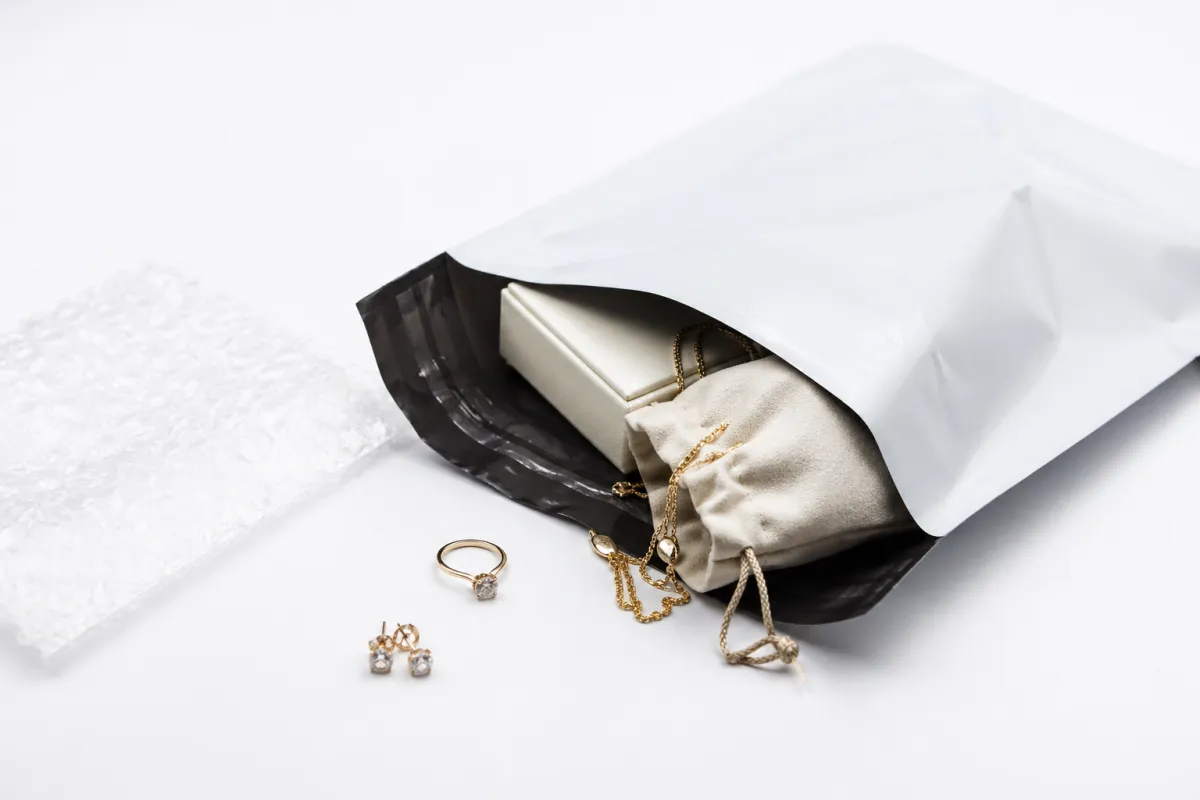
How guide shipping jewelry in poly mailers actually works
The best way to think about this pack is as a layered system. The jewelry item goes into an anti-tarnish pouch or small polybag, then onto a rigid backing card or chipboard insert, then into a slim protective sleeve, and finally into the outer poly mailer. Each layer has a job. The inner layers handle scuffing, tangling, and bending; the outer layer keeps everything contained, dry, and discreet. When guide shipping jewelry in poly mailers is done well, the outer mailer is only the last line of defense. In practical terms, that often means a 350 gsm C1S artboard insert paired with a 2.5 mil opaque mailer and a 40 x 60 mm pouch for each chain.
That distinction matters because the mailer itself is not designed to take the full force of impact the way a corrugated box can. Its job is containment and weather resistance. A good mailer with a strong adhesive strip, an opaque film for privacy, and a tear-resistant construction can reduce casual damage and tampering, but it cannot rescue a loose pack. I have seen a 3.5 mil coextruded mailer work beautifully with a necklace card, and I have seen a cheaper 1.5 mil bag fail because the insert floated around inside like a receipt in a car cup holder. Which, frankly, is not the vibe anyone is going for. A real-world test at 18 pounds of top-load pressure made the difference obvious in less than 20 seconds.
Guide shipping jewelry in poly mailers works best when the mailer format is chosen with the product, not the supplier catalog, in mind. Opaque mailers help with privacy and retail presentation. Tamper-evident closures add a layer of security that matters for higher-value items. Tear-resistant films matter when the route includes automated sorting equipment or heavy hand-carry handling. If you are selecting branded transit packaging, this is where a Custom Printed Mailer can do double duty: it looks intentional, and it stays light enough to keep postage under control. A narrow, printed option from Custom Poly Mailers can be a smart fit when the product line is standardized, especially for SKUs that ship under 6 ounces.
Branding should stay restrained. A printed outer mailer, a small insert card, and a thank-you note are usually enough. Add too much tissue, void fill, or bulky filler, and you defeat the point of the format. The whole advantage of guide shipping jewelry in poly mailers is that the pack stays compact while still feeling considered. In a busy order fulfillment room, that can save 12 to 18 seconds on every order, and those seconds turn into real labor dollars by the end of the week. At 400 orders a day, shaving 15 seconds per order frees up 100 minutes of labor.
I remember a supplier review in Dongguan, in Guangdong Province, where the team was trying to win a jewelry account by making the outer packaging look more luxurious. They kept adding paper, ribbon, oversized cards, and little flourishes that looked charming right up until the returns started creeping in. The actual damage rate went up because the insert stopped holding the pieces flat. Once we stripped out the extras and used a 400 gsm chipboard card with a fitted pouch, the returns dropped and the customer presentation improved. That is the practical side of guide shipping jewelry in poly mailers: less drama, more discipline. The factory quoted 12-15 business days from proof approval for the printed mailers, and the timeline held.
For brands that care about responsible sourcing, it is worth checking whether the paper components are FSC-certified, especially if your backing cards or thank-you inserts are part of the customer-facing experience. A supplier in Ningbo, Zhejiang, may offer FSC mix paper on a 5,000-piece run at $0.09 per insert, while a domestic printer in Chicago might quote $0.14 to $0.18 depending on the finish. You can also review transit-testing guidance through ISTA and paper stewardship standards through FSC. Those references will not design your pack for you, but they do help anchor decisions in known standards instead of guesswork, which is a welcome relief after enough packaging trial-and-error to make anyone question their life choices.
Cost and pricing factors for jewelry shipping in poly mailers
The biggest cost advantage is obvious: lower material weight can mean lower postage, especially when an order stays under a key weight break or avoids dimensional weight penalties. I have seen a 3.2 ounce necklace order jump into a more expensive zone just because a small carton added dead air and extra padding. Guide shipping jewelry in poly mailers helps keep the shipment flat, and flat usually means cheaper. That savings can be meaningful if you ship 500 or 5,000 orders a month. A 4.6-ounce parcel might stay in one rate band, while the same item in a 7 x 5 x 2 inch box crosses into a higher bracket.
Still, the real cost is not just the mailer. You need to look at the whole stack: the poly mailer, the insert card, the anti-tarnish pouch, the label, the tape or seal reinforcement, and the labor needed to assemble it. A simple cost model makes this much clearer. If the mailer is $0.15 per unit for 5,000 pieces, the chipboard insert is $0.07, the pouch is $0.05, and labor is 45 seconds at your bench rate, the true per-order cost is already different from the sticker price. Guide shipping jewelry in poly mailers can be economical, but only if you measure the full package, not just the bag. For a 2,500-piece run, that same mailer may rise to $0.19, which is why volume matters.
| Packaging option | Estimated material cost | Typical labor time | Best fit | Main tradeoff |
|---|---|---|---|---|
| Poly mailer with rigid insert | $0.28 to $0.58 | 35 to 60 seconds | Flat earrings, chains, bracelets, small sets | Needs tight internal control |
| Bubble mailer | $0.42 to $0.78 | 30 to 50 seconds | Light items needing modest cushion | Bulkier and less premium-looking |
| Small shipping box | $0.72 to $1.48 | 60 to 90 seconds | Fragile, premium, or heavier pieces | Higher postage and dimensional weight risk |
That table is not a universal rulebook, but it does show the basic tradeoff. Guide shipping jewelry in poly mailers usually wins on postage and material cost, while boxes often win on crush resistance and unboxing drama. Bubble mailers sit in the middle, which can be useful for some product lines, though they often look less premium than a printed poly mailer with a clean insert. A satin-finish mailer with a one-color logo may cost $0.03 more than a plain white bag, yet still feel more deliberate to the customer.
The hidden costs matter more than many sellers expect. A damaged necklace can trigger a reshipment, customer service time, and sometimes a refund plus a replacement. A single cracked clasp or bent card can erase the savings from shipping in a cheaper format. In my experience, the cleanest way to evaluate guide shipping jewelry in poly mailers is to calculate five things for each SKU: per-order packaging cost, shipping cost, pack time, damage rate, and return reason. If the damage rate goes above 1.5% on a 30-day window, the cheapest pack is no longer the cheapest choice. A $9.80 return label plus a $14.00 replacement quickly changes the math.
Labor matters too. Standardized mailers speed up packing at a bench or conveyor station because the crew does not need to decide how to build each order from scratch. When the insert size, pouch size, and mailer size are consistent, order fulfillment becomes more predictable. That predictability can matter more than a penny or two on the bag itself. I have seen a seven-person packing room in Phoenix save nearly an hour a day just by standardizing their inserts and using one mailer format for three of their top-selling SKUs. At a $18 hourly loaded labor rate, that is a real monthly number.
If your product mix includes both jewelry and other retail goods, it helps to compare the mailer strategy against Custom Shipping Boxes for the items that need more structure. Not every product should be forced into the same transit packaging, and that is especially true in ecommerce shipping where dimensional weight and customer expectations can pull in opposite directions. A rigid bangle set with a stone setting may justify a box at 8.1 ounces, while a simple chain under 2.5 ounces usually does not.
Step-by-step process and timeline for packing orders
A good workflow starts before the first order lands on the bench. In a well-run shop, the team pre-sorts the jewelry, stages the inserts, keeps the mailers within arm's reach, and places the label printer where it does not interrupt the pack flow. If you are trying to guide shipping jewelry in poly mailers at scale, that setup is more important than the final tape seal. A tidy packing table can save more mistakes than a fancy machine ever will. One 24-inch deep table, three labeled bins, and a thermal printer positioned 18 inches from the pack zone usually beat a crowded desk every time.
Here is the sequence I recommend: inspect the item, place it in an anti-tarnish pouch or sleeve, secure it to a rigid card, add a slim buffer only if the SKU needs it, then slide the finished piece into the mailer and seal it firmly. After that, check the address label, confirm the clasp or stud set is centered, and give the package a gentle shake test. If you hear movement, the pack is not ready. That simple routine is one of the best ways to guide shipping jewelry in Poly Mailers Without turning the process into a circus. For a 1.2-ounce earring set, that whole sequence should take about 40 seconds once the crew is trained.
Timing matters too. For a small studio, same-day packing may be realistic if you receive orders before noon and keep the SKUs under control. For a larger fulfillment line, next-day packing might be cleaner and less stressful. I have watched a contract packer in Dallas move from a chaotic evening rush to a solid next-day cycle just by staging the inserts by SKU and batching the labels into 50-order runs. Their error rate dropped because the crew was not switching formats every three minutes. The change also cut overtime by 2.5 hours per week.
Batch packing is especially useful when daily volume rises. If you guide shipping jewelry in poly mailers one order at a time, you will spend too much time hunting for parts. If you batch by SKU, you can cut cards, preload pouches, and stack mailers in a way that makes the work almost rhythmic. That rhythm matters in a factory or a micro-fulfillment room because it keeps people focused and reduces fatigue-related mistakes. A 200-order batch of identical pendant necklaces is much easier to process than 200 random picks mixed with candles, scarves, and keychains.
Good quality control should be built into the schedule, not treated as a bonus. I like three checkpoints: first, item inspection for finish damage or missing parts; second, pack inspection for label placement and seal integrity; third, route check for service level and postage. If you use a printed mailer, make sure the graphics are aligned and the adhesive strip is fully closed. Guide shipping jewelry in poly mailers gets much safer when you treat every pack like a small assembly process instead of a casual envelope fill. A 1/8-inch misalignment on a logo can signal rushed handling before the package even leaves the room.
There is also a timing detail that brands overlook: the drying or curing time of inks, adhesives, and label stock. If your printed mailers are coming in from a fresh production run, the surface should be ready for handling before you stack them tightly. I have seen a glossy mailer scuff itself because the ink was still soft. That sort of mistake does not show up in a polished product photo, but it absolutely shows up in customer feedback, usually in a sentence that sounds polite and still manages to sting. A 24-hour rest period after printing can prevent a lot of avoidable marks.
Common mistakes when shipping jewelry in poly mailers
The most common mistake is using a mailer that is simply too large. Extra room sounds harmless until the necklace slides, the bracelet shifts, or the earrings rub against the inside wall during transit. I watched one startup in Atlanta lose money for three months because they ordered one size up to "be safe." Their damage reports kept mentioning bent cards and tangled chains, and the reason was obvious: the pieces had enough room to move. Guide shipping jewelry in poly mailers only works when the pack fits closely. A mailer that is 9 x 12 inches for a 4 x 6 inch item is asking for trouble.
Weak sealing is the next problem. Some closure strips lose tack when the room is warm or dusty, and some packs are overstuffed so the adhesive barely touches. I prefer a mailer with a dependable peel-and-seal strip plus a reinforcing sticker when the contents are valuable or the route is rough. Guide shipping jewelry in poly mailers should not rely on one flimsy closure and optimism. If the seal opens in a carrier chute, the shipment has failed before it ever reaches the customer. A 3/4-inch seal strip is usually more dependable than a narrow 1/4-inch adhesive line.
Loose pieces are another easy way to create damage. Chains tangle, charms scratch, and stud sets disappear into corners if they are not locked down. The fix is simple, but it needs discipline: close the clasp, center the chain, secure the item to a card, and separate each piece in its own pouch when needed. I have seen elegant jewelry arrive looking oddly secondhand because two delicate pieces rubbed together for 400 miles. That is not a carrier problem. That is a pack design problem. A pair of hoops in one sleeve can scratch faster than most sellers expect.
Fragile support is just as important. A poly mailer without a rigid insert can bend under pressure, and the customer may receive a package that looks soft, creased, or oddly handled. For premium presentation, that matters as much as actual breakage. Guide shipping jewelry in poly mailers should preserve the perceived value of the item, not just the physical item. If a backing card crumples, the whole order feels less expensive, even if the necklace itself is perfectly fine. A 300 gsm insert may be enough for a lightweight charm, but a 500 gsm board can hold up better under carrier compression.
Weather and route conditions also deserve respect. Heat can soften adhesive, moisture can dull finishes, and rough handling can crush a poorly supported pack. Those risks exist in almost every transit lane, but they become more damaging when the packaging is weak to begin with. A silver-plated piece without an anti-tarnish pouch is asking for trouble if the package sits in a hot trailer or a humid depot for two days. This is where package protection is less about one material and more about the full stack working together. A route through Miami in August is a very different test than a route through Denver in February.
The final mistake is assuming the first successful test means the system is finished. It is not. A good pack should be checked after 25 shipments, after 100 shipments, and again when the carrier lane changes. Guide shipping jewelry in poly mailers depends on repeatable control, not one lucky run. If the process drifts, the savings disappear faster than anyone wants to admit. A supplier swap in Shenzhen or a new adhesive lot from Mumbai can change the outcome in a week.
Expert tips to improve protection and reduce shipping costs
If you ship silver or plated pieces, use anti-tarnish packaging early in the stack, not as an afterthought. A small treated pouch can keep the inside environment cleaner during storage and transit, especially when an order may sit for a few days before delivery. I have seen plated earrings hold their finish better when the pouch was chosen correctly and the metal never touched bare paper. Guide shipping jewelry in poly mailers becomes far more dependable when the inside environment is controlled. A pouch rated for 30 to 45 days of tarnish protection is often worth the extra $0.03 to $0.06.
Custom-sized inserts are another smart move. A snug chipboard or paperboard insert often protects better than adding loose padding because the goal is to stop motion, not fill space. A 350 gsm card may be enough for a lightweight pendant, while a 500 gsm insert might make more sense for a layered bracelet set. Small brands can punch above their weight here: a well-sized insert looks polished, packs quickly, and prevents the tiny shifts that cause damage. If you want that type of fit, guide shipping jewelry in poly mailers should start with the insert design, not the mailer purchase. A factory in Shenzhen can usually quote a custom insert in 10-12 business days, while a domestic printer in Los Angeles may take 7-9 business days depending on finish.
It also pays to test carrier lanes, because a few grams can move a parcel into a different rate class or service level. That matters in ecommerce shipping when you are sending hundreds of near-identical orders. One brand I worked with in Las Vegas saved money simply by trimming each finished pack by 0.4 ounces, which kept more orders under a better rate band. The saving was not dramatic on a single label, but over a quarter it was hard to ignore. Guide shipping jewelry in poly mailers can absolutely support that kind of optimization. On 8,000 parcels, a $0.31 postage reduction becomes very real.
Standardization is another quiet advantage. If you keep mailer sizes consistent across a product line, your packing table gets easier to manage, inventory stays organized, and mistakes drop. A smaller set of approved mailers also makes purchasing easier, especially when you are working with variable lead times or minimum order quantities. For brands building a stronger packaging system, this is where shipping materials become part of process control rather than just a supply expense. A 6 x 8 inch mailer for studs, a 7 x 10 inch mailer for chains, and a 9 x 12 inch mailer for small sets can cover most catalogs without creating chaos.
Track performance, not just opinions. Damage rate, average shipping cost, pack time, and customer photo complaints tell you far more than a gut feeling. I like to review those numbers every 30 days, because a pack that looks perfect on day one can drift after a supplier change or a carrier update. That is the practical side of guide shipping jewelry in poly mailers: measure, adjust, repeat. Honestly, the data usually has less drama than the team Slack channel, which is probably for the best. A dashboard with four columns can expose patterns faster than a week of hallway speculation.
When you compare options, the cheapest format is not always the best one. A poly mailer can be a smart answer for many flat jewelry pieces, but the right call depends on product shape, value, and route risk. If the piece is heavy, oddly shaped, or fragile in a way that cannot be controlled with a rigid insert, use a shipping box and protect the item properly. The goal is not to force a format; the goal is to make the shipment arrive cleanly and on budget. A 1.8-ounce pair of studs and a 6.4-ounce beaded cuff do not belong in the same pack spec.
Next steps for a repeatable jewelry shipping workflow
Start with one packing spec for your top-selling items, then test it with a small run of 25 to 50 orders before scaling. That small batch will tell you more than a spreadsheet ever could. If you guide shipping jewelry in poly mailers with discipline, you will learn quickly whether the insert is stiff enough, whether the seal holds, and whether the customer opening experience feels intentional or rushed. A 30-order pilot over one week is usually enough to catch the obvious faults.
Build a checklist that covers item prep, insert choice, mailer size, seal quality, label placement, and final inspection. I have seen simple checklists save more money than new equipment because they stop people from skipping the same two or three steps under pressure. If your team changes shifts or works seasonal hours, that checklist becomes even more useful. Guide shipping jewelry in poly mailers is at its best when the process survives a busy Friday afternoon, not just a quiet test day. A printed checklist on the wall near the label printer can do more than a shared note buried in a software tab.
Then compare three real shipment samples by cost, pack time, and customer presentation. One may be cheaper on paper but slower to pack. Another may look nicer but push you into a higher postage band. The best one usually sits in the middle, with enough structure to protect the jewelry and enough efficiency to keep order fulfillment moving. I have found that the winning answer is often the one the packing crew trusts after a week of real work. Trust is a strange metric, but in a packing room it says a lot. If the team chooses the same format 18 times out of 20, that signal matters.
Review damaged returns and customer feedback on a fixed cadence, such as every two weeks or every month. If you see recurring notes about bent cards, tangled chains, or weak seals, treat those as packaging signals, not just service complaints. Guide shipping jewelry in poly mailers is not a set-it-and-walk-away method. It is a repeatable system that gets better when you listen to the failures as closely as you listen to the successes. A 14-day review cycle usually catches trends before they turn expensive.
My advice is straightforward: pair the right mailer with disciplined inner protection, then keep the process narrow enough to run the same way every time. That is the real way to guide shipping jewelry in poly mailers safely, and it is the approach I would trust for everyday fashion jewelry, slim gift sets, and compact ecommerce orders that need to arrive looking sharp without adding unnecessary weight. If you do that well, the savings show up in postage, fewer returns, and a better first impression at the customer's door. A good system in Portland should look almost identical to the one in Tampa, and that consistency is the point.
Frequently Asked Questions
Can you guide shipping jewelry in poly mailers without using a box?
Yes, for compact and low-bulk pieces, a poly mailer can work well when the jewelry is secured to a rigid insert and sealed inside a protective pouch. I would skip the box only when the item will not slide, bend, or press against hard edges during transit. If the piece is heavy, fragile, or unusually shaped, a box is usually the safer call. A 2.9-ounce stud set in a 7 x 10 inch mailer is very different from a 9-ounce cuff in a carton.
What is the best way to stop necklaces from tangling in poly mailers?
Fasten the chain to a card or insert before it goes into the mailer, and keep the clasp closed and centered so the necklace stays flat. Place each necklace in its own sleeve or pouch if you are shipping multiple pieces together. A close-fitting mailer also helps because there is less empty room for the chain to shift. A 5 x 7 inch insert with two small slits often works better than loose tissue alone.
How much does shipping jewelry in poly mailers usually cost?
The total cost depends on the mailer, the insert, the pouch, labor, and whether the package stays below a useful weight threshold. Poly mailers are often cheaper than small boxes because they reduce material cost and can lower postage, but the real savings show up when damage and reshipment rates stay low. I always tell brands to price the full pack, not just the outer bag. A complete pack might land at $0.33 to $0.61 before postage on a 5,000-piece run.
Which jewelry items are safest to ship in poly mailers?
Flat, lightweight items such as stud earrings, bracelets, simple chains, and small fashion jewelry sets are usually the best fit. Pieces with fragile stones, hard edges, or unusual shapes need more careful testing before they are shipped this way. If the item cannot be immobilized inside the package, it is not a strong candidate for guide shipping jewelry in poly mailers. A pendant under 20 grams is typically easier to control than a multi-stone bracelet.
What should I test before scaling a jewelry poly mailer setup?
Test drop resistance, seal strength, label adhesion, and how the package looks when opened by the customer. Run a small batch through your real carrier route, not just a tabletop test, so you can see how it performs in transit. I would also track complaints, returns, and any crushed packaging before rolling the method out broadly. A 25-order pilot shipped through Dallas, Phoenix, or Newark can show different failure points quickly.


