Buyer Fit Snapshot
| Best fit | To Corrugated Brand Wraps projects where brand print, material claims, artwork control, MOQ, and repeat-order consistency need to be specified before quoting. |
|---|---|
| Quote inputs | Share finished size, material target, print colors, finish, packing count, annual reorder estimate, ship-to region, and any compliance wording. |
| Proofing check | Approve dieline scale, logo placement, barcode or warning zones, color tolerance, closure strength, and carton packing before bulk production. |
| Main risk | Vague material claims, crowded artwork, missing packing details, or unclear freight terms can make a low unit price expensive after revisions. |
Fast answer: To Corrugated Brand Wraps: Film, Print, MOQ, and Carton Packing should be specified like a repeatable production item. The safest quote records material, print method, finish, artwork proof, packing count, and reorder notes in one written spec.
Production checks before approval
Compare the actual filled-product size with the drawing, then confirm tolerance on folds, seals, hang holes, label areas, and retail display edges. Reserve space for logos, QR codes, warning copy, and material claims before decorative graphics fill the panel.
Quote comparison points
Review material grade, print process, finish, sampling route, tooling charges, carton quantity, and freight assumptions side by side. A quote is only useful when the supplier can repeat the same color, closure quality, and packing count on the next order.
Guide to Corrugated Brand Wraps: Design, Cost & Process
I still remember the first time I watched a plain brown shipper turn into something that looked worthy of a flagship table. It happened on a 42-inch conveyor at a co-packer in Bolingbrook, Illinois, under 5,000K warehouse LEDs and beside a case-packer that had been rattling through a 14-hour shift, and the shift in perception came from a printed wrap rather than a new carton. That moment stuck with me because the package did not suddenly become magical; it simply started doing the quiet, practical work of brand building with a little more confidence. A guide to corrugated brand wraps starts there, on the line, because the board grade, the score line, the glue seam, and the way the panel folds will decide whether the package feels refined or rushed once it reaches a customer’s hands. A flat sheet can carry a brand story, but only if it survives the route, the pallet, the drop test, and the person who grabs it from the stack and gives it a second look. On a 3,000-piece pilot, those details usually matter more than the headline artwork.
One seasonal kit I worked on in Minneapolis moved from forgettable to memorable with a two-color flexographic wrap, a 0.125-inch logo clear zone, and a soft matte aqueous coating that held its own under the bluish light of a 180,000-square-foot fulfillment center. The team had spent weeks debating the copy and the color palette, and I get why, because everyone wants the hero graphic to be perfect. But the thing that made the biggest difference was something far more ordinary: the same type sizes, icon positions, and color relationships repeated across a 6-inch mailer, a 12-inch retail-ready shipper, and a 24-inch club pack. A guide to corrugated brand wraps makes that lesson practical, because the package does not need to be loud to feel intentional; it needs to stay consistent across formats, print methods, and production runs. When the same Pantone 186 C red held within a Delta E of 2.0 across three sizes, the brand looked disciplined instead of decorative.
"If the seam lands 2 mm off, the whole shipper looks expensive in the mockup and tired on the pallet." A converter in Secaucus, New Jersey, said that to me beside a three-station folder-gluer, and he was right.
Corrugated brand wraps carry more than decoration. They hold identity, compliance language, QR codes, lot code references, seasonal graphics, sustainability notes, and the story a brand wants told before the carton is opened. A wrap can also point a customer to a landing page, keep a promotion alive for 30 days, or unify a family of SKUs without forcing a full carton redesign. The strongest guide to corrugated brand wraps keeps both the visual and operational sides in view, because a beautiful layout that ignores the score line by 3 mm still fails when it reaches a folder-gluer moving at 200 cartons per minute. I have seen a team fall in love with a mockup and then lose their enthusiasm the minute the first sample popped open at the glue seam. The box looked great right up until physics got a vote, and physics is rarely impressed by a mood board.
What Corrugated Brand Wraps Are and Why They Stand Out
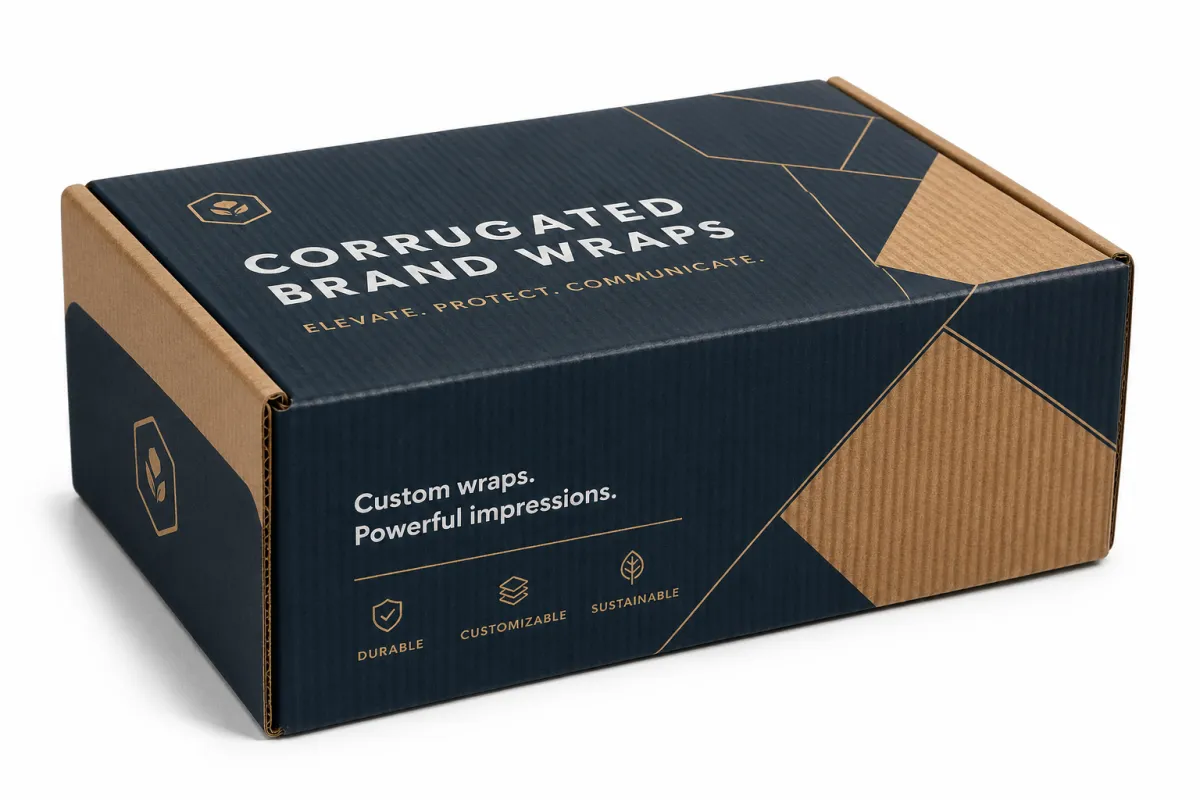
Corrugated brand wraps are printed outer layers, sleeves, or full-coverage panels that turn a functional shipper into a branded surface. I have seen them used on a 6-pack subscription mailer, a 32-count influencer kit, and a high-volume retail shipper for a household brand, and the effect is immediate: the box stops reading like freight and starts reading like a designed object. A guide to corrugated brand wraps should begin with that shift, because the wrap lives between the structural carton and the customer’s eye, where brand identity gets its first real test. It is a strange little moment of truth, really; the package is doing its job before anyone has even touched the product inside. On one Philadelphia launch, a simple one-color wrap lifted perceived value before the lid was even opened.
Subscription kits, retail-ready shippers, influencer mailers, seasonal promotions, and high-touch e-commerce orders rely on this format because the unboxing moment matters as much as the product itself. A cosmetics client I met with last spring moved from a plain RSC to a printed wrap on a 12 x 9 x 4 inch shipper, and the package started photographing better under ring lights, window daylight, and the harsh overheads in the sampling room in Austin, Texas. Sales did not jump because of a slogan; they improved because the package looked like it belonged in the feed. A guide to corrugated brand wraps should treat that as a production reality, not a marketing fantasy, because the best packaging often earns its keep one photo at a time. On a 10,000-piece run, better photo performance can matter as much as a 5 percent media lift.
Decoration matters, though it is only half the job. Communication carries the rest. A wrap can direct a customer to a landing page, explain the return path, carry a regulatory panel, identify a lot code, or preserve brand consistency across multiple structures and sizes. The strongest guide to corrugated brand wraps keeps that distinction clear, since the right package has to guide the eye, support the product, and keep the line moving without giving the plant a reason to stop and think. I will always choose a wrap that makes the line crew nod once and keep moving over one that makes everybody reach for the tape measure three times. A 2 x 2 inch QR code, a 9-point compliance line, and a 1/8-inch bleed all have to coexist without starting a fight.
On the factory floor, I judge a wrap by three questions: does it fit, does it print cleanly, and does it hold up after handling. A 44 ECT C-flute shipper behaves differently from a 32 ECT B-flute display tray, and a full-coverage wrap behaves differently again if the seam sits on a narrow panel or a top flap. Those differences are not academic. They decide how the package looks after it has traveled through a case packer, a stretch-wrapper, a freight truck, and a receiving dock in Atlanta, Georgia. A useful guide to corrugated brand wraps keeps returning to structure, because the board and the artwork only work together when both are built for production speed. I have seen a gorgeous image survive the pressroom and then get battered into oblivion by the pallet wrap alone, which is a special kind of packaging heartbreak.
Guide to Corrugated Brand Wraps: How They Work on the Line
Most corrugated brand wraps begin with a base structure, a printed wrap or panel, and a finishing step that applies the graphics by hand, with semi-automated equipment, or through a fully integrated line. On a 48-inch folder-gluer in Dayton, Ohio, I watched a one-piece printed sleeve slide over a shipper in less than 2 seconds, then I watched a hand-applied wrap take 45 seconds per unit because the run only called for 600 pieces. A guide to corrugated brand wraps has to account for that difference, since labor, speed, and repeatability change the economics almost immediately. And yes, the second version looked more artisanal; no, the CFO did not find that charming, especially when the labor line added another $0.09 per unit.
Flute profile carries more weight than most designers expect. A C-flute board with roughly 1/8 inch caliper scores differently from an E-flute or a double-wall blank, and that difference affects corner pull, seam pressure, and the way the wrap sits once the glue sets. A panel that looks perfect in Illustrator can still fight the package on the machine if the cut lines, closure style, and board crush resistance were never discussed with the plant. A practical guide to corrugated brand wraps starts with that kind of conversation, long before the art file is approved. I have learned not to trust a pretty PDF until I have seen what the knife, the crease, and the board actually do together on a real sample from the converter in Grand Rapids, Michigan.
Prepress and converting turn the idea into a real package. The designer sends a dieline, prepress checks bleed, image resolution, and overprint settings, and the converter makes sure the crease pattern, knife positions, and glue zones line up with the printed image. I have seen a polished 4-color wrap fail because the art file ignored a 1/4 inch glue flap, and the mistake added a proof cycle plus 5 business days to the schedule. In a serious guide to corrugated brand wraps, that workflow is not a side note. It is the backbone of the job. A missed flap can turn a smooth launch into a string of apologetic emails, and nobody needs that kind of excitement on a Thursday afternoon. When the spec sheet says 0.1875-inch score allowance, somebody has to check the file against it.
Registration, ink laydown, and white point are the details that separate a crisp result from a frustrating one. Recycled kraft board often carries a warmer cast, which means a pale brand color may drift toward beige unless the printer adjusts the underprint or rebalances the ink curve. I tell teams to request a substrate-specific proof rather than a generic mockup, because a guide to corrugated brand wraps only becomes useful when it reflects the board, the press, and the light the carton will actually live under. The nicest color in a deck can look muddy on a recycled substrate, and that is one of those moments where everyone suddenly discovers how opinionated they are about blue. On a 350gsm C1S artboard insert card paired with a corrugated tray, the mismatch can show up even faster under a 4,000K proofing lamp.
- Hand-applied wraps fit low-volume launches, sample runs, and 500 to 2,000 unit test programs.
- Sleeved or folded panels work well when a line needs speed and the wrap can be staged before packout.
- Fully integrated wrap systems suit higher-volume programs where 5,000 to 50,000 units justify more setup.
- Digital prototypes help, but a physical sample still catches 1 to 2 mm fit issues that a screen cannot show.
For brands that care about traceability, I also ask about fiber certification, especially when sustainability claims need to stand up to scrutiny. The FSC system at FSC is a useful place to begin if sourcing documentation matters to your procurement or compliance team. A guide to corrugated brand wraps feels incomplete without that piece, because the board spec and the brand promise are linked more closely than many teams realize. If the marketing team wants to talk about recycled content, the paper trail should be able to answer back without stammering. On a 20,000-piece production order, I want the chain-of-custody file and the carton spec on the same day, not two weeks apart.
Key Design, Structural, and Print Factors
The strongest wraps begin with disciplined design choices: logo scale, type size, contrast, bleed, safe zones, panel sequencing, and the path the viewer’s eye follows from front to side to back. I have seen a 9-point legal line vanish because someone treated the wrap like a brochure, and I have seen a clean 48-point headline carry a gift set on a retail shelf crowded with louder competitors in Denver, Colorado. A guide to corrugated brand wraps gets better when those choices are made with a ruler in one hand and the actual blank in the other. It is less glamorous than mood boards, sure, but it saves everybody from the miserable little surprise of text disappearing into a fold. A 1/8-inch safety margin around the fold line can save a reprint, a delay, and a very awkward signoff meeting.
Structure matters just as much as graphics. Board thickness, crush resistance, corner radius, and score depth all affect the final look, especially when the wrap has to cross a seam or bridge a folded edge. On a beverage project near St. Louis, Missouri, a 0.030 inch shift in caliper changed the way the top flap met the artwork, and the team moved the logo 3 mm so the brand mark would not land inside a high-stress fold. A thorough guide to corrugated brand wraps has to make room for those tolerances, because structure is never neutral. A carton can look rock solid in a render and still behave like a stubborn old suitcase once it goes through converting. Even a 1/16-inch difference in board crush can change the feel of the finished pack.
Print method shapes the feel of the package. Flexographic printing is common for large-volume runs and can be extremely efficient on 2-color and 3-color jobs. Litho lamination brings a smoother image, finer detail, and stronger premium appeal, especially on outer packs that need a more polished shelf presence. Aqueous coating offers solid rub resistance, while matte and gloss finishes change how the box reads under warehouse sodium lights or in a 1,000-lumen retail aisle. In a guide to corrugated brand wraps, those finish choices affect perception as much as they affect protection. I have a clear preference here: matte often wins when the brand wants restraint, while gloss works best when the brief asks for energy and a little swagger. On a 15,000-unit run, that finish choice can also change the unit price by $0.03 to $0.07.
One brand I worked with used a 4/0 litho-lam wrap on a high-touch gift set and wanted the color to match a coated swatch within Delta E targets. The challenge was not the artwork. The challenge was substrate brightness on a recycled board blend that pushed the blues warmer by 4 to 6 points under changing press conditions. The fix came through a tighter color target, a revised proof, and a cleaner spec sheet. A guide to corrugated brand wraps should include color management for that reason alone, because the numbers matter once ink meets board. I still remember the long pause in the pressroom in Charlotte, North Carolina, while everyone stared at the sample and tried to decide whether it was “slightly off” or “absolutely not.” That is not a scientific unit of measure, but it does show up in packaging meetings.
For teams weighing a wrap against a complete box redesign, our Custom Shipping Boxes page is a useful starting point because it frames the structural tradeoffs between a decorated shipper and a reengineered carton. Sometimes the better answer is a wrap; sometimes the carton itself needs a new die, a new flute, or a different board grade such as 32 ECT instead of 44 ECT. A practical guide to corrugated brand wraps should give you both lenses so the decision comes down to fit, budget, and launch timing rather than whichever sample looked better in a meeting room. Beautiful samples are persuasive, but production reality is the thing That Actually Gets shipped, usually in a 53-foot trailer with a freight invoice attached.
Food-contact rules, moisture exposure, and temperature swings also deserve attention. A mailer stored in a 38-degree reefer behaves differently from one kept in a 75-degree warehouse, and a wrap that looks crisp in a dry studio can warp after 36 hours in humid transit. A solid guide to corrugated brand wraps asks where the package lives for the first 24 hours, because that answer often changes the material spec and sometimes the finish as well. I have watched a wrapper curl at the corners after a hot truck ride from Houston, Texas, and the effect was not “rustic”; it was just annoying. If the launch window includes a summer move through Memphis or Atlanta, the board spec should account for it.
Guide to Corrugated Brand Wraps Cost: What Drives Pricing
Cost catches many teams off guard, because corrugated brand wraps can look straightforward while hiding real setup work. The biggest drivers are print coverage, number of colors, substrate choice, board grade, coating, die-cut complexity, and whether the program runs once or repeats often enough to spread tooling across multiple orders. A clean guide to corrugated brand wraps should make the economics plain: the more the wrap must do, the more the price shifts from raw materials into labor, press time, and setup. I tend to tell clients that the box is never just the box, which usually earns me a smile until the quote comes back. A shop in Dallas-Fort Worth may price a 2-color wrap very differently from a converter in Ontario, Canada, once freight and converting are added.
I prefer to quote a job in pieces rather than as one blended number. A 5,000-unit run with a hand-applied wrap can price very differently from a 20,000-unit run with a semi-automated sleeve, even when both use the same 2-color art. Setup costs, make-ready sheets, plate charges, and cutting dies spread across quantity, so low-volume jobs usually carry a higher unit price even when the graphics are modest. Volume changes everything, and a guide to corrugated brand wraps that ignores that fact will mislead the buyer. There is no polite way to say it: small runs can be a pain in the budget. For example, a 5,000-piece order might land around $0.15 per unit for a simple hand-applied wrap, while a 20,000-piece repeat could drop closer to $0.11 per unit once the press and die costs are spread out.
| Wrap Format | Typical Run Size | Best Use Case | Rough Unit Price | Common Adders |
|---|---|---|---|---|
| Hand-applied printed wrap | 1,000 to 5,000 units | Seasonal promos, pilot launches | $0.15 to $0.38 | Labor, glue, manual folding |
| Printed sleeve or panel wrap | 3,000 to 20,000 units | Subscription kits, retail-ready shippers | $0.11 to $0.26 | Die-cutting, scoring, setup |
| Full-coverage litho-laminated shipper | 5,000 to 50,000 units | Premium gifting, high-touch e-commerce | $0.42 to $1.05 | Laminate, premium board, color control |
Those ranges are not promises, and they should never be treated like a fixed menu. A 32 ECT B-flute shipper with a single-color logo can still cost more than expected if it needs a custom insert, a window patch, or a tight color match on recycled sheet. A useful guide to corrugated brand wraps pushes teams toward apples-to-apples quotes that separate print, board, converting, assembly, and freight. If one vendor bundles the five items and another lists them line by line, the numbers are not speaking the same language. That little mismatch has caused more budget confusion than I care to count. I want to know whether the quote includes kraft outer wrap, hot-melt adhesive, and a 53-foot truck load from the plant in Richmond, Virginia.
I remember one supplier meeting where a brand team was stunned that a simple-looking wrap added 18 percent to the pack price. The reason was not the art. It was a 12-minute hand assembly step, a second quality check, and a smaller freight pallet count because the wrap kit shipped flat in 24-box cartons. A useful guide to corrugated brand wraps points out those hidden costs, because the biggest price difference often lives in the labor plan rather than the ink. The quote looked innocent until someone followed the process all the way to the dock, which is where the real expense had been hiding the whole time. On a 7,500-unit run, that extra inspection step can cost more than the printed sheet itself.
If you want to compare options properly, ask for three things: the board spec, the print method, and the assembly method. That trio tells you far more than a single headline price, and it helps a team decide whether a more Premium Unboxing Experience is worth the unit cost. In my experience, a guide to corrugated brand wraps saves money when it steers the conversation toward structure and throughput instead of a race to the lowest quote. Lowest quote is often just shorthand for “we have not discussed enough yet,” especially when one plant is quoting 12 business days and another is quoting 4 weeks.
Step-by-Step Process and Timeline
A clean project usually moves from discovery to delivery in a sequence that looks tidy on paper and messy in real life. The steps are discovery, structural review, concept design, dieline approval, prepress, proofing, production, finishing, and packout. For a new wrap, I usually tell clients to plan for 12 to 15 business days from proof approval if the job is simple, and 3 to 5 weeks if the project includes a new structural layout, specialty coating, or test samples. A guide to corrugated brand wraps is useful because it shows where the clock really runs, and where it politely pretends not to run until someone asks a very specific question. If the supplier is in Monterrey, Mexico, and the art team is in Brooklyn, New York, the time zone gap alone can add a day to each approval round.
- Discovery: confirm quantity, package dimensions, board style, and handling conditions.
- Structural review: verify scores, seams, and glue zones before any art is finalized.
- Concept design: build the visual system around the real blank, not a generic mockup.
- Prepress: check bleed, overprint, image resolution, and color targets.
- Proofing: approve digital proofs and, if needed, white samples or printed comps.
- Production: run the press, dry or cure the ink, then move into converting.
- Finishing: fold, glue, laminate, or sleeve the wrap based on the chosen method.
- Packout: palletize, carton count, and book freight with the final dimensions.
Delays tend to show up in copy approval, color corrections, or last-minute structure changes. I watched one project lose 4 days because legal wanted a recycling claim adjusted after the proof was already marked up, and I watched another lose 2 more days because the customer asked for a brighter green after seeing the first printed sample. A good guide to corrugated brand wraps treats approvals like production inputs, not paperwork, because every late change touches the press schedule. Once a file hits the plant, even a tiny revision can ricochet through plates, proofs, and line time. I have seen one missing SKU code turn into three reproofs and a missed truck booking.
Proofing matters more than many teams expect. A digital proof catches spelling and layout, yet it cannot reveal how a 0.5-point line behaves on uncoated board or whether a score line sits too close to a photo edge. White samples, structural comps, and press checks still earn their place, especially on launch-critical SKUs. For transit validation and package performance, I often refer teams to ISTA, because a wrap that looks perfect in the studio still has to survive real handling, vibration, and drop conditions. The freight dock does not care how pretty the mockup was. A 24-inch drop from a pallet edge in shipping can expose a flaw that looked invisible on screen.
Once a program repeats, the timeline shortens because the file is settled and the plant already has a documented spec sheet. Version control pays off at that point: one approved dieline, one named artwork version, one color target, and one contact list for signoff. In a mature guide to corrugated brand wraps, repeat-order discipline matters almost as much as the first prototype, because reorders move faster when the team does not have to rediscover the same details twice. I have seen that discipline save entire launch windows, and I have also seen the opposite, which is a mess nobody wants to inherit. When the plant in Omaha already knows the repeat spec, a reorder can move in 8 to 10 business days instead of starting from scratch.
Common Mistakes That Hurt Fit, Color, and Production
Designing too close to the edge is the classic mistake. On a corrugated blank, a 1/8 inch move can be the difference between a crisp panel and a logo dropping into a fold, a trim line, or a glue zone. I have rescued more than one project where the hero image sat 2 mm too low, and the fix was never glamorous: we moved the art, reopened the proof, and lost another 2 business days. A guide to corrugated brand wraps should make margin discipline feel ordinary, because edge control protects both the look and the line. It is not exciting, but it is absolutely the difference between “professional” and “why is the logo sliced in half?” On a 9 x 6 x 3 inch mailer, those 2 mm can change the whole read.
Ignoring flute direction and board caliper causes its own kind of trouble. If the wrap crosses the wrong grain direction, it can crack at the score, bow at the panel, or spring open by 1/16 inch after assembly. A brand once sent a mockup that looked flawless in PDF form, but the board moved enough during converting that the side panel art became visibly skewed across 400 test units. A real guide to corrugated brand wraps keeps asking the same question: how does this behave after the board is cut, scored, folded, and shipped? That question sounds simple until you watch a stack of beautifully printed panels curl like they are trying to escape the building. A converter in Savannah, Georgia, once showed me a batch that passed print and failed fold because the grain ran the wrong way.
Color creates another trap. A monitor that has not been calibrated can make a dull PMS warm gray look like a rich charcoal, and that mistake becomes expensive when the printed result needs to match the screen exactly. I have seen brand teams sign off on a blue at their desks under 5,000K lighting, then reject the press sheet under warehouse fluorescents because the board stock absorbed the color differently. A serious guide to corrugated brand wraps never treats screen approval as enough when color accuracy matters. The screen is a suggestion; the press sheet is the truth, even when the truth arrives with a little attitude. If the target is a PMS 3005 C blue, I want a wet proof, a dry proof, and a board sample in the same room.
"The mockup looked like a premium gift box, but the first fold pulled the logo into the seam." That was a client comment after their 2,500-unit pilot, and it led to a cleaner dieline and a better second run.
Overcomplicated art causes trouble in a different way. Tiny legal text, four different fonts, layered gradients, and a dozen callouts may look impressive in a review deck, then collapse on a packing bench where operators need clear visual cues in 8 seconds or less. The best guide to corrugated brand wraps usually favors fewer typographic styles, stronger contrast, and a message hierarchy that can be read from 3 feet away. That is not a design compromise; it is production clarity. I would rather have one strong headline and a clean information path than a page full of decorative noise that nobody can process before the carton disappears down the line. On a launch in Portland, Oregon, we cut the font count from four to two and shaved a full proof round off the schedule.
Missed lead times and unclear revision ownership create almost as many problems as bad art. If one person owns copy, another owns structure, and a third owns color, a single signoff path becomes essential or the project drifts. I learned that during a supplier negotiation in Shenzhen, China, where one packaging team sent three different artwork revisions for the same 10,000-unit order and the plant froze production until the version history was untangled. A strong guide to corrugated brand wraps protects the file as carefully as the carton. Otherwise you end up with three “final” files, all of them inconveniently not final, and somebody in the plant has to guess which one is real.
Expert Tips and Next Steps for a Better Rollout
Start with the physical package first. Measure the finished carton, the inner depth, the seam position, and the actual handling path before you build the wrap around it. On one client project, that meant choosing a 10 x 8 x 3 inch base shipper instead of a 9.5 x 7.5 x 3 inch clone because the larger footprint gave us a cleaner score line and a more forgiving 1/8 inch bleed margin. A guide to corrugated brand wraps works best when the real object leads the design process. The box is the boss, even if the art file has the louder personality. If the line speed is 60 cartons per minute, the artwork should follow that pace, not fight it.
Request samples from the actual board and print method whenever possible. A paper swatch or generic comp sheet rarely behaves like a finished corrugated panel, especially once it is scored, glued, and folded. I like to see one unprinted board sample, one printed sample, and one assembled unit before a full run, because those three touchpoints expose fit, color, and handling issues early. A smart guide to corrugated brand wraps treats sampling as insurance rather than delay. The extra sample stage usually costs less than one rushed reprint, and it certainly costs less than trying to explain a miss to a launch team. A 350gsm C1S artboard insert card can be a useful side-by-side reference when the wrap includes a retail belly band or premium inner card.
Create a shared spec sheet before production starts. Include dimensions in inches and millimeters, color targets, artwork version numbers, finish notes, carton counts, shipping destination, and the approval contact for each department. If a project has 8 stakeholders, the sheet should answer the same 8 questions every time, or someone will ask for a last-minute change at 4:30 p.m. on a Friday. In a practical guide to corrugated brand wraps, paperwork is not bureaucracy; it is what keeps the job stable. I know paperwork is nobody’s hobby, but it does beat archaeology when the plant is looking for the right revision and everybody else is already on the weekend. I want one sheet that names the carton style, the glue spec, and the freight dock in Kansas City, Missouri.
Phased rollouts save money and protect the brand. Launch one pilot SKU, one region, or one channel first, then review 100 to 300 units for fit, color, and line speed before scaling to the full 5,000 or 20,000 unit program. I have seen brands save an entire seasonal launch by catching a glue issue in the pilot, and I have also watched brands burn through the budget because they skipped that 300-unit checkpoint. A measured guide to corrugated brand wraps always leaves room for a pilot. It is much easier to fix a small bad decision than a warehouse full of expensive ones. A 300-unit test in one Midwest DC can tell you more than a ten-slide deck ever will.
If you need a real-world reference, browse our Case Studies page and compare how different brands handled print coverage, board choice, and assembly speed across projects with very different budgets. That kind of review helps teams spot patterns, especially around brand consistency and repeat-order planning. It is one of the quickest ways to turn a guide to corrugated brand wraps into an internal standard that people actually use. I like seeing how real programs behave, because that is where the useful lessons hide. A good case study from a Nashville or Phoenix rollout usually shows the tradeoffs in plain numbers: board grade, unit cost, and timeline.
My final advice is simple: audit the packaging you already have, pick one high-visibility SKU, collect the measurements, confirm the print method, and line up a supplier conversation with exact tolerances instead of general ideas. A good guide to corrugated brand wraps will not promise that every package becomes a luxury object, but it will help you make smarter choices about visual branding, customer perception, and the unboxing experience without losing control of cost or timing. Apply the guide to corrugated brand wraps to one real launch this month, and you will learn more than you will from ten polished mockups; the next project will move faster because the specs are already real, and that alone is worth a little patience now. If the next run is 7,500 pieces instead of 500, you will feel the difference immediately in both the quote and the schedule.
How Do You Choose the Right Corrugated Brand Wrap?
The right choice usually comes down to three things: the package structure, the production volume, and the kind of brand experience you want the customer to feel the moment the carton appears. A guide to corrugated brand wraps becomes useful here because it helps you compare a hand-applied wrap, a sleeve, or a full litho-laminated format against the realities of line speed, labor, and budget. If you are shipping a 5,000-unit seasonal promotion, a simple printed panel may be the most practical path. If the goal is a premium gift set or a high-touch retail shipper, a more finished wrap can earn its keep through better presentation, tighter color control, and stronger shelf presence. I usually start with the carton dimensions, then look at board grade, print method, and how much handling the package will take before it reaches the customer’s hands.
There is also a brand truth that gets ignored more often than it should: the packaging choice should fit the customer journey, not just the marketing mood board. A wrap that feels elegant in the studio can be kind of irritating on a fulfillment line if it slows packing or creates an awkward seam near the handle cutout. A wrap that looks simple can be exactly right if it reduces touch points and still carries the logo, color, and compliance text cleanly. The best guide to corrugated brand wraps keeps that balance in view, because the right answer is usually the one that survives both the meeting room and the dock.
I also ask teams to think about repeatability. If the program is going to run once, the priority may be fast setup and low tooling. If it is going to repeat every quarter, it is worth investing in a format that can be stored, versioned, and rerun without drama. I have watched a brand save money on the first order and pay for it six months later with rework, fuzzy color matching, and a stack of emails nobody wanted to read. That kind of pain is avoidable if the spec is clear and the line is actually built for the job.
How do corrugated brand wraps differ from a standard printed carton?
A standard printed carton usually carries graphics directly on the box panel, while a corrugated brand wrap can act as a separate printed layer, sleeve, or full-coverage format that gives more control over the visual field. That matters on a 12 x 9 x 4 inch shipper or a 24-inch club pack, because the wrap can be tuned for stronger coverage, easier versioning, and a more consistent brand identity across multiple structures. A practical guide to corrugated brand wraps also considers how the wrap supports the unboxing experience without forcing a full carton redesign. In plain terms, it gives you more control before the customer ever gets the tape cut, and it can do that on a 5,000-piece seasonal run just as well as on a 50,000-piece repeat program.
What information do I need before requesting a quote for a corrugated brand wrap?
Have finished dimensions, board or carton style, expected quantity, print coverage, color count, finish requirements, and whether the wrap will be hand-applied or machine-applied. Include the target timeline, shipping destination, and any compliance or food-contact requirements so the supplier can quote the real production setup, not a rough placeholder. If you already have a dieline or a sample from a prior run, send that early, because it helps the plant spot fit issues before pricing the job. I always tell people that the quote is only as good as the details that feed it, which is not a thrilling line, but it is true. A quote for 5,000 units in Asheville, North Carolina, needs different information than a 25,000-unit rerun in Kent, Washington.
How long does a corrugated brand wraps project usually take?
Simple repeat jobs can move quickly once artwork is approved, but new projects usually need time for structural review, proofing, and sample approval. A straightforward run may take 12 to 15 business days from proof signoff, while a first-time structural project can stretch to 3 to 5 weeks if there are revisions or special finishes. The biggest schedule risks are late artwork changes, color corrections, and delays in approving physical samples. If legal, marketing, and operations are all talking in different time zones, build in a little extra patience and a lot more version control. A plant in Elgin, Illinois, may turn a repeat faster than a shop in Salt Lake City if the approval chain is already locked.
What are the most common cost drivers for corrugated brand wraps?
The biggest cost drivers are quantity, print coverage, number of colors, board grade, finishing, and the complexity of cutting or folding the structure. Labor matters too, especially if the wrap is applied by hand or requires extra assembly steps on the line. Short runs can look expensive because setup and tooling are spread across fewer units, so a 1,000-unit pilot will almost always price differently from a 20,000-unit repeat program. If a quote seems high, I usually ask which part of the process is doing the heavy lifting, because that answer is almost always hiding in plain sight. On some Midwest jobs, the adhesive and labor can cost more than the printed board itself.
How can I make sure the colors on my corrugated brand wraps stay consistent?
Use calibrated proofs, defined brand color standards, and the same substrate whenever possible, because corrugated stock can change how color reads under different light. Approve from physical samples rather than a screen when color accuracy matters, especially for blues, reds, and dark neutrals. Keep a clear file history and reference the approved sample on repeat orders so the printer can match the earlier result more reliably. A consistent guide to corrugated brand wraps also includes one named contact who owns color decisions, because too many opinions can muddy even the best press run. If the target is a matte wrap on recycled board in a plant near Columbus, Ohio, the proof should be matched to that exact setup, not a generic stock image.

