Buyer Fit Snapshot
| Best fit | Size Mailers for Accessories projects where brand print, material claims, artwork control, MOQ, and repeat-order consistency need to be specified before quoting. |
|---|---|
| Quote inputs | Share finished size, material target, print colors, finish, packing count, annual reorder estimate, ship-to region, and any compliance wording. |
| Proofing check | Approve dieline scale, logo placement, barcode or warning zones, color tolerance, closure strength, and carton packing before bulk production. |
| Main risk | Vague material claims, crowded artwork, missing packing details, or unclear freight terms can make a low unit price expensive after revisions. |
Fast answer: Size Mailers for Accessories: Film, Print, MOQ, and Carton Packing should be specified like a repeatable production item. The safest quote records material, print method, finish, artwork proof, packing count, and reorder notes in one written spec.
Production checks before approval
Compare the actual filled-product size with the drawing, then confirm tolerance on folds, seals, hang holes, label areas, and retail display edges. Reserve space for logos, QR codes, warning copy, and material claims before decorative graphics fill the panel.
Quote comparison points
Review material grade, print process, finish, sampling route, tooling charges, carton quantity, and freight assumptions side by side. A quote is only useful when the supplier can repeat the same color, closure quality, and packing count on the next order.
I still remember a bracelet run at a Shenzhen converter on Guanlan Road where the sample looked perfect on the bench, then puffed up the second we added the dust bag, the 350gsm C1S artboard insert card, and a folded care sheet. That kind of surprise is exactly why how to size mailers for accessories matters so much: the real package size is never the naked product size, and a clean fit is usually the difference between a polished unboxing and a wrinkled, overworked shipper that looks like it lost an argument with the packing table. It is also why the packout details matter just as much as the product itself, especially when poly mailers, paperboard inserts, and a little closure allowance have to work together without making the operator fight the flap.
At Custom Logo Things, I have seen accessory brands lose margin on 2 mm of extra film and lose customers over a mailer that was tight by 5 mm. I wish that were dramatic, but it is just packaging math doing packaging math, the same way it does in Dongguan, Ningbo, or a small converting shop in Foshan. How to size mailers for accessories is not about picking the biggest bag that will technically close; it is about measuring the finished packed item, leaving enough room for the seal, and choosing the smallest mailer that protects the product without making the carton line or warehouse team fight the packout, which nobody enjoys before a 7:30 a.m. shift.
That sounds simple, but accessory orders are messy in the best possible way. A flat scarf, a rigid sunglasses case, a braided belt, and a set of earrings with a paperboard insert all behave differently once they hit the packing table. I have watched one SKU fit beautifully in a 9 x 12 poly mailer while its sibling, only 18 mm thicker because of a dust pouch, needed a 10 x 13 to avoid edge stress. That is why how to size mailers for accessories needs a process, not a guess, and definitely not a hopeful shrug from somebody standing in front of a pallet of printed bags.
If you want the short version, start with the finished packed dimensions, not the product catalog dimensions. Then test a few candidate sizes with real wrap, real inserts, and real seal pressure. The goal is not the largest mailer that works; the goal is the smallest mailer that looks sharp, protects the item in transit, and keeps shipping costs under control. If you are comparing packaging styles across a line, our Custom Packaging Products page is a good starting point, and our Custom Poly Mailers page is where most accessory brands begin once they know they need film mailers.
How to size mailers for accessories?
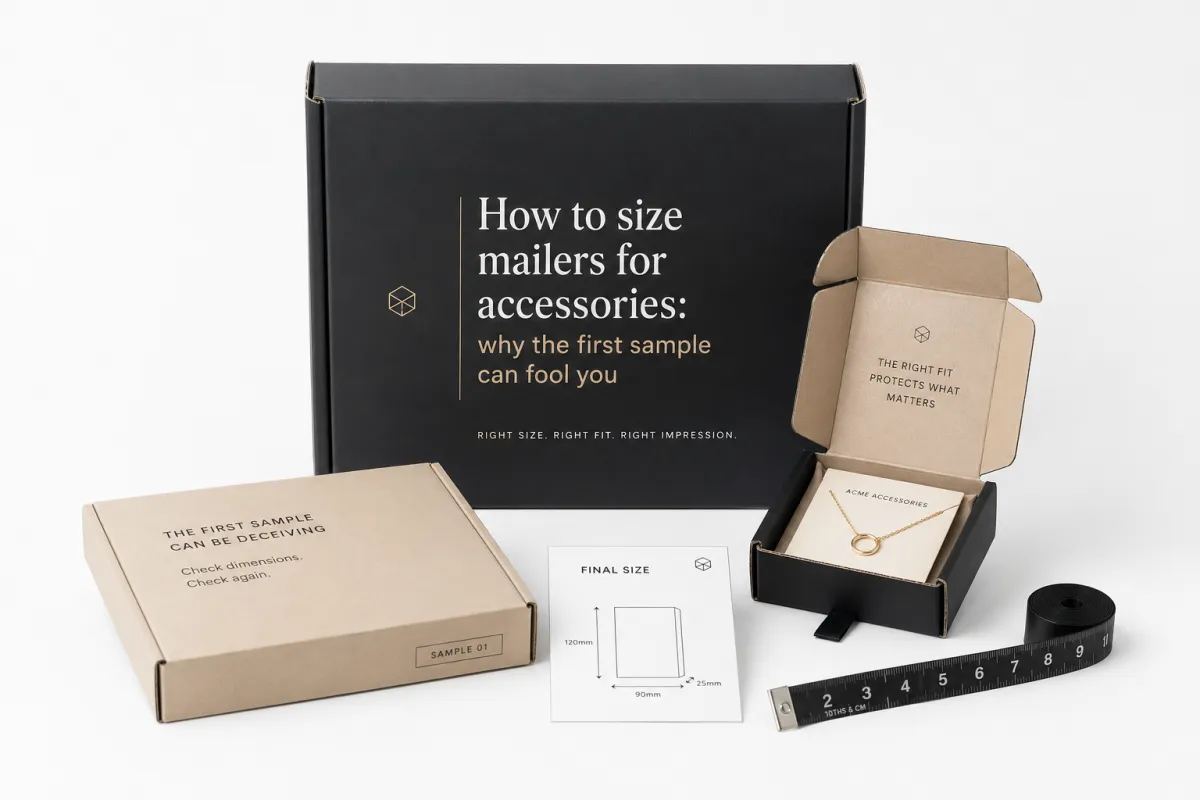
The first sample often lies by omission. On the bench, a mailer can look perfect because the accessory is flat, the tissue is neatly folded, and nobody has added the little details that happen on a real packing line. I saw this at a client meeting for a boutique jewelry brand in Los Angeles: the sample fit a bracelet tray with room to spare, but once the team added a velvet pouch and a gold-foil insert card, the flap had to be forced shut. That is not a sizing win; that is a future return claim waiting to happen. For how to size mailers for accessories, the fully packed item is the only measurement that matters.
A good rule is to measure three things: finished length, finished width, and finished pack thickness. The hidden troublemaker is almost always thickness. A necklace card that measures 4 mm when flat can become 11 mm once the chain, tissue, and backing are folded together. A sunglasses case may only add 2 cm of thickness, but that small increase can push the mailer into a higher size class and change the closure behavior. When I say how to size mailers for accessories, I mean measuring the geometry of the packed product, not the geometry in the catalog, because the catalog has a nasty habit of pretending the world is neatly flat.
Accessory brands also deal with mixed shapes, and that makes one-size-fits-all thinking expensive. A scarf collection can ship in a low-profile bag, while a leather belt with a buckle, a rigid hair accessory, or a watch box needs more clearance around the edges. The tighter the product surface finish, the more careful you need to be. Matte-coated paperboard can scuff if squeezed too hard; polished metal can show pressure marks; soft leather can develop a set line if the mailer pinches the corner. That is why how to size mailers for accessories should be treated like a fit test, not a catalog selection, and why I never trust the first glance alone.
Here is the practical expectation I set with teams: size for the real packed unit, leave room for the seal, and accept that the right answer may be one size larger than the product suggests. The smallest usable mailer usually wins because it reduces void space, keeps the item from sliding around, and looks more intentional on arrival. But if the accessory has sharp edges, stacked components, or a rigid insert, a slightly larger mailer can prevent seam stress and keep the adhesive from being overworked. That balance is the heart of how to size mailers for accessories, and it is where a lot of otherwise smart teams accidentally trip over a small measurement.
One more thing most people miss: the mailer itself has a personality. A 2.5 mil co-extruded poly mailer behaves differently from a paper mailer or a padded envelope because the film flexes, the seam width matters, and the adhesive zone needs clean contact. A bag that closes beautifully with a single bracelet can struggle once a second item gets bundled in. The first sample only tells the truth if you test it with the actual finished pack, not a tidy mockup that nobody would ever ship in real life, even if the mockup was taped together neatly at a sample table in Yiwu.
How to size mailers for accessories by fit, flex, and closure
When I explain how to size mailers for accessories to a packing team, I start with fit, flex, and closure because those three pieces decide whether the pack survives a real shipment. Fit is the finished packed size. Flex is how much the mailer can give without looking stretched. Closure is the part most people underestimate, because a mailer that barely reaches the adhesive strip may still fail once the item settles during transport. On a busy line in Guangzhou, a clean closure is worth more than a pretty bench sample, and a clean closure is also a lot cheaper than replacing damaged product because somebody wanted to be optimistic.
Poly mailers are forgiving in one sense and unforgiving in another. The film will flex around the product, but the seams, corners, and adhesive flap have hard limits. If the pack thickness crowds the flap, the seal can wrinkle or peel. If the length is too tight, the item can sit against the seam and create wear points. If the width is too loose, the accessory can drift and arrive with the wrap out of place. That is why how to size mailers for accessories always includes the closure allowance, not just the footprint. The mailer has to close like it meant it, not like it is holding its breath.
I like to think about three measurements on the bench. First, the finished length of the fully packed item. Second, the finished width. Third, the packed thickness, which should be measured after all inserts, dust bags, and tissue are in place. For a jewelry set, that thickness might be 8 to 15 mm. For a belt with a buckle in a paperboard sleeve, it may be 18 to 25 mm. For a sunglasses case, it can easily reach 30 mm or more. Those numbers matter because a 2 mm change can shift the entire pack spec, and packaging work has a funny way of turning tiny changes into giant headaches.
There is also a presentation question. Some accessory brands want a snug, boutique feel where the item sits tightly and the pack arrives flat. Others need a little more room so the contents do not press against one side and telegraph every edge through the film. I have seen flat scarves shipped beautifully in a mailer with only 5 mm of extra room, while a pair of small leather gloves needed closer to 12 mm of clearance to avoid corner stress. Good how to size mailers for accessories work respects the product surface as much as the dimensions, because a nice-looking pack that arrives creased is just a fancy way to disappoint someone.
For teams that sell across many accessory categories, I often recommend a simple fit matrix. It does not need software, just a spreadsheet and a tape measure. Track the SKU, the packed length, the packed width, the packed thickness, the mailer size, and the seal result. After ten or twenty samples, the patterns become obvious. The jewelry line may all live in one size; the belts may need one size up; the rigid gift sets may need a different family entirely. That is the kind of clarity that makes how to size mailers for accessories repeatable, and repeatability is what keeps your best packer from reinventing the wheel every Tuesday afternoon.
If your line includes paperboard inserts, ask for FSC-certified board when it makes sense, especially for retail-facing packs where sustainability claims matter. For transit testing, I also like to keep an eye on ISTA and ASTM methods rather than relying on "it felt fine in the office." The industry standards at ista.org are useful for shock, drop, and vibration thinking, and background reading at packaging.org can help your team compare materials with a little more rigor. Those references do not size the mailer for you, but they do keep the team honest, which is often half the battle.
Practical rule: if the mailer has to fight to close on the packing table, it will probably hate the conveyor, the truck ride, and the sortation center even more.
Key factors that change mailer size, cost, and protection
How to size mailers for accessories gets easier once you separate the variables that actually change the pack. Product dimensions are only the start. Finished pack thickness, accessory fragility, surface finish, order mix, weight, and retail presentation all affect the final answer. A tiny necklace on a card may fit in a thin mailer, but if the card has a metallic foil edge, a little extra space can protect the finish. A stitched leather belt is flexible, but the buckle can act like a corner punch if the mailer is too tight. The product may be small; the risk is not, and that is the part that tends to surprise people who only look at the item on its own.
Weight matters too, but not always in the way people assume. A mailer that holds 120 grams of accessories may still need the same size as one holding 220 grams if the thickness is similar. I have seen buyers focus on grams and ignore geometry, which is how a 9 x 12 mailer gets approved for a 24 mm sunglasses case and then tears at the flap during the first shipment run. For how to size mailers for accessories, thickness is usually the hidden cost driver, not weight. The freight calculator may care about both, but the adhesive strip only cares whether the thing fits.
Presentation value can change the spec just as much as protection. A high-end scarf brand in New York may want a crisp, branded pack that lands flat, with the logo centered and the flap aligned. A discount accessory line may care more about speed and freight cost than about a perfect presentation angle. Neither approach is wrong. The mistake is pretending they are the same job. I have sat in meetings where a buyer wanted a premium finish but priced the pack like a commodity shipper. That math does not hold for long, and the warehouse usually ends up paying for the fantasy.
Operational reality matters, especially in a warehouse that handles 300 to 2,000 orders a day. If the same mailer has to work for one bracelet order and a two-piece bundle, you need enough tolerance to handle both without forcing operators to reach for a second size too often. A line that packs scarves in the morning and belts in the afternoon may benefit from two standard mailer sizes instead of one oversized catchall. That is one of the quieter lessons in how to size mailers for accessories: efficiency often comes from a small, disciplined range, not a single universal bag that tries to be everything to everyone and ends up being awkward at all of it.
I had a supplier negotiation in Dongguan where the film vendor wanted to add 3 mm to the closure flap because "it gives the line more comfort." He was not wrong, but that extra millimeter stack changed the converted width and increased material usage by about 6.8% across the order. On a 50,000-piece run, that is real money. We settled on a narrower pack plus a better adhesive spec, which kept the seal strong without inflating the footprint. Those are the tradeoffs that sit behind how to size mailers for accessories, and they are exactly why I like to have a ruler in my hand before I have a coffee in my cup.
For teams comparing materials, it helps to think in layers. A 2.5 mil poly mailer is one thing. A padded envelope with a 3 mm bubble layer is another. A paper mailer with a 120 gsm kraft face and a recycled inner layer is something else entirely. If you are balancing sustainability, print quality, and shelf appeal, I would rather see a carefully sized mailer with a modest insert than an oversized package that wastes film and makes the item wander inside. Good sizing is often the cleanest sustainability move you can make without changing the whole pack architecture, and it has the nice side effect of making the pack look like someone cared.
Step-by-step sizing process and production timeline
The most reliable way to handle how to size mailers for accessories is to follow the same sequence every time. Measure the finished packed item, choose two or three candidate mailer sizes, test the closure with real product, check transit behavior, and document the approved spec. That sounds ordinary, but ordinary is what saves a brand from reworking 5,000 printed mailers because the first size was "close enough." Close enough is expensive when the adhesive strip fails on the first cold night in a distribution center, or when the pack looks slightly off and nobody wants to be the person who signed off on it.
Start with a packed sample, not a loose product. Build it exactly as the fulfillment team will build it: tissue fold, card insert, dust bag, sleeve, barcode label, whatever the real order needs. Then measure the length, width, and thickness with a caliper or a steel rule, not a soft tailor tape. I like to record the dimensions to the nearest millimeter for the prototype stage, then round to the nearest usable mailer increment. For accessory work, that level of detail makes how to size mailers for accessories far more dependable, and it keeps the sample room from becoming a guessing contest with a ruler.
- Pack one real order. Use the actual tissue, cards, and inserts that will ship.
- Measure all three dimensions. Length, width, and thickness after compression, not before.
- Pick two or three candidates. A 9 x 12, 10 x 13, and 12 x 15 comparison is common for small retail items.
- Test the seal. The flap should close without stretching the film or riding the edge of the adhesive.
- Shake and drop. A simple 3-foot hand drop and a 10-second shake test will catch many fit issues before production.
- Lock the spec. Save the approved size, print area, flap allowance, and insertion direction for reorder use.
That sampling flow mirrors how I would set it up in a plant. On one line I visited in Huizhou, the operators kept three sample bins on the table: a small bin for jewelry cards, a medium bin for belts and scarves, and a larger bin for sunglass cases and bundled accessory sets. The team could tell within 20 seconds which mailer size was right because the sample routine was standardized. That is the practical side of how to size mailers for accessories; it saves time at the bench and protects throughput later. Nobody wants to discover a fit issue when the shipping queue is already four carts deep and the clock says 4:45 p.m.
Production timelines matter just as much as dimensions. Once the sample is approved, Printed Poly Mailers usually move through proofing, film sourcing, printing, converting, and packing. For a straightforward custom run, I would plan on 12 to 15 business days from proof approval to finished goods leaving the factory, assuming the art is locked and the substrate is in stock in Guangdong. If the job needs special ink matching, a matte finish, or a custom gauge, that window can stretch to 18 business days. Planning that lead time is part of how to size mailers for accessories because launch timing and mailer size are tied together, and a beautiful pack that arrives after launch week is just a very expensive souvenir.
Seasonal launches are where teams get burned. I have seen a scarf drop delayed because the mailer spec was revised after the marketing team added a folded thank-you card from a studio in Brooklyn. I have also seen a belt brand miss a replenishment window because the size chart was based on a sample without the hardware protector. The fix is simple: freeze the pack structure before you approve the mailer. If the insert changes, remeasure. If the dust bag changes, remeasure. If the bundle changes, remeasure. The habit is boring, but it is the safest path for how to size mailers for accessories, and boring is sometimes exactly what you want in operations.
Use a sign-off sheet with four details: packed dimensions, mailer size, closure result, and any special handling note. That sheet becomes gold later when someone in operations asks why the team chose one size over another. I also like to store a photo of the packed item next to a ruler in the same file. The picture saves arguments, and the numbers save the order history. If you have ever tried to decode an old launch file with no measurements and a blurry photo of a white bag on a white table, you know why I am so stubborn about this.
Cost, pricing, and shipping math for poly mailers
People often ask me whether smaller mailers really save money. The answer is yes, but only if the fit is right. How to size mailers for accessories affects material use, freight, print coverage, labor, and even claims. A compact mailer can cut film usage, reduce void space, and improve shipping efficiency. If the accessory sits snugly without crushing, you get a better-looking pack and usually a lower total cost. If the mailer is too small and causes rework, the savings disappear fast, and sometimes the rework bill arrives with a smug little attitude of its own.
The hidden cost of oversizing shows up in several places. Larger mailers use more film, more ink coverage, and more cube in a carton. They can also move a package into a worse dimensional weight bracket with certain carrier services. A 2-inch increase in the finished bag size might not look dramatic on paper, but multiplied across 20,000 accessory orders, it can become a real freight problem. That is why how to size mailers for accessories should be tied to shipping math, not just product fit. You are not merely picking a bag; you are choosing a freight profile.
| Mailer size | Best fit for | Typical unit cost at 5,000 pcs | What happens if it is too small |
|---|---|---|---|
| 8 x 10 in | Flat jewelry cards, small keychains, thin accessory pouches | $0.15 | Seal stress, curled edges, and visible compression on inserts |
| 9 x 12 in | Bracelet boxes, folded scarves, light leather goods, compact bundles | $0.19 | Flap crowding and corner pressure around rigid items |
| 10 x 13 in | Belts, sunglasses cases, larger jewelry sets, mixed accessory kits | $0.24 | Product ride-up and poor seal closure if the thickness grows |
| 12 x 15 in | Bundled accessories, heavier gift sets, items with inserts and sleeves | $0.29 | Excessive bending if the product is forced into a tighter format |
Those prices are not universal, of course. They move with film gauge, print coverage, resin pricing, and order quantity. A 2.5 mil clear poly mailer with a one-color logo will price differently from a full-color printed bag with a custom adhesive strip and a matte finish, especially on a 10,000-piece run out of Shenzhen. Still, the table shows the direction clearly: more size usually means more cost. The trick in how to size mailers for accessories is to choose the smallest size that protects the item and keeps the brand presentation intact, because expensive looking is not always expensive, and cheap looking can be surprisingly costly.
Here is the part buyers sometimes overlook: the cheapest mailer is not always the lowest total cost. If an undersized bag causes 2% of orders to arrive scuffed or forces the packing team to rework sealed units, the labor and replacement costs can wipe out the savings. I would rather see a mailer that costs $0.03 more per unit and avoids a 1.5% return rate than chase a smaller number on the invoice. That is not theory; I have watched rework eat up an entire week’s margin on a small accessories launch, and the only thing anyone saved was a headache.
If you are deciding between a poly mailer and a double-pack setup with a rigid insert, do the math on labor and freight together. Sometimes a better-sized mailer eliminates the need for an extra backer card or a second outer bag. Other times, a rigid mailer with a lighter film inner pack is the smarter route for fragile hardware. The right answer depends on the item, but the decision still starts with how to size mailers for accessories in a way that keeps all three cost buckets visible: materials, labor, and shipping. If one bucket gets ignored, the budget will eventually remind you, usually with a number that makes everyone stare at the spreadsheet in silence.
I also like to factor in environmental cost, especially for brands that talk about waste reduction in their retail messaging. The EPA has long pushed companies to reduce unnecessary packaging volume, and that lines up with the practical reality on the factory floor: less dead space usually means less material and less freight. If your accessory line uses paperboard inserts, FSC options can support your sourcing story. None of that replaces fit testing, but it does make the business case for thoughtful sizing stronger, and frankly it saves everyone from sending a tiny item around in a giant bag just because nobody wanted to remeasure it.
Common mistakes that create waste or damage
The classic under-sizing mistake is easy to spot once you know the signs. The mailer fits the flat item, but the moment tissue, a card, or a dust pouch gets added, the seam bulges and the flap barely grabs the adhesive. I have seen this happen with ring boxes, scarf sleeves, and even small leather card holders. On the packing bench it looks manageable; after a truck ride and a sortation pass, it becomes a weak seal and a wrinkled edge. That is the fastest way to turn how to size mailers for accessories into a claims problem, and claims are the kind of problem that somehow always show up right before a holiday rush.
Oversizing causes a different kind of trouble. The item slides around, the logo print looks off-center, and the pack arrives with a less premium feel. A bracelet box that floats in a loose 12 x 15 bag can rub against the film during transport, especially if the hardware is exposed. A scarf can bunch at one end and arrive looking tired. I have had buyers tell me the product was undamaged but "felt cheap" on arrival. That is a brand problem, not just a shipping problem, and it is why how to size mailers for accessories needs a presentation standard as well as a protection standard. The customer may not know the dimensions, but they absolutely know when the pack feels sloppy.
Another mistake is ignoring the closure zone. On a 1.5-inch adhesive flap, you need enough clear area for the seal to bite cleanly. If the packed item crowds that zone, the adhesive can wrinkle or the seal can catch on tissue, dust, or a fold line. I have also seen teams forget that film thickness, seal width, and seam placement all affect the usable interior. A bag that looks generous on a drawing can be surprisingly tight once the actual welded edges are measured. In other words, how to size mailers for accessories must include the hidden geometry of the closure, not just the nominal outer size. The numbers on the spec sheet are not the whole story, no matter how neat they look in a folder.
Testing only one sample is another trap. A single flat jewelry card tells you almost nothing about the full line if the same range also includes a rigid glasses case, a bundle with a keychain, and a folded silk scarf. I once reviewed a launch where the approved mailer fit 80% of the SKUs beautifully, but the remaining 20% needed manual force. That may sound acceptable until you multiply it by a holiday rush and a tired packing crew. Good how to size mailers for accessories work always checks the awkward SKUs, not just the easy winners. The awkward ones are where the real truth lives.
One more mistake comes from treating the sample room like the warehouse. The sample room is warm, tidy, and slow; the warehouse is fast, variable, and often a few degrees colder. Adhesives behave differently, tissue compresses differently, and operators pack a little differently when the line is moving. If your mailer only works in the calm of the prototype table, it is not ready. That is exactly why how to size mailers for accessories should end with a short transit test and a sign-off from the people who will actually pack the orders. In my experience, the warehouse team usually spots the problem first anyway, and they do it with a level of honesty that can be oddly refreshing.
What I tell clients: a mailer that needs a good story to explain the fit is usually the wrong mailer.
Expert tips and next steps for a faster launch
After enough factory visits, I have settled on a few habits that make how to size mailers for accessories much easier to manage across reorders. Keep a sizing sheet for every SKU. Record the packed dimensions, the wrap style, the insert style, the chosen mailer, and the seal result. Add one note about whether the item was tested as a single piece or a bundle. That little detail saves hours later when someone asks why the same belt line switched from one mailer size to another. And yes, someone always asks, usually on a Friday at 4:10 p.m.
I also recommend ordering a small range of sample mailers before you commit to print. Two or three sizes are usually enough to see the fit difference clearly. If the line includes both soft and rigid items, do not assume one sample will represent the whole collection. A scarf and a sunglasses case are not cousins in packaging terms; they behave very differently in transit. That is why how to size mailers for accessories gets better when you compare real packs side by side on the same bench, not when you stare at one sample and hope it somehow becomes universal through willpower.
Here is the kind of sign-off checklist I like to leave with packing teams:
- Packed dimensions confirmed: length, width, and thickness are recorded with the actual wrap and insert.
- Mailer fit confirmed: the bag closes flat without stretching the film or wrinkling the flap.
- Seal verified: the adhesive strip has full contact and no loose corner lift.
- Transit tested: at least one shake test and one short drop test were completed.
- Spec documented: the approved mailer size is saved for reorders and seasonal updates.
That checklist sounds basic, but basics are what prevent a 3,000-piece reorder from drifting off spec. On one belt program I reviewed, the first production lot had been packed by one shift with a slightly different fold on the dust pouch, and the mailer fit shifted by nearly 4 mm. The fix was not a new box; it was a better pack standard. That is the sort of operational discipline that makes how to size mailers for accessories stick from one shift to the next, even when the line gets busy and everybody suddenly has opinions.
If you are working toward a launch, measure three real packed orders this week, compare two mailer sizes, and keep the winner documented in a place the warehouse can actually find. If the accessory line is growing, consider building a small internal library of approved pack specs, then connect that spec to your reorder sheet. That is often faster than starting from zero every time. It also helps your team decide whether to use Custom Poly Mailers for the core line or pull from the broader Custom Packaging Products range for special bundles and seasonal kits.
Honestly, the brands that do this well are not the ones with the fanciest packaging presentation. They are the ones that respect the packed dimension, test the seal, and keep their notes tight enough that a new operator can follow them in under a minute. If you keep that discipline, how to size mailers for accessories becomes a repeatable process instead of a guessing game, and your next reorder is usually smoother than the first. That alone is worth a lot of small, boring measuring sessions.
For the next step, I would measure three finished accessory packs, run them through two candidate mailer sizes, and choose the one that closes flat with the least film stress. Then save that spec, order a short printed run, and use the same standard for the next refill. That is the simplest path I know for how to size mailers for accessories, and it has held up across jewelry cards, belts, scarves, sunglasses cases, and the small leather goods that always seem straightforward until the first sample tells a different story.
Frequently Asked Questions
How do I size mailers for accessories like jewelry or belts?
Measure the finished packed item, not the product alone, because tissue, cards, dust bags, and inserts can add 5 mm to 25 mm very quickly. Then choose the smallest mailer that closes flat without stretching the film, pinching the accessory, or crowding the adhesive strip. That is the simplest way to keep how to size mailers for accessories tied to the real pack instead of the product spec sheet, which is where too many teams get tripped up.
Should I size mailers for accessories by product size or packaged size?
Always size to the packaged dimensions, because that is the shape that actually has to fit into the mailer and survive transit. Product size is only a starting point, especially if the item sits in a rigid box, a dust pouch, or a layered retail insert. In practice, how to size mailers for accessories works best when the pack is measured exactly as it will ship, not as it looked on the sample table before the inserts arrived.
How much extra room should I leave when sizing a poly mailer?
Leave enough room for easy insertion and a clean seal, but not so much that the accessory slides around. For many small retail items, that means a modest allowance of a few millimeters on the length and width, then a careful check of the thickness at the closure. If the item is rigid or layered, test more than one size because thickness is usually the dimension that creates trouble in how to size mailers for accessories. A millimeter here and there can feel trivial until the flap starts misbehaving.
Are poly mailers okay for fragile accessories?
Yes, as long as the accessory has the right inner wrap, insert, or rigid backer and the mailer size keeps the item from moving too much. A fragile finish, sharp edge, or heavy hardware calls for extra attention to fit and seal strength. When fragility goes up, how to size mailers for accessories should include a quick transit test before you approve the final spec, because the office desk is not a delivery truck and never will be.
How does mailer size affect shipping costs for accessories?
A properly sized mailer can reduce material use, limit void space, and help control dimensional weight exposure on carrier services. Oversized mailers usually cost more in film, ink, and freight, and they can increase damage risk because the product shifts inside the pack. That is why how to size mailers for accessories is never just a packaging choice; it is a shipping-cost decision too, and one that quietly shapes margin on every single order.


