How to Order a Custom Bridesmaid Proposal Box That Feels Thoughtful, Not Overdone
A custom bridesmaid proposal box has a simple job on paper and a surprisingly complicated one in practice: it asks a meaningful question while setting the visual tone for the rest of the wedding experience. If the structure feels flimsy, the print is off, or the box arrives with crushed corners, the emotional part of the gift takes a hit before the lid is even fully open.
From a packaging buyer’s perspective, the unboxing is the product. Ribbon, insert layout, print finish, material thickness, and closure style all shape the first impression. That is why random filler rarely helps. The box needs to hold the gifts securely, match the wedding style, and still feel special enough to photograph well without looking like a prop shop inventory cleanout.
Most bridesmaid proposal orders are small, time-sensitive, and highly personalized. That combination creates a different buying pattern from standard retail packaging. Quantity may be low, but expectations are high. Names change, the bridal party list shifts, and the deadline often arrives before the calendar feels ready. In that kind of order, the cost is driven less by the word “custom” and more by setup, print method, inserts, and assembly time.
Good packaging sells the feeling first. If the box opens cleanly, holds the contents well, and lands with the right tone, the recipient is far more likely to remember the moment as thoughtful instead of transactional.
One misconception is that custom packaging is automatically expensive. Not true. A printed sleeve over a stock box can be surprisingly affordable, while a fully custom rigid build with foil stamping, interior printing, and fitted foam can move into a much higher tier. The structure matters as much as the decoration, and in some orders it matters more.
For buyers coordinating gifts, invitation pieces, and party favors, this decision often follows the same logic used for branded packaging and product packaging programs. The box should match the message, survive the shipping path, and fit the contents without wasted space. That sounds basic. It is also where most ordering mistakes begin.
What a Bridesmaid Proposal Box Actually Does
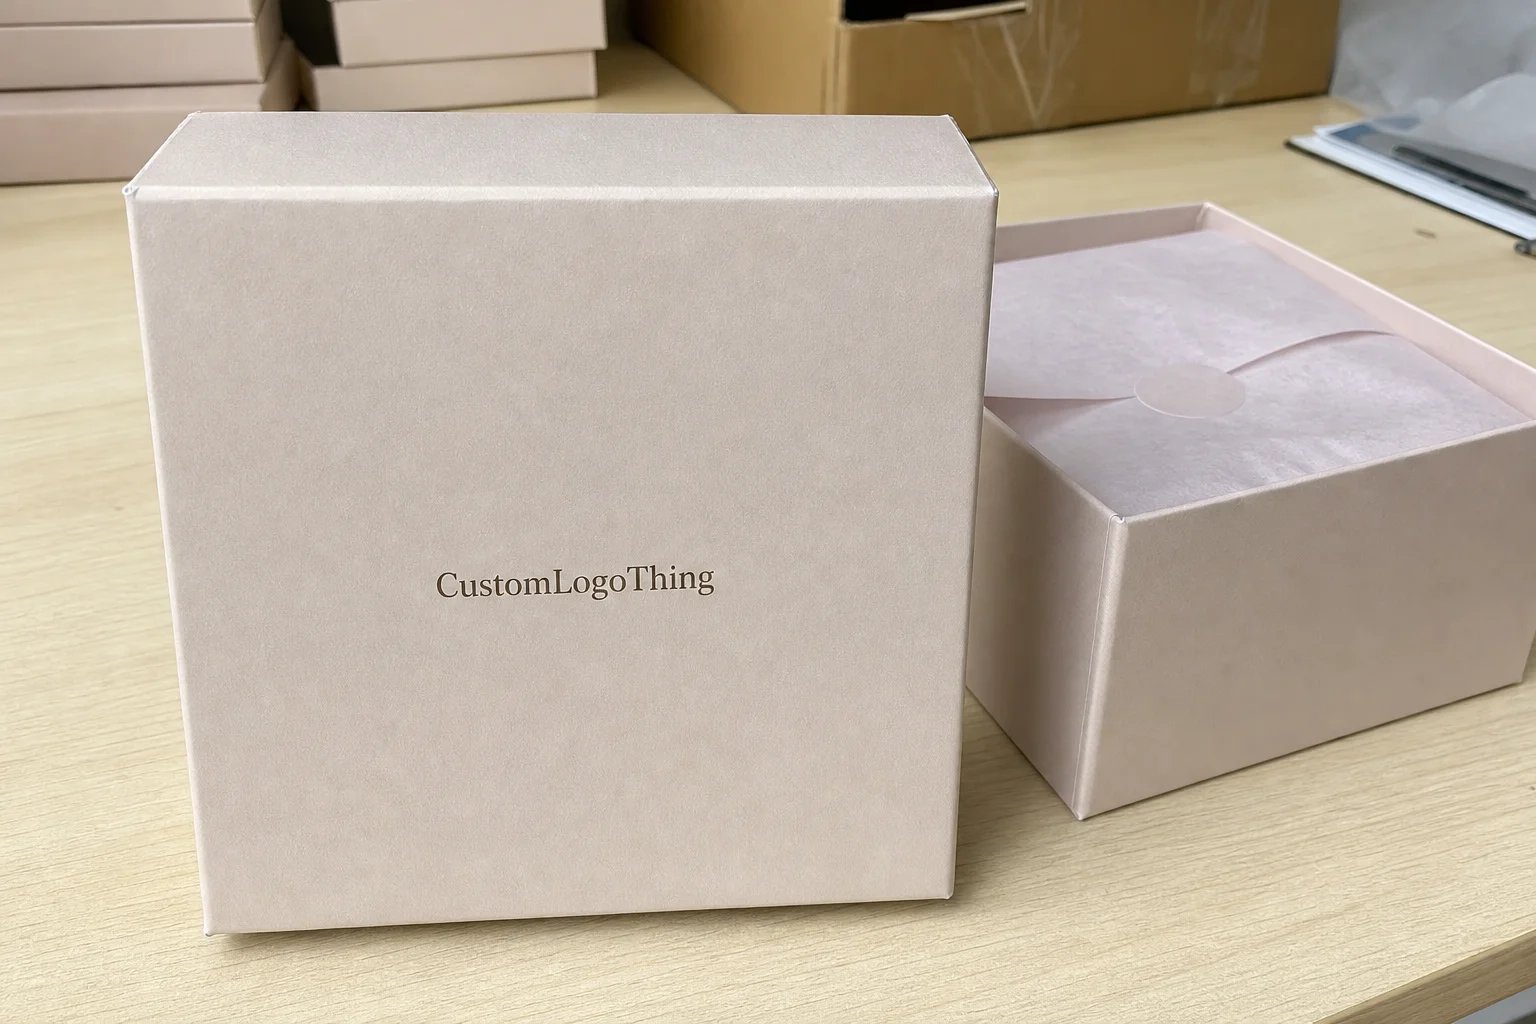
A proposal box is not just decoration. It carries a message, protects the contents, and gives the recipient a clear cue that this is a personal ask, not a generic gift bag dressed up with tissue paper. The structure needs to support all three roles at once.
Most builds include five parts: an outer mailer or rigid box, an insert or divider system, filler like tissue or crinkle paper, printed branding or personalization, and protection for anything fragile. If the contents include candles, glass, perfume, or cosmetics, the inside matters as much as the outside. Pretty packaging that crushes in transit is just expensive disappointment.
This is where a custom bridesmaid proposal box earns its keep. Brides usually order before every detail of the bridal party is finalized, which means the quantity can change and the deadline may be tight. That affects price, production speed, and the kinds of customization that actually make sense. A supplier is not charging extra for drama. Setup, tooling, material waste, and labor drive the number.
Another thing buyers often underestimate is how fast a box communicates status. A rigid build with a tight lid and clean print says “keepsake.” A lightweight mailer with a label says “practical and on time.” Neither is wrong. The right choice depends on whether the box is meant to be displayed, shipped, or both.
For a single-use event, restraint usually wins. Overfilling the box with decorative extras can make it feel cluttered, and clutter reads as indecision. One strong message, one or two well-chosen gifts, and a clean interior layout are enough to create impact.
That approach also makes assembly easier. When every inch of space has a purpose, the box packs faster and ships better. The more modular the contents, the less likely you are to end up with a last-minute rework because a robe is thicker than expected or a card no longer fits where the mockup said it would.
How a Custom Bridesmaid Proposal Box Works
A custom bridesmaid proposal box usually starts with structure, then size, then artwork. That order matters. If the gifts have not been measured, the design may look elegant and still fail in real life. The flow is usually quote, dieline or template, proof, sample if needed, production, packing, and delivery. Straightforward on paper. Easy to derail if dimensions are estimated instead of checked.
Customization options are broad, but not every finish makes sense for a small wedding run. Common choices include name personalization, monograms, color matching, foil stamping, interior printing, and branded inserts. Some buyers want the box to feel quietly luxurious. Others want a bold reveal. Both can work, but the details should support the gifts instead of competing with them.
Artwork application depends on the material and order size. Direct printing is efficient for larger quantities and gives the cleanest result on a fully custom surface. Labels are more flexible for smaller runs or variable names. Sleeves can deliver a custom look over a stock box without requiring a fully custom structure, which is often the most practical path for smaller bridal party orders.
Suppliers usually ask for a few pieces of information before quoting:
- Exact dimensions of the gifts and cards
- The proposal message or copy
- Preferred colors or reference images
- Quantity needed, plus extras for replacements
- Shipping details and required delivery date
If the proposal box is part of a larger set that includes cards, favors, or coordinating gift packaging, gathering everything before requesting a quote speeds up the proof stage. The cleaner the brief, the fewer revisions later.
There is a practical tradeoff, though. The more premium the presentation, the more time and labor it usually takes. A rigid box with a fitted insert looks polished, but it assembles more slowly than a printed mailer with tissue and a card pocket. If the event timeline is tight, a simpler build is not a downgrade. It is usually the safest option.
For clients comparing several package styles, it can help to think in terms of cost per use. A rigid keepsake box may feel more special, but a well-designed sleeve system can produce nearly the same emotional effect at a lower cost and with less risk of over-ordering.
Cost, Pricing, MOQ, and Unit Cost
Pricing moves with five main variables: material, box style, print coverage, special finishes, and order quantity. The short version is simple. Lower quantities cost more per box, and larger runs reduce the unit price quickly. The machine setup does not care that the order is for a bridal party and not a retail launch.
For smaller wedding orders, a printed mailer or sleeve-based design usually lands in a lower cost tier. A rigid custom box with inserts, foil, or full coverage print can move much higher. The exact number depends on size, structural complexity, and decoration, but realistic buyer ranges look more like this than the vague pricing people often quote.
| Option | Typical Unit Cost | Best For | Tradeoff |
|---|---|---|---|
| Printed mailer box | $0.85-$2.25 | Small gifts, mail-friendly orders | Less premium feel, limited structure |
| Rigid box with insert | $2.40-$5.50 | Luxe presentation, keepsake packaging | Higher labor and shipping cost |
| Sleeve over stock box | $1.10-$3.20 | Flexible personalization | Less durable than a fully custom build |
| Foam or molded insert package | $3.50-$7.00+ | Fragile items, premium gift sets | More tooling and setup time |
MOQ exists for plain reasons: setup time, machine calibration, material waste, and press efficiency. If a supplier runs a custom structure for 25 boxes, the prep cost gets spread across very few units. That is why 50, 100, 250, and 500-unit quotes can look dramatically different. Ask for tiered pricing before deciding, because guessing from one quote is how people overpay.
Hidden costs matter too. Soft-touch lamination, foil stamping, embossing, spot UV, and full interior print can move the price more than the base structure itself. Inserts can do the same. A cardboard divider is relatively inexpensive. A precision-cut foam fit costs more because it requires tighter tolerances and extra prep.
Buyers should also watch the difference between display packaging and transit packaging. A box that photographs well may still ship poorly if the walls are thin or the inserts are loose. If the proposal is being mailed, ask how the structure handles compression, corner impact, and vibration. A beautiful box that arrives dented is still a damaged box.
For broader packaging planning, it helps to compare a proposal build with other custom printed boxes and see how the structure changes the budget. That keeps the focus on material, fit, and total landed cost instead of the sticker price alone.
One more useful habit: request quotes in multiple tiers. A 50, 100, 250, and 500-unit breakdown shows where the real break points sit. Even if the final order is small, that comparison reveals whether a slightly larger run would reduce cost enough to justify a few extras for replacements or last-minute additions.
Process and Timeline for Ordering Without Panic
The cleanest ordering process starts with the contents, not the artwork. List the gifts, measure the largest piece, note anything fragile, and confirm how much padding each item needs. People reverse that order all the time, then wonder why the finished box is too shallow or the insert feels improvised.
Typical lead times vary by structure. Stock boxes with labels or sleeves can move faster, often in about 7 to 12 business days after proof approval. Fully custom rigid builds usually take longer, commonly 12 to 20 business days, and complex finishing can add more time. If sampling is involved, budget extra days. It is cheaper to wait for a sample than to reprint an order because the lid closes crooked or the interior layout shifts.
The slow points are predictable. Artwork revisions, missing dimensions, and delayed approvals cause most problems. The production team cannot guess the thickness of a candle, the height of a hair clip box, or how much clearance a name card needs. If the brief is incomplete, the job will either stall or get built conservatively. Neither outcome is ideal.
For mail-based gifting, the box also has to survive carrier handling. That is where distribution testing matters. The ISTA publishes package testing methods for drop and vibration conditions, and asking whether a supplier references those methods is worthwhile if the proposal boxes are traveling. A box that only leaves the room in someone’s hand has a very different requirement than one crossing the country.
Give yourself a buffer between delivery and assembly. Five days is the bare minimum. A week is better. If some bridesmaids will receive theirs early, split shipments can help keep the project moving without forcing one giant delivery into a tight window. That is especially useful when names, addresses, or contents vary by person.
Schedule the box to arrive before the gifts. It sounds obvious until a missing shipment turns a simple packaging order into a group chat full of polite concern and thinly disguised panic.
How to Choose Size, Materials, and Inserts
Size the box around the contents, not the other way around. Oversized boxes waste money, increase dimensional weight, and make the presentation feel loose. Undersized boxes create crushed corners and awkward packing. The right fit is snug enough to hold items in place without bowing the lid or tearing the insert.
Material choice depends on use. Rigid board gives the most luxe feel and works well for keepsake-style gifting. Corrugated board is better for shipping protection and can still look polished with the right print finish. Folding cartons are lighter and more economical for smaller items. Plastic components can make sense if moisture resistance or visibility matters, though they usually feel less wedding-forward unless used sparingly.
In practice, inserts do most of the real work. Foam protects fragile items. Cardboard dividers are cleaner and often more recyclable. Crinkle paper is fine as filler, but it should not be doing structural heavy lifting. Molded trays and clear pockets help when a card, sample vial, or small accessory needs to stay put without rattling around.
For glass, candles, or cosmetics, add structure. A pretty outer box is not enough if the inside lets items collide in transit. For apparel, stationery, or a card plus one small gift, a simpler insert can be sufficient. The content dictates the build. That is the rule most first-time buyers miss.
Finishes should match the wedding tone. Matte feels restrained. Soft-touch feels quiet and premium. Gloss catches light and reads more playful. Metallic accents can be effective if used with restraint. Clear windows or protective overlays can showcase the contents, but only if the layout is neat. A messy window is public proof that the packing stage was rushed.
For buyers concerned with sourcing, look for paperboard with FSC certification where possible and ask whether the structure includes recycled content. The FSC system is widely recognized for responsible forest sourcing. That does not require a heavy sustainability pitch. It simply gives the order a more defensible material story.
Basic packaging design discipline pays off here. Clean typography, one focal graphic, and a restrained palette usually outperform a crowded layout full of competing details. The box is not a scrapbook. It is a piece of package branding that should feel deliberate.
There is also a practical finish choice buyers rarely consider until samples arrive: coating durability. Matte and soft-touch coatings can scuff if the boxes are stacked tightly or slid across a table. Gloss is often easier to clean, but it shows fingerprints and can reflect light in ways that make photography harder. The best finish depends on whether the box will be handled once, displayed for a few photos, or stored as a keepsake.
Common Mistakes Buyers Make With Proposal Packaging
The biggest mistake is ordering before the contents are final. That is how you end up with boxes that are too shallow, inserts that do not fit, or a layout that needs random filler just to keep items from shifting. Measure first. Design second. Order third.
Another common problem is forgetting shipping weight and dimensional size. A proposal box that looks compact on a screen can turn into an expensive freight surprise once it is fully assembled. If the order involves dozens of boxes, even a small size change can add up fast. That part is less romantic than the Pinterest board, but it is the part that shows up on the invoice.
Overdesign is a real issue too. Too many colors, too many fonts, too many decorative elements, and the box starts looking busy instead of elegant. One strong visual motif beats five competing ones. Good packaging should feel calm. If the lid looks like it is trying too hard, it probably is.
People also mix up display packaging and transit packaging. A beautiful box that cannot survive a corner crush is not fit for mailing. If the box is only for in-person gifting, a lighter structure may work. If it is going through a carrier, test the build for drop resistance and edge strength before approving it. Packaging standards exist for a reason.
Proof approval is the final trap. Misspelled names, wrong dates, off-brand colors, and bad spacing happen when the proof gets skimmed instead of checked. Read it like the printer has never seen your wedding before. Because they have not.
- Check every name character by character
- Confirm box dimensions against the actual gifts
- Review color references under natural light if possible
- Verify the closure style and insert layout
- Approve only after one last content count
Expert Tips for a Better Unboxing and Smarter Order
Keep the hero message simple. One strong phrase, one visual motif, one clear ask. That is usually enough. The best boxes do not try to say everything at once. They create a clean first read, then let the contents finish the story.
If the design includes foil, coating, or a new structure, order a sample. A sample is cheaper than a reprint, and it tells you how the box behaves in real life. Does the lid scuff? Does the insert shift? Does the print look darker on the actual board than on-screen? Those are the questions that matter.
For shipping builds, ask for a real spec sheet, not just a rendering. You want dimensions, board thickness, closure style, insert material, print method, and estimated packed weight. Visuals help sell the idea. Specs tell you whether the idea works. One is presentation. The other is reality.
If the same structure needs to work for different bridesmaids with different gift sets, consider a modular approach. The main box can stay the same while the insert, card, or filler changes by person. That keeps the look consistent and reduces the chance of ordering several nearly identical versions that differ in one overlooked detail.
Buyers who want a better result without adding chaos should think in systems. Pair the proposal box with coordinated tissue, a name card, and a small insert pocket for the note. That creates a complete unboxing sequence instead of a stack of unrelated objects. The same logic appears in premium branded packaging and gift presentation programs: consistency makes the whole order feel more intentional.
There is also a sustainability angle that can be handled sensibly. Right-size the box, avoid unnecessary plastic, and choose recyclable board where the contents allow it. The EPA has useful packaging and waste-reduction guidance at epa.gov, which is worth reviewing if the goal is thoughtful packaging without wasteful extras.
If the order is large enough to feel like a small production run, compare a few paths through Custom Packaging Products before committing. Sometimes the cleaner structure is also the cheaper one. Fancy is not always smarter. Sometimes it is just more expensive.
One practical detail that gets overlooked is storage before assembly. Boxes with soft-touch or matte finishes can show pressure marks if they are stacked under weight for too long. Keep them flat, dry, and away from direct sunlight. Paperboard is sturdy, but it is not immune to humidity, and a warped lid can ruin the first impression faster than a bad ribbon choice.
Next Steps to Place a Smart Order
Start with the contents list. Write down every item, measure the largest piece, and note anything fragile. Then decide whether the box needs to be mailed, handed out in person, or stored as a keepsake. That sequence prevents most expensive mistakes.
Next, ask for tiered pricing, a dieline or template, and a proof. If you are comparing a printed mailer, a sleeve, and a rigid build, line them up using the same dimensions and the same contents. Otherwise the comparison is fake and the quote is basically theater.
Build in time for sampling and revision. A simple printed run can move quickly, but a more detailed custom bridesmaid proposal box with foil, inserts, or mixed contents needs more breathing room. A final order should not go out until the names, colors, and measurements are locked. That sounds strict because it is. The box will not care that the wedding schedule is crowded.
Before you send the order, check the final proof one last time. Names. Spacing. Lid orientation. Box dimensions. Insert layout. Then confirm the ship date against your assembly date, not your hope. If those line up, you are in good shape.
A custom bridesmaid proposal box works best when it is sized to the contents, priced in tiers, and approved with the same care given to the rest of the wedding details. Do that, and the box feels intentional instead of improvised. Skip it, and you end up with a pretty container and a surprisingly high chance of regret.
Frequently Asked Questions
How much does a custom bridesmaid proposal box usually cost?
Expect a wide range based on material and quantity. Simple printed boxes can stay economical, while rigid builds with inserts, foil, or interior print cost more. The clearest way to compare is to request pricing at 50, 100, 250, and 500 units so you can see where the unit cost starts to drop.
What is the typical lead time for a custom bridesmaid proposal box?
Stock-based options can move faster, often in about 7 to 12 business days after proof approval. Fully custom builds usually need more time, commonly 12 to 20 business days, and sampling can add another step. The delay usually comes from artwork changes or incomplete measurements, not the box itself.
What should I put inside a bridesmaid proposal box?
Common contents include a proposal card, a small gift, tissue or filler, and a personalized packaging piece such as a name card or insert. Keep the set thoughtful and compact. One or two well-chosen items usually look better than a box full of random extras.
Can I order a small MOQ for a custom bridesmaid proposal box?
Yes, but lower quantities usually mean a higher unit cost. Small-run options often use labels, sleeves, or digital printing to keep setup simpler. Ask for MOQ and pricing together so you can compare the real cost, not just the headline number.
What is the best box style for mailing bridesmaid proposals?
A corrugated mailer or a rigid box with protective inserts works best if the box has to travel. If the box is mainly for presentation, a lighter structure can work, but only if it still protects the contents. The carrier is not impressed by good intentions, so test the build before you commit.


