Paper Gift Bag Tissue Insert Checklist Before Ordering
Use this paper gift bag tissue insert checklist to size tissue, control costs, avoid rushed rework, and brief suppliers before your next branded bag order ships.
Paper Gift Bag Tissue Insert Checklist: What It Prevents
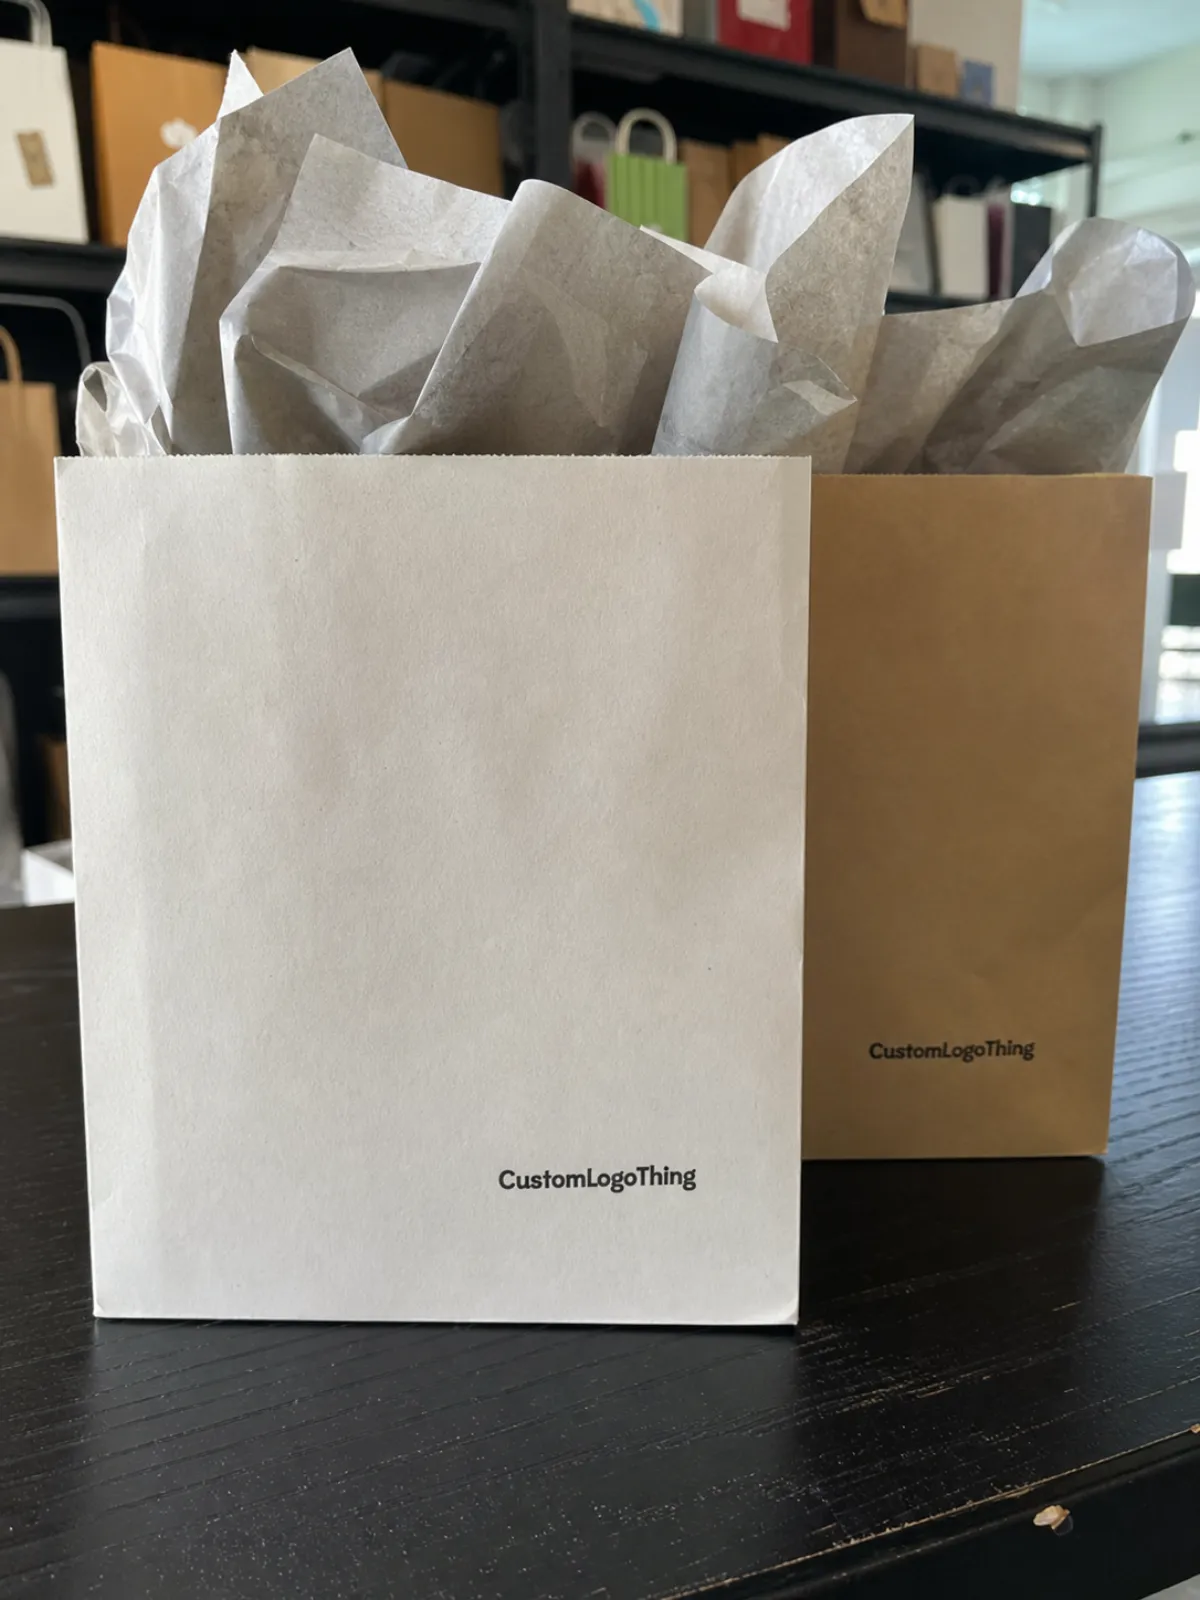
Put two identical kraft Paper Gift Bags on a counter. One has crisp branded tissue standing about 2 inches above the rim; the other has limp, oversized tissue sliding into the handles. The product has not been seen yet, but the customer has already started assigning value. A paper gift bag tissue insert checklist may sound like a small production detail, but it controls presentation, packing labor, freight volume, damage risk, and the first impression of the brand.
Tissue is inexpensive compared with a custom bag, the product inside it, or the freight bill. That can make it easy to treat as an afterthought. In practice, it behaves more like a hang tag, ribbon, or foil stamp: a low-cost element with a loud visual signal. A plain white 17gsm sheet may cost only a few cents in volume, while Custom Printed Tissue can move higher depending on sheet size, ink coverage, print method, and minimum order quantity. Either way, it is often visible before the receipt, before the product label, and before the customer handles the item.
The checklist should cover finished bag dimensions, gusset depth, handle type, tissue sheet size, paper weight, color, fold method, insert count, logo placement, packing method, case quantity, inspection standard, and delivery deadline. Miss one of those, and the problem often appears late. Not during the quote. Not during artwork approval. During packing, when staff are trimming sheets by hand, adding a second sheet to every bag, or accepting a presentation that looks flatter than the buyer expected.
Tissue has to be planned with the bag, not after the bag has already been produced. Twisted paper handles, ribbon handles, die-cut handles, wide gussets, tall product profiles, and the customer’s viewing angle all change how tissue behaves. A 10 x 5 x 13 inch paper shopping bag has different tissue needs than a 6 x 3 x 8 inch boutique bag, even if the same product technically fits inside both.
Packaging failure is often a specification failure. The material may be acceptable. The print may be accurate. The purchase order simply never said how the tissue had to sit, fold, ship, or look after packing.
How Tissue Inserts Work Inside Paper Gift Bags
Tissue has several jobs, and only one of them is decoration. It fills visual empty space, softens light scuffs, delays the product reveal, creates color contrast, and adds height above the bag opening. In retail packaging, that added height matters. A bag that looks half-empty suggests the product is smaller than expected. A bag with tissue standing neatly above the rim suggests care before the customer even looks inside.
The relationship between bag size and tissue size is physical, not just mathematical. Small paper gift bags often need less sheet area because the rim is close to the product. Tall bags or wide-gusset bags may need longer sheets to create a visible plume. A practical test is simple: place the actual product in the bag, add one sheet, photograph it from the customer’s viewpoint, then repeat with two sheets or a larger sheet. Ten minutes at a packing table can prevent 10,000 awkward finished bags.
There are several tissue approaches worth comparing before the order is locked:
- Loose single sheet: low cost, fast packing, best for small or shallow bags.
- Two-sheet cross fold: fuller look, stronger color presence, slightly slower packing.
- Pre-folded insert: consistent presentation, higher labor or supplier packing cost.
- Wrapped product bundle: better reveal control, useful for apparel, candles, boxed gifts, and sets.
- Branded top sheet over plain filler: controls cost while keeping the visible layer custom.
Tissue weight is usually specified in gsm, or grams per square meter. Lighter tissue, often around 14-17gsm, drapes easily and packs small, but tears faster around corners, sharp product edges, and box seams. Heavier tissue, such as 20-28gsm, holds shape better and can feel more premium, though it increases cost, carton volume, and sometimes packing resistance. For luxury gift bags, heavier is not automatically better. A stiff sheet can look forced in a narrow bag, especially when the handles already crowd the opening.
Ink and fiber choices change the result as much as paper weight does. Dark flood printing can increase rub risk. Metallic print can raise lead time and may complicate recyclability. Recycled fibers can create a softer, slightly less uniform surface. Dyed tissue may show stronger color than printed white tissue, but it can also transfer color if poorly specified or exposed to moisture. Ask for rub testing guidance if tissue will touch pale textiles, matte-coated boxes, cosmetics cartons, uncoated paperboard, or anything with a delicate finish.
One caution belongs near the top of the checklist: tissue is not structural protection. It may prevent minor scuffs and improve the reveal, but it will not protect glass jars, ceramic pieces, electronics, or fragile ornaments from compression. Those still need dividers, paper wrap, corrugated inserts, molded pulp, or a mailer insert designed for the actual distribution path. For formal transit testing, many packaging teams reference ISTA procedures when shipping damage risk is part of the project.
Key Specs to Confirm Before You Approve Artwork
Artwork approval is the wrong moment to discover that the sheet size changed. Before the logo repeat is signed off, lock the finished bag size, gusset, handle type, tissue dimensions, sheet count per bag, print color count, ink coverage, and fold direction. If the bag is 8 x 4 x 10 inches with a 4-inch gusset, the tissue decision should reflect that internal volume, not only the brand color palette.
Printed tissue does not behave like a rigid paper bag. Thin paper wrinkles. Layers shift. Color can deepen where sheets overlap and fade where the paper stretches over a product corner. A logo that looks disciplined on a flat PDF can appear scattered once it is folded, tucked, and partly hidden. That is not automatically a supplier error; it is how lightweight paper behaves after handling.
Decide whether the tissue is the main brand moment or a supporting accent. Full-pattern tissue, logo-repeat tissue, solid-color tissue, and a single centered logo solve different problems. A fashion launch may need a repeating mark every 3-4 inches so at least one logo remains visible after folding. A corporate gifting program may look better with one restrained logo on the top sheet, especially if the outer bag already carries foil, embossing, or a large printed mark.
Color matching deserves careful handling. Pantone targets help, but substrates change results. White tissue, kraft tissue, dyed tissue, and recycled natural tissue can produce different visual outcomes with the same ink. A deep green printed on white tissue may look clean; on kraft it may look muted; on natural recycled tissue it may look warmer and less precise. If the custom paper bag uses soft-touch lamination, gloss coating, metallic foil, or a saturated brand color, compare the tissue beside the physical bag sample rather than judging from a screen.
Sustainability claims need the same discipline as color claims. Confirm recycled content, FSC certification, ink type, coatings, and disposal assumptions before copy goes to print. The Forest Stewardship Council provides certification frameworks for responsibly sourced fiber, but buyers still need to ask whether the specific tissue paper grade, not just the supplier, is certified. Metallic effects, plastic coatings, and heavy saturation can complicate recovery depending on local recycling systems.
A flat artwork proof is useful. A folded mockup is better. The visible area after packing may be only 20-40% of the printed sheet, especially if the tissue wraps around a product or sits below the handles. Add a photo of the approved packed sample to the paper gift bag tissue insert checklist so the production team, warehouse, retail staff, and event crew all share the same target.
Process and Timeline from Bag Sample to Packed Order
The cleanest process starts with structure. Confirm the bag style, finished size, paper stock, handle type, and gusset. Then choose tissue size and material. After that, prepare artwork, review print layout, approve a sample or proof, produce tissue, produce or source the bags, pack, inspect, and ship.
The sequence looks simple on paper. The delays rarely are.
Production often slips because of late artwork, unclear logo repeat spacing, color matching revisions, missing product dimensions, or changes to case pack requirements. A buyer may approve a bag sample, then later decide that each carton should hold 100 pre-tissued bags instead of 250 flat bags with bulk tissue packed separately. That one change affects carton size, freight class, warehouse handling, and the risk of tissue crushing during transit.
Custom Printed Tissue timelines depend on paper availability, print method, artwork complexity, finishing, order volume, and freight mode. A straightforward one-color repeat on stock white tissue may move faster than a dense flood print on dyed tissue with metallic detail. Proofing can add several business days if color is sensitive. Larger runs can be efficient once approved, but they punish indecision early in the process.
Quote bags and tissue together when possible. Split sourcing can work, but it creates timing gaps and responsibility gaps. Bags may arrive before the tissue. Tissue may be sized to the first bag sample while the final bag gains a deeper gusset. Artwork may be approved by one vendor while another changes carton count. None of those issues is dramatic alone; together, they create the kind of small friction that turns into overtime, repacking, or a downgraded presentation.
For seasonal launches, pop-up retail, corporate gifting, trade shows, and subscription box drops, assign approval deadlines. Name the person responsible for bag structure, tissue specification, artwork, proof, packed sample, and final release. If three people can approve color but nobody owns the fold method, the fold method will be decided by whoever is packing under pressure.
Rushed tissue decisions look harmless on a spreadsheet. Later, they show up as extra packing labor, higher waste, inconsistent presentation, and cartons that take up more space than planned.
Cost and Pricing Variables Buyers Usually Miss
A serious checklist should include cost per packed bag, not only cost per sheet. That distinction matters. One premium tissue sheet at $0.11 may be cheaper in use than two thin sheets at $0.07 each if the thinner option requires extra handling and still looks flat. Labor is not free simply because it sits outside the packaging quote.
The main cost drivers are sheet size, gsm, paper color, print method, ink colors, coverage area, metallic or specialty finishes, folding, pre-inserting, MOQ, and freight volume. Oversized sheets create trimming waste or slow tucking. Heavy tissue increases carton size. Dark flood printing can raise ink cost and drying risk. Manual folding can add labor, especially if the presentation requires a consistent 2-inch rise above the bag rim.
MOQ is a trade-off, not a moral test. Lower minimums reduce inventory risk, which helps if a campaign may change or a seasonal logo has a short life. Larger runs can lower unit cost, but they increase storage demand and brand-change risk. For many buyers, asking for tiers at 1,000, 2,500, 5,000, and 10,000 units reveals the price break that matters. Sometimes the jump from 2,500 to 5,000 is meaningful. Sometimes it is too small to justify holding the extra stock.
| Option | Typical Use | Cost Pressure | Buyer Watchout |
|---|---|---|---|
| Plain white tissue | Basic retail fill, quick programs, neutral presentation | Lowest; often a few cents per sheet in volume | May look generic beside a highly branded bag |
| Solid brand-color tissue | Color blocking, launches, event gifting | Moderate; dyed stock and availability affect price | Color may shift against kraft, matte, or gloss bags |
| One-color logo repeat | Premium retail, cosmetics, apparel, corporate gifts | Moderate to higher; depends on sheet size and MOQ | Repeat spacing must survive folding and layering |
| Metallic or specialty print | Luxury launches, holiday gifting, VIP kits | Higher; setup, lead time, and waste can increase | May affect recyclability and rub performance |
| Pre-inserted tissue | Store rollouts, event kits, consistent presentation | Higher packed cost and freight volume | Tissue can crush if cartons are overpacked |
Ask for line-item pricing. Separate bags, tissue, printing, setup, sampling, folding, packing, and freight. A quote that blends everything into one unit price can hide the real movement. Maybe the bag is stable but freight jumps because pre-inserted tissue doubles carton volume. Maybe print setup is minor, but manual folding is the expensive part. Good quoting exposes the trade-offs before the purchase order is locked.
Step-by-Step Checklist for Building the Insert Brief
The insert brief should begin with measurements, not mood words. Record product height, width, depth, weight, fragility, finished bag dimensions, gusset, and desired tissue height above the rim. If the goal is a 1.5-2.5 inch tissue plume, say that. If the product must stay hidden until the customer opens the bag, say that too.
- Measure the product and bag together. Include the tallest product orientation, not only the neatest one in a photo.
- Select the tissue role. Choose decorative plume, protective wrap, privacy cover, brand reveal, color accent, or a mix.
- Choose sheet size and sheet count. Test with the real product before trusting a spreadsheet.
- Define material specs. Include gsm, finish, recycled content, color, opacity, softness, tear resistance, and any food-safe or fragrance-free requirement.
- Prepare artwork instructions. State logo size, repeat spacing, orientation, bleed, color tolerance, and whether random placement after folding is acceptable.
- Confirm operations. Note whether tissue ships flat, folded, or pre-inserted; who packs it; case quantities; carton labels; storage conditions; and inspection criteria.
- Set approval rules. Name who signs off on proof, sample, color, packing method, and final production release.
The physical packing test is the step that catches the most errors. A 20 x 30 inch tissue sheet may sound generous, but if the bag has a wide gusset and the product sits low, the sheet may disappear. A smaller sheet may perform better if it is folded correctly. Record the tested method, not only the selected size.
For food, fragrance, cosmetics, or baby products, add extra caution. Tissue may need to be fragrance-free, low-lint, or separated from the product by primary packaging. For apparel, rub risk matters. For candles, oils, and soaps, scent transfer can become a quiet complaint driver. Not always, but often enough that the brief should ask the question before production.
Common Mistakes That Make Tissue Look Cheap
The most common mistake is undersizing. The tissue sits below the bag opening, and the bag looks underfilled. Buyers often notice it only after the first packed sample photo, which is exactly why that photo belongs in the approval process. If the bag is tall, a sheet that works beautifully in a shallow gift bag may vanish.
The opposite mistake is oversizing. Too much tissue creates bunching, crushed corners, and a bulky silhouette around the handles. It also slows packing. If staff need 20 extra seconds per bag across 3,000 bags, that is more than 16 labor hours spent fighting paper instead of packing product.
Color chosen in isolation is another trap. Kraft paper warms colors. Matte white can make pale tissue look creamier. Gloss lamination reflects nearby color. Ribbon handles and foil logos add their own visual temperature. A blush tissue that looks refined on a white desk may look muddy inside a natural kraft bag under warm event lighting.
Print overcrowding deserves its own warning. A tight logo repeat can look elegant on a flat proof and chaotic once wrinkled, folded, and layered. Thin tissue multiplies the effect because marks show through from lower layers. More logo is not always more brand. Sometimes a wider repeat, smaller mark, or plain filler sheet under a branded top sheet looks more expensive.
Operational mistakes are less glamorous but more damaging: no packing standard, inconsistent sheet count, mixed tissue batches, unclear case labels, and no retained sample for comparison. A retained sample should show the approved bag, tissue, fold, sheet count, and product position. Keep one with purchasing and one where packing happens.
Inspect under the lighting that matters. Store LEDs, hotel ballroom lighting, outdoor tents, and office fluorescents can change translucency and color cast. Tissue is thin, so it responds to its surroundings. If the bags will be used at an evening event, inspect at least one sample under warmer light before approving a full run.
Next Steps Before You Send the Supplier Brief
Start with one real product and the intended bag. Pack it. Photograph it from the customer’s viewpoint, not the designer’s overhead view. Then write down what looks empty, messy, hidden, overbuilt, or off-brand. The photo will tell the truth faster than a spec sheet.
Create a one-page brief with bag dimensions, tissue size, gsm, color, print details, sheet count, fold method, MOQ target, delivery address, and required in-hands date. Add the approved photo if you have it. If not, request a sample fold or mockup before production approval.
Ask for two or three tissue options instead of one guess. A practical comparison might include standard white tissue, a solid brand-color tissue, and a one-color logo-repeat tissue. Compare the cost per packed bag, packing time, carton volume, and final presentation side by side. The least expensive sheet can become the costly choice if it needs extra labor or extra layers.
Your quote request should include production time, proofing time, freight estimate, overrun or underrun policy, and approval deadlines. If the supplier is also packing the tissue into the bags, ask how cartons are protected from crushing and how case quantities are labeled. If your own team is packing, ask whether tissue will arrive flat, quarter-folded, or bulk folded.
Before a large rollout, run a small internal test. Have three team members pack ten bags each. Measure time, waste, and consistency. If one person creates a polished presentation and another creates a crumpled one using the same materials, the issue is probably the packing standard, not the tissue.
A paper gift bag tissue insert checklist keeps small decisions visible before they become expensive. Use it to reduce guesswork, compare real options, and brief suppliers clearly before committing to Custom Paper Bags and tissue inserts.
FAQ
What should be included in a paper gift bag tissue insert checklist?
A paper gift bag tissue insert checklist should include bag size, product dimensions, tissue sheet size, gsm, color, print specs, sheet count, fold style, packing method, MOQ, quote tiers, approval contacts, and required delivery date. Add visual standards too, such as desired tissue height above the rim, logo visibility after folding, and an approved packed sample photo.
How do I choose the right tissue size for paper gift bags?
Start with the bag height, width, and gusset, then test a physical sheet with the actual product. Fold volume changes how much tissue is visible. For a fuller retail look, buyers often test two sheet sizes and compare the packed silhouette, packing speed, and waste before ordering.
Does custom printed tissue increase the cost of gift bags a lot?
The increase depends on sheet size, paper weight, ink coverage, print colors, MOQ, and whether the tissue is folded or packed by hand. Compare cost per finished bag rather than cost per sheet, since cheaper tissue may require more sheets or more labor to achieve the same presentation.
How long does the paper bag and tissue insert process take?
Timeline depends on artwork readiness, proof approvals, sampling, paper availability, printing method, order quantity, packing requirements, and freight distance. The safest approach is to approve bag structure and tissue specs together so the supplier can coordinate production steps and reduce mismatched arrival dates.
Should tissue inserts be pre-packed into paper gift bags?
Pre-packing can save store or event labor and improve consistency, but it may increase packing cost, carton volume, and the risk of tissue crushing in transit. Flat or folded bulk tissue is usually more flexible when products vary by order or when staff need to inspect items before final presentation. Add that decision to your paper gift bag tissue insert checklist before requesting final pricing.


