Personalized drink labels have to do more than look good in a mockup. They need to fit the container, survive condensation, stay readable after handling, and hold up on the actual bottle, can, or beverage package. That makes them a packaging decision, not just a design choice.
For Custom Logo Things, the important questions are practical: what material works on the real container, what adhesive fits the environment, how much the labels cost, how long they take to produce, and whether the finished labels will pass inspection once they are applied.
Why personalized drink labels matter on the shelf and at the table
A drink label has one core job: communicate clearly. It also shapes the first impression of a product in a retail cooler, at an event, on a banquet table, or in a private-label program. A well-fitted label can make a simple beverage look intentional and professional; a curled edge or smeared finish can do the opposite.
Personalized drink labels are custom printed labels made for a specific bottle, can, or beverage package rather than a stock size. That matters because the label can be matched to the container’s dimensions, surface texture, and use environment, which improves fit and durability.
These labels are common on wedding favors, brewery releases, bottled water, cold brew coffee, juice products, private-label beverages, and branded gifts. The product inside may be standard, but the package can still feel specific and polished when the label is sized and printed correctly.
“A drink label only earns its value when it still looks right after refrigeration, condensation, and a few handoffs. If the adhesive or finish is wrong, the design never gets a fair test.”
For buyers planning other packaging pieces, related formats like Custom Labels & Tags can help keep the visual system consistent across containers and supporting items.
How the labeling process works from artwork to application
The process usually starts with artwork review. A printer checks file size, bleed, resolution, color setup, and whether the design matches the actual container shape. Then comes the digital proof, where spelling, placement, barcode location, and finish details should be checked before production starts.
Once the proof is approved, the build is finalized. That means selecting the facestock, adhesive, liner, and finish, then moving into print production, die-cutting or kiss-cutting, finishing, and packing. Depending on the order, labels may ship as rolls, sheets, or individual pieces.
Roll labels are usually the better choice for machine application or large manual runs because they dispense consistently and reduce handling time. Sheet labels are common for smaller projects and hand application. Individual labels can work for limited event quantities, although they are less efficient when large numbers of bottles need to look uniform.
Label size tolerance matters more than many buyers expect. A difference of a few millimeters can change how a label sits on a curved bottle, whether it crosses a seam, or whether it crowds a shoulder or panel line. Bottle drawings, flat dimensions, or accurate measurements from the real container are more useful than a photo alone.
Temperature and handling conditions also affect the recommendation. If the product will be stored cold, served iced, or filled while wet, the adhesive choice changes. If labels need to pass through a conveyor or be applied quickly by hand, shape and liner behavior matter too. A label for a wedding favor is not automatically suitable for a beverage line.
Material, adhesive, and finish choices that affect performance
Material selection is where label performance is usually won or lost. Standard paper stocks can work in dry, short-term conditions, but once condensation appears, film-based materials usually hold up much better. BOPP is one of the most common choices for beverage labels because it resists moisture and stays readable on chilled containers. Polyester can be a better fit when extra durability or chemical resistance is needed.
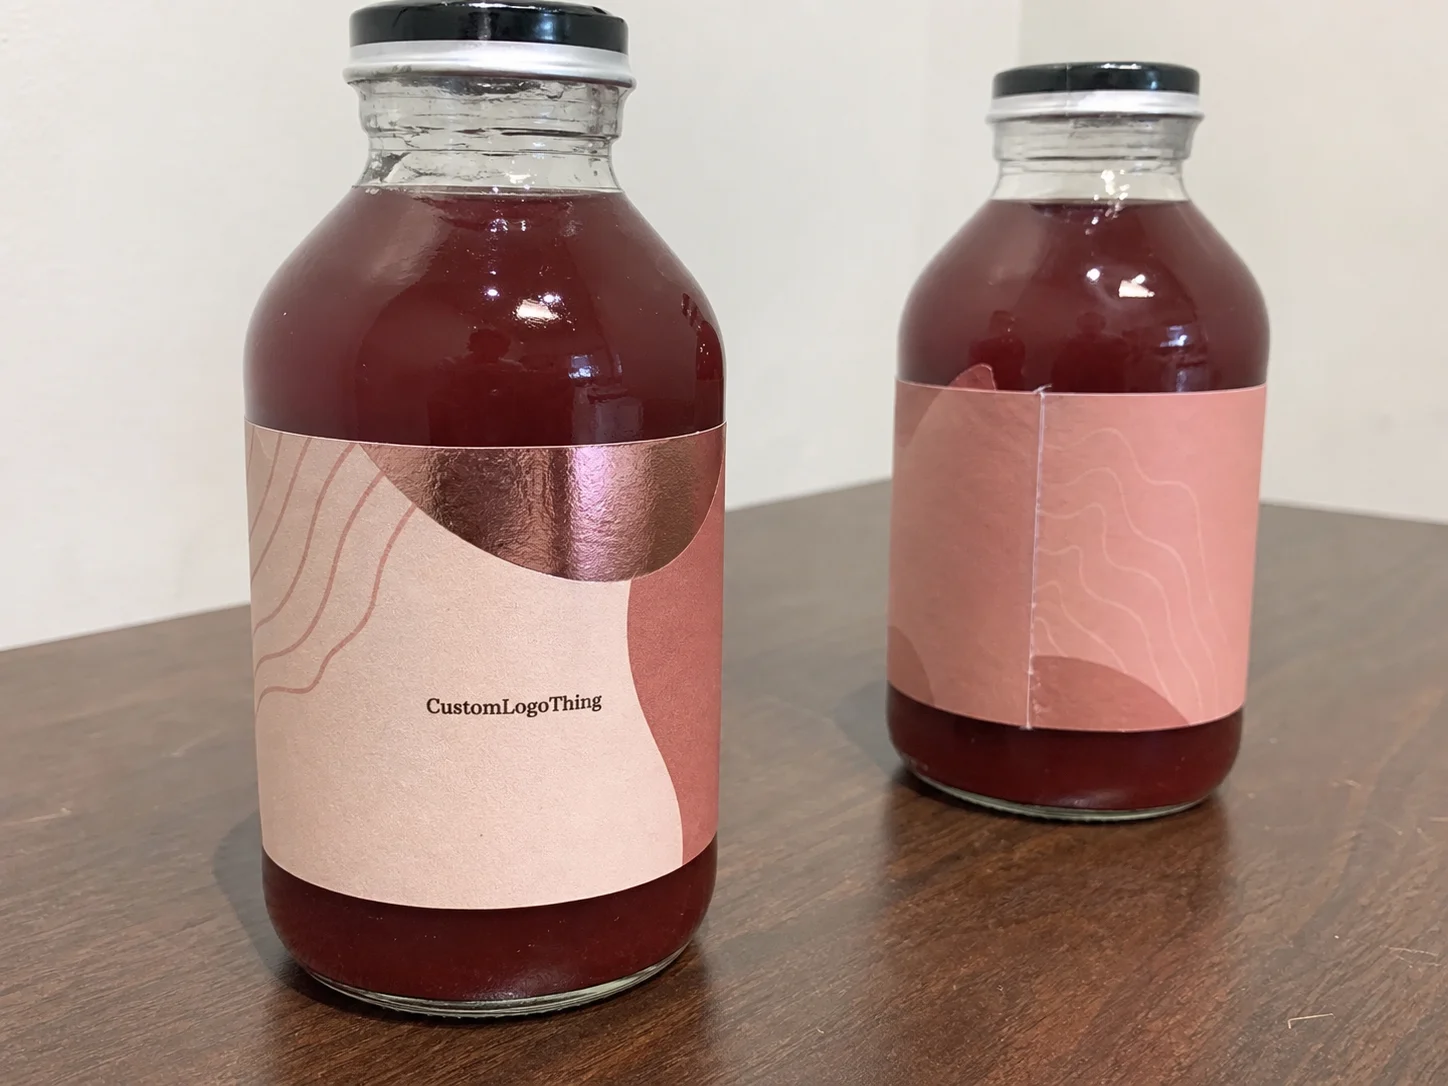
Clear film is useful when the design calls for a minimal look or when the container color should show through. The tradeoff is contrast: text, logos, and fine details need to remain legible against whatever is behind the label. Clear labels can look elegant, but they are less forgiving of weak artwork.
Adhesive selection matters just as much as the face material. Permanent adhesive is the default for most drink labels because the label should stay put after application. Removable adhesive is worth considering when the bottle needs to be reused or returned. Freezer-grade or moisture-resistant adhesives are useful when the product will be chilled for long periods, exposed to ice buckets, or handled with wet hands.
Finish changes both appearance and function. Gloss usually makes color feel brighter and more saturated. Matte reduces glare and often reads better under strong light. Soft-touch adds a premium feel, although it can show scuffing differently than harder finishes. Metallic effects and clear constructions can improve shelf appeal, but they also raise the bar for artwork quality and print contrast.
For a practical comparison, the basic constructions below cover most beverage label decisions:
| Label option | Best use | Strengths | Watch-outs |
|---|---|---|---|
| Paper stock | Dry, short-term indoor use | Lower cost, easy print surface | Poorer moisture resistance |
| BOPP film | Chilled drinks and general beverage use | Good moisture resistance, durable | May cost more than paper |
| Polyester | Higher durability or tougher handling | Strong resistance to wear and chemicals | Often higher cost |
| Clear film | Modern branding on clear containers | Clean, minimal look | Artwork must maintain contrast |
Curved bottles, squeezable containers, and high-speed application lines can also require different liner behavior and adhesive response. A label that performs well on a straight-sided glass bottle may wrinkle on a narrow neck or fail to track cleanly around a curved panel. That is why testing on the real container matters more than assuming from a specification sheet.
Buyers who want a broader packaging context can also look to the Packaging Machinery Manufacturers Institute and the ISTA packaging testing standards. Those sources are not label suppliers, but they help explain how packaged products are evaluated in transit and distribution.
Cost and pricing factors buyers should compare before ordering
Pricing for personalized drink labels usually depends on quantity, size, shape complexity, number of colors, material choice, finish, and whether special effects are involved. Small runs typically carry a higher unit price because setup, proofing, and production time are spread across fewer labels. Larger volumes usually improve unit cost because the press and finishing time are used more efficiently.
For simple beverage labels, buyers often see pricing around $0.18 to $0.28 per unit for 5,000 pieces, depending on size, coverage, and material. Smaller event runs can cost more per label. Specialty finishes, white ink, clear film, foil-like effects, and custom die shapes usually push the quote higher.
Some costs are not obvious on the first quote. Proof revisions take time. Custom tooling or unusual cuts can add setup cost. Rush schedules may require priority production. Delays can also become a hidden expense if they affect shipping or a launch date, even when the printed price itself looks fine.
Comparing quotes means more than checking the headline number. The same price can cover very different materials, adhesives, finishes, and delivery formats. Ten thousand paper labels and ten thousand BOPP labels with a gloss finish and moisture-resistant adhesive are not interchangeable offers, even if the quantities match.
A simple spec list usually keeps comparisons honest:
- Size: width, height, and shape
- Material: paper, BOPP, polyester, or clear film
- Adhesive: permanent, removable, freezer-grade, or moisture-resistant
- Finish: matte, gloss, soft-touch, metallic, or clear
- Quantity: total pieces and any overages
That approach helps buyers avoid paying less for a label that fails in use, or more for a feature that offers no practical value on the actual container. The best quote is the one matched to the real application, not the lowest number on the page.
Process and timeline: from proof approval to finished labels
Once an order is placed, the standard sequence is predictable: file review, digital proof, customer approval, production, finishing, packing, and shipment. The biggest timing variable is usually artwork readiness. Clean files and clear specs move quickly. Files that need resizing, correction, or layout adjustments slow the job down.
Material availability matters too. Standard label stocks and common adhesives usually move faster than specialty films or unique finishes. Quantity also changes the schedule. A modest run is easier to turn than a multi-SKU order with separate layouts, especially if each version needs its own setup and inspection.
For straightforward orders, lead times are often measured in business days after proof approval rather than calendar days. A simple beverage label project might finish in roughly 12 to 15 business days once the proof is approved, while a complex or rushed order can take longer or require priority scheduling. If the labels are tied to a launch or event, buffer time for shipping and final application checks is worth building in.
There is one more step that gets skipped too often: testing the printed label on the actual container. Even a perfect proof cannot reveal whether the adhesive grabs too aggressively, whether the label tents on a curve, or whether condensation changes the feel after chilling. A short test run usually catches those issues before they become expensive.
Step-by-step guide to ordering labels without costly reprints
Step 1: Measure the bottle or can carefully. Measure the usable label panel, not just the overall container height. Include diameter, curve, seam area, shoulder transition, and any areas that must stay open. A tape measure is enough for a rough check, but a flat sketch with dimensions is more reliable.
Step 2: Match the label to the environment. If the drink will be refrigerated, iced, frozen, or carried outdoors, say so clearly. A paper label can look fine on a dry sample and still fail once condensation appears. For cold and wet use, BOPP or another film stock is usually the safer starting point.
Step 3: Prepare print-ready artwork. Use proper bleed, keep essential text inside the safe area, and make sure logos and small copy are high resolution. Fine text can turn muddy if the file is weak. If the label includes ingredients, a barcode, a warning, or legal copy, leave enough room for readability.
Step 4: Review the proof like a production buyer. Check spelling, barcode placement, brand colors, finish notes, and the exact size. A proof can look attractive and still be wrong if the label panel is too short or the type sits too close to a seam.
Step 5: Test a sample before full production. Apply a few labels to the real container and let them sit under actual conditions. Chill them. Handle them. Check them after exposure to moisture. It is much cheaper to catch a sizing or adhesive issue on 50 labels than on 5,000.
For buyers ordering supporting branding pieces at the same time, keeping other specs aligned can help. Matching size, finish, and artwork style across related items through Custom Labels & Tags can make the whole package feel more consistent without adding unnecessary complexity.
Common mistakes with label sizing, adhesion, and artwork
One of the most common mistakes is choosing paper stock for a bottle that will be chilled or handled with wet hands. It can look acceptable for a short display period, then fail once condensation starts forming. Another is ignoring the curvature of the container, which leads to lifting edges, wrinkles, or a seam that sits awkwardly in view.
Artwork errors are just as frequent. Low-resolution files can look acceptable on a monitor and still print poorly at label size. Tiny text can disappear once it is reduced to a real packaging scale. Overcrowded designs create another problem: the label may have plenty of information, but none of it feels easy to read.
Compliance details are easy to overlook on smaller custom projects. Depending on the beverage, you may need ingredient text, net contents, warnings, or a barcode that remains readable after printing and application. If the layout is too tight, those requirements can quickly squeeze out the space the design needs to work.
Skipping a test run is another expensive habit. That is often how buyers discover that the adhesive is too aggressive for a reusable bottle, or that the finish scuffs during transport. A short test on the exact container usually costs less than one reprint.
If sustainability is part of the brief, ask about recyclable or responsibly sourced components and confirm that the structure still meets performance needs. The Forest Stewardship Council is a useful reference point for paper sourcing, and the EPA’s resources at epa.gov can help frame broader environmental packaging decisions.
Expert tips and next steps for a cleaner, more reliable order
Test one real container under one real condition before scaling the order. Use the exact bottle, the exact chill level, and the exact handling expected after labeling. That small step removes a surprising amount of guesswork.
Ask for recommendations based on use, not just appearance. If the bottle will sweat in a cooler, say so. If it will be frozen, say that too. If people will hold it for a long time at an event, mention it. Once the actual environment is clear, the right material and adhesive are easier to narrow down.
Keep a simple spec sheet for every reorder. Write down the size, finish, adhesive, quantity, material, and application method. That saves time later and prevents a project from depending on memory or old emails to reconstruct what worked last time.
Personalized drink labels work best when design, material, and process are planned together rather than treated as separate decisions. When the bottle measurements, artwork files, and target quantity are ready, the order becomes easier to quote, proof, and produce with fewer surprises.
What materials work best for personalized drink labels on cold bottles?
BOPP and other film stocks usually perform better than standard paper when condensation is expected. A moisture-resistant adhesive helps the label stay in place during chilling and handling, which is often the real test for beverage packaging.
How do I know which size personalized drink labels to order?
Measure the label panel on the actual bottle or can, not just the overall container height. Leave room for curvature, seams, and any required text or barcode elements so the label fits cleanly once applied.
Are personalized drink labels expensive for small quantities?
Small runs usually cost more per label because setup and proofing are spread across fewer pieces. Simple shapes and standard materials can help keep the order more affordable, especially when specialty effects are not necessary.
How long does it take to receive custom drink labels?
Timing depends on artwork readiness, material selection, and production complexity. Standard jobs move faster when proofs are approved quickly and the design is already print-ready, while specialty builds and rush requests need more planning.
Can personalized drink labels be removed without damaging the bottle?
Removability depends on the adhesive and the surface finish of the container. If clean removal matters, ask for a removable adhesive and test it on the exact bottle first, since performance can vary by substrate and temperature.