Personalized mini champagne bottle Labels to Order
Mini bottles do not leave much room for error, which is exactly why personalized mini Champagne Bottle Labels matter so much. On a 187 ml bottle, the label has to say enough, fit the curved panel cleanly, and still look polished when the bottle is photographed, tucked into a gift bag, or set in an ice bucket. The format is small, but the visual standard is not.
Why Small Labels Have a Big Visual Job
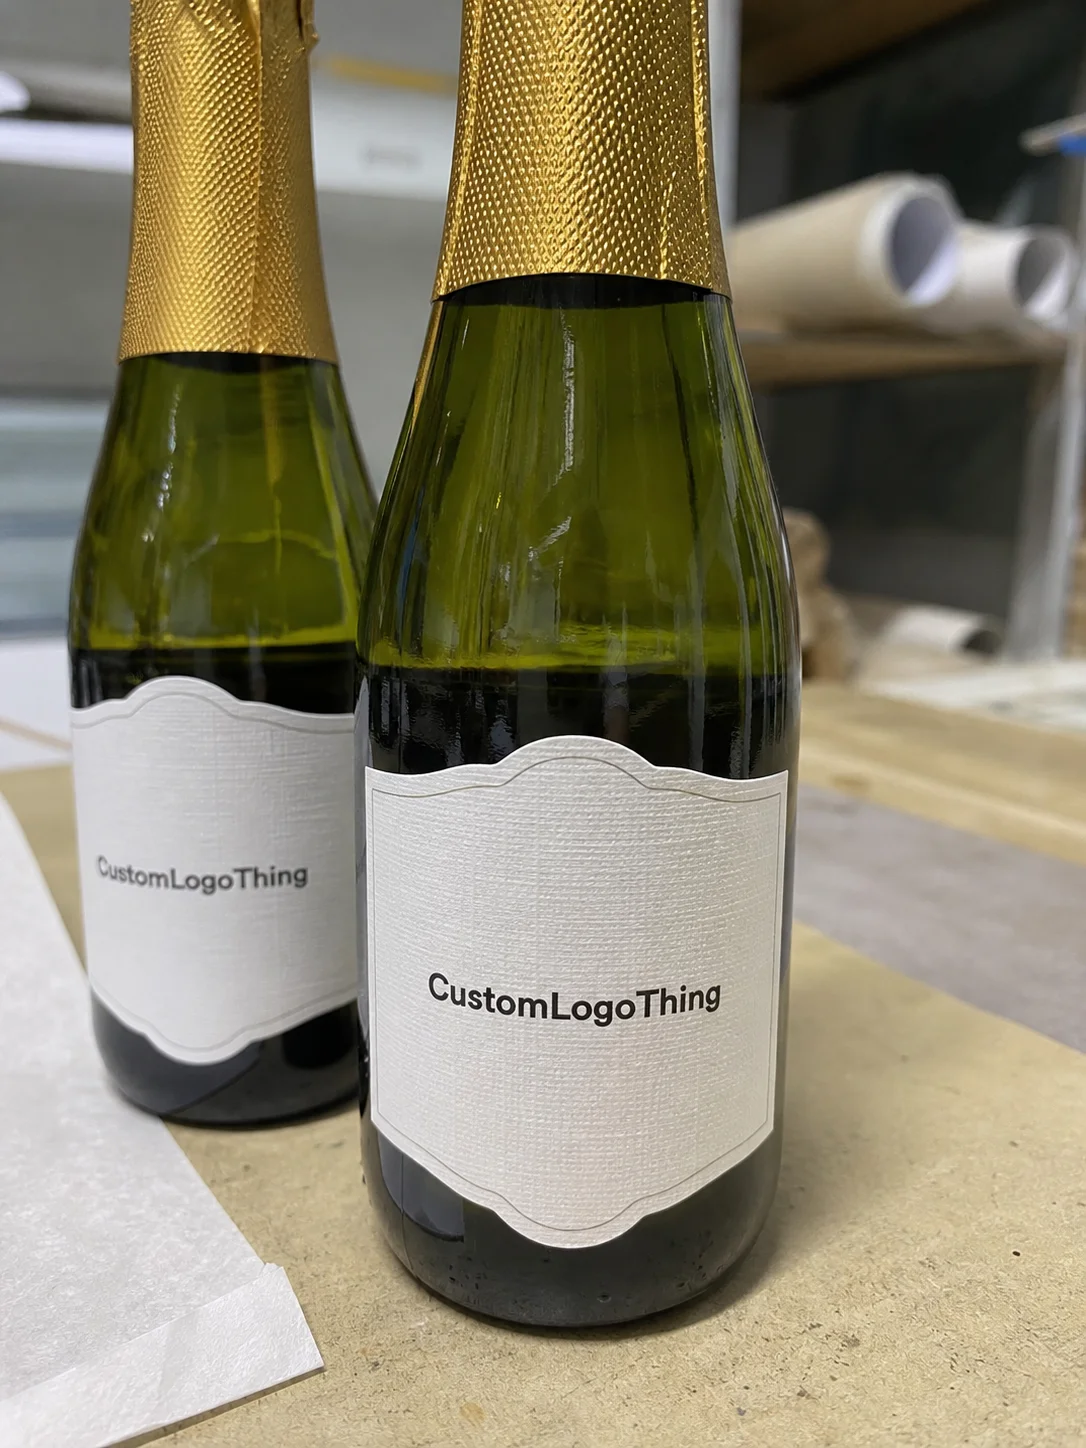
A mini champagne bottle is a tiny canvas, yet the expectation behind it is still premium. That mismatch is where a lot of labels fail. Artwork that looks elegant on a screen can turn cramped, crooked, or cheap once it is reduced to a label that only has a narrow front panel to work with. On small packaging, the eye notices fit before it notices decoration.
That is why personalized mini champagne bottle labels are used so often for showers, weddings, hotel welcome kits, event favors, tasting sets, and branded gifting. These bottles are handled up close, photographed even closer, and judged in seconds. A clean label can raise the perceived value of the bottle without changing what is inside. Packaging does the first round of selling.
Three details matter more than flash:
- Label width must match the usable panel, not the full circumference.
- Corner radius affects both appearance and adhesion, especially on curved glass.
- White space keeps the design readable when the label is scaled down.
A small label with good spacing usually looks more expensive than a busy label with expensive printing. Buyers tend to feel that before they can explain it.
The bottle shape also changes the outcome. Straight-sided panels are easier to label cleanly. Tighter curves need more attention to seam placement, width, and adhesive choice. A rough product photo is not enough to plan around. For that reason, Custom Labels & Tags should always be sized against the actual bottle or a proper dieline.
In practice, the strongest labels are the ones that accept the size limit and design around it. That means fewer type styles, fewer competing elements, and a hierarchy that can be read in a second.
How the Custom Label Process Works
Start with the bottle, not the artwork. Better still, start with a measurement or vendor dieline. The straight panel width, wrap length, and bottle diameter determine whether the label sits flat or fights the curve. If the seam lands badly, you can see it immediately, which is not the kind of detail you want standing out on a premium event favor.
The proof stage is where most of the real checking happens. A useful proof should show bleed, safe zones, font sizes, logo placement, and any variable fields such as guest names, table numbers, or event dates. If the design includes personalization, the file should be set up so names can be reviewed quickly. Manual copy-and-paste mistakes are common, and they are expensive.
Most production flows are straightforward:
- Artwork review and proof approval.
- Print, either on sheets or rolls depending on the run.
- Laminate or coat the label if extra protection is needed.
- Die-cut to the final shape.
- Inspect for alignment, color consistency, and adhesive performance.
- Pack and ship.
Simple artwork moves faster. Custom shapes, multiple names, foil accents, and extra proof rounds slow the process down. A clean order with ready-to-print files can often move in about 5 to 8 business days after approval. More complex jobs, especially with specialty finishes or many personalized versions, usually land closer to 10 to 15 business days. Shipping adds its own timing, so it should be planned separately rather than assumed.
If the labels are part of a kit that will travel, packaging should be treated as a functional layer, not a decorative afterthought. Transit assumptions matter more than most people expect. For jobs that need to survive rough handling, the logic behind ISTA transit testing is more useful than a polished mockup.
Proofing should also answer a practical question: will the label still look right once it is applied by hand, under time pressure, and on a cold bottle? That is where production reality matters more than design perfection.
Materials and Finishes That Hold Up Cold
Mini champagne bottles are often served chilled, which means condensation is not a small issue. It is the issue. If the bottles are going into an ice bucket, stored in a refrigerator, or handed out cold, the label has to handle moisture without wrinkling, peeling, or turning cloudy.
Here is the practical material breakdown:
| Material | Best For | Typical Unit Range | Tradeoff |
|---|---|---|---|
| Paper label stock | Indoor favors, dry display, budget-conscious runs | $0.18-$0.32 each at moderate quantities | Looks good, but moisture resistance is limited |
| Moisture-resistant film | Chilled bottles, ice bucket service, longer handling time | $0.22-$0.40 each | Better durability, slightly higher cost |
| Premium film with matte or soft-touch finish | Weddings, premium gifting, photo-heavy events | $0.28-$0.55 each | Best feel and presentation, but price climbs faster |
If the label should have the warmth of paper but needs better traceability, ask whether the stock is FSC-certified. That matters to buyers who care about sourcing and paper stewardship. The Forest Stewardship Council is the reference point most teams recognize.
Adhesive choice is just as important as stock. A permanent adhesive is usually the safer option for event labels because it stays put after application. Removable adhesive makes sense only when a clean peel later is truly required. If the bottle is cold, the adhesive should be rated for cold surfaces. Otherwise, the edges may begin to lift after a few minutes in condensation.
Finish is where people often overdo it. Matte reads calm and refined. Gloss is brighter and has more pop under event lighting. Foil accents can work on tiny labels, but only if they are used sparingly. Too much foil on a small format turns the label into visual noise. Thin script fonts can fail for the same reason; once the artwork is reduced, readability becomes the real test. On a 1.5-inch label, clear type usually beats decorative ambition.
Soft-touch coatings can feel excellent in hand, but they also tend to raise the price more than buyers expect. That extra tactile value makes sense for premium gifting, yet it is rarely the right choice for a short-lived favor that will be tossed after the event. Matching material to use case saves money and prevents disappointment.
Cost, Pricing, MOQ, and Quote Drivers
Pricing for mini bottle labels is driven by a small group of variables: label size, stock, finish, shape complexity, number of versions, and total quantity. Those are the real levers. Everything else is a variation of the same production math.
Small-batch orders usually carry a higher unit price because setup, proofing, and die work are spread across fewer labels. That is not a trick. It is how print production works. A 250-piece run and a 5,000-piece run may use the same prep time, but the larger quantity absorbs the fixed costs more efficiently.
MOQ is usually tied to print method and sheet efficiency. Digital printing can support smaller quantities more comfortably than specialty processes such as foil-heavy runs or unusual die-cut shapes. If a minimum order is quoted without explanation, ask for the reason. The answer should usually point to setup time, sheet yield, or finishing limits.
These are the most common add-ons that push cost higher:
- Multiple names or variable data fields.
- Waterproof or moisture-resistant stock.
- Foil, spot UV, or specialty finishes.
- Rush production.
- Split shipments.
- Artwork revisions after proof approval.
For buyers comparing options, a realistic unit price often lands in a range rather than a single number because the material and finish can change the result quickly. Paper labels at moderate quantities may stay on the lower end, while premium film with special finishing will sit higher. That spread is normal, and it is usually more useful than forcing a flat estimate that hides the actual spec.
If the labels are part of a larger branded kit, shipping and handling should be discussed at the same time as printing. A label is only one piece of the job. The whole package needs to arrive looking coordinated.
For a fast quote, send the bottle size, quantity, event date, and whether names or table-specific versions are needed. A vendor can move quickly when the inputs are complete. The slower quotes are usually the ones missing the bottle specification, which is a reliable way to waste time on guessing. If the labels are part of a larger setup, keep custom labels and tags in the same planning stream instead of treating them as a last-minute add-on.
Step-by-Step Ordering Checklist for Clean Artwork
Good artwork starts with the right measurements. Measure the bottle directly, or ask for the dieline before designing anything. Guessing is how people end up with labels that wrap too far, stop short, or crowd the seam. A product photo is not a measurement tool.
Build the file at actual size. Include bleed, keep key text inside the safe area, and check every name or number at final scale. A design that looks fine when zoomed in can fail once it is shrunk to a tiny panel. On mini bottles, 8 pt type can still be readable if the font is clean and the contrast is strong. Decorative type below that becomes risky very quickly.
If the order includes personalization, set up the data in a spreadsheet-ready format from the beginning. Name, line 1, line 2, table number, guest role, or whatever the variable field may be should all be organized before proofing starts. Cleaner data means fewer corrections, and fewer corrections mean less delay.
Before approving production, check these items:
- Spelling on every name, date, and event detail.
- Label width and height against the bottle dieline.
- Color expectations on screen versus print output.
- Barcode, QR code, or small text placement if used.
- Pack format, meaning sheets or rolls, for application speed.
That last point gets overlooked often. Labels on sheets are easier to hand-apply in small runs. Rolls make more sense when speed matters or when application will be semi-automated. Neither is universally better. The right format depends on quantity, crew size, and whether the bottles are being labeled at a prep table the night before or in a more controlled setup.
One more practical step: ask for a proof, and for high-stakes orders, ask for a sample. Weddings, launches, and corporate gifts have very little tolerance for surprise. That is not drama; it is quality control.
Common Mistakes That Make Tiny Bottles Look Amateur
Mini bottle labels usually fail for predictable reasons. Most of them can be prevented before production starts.
- Too much text. Small labels punish clutter. If the layout needs a paragraph to explain itself, it is already overloaded.
- Fonts that are too delicate. A script font may look elegant on screen and still disappear on a 1.5-inch label.
- Wrong shape for the bottle. A label that ignores curvature can wrinkle, lift, or leave awkward gaps.
- Wrong adhesive for cold use. Condensation will expose a bad spec faster than any design review can.
- No test print. A quick proof on paper often catches spacing and scale issues before they become expensive.
Another common mistake is overdesigning the background. Borders, icons, monograms, florals, foil, and multiple logos can all work individually. Put too many of them on a small label and the result becomes noisy instead of polished. Small-format design needs discipline: fewer elements, stronger spacing, clearer hierarchy.
If the bottle is going straight into an ice bucket, the finish matters too. Matte or soft-touch usually hides fingerprints and water spots better than high gloss. Gloss can still work, especially for photography, but it will show condensation sooner. The label did not fail; the wrong finish did.
There is also a timing mistake that shows up often. Buyers approve the artwork, then discover that the labels arrive in sheets while the team only has a narrow window for application. That mismatch creates avoidable stress. Print format should match the way the bottles will actually be handled.
To be blunt, most amateur-looking mini bottle labels were not ruined by the printer. They were ruined upstream, in layout choices that never respected the size of the bottle or the conditions it would face.
Expert Tips and Next Steps Before You Order
Start with three inputs: the exact bottle spec, the event date, and the final quantity. Those details solve more quote issues than anything else. If the bottle model changes later, the label may need a new dieline. If the quantity changes, price and timing can move too. That is normal, but it should be planned for.
For higher-stakes jobs, ask for a digital proof and, when possible, a physical sample. A proof is useful for layout. A sample is useful for feel, adhesion, and how the finish behaves in light. Under warm event lighting, matte can read softer and more expensive. If the setup depends on sparkle and reflection, gloss may be the better fit.
Build the schedule backward from the event date. Leave room for proof changes, production, shipping, and application. That last part gets missed frequently. Labels may arrive on time, but if no one has planned for a two-hour labeling session the night before the event, the calendar still wins.
If the labels are part of a broader printed package, keep the visual system consistent across the full set. A simple logo lockup, matching type, and one finish choice go a long way. Coordinated Custom Labels & Tags make the whole gift look intentional rather than patched together.
Before you place the order, use a final checklist:
- Measure the bottle or get the dieline.
- Choose stock and finish based on cold handling.
- Confirm MOQ, pricing, and turnaround.
- Approve the proof only after checking every variable field.
- Leave enough buffer for shipping and application.
That is the cleanest path to personalized mini champagne bottle labels that look intentional, stay put, and do the job without drama. For a small piece of packaging, that is really the whole point.
How do I size personalized mini champagne bottle labels for 187 ml bottles?
Measure the straight label panel and the full wrap width instead of guessing from a product photo. Leave a small seam gap so the label does not overlap or bunch at the edge. Whenever possible, use the supplier's dieline because it is more accurate than estimating dimensions by eye.
What material is best for mini champagne bottle labels in ice buckets?
Choose a moisture-resistant or waterproof stock with an adhesive rated for cold surfaces. Matte finishes usually hide fingerprints and condensation better than high-gloss options. If the labels will sit in ice for hours, ask for a sample or test application before approving the full run.
How fast can personalized mini champagne bottle labels be produced?
Simple artwork can move quickly once the proof is approved, often in about 5 to 8 business days. Special finishes, custom shapes, and multiple name variations add setup and approval time. Shipping still matters, so leave a buffer before the event date instead of cutting it close.
What is a realistic MOQ for custom mini bottle label orders?
MOQ usually depends on print method, sheet efficiency, and die-cut setup. Digital printing can support smaller quantities than foil or specialty production methods. Lower quantities usually mean a higher unit price, so compare total cost instead of focusing only on the minimum.
What should I send for a fast quote on mini champagne bottle labels?
Send the exact bottle size or a link to the bottle model, plus quantity and event date. Include whether the design changes per bottle and provide logo files and final copy so the proof does not stall over missing assets. The cleaner the input, the faster the quote.


