Why Food-Themed Apparel Labels Need Sample Approval
A woven label can look perfect on a screen and fail the second it is sewn into a chef coat, bakery apron, culinary school uniform, or food promo shirt. Scale changes. Thread contrast shifts. A fold that looked flat in a PDF can create a stiff lump at the neckline. That is why a Printed Woven Labels food sample approval checklist is not decorative paperwork. It is a practical control for catching small defects before thousands of labels are stitched into garments.
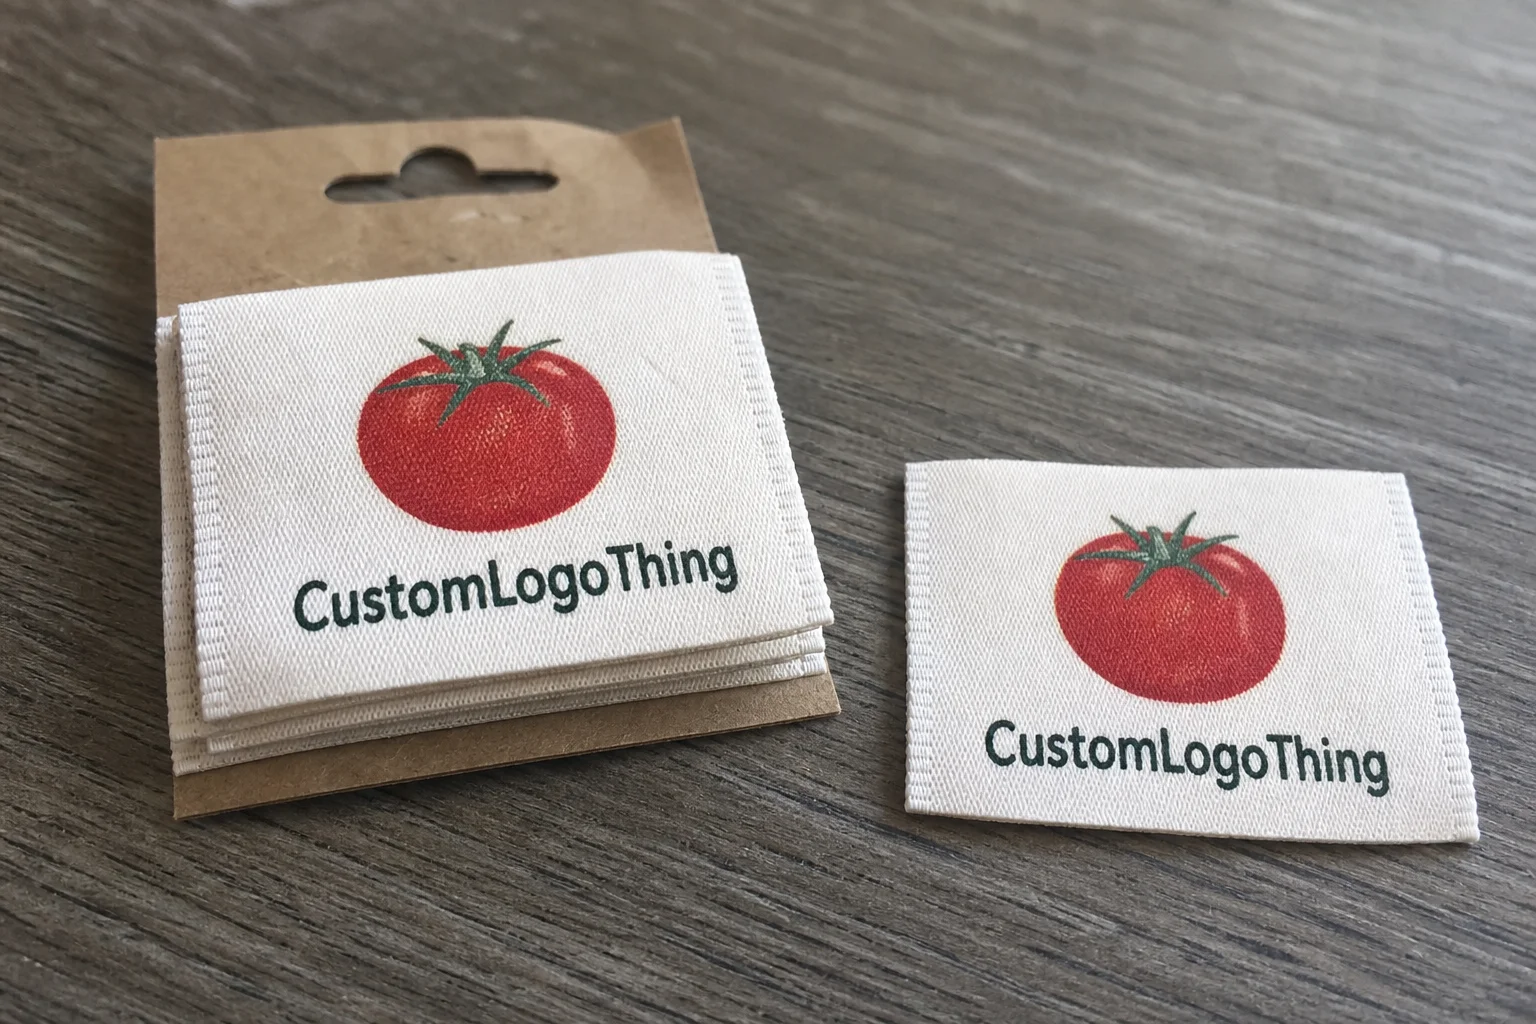
Food-themed apparel labels sit in a slightly strange category. They are not food-contact packaging, and nobody should pretend they touch ingredients or meals. Still, they borrow plenty from food packaging: nutrition-style panels, ingredient typography, coffee cup icons, wheat stalks, fruit outlines, batch numbers, “fresh baked” cues, and farm-market language. Nice at 200% zoom. Less nice when the basil leaf turns into a green blob at 18 mm wide.
Buyers often mix up three approval stages. A digital proof checks layout, spelling, proportions, fold marks, and general color direction. A pre-production sample shows the actual woven base, printed detail, edge finish, and backing. A finished sewn-in sample goes further by showing how the label behaves on the real garment under stitch tension, against cotton twill, polyester, denim, jersey, or chef-coat fabric.
Only the physical sample tells the truth about texture. It shows whether the label scratches the neck, curls at the edge, hides the brand name after folding, or loses contrast against a black apron. Packaging buyers already know this pattern: approve the physical standard before approving the run.
For restaurant uniforms, meal-kit merch, farmers market apparel, food truck staff shirts, culinary school garments, and promotional event pieces, sample approval protects five things at once: brand consistency, durability, compliance wording, wearer comfort, and production readiness. Miss one, and the cost rarely stays small.
How the Sample Approval Process Works
The process starts with the buyer sending artwork, target label size, fold type, backing, color references, expected quantity, and garment application. A supplier then converts that information into a proof and sample plan. For Custom Labels & Tags, a useful inquiry sounds specific: “35 mm x 45 mm centerfold woven label, black damask base, two woven thread colors, one printed red accent, side seam placement on cotton aprons.” That beats “small label for uniforms.” Obviously.
Before sampling, the manufacturer checks feasibility. Minimum stroke thickness matters. So does thread count. Dense woven backgrounds can swallow fine lettering, while printed detail may handle small decorative elements better than thread alone. The supplier also checks label orientation, seam allowance, fold position, cut style, and whether the label should be centerfold, endfold, straight cut, mitre fold, or heat-seal.
Proof review should be slow enough to catch dull but expensive errors. Confirm logo position. Check text hierarchy. Review nutrition-style copy if it is decorative. Verify trademark marks, washing symbols, size markers, country-of-origin language, and SKU references. If a label says “100% Cotton” on a poly-cotton garment, the problem is not cosmetic. It can create compliance and customer-service headaches.
Physical sample review is more tactile. Hold the label under daylight, then under indoor lighting around 3000K to 4000K. Bend it. Rub the printed area with a dry finger and a white cloth. Compare it to the garment fabric. Put it near the seam, pocket, sleeve, strap, or neckline where it will actually sit.
Approval should be written, not verbal. The signed proof and accepted physical sample become the production standard for the bulk run. If the bulk labels drift, both buyer and supplier need the same reference point.
Most approval problems start with missing assumptions. The buyer assumes the label will be soft. The supplier assumes the fold is standard. The designer assumes the tiny espresso cup icon will stay sharp. A good checklist drags those assumptions into the open while changes are still cheap.
Printed Woven Labels Food Sample Approval Checklist
Use this section as the working inspection list. Not every item applies to every label, but each one deserves a deliberate yes-or-no check before production approval.
Artwork and Readability
- Logo accuracy: Compare the sample against the approved artwork file, not a memory of the brand mark.
- Actual size: Measure the label at final scale, such as 25 mm x 50 mm, 30 mm x 60 mm, or the quoted custom size.
- Small icons: Inspect forks, coffee cups, wheat stalks, fruit outlines, bakery tools, and ingredient-style symbols for blur or fill-in.
- Text legibility: Read brand names, care text, size markers, and batch-style copy at normal viewing distance, about 30 to 60 cm from the garment.
- Fold visibility: Confirm no important text disappears into a centerfold, endfold, seam allowance, or stitch line.
Food graphics are vulnerable because buyers often ask one tiny label to carry too much personality. A fork icon with 0.3 mm tines may not weave cleanly. A script bakery logo may need thicker strokes. Fine print can work better as printed ink on a woven base than as thread, but that depends on the ink system, base fabric, artwork contrast, and wash exposure.
Material, Finish, and Comfort
- Fabric base: Confirm damask, satin, taffeta, cotton, polyester, or blended base according to the quote.
- Weave density: Higher density can sharpen detail but may increase stiffness.
- Printed areas: Rub the print lightly and check for cracking, smudging, weak coverage, or ink sitting unevenly on raised threads.
- Edges: Look for fraying, hard heat-cut edges, scratchy corners, or inconsistent cutting.
- Backing: Verify sew-on, iron-on, heat-seal, adhesive, or no backing.
Comfort is not a soft issue. It is a return-risk issue. If a label scratches the neck of a chef coat during a 10-hour shift, staff will cut it out. If it curls on a premium apron, the garment looks cheap. A beautiful label that fails during wear is still a failed label.
Color and Durability
Color matching needs realistic expectations. Woven thread and printed ink do not always match a Pantone chip exactly because fiber sheen, background color, and weave direction change perception. A red tomato icon on a white proof can look darker on a black woven base. Metallic thread can look premium in photographs and harsh under fluorescent kitchen lighting.
- Color reference: Compare against Pantone, a brand guide, approved garment trim, or an accepted prior sample. Record the tolerance.
- Wash resistance: Ask for expected wash performance, especially for uniforms laundered weekly or through commercial services.
- Abrasion: Rub the label against the garment fabric and check whether printed elements scuff.
- Heat exposure: Confirm whether pressing, heat sealing, tumble drying, or industrial laundry temperatures may affect the label.
- Placement: Test the label near the neck, hem, sleeve, apron pocket, waistband, strap, or side seam before approving.
If the garment will be used in restaurant or promotional programs, review broader labeling requirements too. The Federal Trade Commission covers textile labeling rules in the United States. Packaging-adjacent teams may also reference sustainability frameworks from groups such as the Forest Stewardship Council for paper tags and hangtag materials. For transit packaging around finished apparel, ISTA test procedures can be relevant when cartons are being qualified for distribution.
A label sample is not approved because it is pretty. It is approved because it matches the specification and survives the use case. That distinction saves money.
Cost, Pricing, and MOQ Factors Buyers Should Compare
Label pricing is rarely driven by one factor. Size, quantity, fold type, color count, weave complexity, printed detail, backing, finishing, sampling, revision count, and shipping speed all matter. A simple 30 mm x 50 mm woven label may land around $0.08 to $0.18 per unit at higher quantities. A smaller custom run with printed accents, backing, and sampling can sit closer to $0.20 to $0.45 per unit. These are practical ranges, not universal promises.
MOQ deserves a hard look. A restaurant group ordering 10,000 uniform labels has a different cost structure than a small bakery testing 300 aprons. Lower minimums help, but setup and sampling costs get spread across fewer units. The cheapest-looking unit price can be misleading if it excludes sample fees, rush fees, freight, or revisions.
| Option | Typical Use | Cost Behavior | Approval Risk |
|---|---|---|---|
| Fully woven label | Brand marks, size labels, premium uniforms | Often efficient at scale; dense detail can increase cost | Fine icons and small text may lose definition |
| Printed detail on woven base | Food illustrations, gradients, nutrition-style decoration | Can be economical for fine copy and small graphics | Print durability must be checked through rub and wash testing |
| Heat-seal backing | Fast application on uniforms or promo shirts | Adds finishing cost but may reduce sewing labor | Heat, fabric compatibility, and edge lift need review |
| Low-MOQ sample run | New restaurant launch, limited merch, event apparel | Higher unit cost because setup is spread across fewer labels | Useful for testing before scaling to bulk production |
Ask for an itemized quote. Separate the sample fee, bulk unit cost, setup charge, plate or screen charge, rush fee, shipping, and revision fees after the first proof. If comparing two suppliers for Custom Labels & Tags, compare total landed cost, not just the unit price in the first email.
The hidden cost of approving too quickly is ugly. A misspelled “sourdough,” a wrong fold, a scratchy edge, or an incorrect care symbol does not only affect the label invoice. It can add sewing labor, delay a restaurant opening, hold up a food festival merch drop, or make finished garments unusable. For 5,000 pieces, even a $0.16 label can become a four-figure problem once removal, replacement, freight, and labor are counted.
Use the sample checklist as a buying control, not just a creative review. It keeps pricing connected to the real specification: the label you approved, in the finish you need, for the garment that will be worn.
Timeline, Lead Time, and Production Steps to Plan Around
A typical custom label timeline has more steps than buyers expect: artwork review, digital proof, proof revision, physical sample production, buyer inspection, final approval, bulk production, quality control, packing, and shipping. For many custom woven or printed-woven label orders, sampling can take around 5 to 10 business days after artwork is ready. Bulk production often adds 10 to 18 business days after approval. Freight can add a few days or much longer, depending on service level and destination.
The production clock usually starts at sample approval, not inquiry. That distinction matters. A buyer may feel an order has been “in process” for two weeks, while the supplier is still waiting for final dimensions, Pantone references, or approval from a second stakeholder.
Delays usually cluster around incomplete artwork, missing size specs, unclear color references, late feedback, and changes after physical sampling. None of that is glamorous. All of it burns time.
Build buffer time into apparel launches. Restaurant openings, culinary school uniform orders, meal-kit merch drops, farmers market staff apparel, and seasonal food campaigns all have fixed dates. Labels are small, but they sit on the critical path because garments cannot be finished until the attachment method and placement are locked.
Rush production may shorten manufacturing time, but it rarely removes proofing or sampling. Skipping approval can save several days upfront and cost several weeks later. Better to spend 48 hours reviewing one good sample than spend a month explaining why 3,000 aprons have a scratchy, off-center, misfolded label.
A practical review window is 24 to 48 hours after the sample arrives. Photograph the sample. Gather feedback in one document. Avoid six separate email threads from design, operations, marketing, and the uniform vendor. A precise note such as “increase white thread contrast behind the coffee cup icon; current version disappears on black apron fabric” is far more useful than “make it pop.”
Add the approval deadline to the same message as the final file name, label size, fold type, quantity, freight method, and shipping address. If the supplier needs written approval by Wednesday to ship bulk labels before a garment sewing slot, nobody should be hunting for that date in an email chain.
Common Sample Approval Mistakes That Cause Rework
The most common mistake is approving the digital proof and skipping the physical sample, especially when the label includes small food icons, narrow lettering, metallic thread, or dense woven backgrounds. Screens flatter labels. Zoom hides scale. A PDF cannot tell you whether an endfold feels bulky under a side seam.
Another mistake is reviewing the label in isolation. Put the sample on the actual garment. A cream label may look warm and premium on a desk, then vanish on a natural cotton apron. A black label may look sharp until it sits next to a black chef coat and loses all edge definition. Proportion matters too. A 60 mm label can dominate a small sleeve but look right on a heavy apron pocket.
Vague feedback causes rework because it forces the supplier to guess. “Looks off” is not an instruction. “Move the tomato icon 2 mm left, increase the brand name thread contrast, and keep the centerfold line clear of the legal text” is actionable. Good revision notes specify the issue, location, desired change, and reference standard.
Color assumptions are another trap. Monitor settings, thread sheen, fabric texture, and lighting all change perceived color. A brand guide may call for a bright green, but the closest woven thread can look dull on dark fabric. Printed ink may get closer, though it needs durability review. Not every time, but often enough to justify a physical check.
Compliance details are easy to overlook because food-themed decoration can distract from functional label content. Check care symbols, fiber content, country-of-origin wording, trademark marks, size labels, and internal SKU or batch references. For U.S. textile guidance, buyers can review the FTC’s clothing and textile resources before finalizing required wording.
Here is what most people get wrong: label failures are rarely dramatic manufacturing disasters. They are tiny unchecked assumptions multiplied by a bulk order. One overlooked fold. One unreadable ingredient-style line. One scratchy edge. The checklist exists to stop that multiplication before it starts.
Actionable Next Steps Before You Approve Bulk Labels
Before approving bulk labels, slow the process down for one focused review. Print the checklist or keep it open beside the sample. Gather the physical label, approved artwork, garment fabric, quote, and proof. Place the sample exactly where it will be sewn or heat-applied. Then review each spec line by line.
- Confirm the final production file name and version number.
- Measure the sample against the quoted dimensions, including folded size if applicable.
- Check logo placement, text hierarchy, symbols, and decorative food graphics.
- Compare thread and print colors against the approved reference under daylight and indoor light.
- Rub, bend, and handle the label to assess edge softness, print adhesion, curl, and comfort.
- Confirm quantity, MOQ, unit cost, setup charges, lead time, freight method, and shipping address.
- Send written approval or revision notes in one clear message.
Photographs help. Take one close-up in natural light, one under indoor light, and one on the garment. If multiple buyers, designers, or production managers need to sign off, those images create a reference trail. They also reduce the chance that someone approves a revised proof without understanding how the first sample looked in use.
Ask the manufacturer to retain a production standard. That can be the accepted sample, a duplicate sample, or a documented reference tied to the signed proof. Bulk quality control becomes cleaner when both sides compare finished labels against the same accepted standard instead of a chain of emails.
Approve only when the label matches the garment use case. A label for chef coats, aprons, bakery uniforms, or food-service promo shirts must handle washing, body movement, folding, storage, and repeated contact. If the garment will be laundered aggressively, ask about wash testing. If it sits near the neck, test comfort. If it uses heat-seal backing, confirm fabric compatibility before the bulk sewing or application slot.
For buyers building a broader branded apparel program, custom label and tag planning should sit beside garment sourcing, carton packing, and launch scheduling. The label is small. The downstream consequences are not.
Keep the approved sample, signed proof, quote, and checklist together until every design, cost, timeline, compliance, and production detail is confirmed in writing. Cautious? Sure. Cheaper than discovering the problem after 5,000 garments are finished.
FAQs
What should be included in a printed woven labels food sample approval checklist?
Include artwork accuracy, label size, fold type, fabric base, thread colors, printed details, edge finish, backing, care text, garment placement, wash durability, quote details, MOQ, lead time, and written approval status. Add a physical review step so the buyer checks the sample on the actual apron, chef coat, uniform, or promotional apparel before approving bulk production.
How many samples should I review before approving printed woven labels for food uniforms?
Review at least one physical pre-production sample that uses the final size, fold, fabric, colors, and print method. Request a revised sample if the first version has readability issues, wrong colors, scratchy edges, incorrect folding, weak print coverage, or poor contrast on the garment fabric.
Can a digital proof replace a food apparel label sample?
No. A digital proof is useful for checking layout, spelling, and general proportions, but it cannot prove texture, fold bulk, edge softness, thread sheen, or wash behavior. For branded uniforms, merch, or apparel programs, the physical sample should be the approval standard for bulk production.
What affects the cost of printed woven label samples?
Cost depends on size, quantity, color count, weave complexity, printed detail, fold type, backing, sampling method, revision count, and shipping speed. Buyers should compare total landed cost, not only unit price, because setup fees, sample fees, rush charges, and freight can change the final budget.
How long does sample approval take for printed woven food labels?
The timeline depends on artwork readiness, proof revisions, sample production, buyer feedback speed, and shipping distance. As a practical planning range, physical sampling often takes about 5 to 10 business days after final artwork is ready, with bulk production adding roughly 10 to 18 business days after written approval.


